1. Introduzione
Thank you for choosing the Homelegance Cotterill Panel Bed. This instruction manual provides detailed guidance for the assembly, operation, maintenance, and troubleshooting of your new Queen-sized bed. The Cotterill Panel Bed features a cherry finish over birch veneer, complemented by a black bi-cast vinyl insert with X-stitching and button-tufting on the headboard. Please read this manual thoroughly before beginning assembly to ensure proper setup and safe use.

Figure 1: Fully assembled Homelegance Cotterill Panel Bed (Queen, Cherry).
This image displays the complete Homelegance Cotterill Panel Bed, showcasing its cherry wood finish and the upholstered headboard with button-tufting. The bed is presented within a bedroom environment, illustrating its design and scale.
2. Informazioni sulla sicurezza
Per evitare lesioni o danni al prodotto, attenersi alle seguenti linee guida di sicurezza:
- Always follow the assembly instructions carefully to ensure stability and prevent tip-over or pinch points.
- Non superare la capacità di peso massima di 450 libbre per la struttura del letto.
- Keep the bed frame away from high traffic areas or areas where children might play to avoid accidental collisions.
- Ensure all hardware is securely tightened before use and periodically check for looseness.
- Do not allow children to climb or play on the bed frame without supervision.
- Use only the specified components and hardware provided by the manufacturer. Substituting parts may compromise safety.
3. Componenti inclusi
Prima di iniziare il montaggio, verificare che tutti i componenti elencati di seguito siano presenti e integri. Se qualche componente risulta mancante o danneggiato, contattare l'assistenza clienti.
- 1x Testiera
- 1x Pedana
- 2x Sponde laterali
- 1x Hardware Set (includes bolts, washers, nuts, and tools if applicable)
- Doghe (Quantity may vary, typically included with bed frames)
- Gambe di supporto centrali (If applicable, typically included with bed frames)
4. Installazione e montaggio
Assembly of the Homelegance Cotterill Panel Bed requires two adults. Please follow these steps carefully:
- Preparare l'area: Predisporre un'area spaziosa per il montaggio. Disporre tutti i componenti su una superficie morbida e pulita per evitare graffi.
- Fissare le guide laterali alla testiera: Align one side rail with the pre-drilled holes on the headboard. Secure using the appropriate bolts and washers from the hardware set. Do not fully tighten yet. Repeat for the second side rail on the opposite side of the headboard.
- Fissare le guide laterali alla pedana: Carefully lift the footboard and align it with the open ends of the side rails. Secure using the remaining bolts and washers. Once all connections are made, gently tighten all bolts with the provided tool until snug. Do not overtighten.
- Supporto del centro di installazione (se applicabile): If your bed includes a center support beam and legs, install them now according to the specific instructions in your hardware packet. These typically attach to the side rails or headboard/footboard for added mattress support.
- Posizionare le stecche: Lay the bed slats across the side rails, ensuring they are evenly spaced and secured if attachment points are present. Some slats may have pre-drilled holes for screws.
- Controllo finale: Verify that all connections are secure and the bed frame is stable.
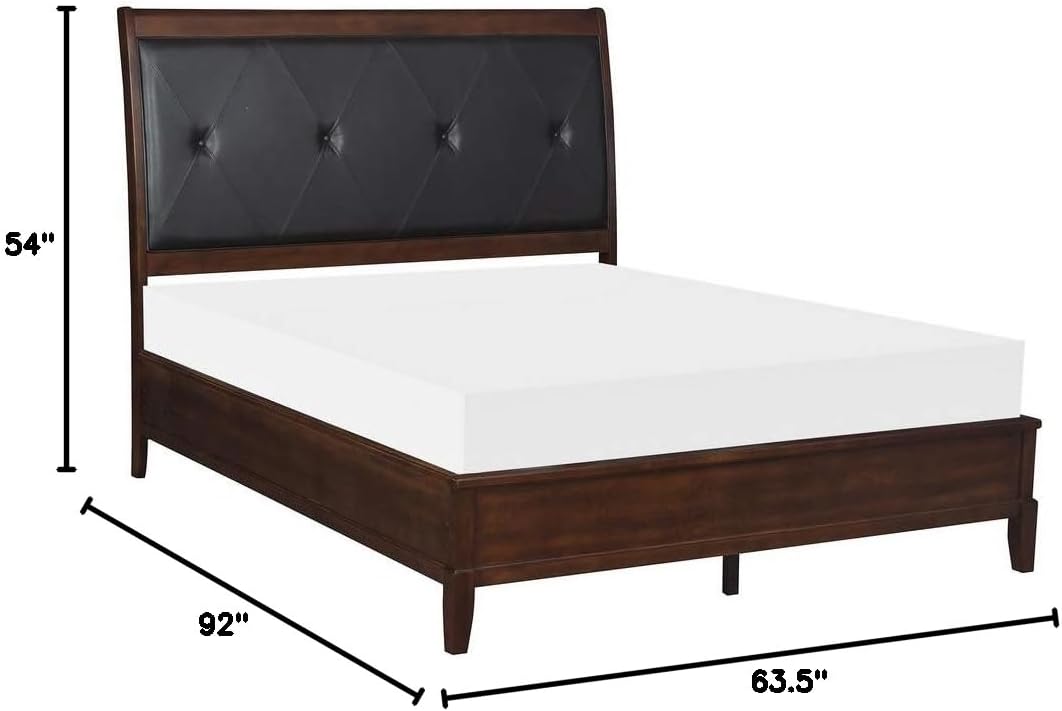
Figure 2: Dimensions of the Homelegance Cotterill Panel Bed.
This diagram illustrates the key dimensions of the assembled bed: 92 inches in length, 63.5 inches in width, and 54 inches in height, providing a visual reference for space planning.
5. Operating Instructions (Proper Use)
The Homelegance Cotterill Panel Bed is designed for use with a standard Queen-sized mattress and, if desired, a box spring. Follow these guidelines for proper use:
- Posizionamento del materasso: Carefully place your Queen-sized mattress onto the bed frame. Ensure it is centered and fully supported by the slats.
- Distribuzione del peso: Distribuire il peso in modo uniforme sul letto. Evitare di concentrare carichi pesanti su piccole aree.
- Movimento: When moving the bed, always lift it rather than dragging it to prevent damage to the frame or flooring. If disassembling for relocation, follow the assembly steps in reverse.
- Condizioni ambientali: Evitare di esporre il letto alla luce diretta del sole o vicino a fonti di calore, che possono causare deformazioni o scolorimenti del legno. Mantenere una temperatura e un'umidità ambientali stabili.
6. Manutenzione
Regular maintenance will help preserve the appearance and longevity of your Homelegance Cotterill Panel Bed:
- Pulizia delle superfici in legno: Dust regularly with a soft, dry cloth. For deeper cleaning, use a slightly damp cloth with a mild wood cleaner, then immediately wipe dry. Avoid abrasive cleaners or harsh chemicals.
- Cleaning Upholstered Headboard: The black bi-cast vinyl insert should be dry cleaned only. For minor spills, blot immediately with a clean, dry cloth. Do not rub. For stubborn stains, consult a professional upholstery cleaner.
- Controllo hardware: Periodically (every 3-6 months) check all bolts and connections to ensure they remain tight. Retighten as necessary to maintain stability.
- Evitare l'umidità: Protect the bed from excessive moisture and spills. Use coasters for drinks placed on adjacent nightstands.
7. Risoluzione Dei Problemi
If you encounter issues with your Homelegance Cotterill Panel Bed, refer to the following common problems and solutions:
| Problema | Possibile causa | Soluzione |
|---|---|---|
| Il letto sembra traballante o instabile. | Collegamenti hardware allentati. | Check and tighten all bolts and screws on the headboard, footboard, and side rails. Ensure center support legs (if applicable) are firmly in place. |
| Rumori stridenti. | Loose connections, friction between components, or uneven floor. | Tighten all hardware. Apply a small amount of furniture wax or silicone spray to contact points between slats and side rails. Ensure the bed is on a level surface; use furniture pads if needed. |
| Slats are bowing or breaking. | Exceeded weight capacity or uneven weight distribution. | Ensure total weight on the bed does not exceed 450 pounds. Replace damaged slats immediately. Consider adding additional support legs or a bunkie board for extra mattress support. |
| Graffi o piccoli danni alla finitura del legno. | Urti accidentali o pulizia abrasiva. | For minor scratches, use a wood repair marker or furniture polish matching the cherry finish. For deeper damage, consult a furniture repair specialist. |
8. Specifiche
| Caratteristica | Dettaglio |
|---|---|
| Marca | Eleganza domestica |
| Numero di modello | 1730-1* |
| Misurare | Regina |
| Dimensioni del prodotto (L x P x A) | 92" x 63.5" x 54" |
| Colore | Ciliegia |
| Tipo di finitura | Wood (Cherry Finish, Veneer) |
| Materiale di rivestimento | Bi-cast Vinyl (100% Polyurethane) |
| Caratteristica speciale | Button Tufted Headboard |
| Assemblaggio richiesto | SÌ |
| Capacità massima di peso | 450 libbre |
| Peso dell'articolo | 83.5 libbre |
| Codice UPC | 782359610986 |
9. Informazioni sulla garanzia
Homelegance products are typically covered by a manufacturer's limited warranty against defects in materials and workmanship. The specific terms and duration of the warranty may vary. Please retain your proof of purchase. For detailed warranty information, including coverage specifics and how to make a claim, please refer to the documentation included with your product or visit the official Homelegance websito.
10. Assistenza clienti
If you have any questions, require assistance with assembly, or need to report missing/damaged parts, please contact Homelegance customer support:
- Websito: www.homelegance.com (Si prega di controllare il sito ufficiale websito per le informazioni di contatto più aggiornate.)
- Telefono: Refer to the Homelegance websito o confezione del prodotto per i numeri di telefono del servizio clienti.
- E-mail: Refer to the Homelegance websito per gli indirizzi email del servizio clienti.
When contacting support, please have your model number (1730-1*) and proof of purchase readily available.


