1. Introduzione
Grazie per l'acquistoasing the RYOBI S-122PC1 Door Closer. This manual provides essential information for the safe and correct installation, operation, and maintenance of your new door closer. Please read this manual thoroughly before installation and keep it for future reference.
The RYOBI S-122PC1 is a high-quality door closer designed for moving partition doors and interior wood doors. It features a 3-valve adjustment system for precise control over closing speed and latching action, with a built-in stop device for a clean aesthetic.
2. Informazioni sulla sicurezza
Per evitare lesioni o danni al prodotto, osservare sempre le seguenti precauzioni di sicurezza.
- Leggere attentamente tutte le istruzioni prima dell'installazione e dell'uso.
- Prima di iniziare l'installazione, assicurarsi che tutti i componenti siano presenti e integri.
- Use appropriate tools and wear personal protective equipment (e.g., safety glasses, gloves) during installation.
- Do not modify the door closer or its components. Unauthorized modifications can lead to malfunction and void the warranty.
- Durante il funzionamento e la regolazione, tenere mani e dita lontane dalle parti mobili.
- Ensure the door closer is securely fastened to the door and frame according to the instructions to prevent detachment.
- If you encounter any difficulties or have questions, contact RYOBI customer support.
3. Contenuto della confezione
Verifica che tutti i seguenti elementi siano inclusi nel tuo pacchetto:
- RYOBI S-122PC1 Door Closer Unit
- Gruppo braccio principale
- Parallel Arm Bracket (for parallel installation)
- Viti di montaggio e elementi di fissaggio
- Manuale dell'utente (questo documento)
- Modello di installazione (se incluso)
4. Specifiche
| Caratteristica | Descrizione |
|---|---|
| Numero di modello | S-122PC1 |
| Tipo | Parallel Arm Door Closer |
| Regolazione della valvola | 3 Valve Adjustment (Latching Action, Closing Speed: Second Speed) |
| Compatible Door Size (Width) | Fino a 35.4 pollici (900 mm) |
| Compatible Door Size (Height) | Fino a 82.7 pollici (2100 mm) |
| Compatible Door Weight | 55.3 - 99.3 libbre (25 - 45 kg) |
| Consegna | Left and Right Handed Doors |
| Metodo di installazione | Avvitare |
| Colore | Metallic Bronze |
| Dimensioni (confezione) | Dimensioni: 34.79 x 11.9 x 5.7 cm |
| Peso dell'articolo | 1.99 kg |
5. Configurazione e installazione
5.1 Strumenti necessari
- Trapano
- Cacciavite (si consiglia la punta a croce)
- Nastro di misurazione
- Matita
- Chiave inglese (per la regolazione del braccio)
- Occhiali di sicurezza
5.2 Opzioni di montaggio
The RYOBI S-122PC1 supports parallel arm installation, suitable for various door and frame configurations.
5.3 Installazione passo passo
Refer to the included installation template for precise hole placement. The following steps outline a general installation process:
- Preparare la porta e il telaio: Ensure the door and frame surfaces are clean, flat, and structurally sound.
- Posiziona il modello: Affix the installation template to the door and frame according to the desired mounting position (e.g., push side, pull side). Mark all drilling points accurately.
- Praticare i fori pilota: Using an appropriate drill bit size for the provided screws, drill pilot holes at the marked locations.
- Montare il corpo più vicino: Secure the main door closer body to the door using the provided screws. Ensure it is level and firmly attached.
- Fissare il braccio principale: Connect the main arm to the closer body's spindle.
- Install the Parallel Arm Bracket: Secure the parallel arm bracket to the door frame using the provided screws.
- Collegare l'avambraccio: Attach the forearm (the shorter section of the arm) to the parallel arm bracket.
- Connect Main Arm to Forearm: Adjust the length of the main arm and forearm as needed, then connect them using the provided fasteners. Ensure the arm assembly is parallel to the door frame when the door is closed.
- Regolazione iniziale: Perform initial adjustments as described in the 'Operating Instructions' section to ensure the door closes smoothly.
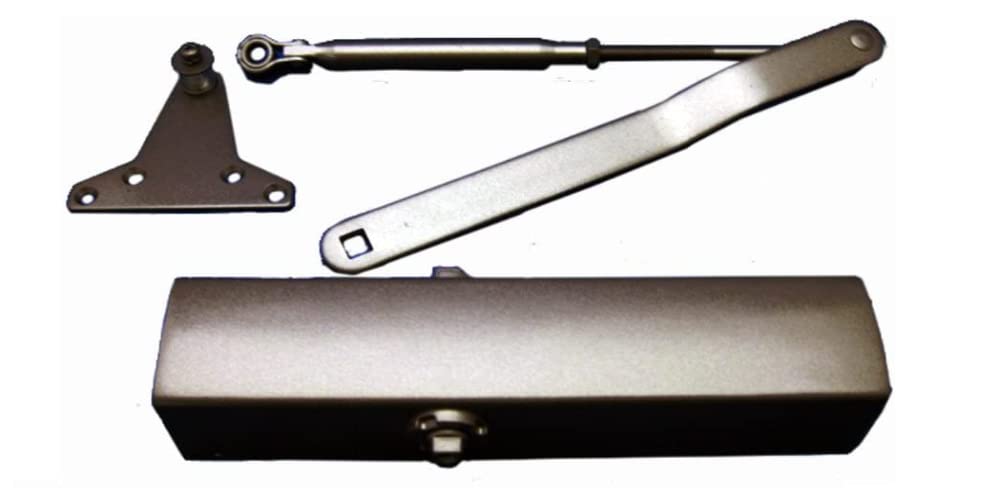
Figure 1: RYOBI S-122PC1 Door Closer unit. This image shows the main body and arm assembly of the door closer, highlighting its metallic bronze finish and compact design.
6. Operating Instructions and Adjustment
The RYOBI S-122PC1 features three adjustment valves to control the door's closing cycle. These valves are typically located on the side of the closer body.
6.1 Adjusting Closing Speed (Valve 1 & 2)
- Valve 1 (Initial Closing Speed): Controls the speed of the door from its fully open position until approximately 15 degrees from closed.
- Valve 2 (Latching Speed / Second Speed): Controls the speed of the door for the final 15 degrees of closing, ensuring the door latches securely without slamming.
To adjust: Turn the respective valve screw clockwise to decrease speed (slower closing) or counter-clockwise to increase speed (faster closing). Make small adjustments (quarter turns) and test the door's closing action after each adjustment.
6.2 Adjusting Latching Action (Valve 3)
- Valve 3 (Backcheck / Latching Action): This valve controls the resistance the door encounters when opened forcefully beyond a certain point (backcheck) and can also influence the final latching force.
To adjust: Turn the valve screw clockwise to increase backcheck resistance or latching force, and counter-clockwise to decrease it. Adjust carefully to prevent the door from slamming or failing to latch.
Importante: Do not unscrew the valves completely, as this can lead to fluid leakage and product damage.
7. Manutenzione
Regular maintenance ensures optimal performance and extends the lifespan of your RYOBI S-122PC1 Door Closer.
- Pulizia: Wipe the door closer body and arm assembly with a soft, damp panno per rimuovere polvere e sporco. Evitare detergenti abrasivi o solventi.
- Ispezione: Periodically check all mounting screws for tightness. Retighten if necessary. Inspect the arm assembly for any signs of wear or damage.
- Lubrificazione: The internal mechanism is factory-lubricated and sealed. No additional lubrication is required.
- Controllo della funzionalità: Test the door's closing and latching action regularly. Readjust the valves if the closing speed or latching force changes over time.
8. Risoluzione Dei Problemi
If you experience issues with your door closer, refer to the table below for common problems and solutions.
| Problema | Possibile causa | Soluzione |
|---|---|---|
| La porta sbatte | Closing speed (Valve 1) or latching speed (Valve 2) is too fast. | Turn Valve 1 and/or Valve 2 clockwise in small increments to decrease speed. |
| La porta non si chiude completamente o non scatta | Closing speed (Valve 1) or latching speed (Valve 2) is too slow; insufficient latching force (Valve 3). | Turn Valve 1 and/or Valve 2 counter-clockwise to increase speed. Turn Valve 3 clockwise to increase latching force. Check for obstructions. |
| La porta è difficile da aprire | Spring power is too high (not adjustable on this model); backcheck (Valve 3) is too strong. | Ensure the door closer is correctly sized for the door weight. Turn Valve 3 counter-clockwise to reduce backcheck. |
| Oil leakage from closer body | Damaged seal or over-adjustment of valves. | Stop using the closer immediately. Contact RYOBI customer support for assistance. Do not attempt to repair. |
| No closing action | Arm assembly disconnected or closer unit damaged. | Check if the arm assembly is securely connected. If the unit is damaged, contact RYOBI customer support. |
9. Garanzia e supporto
For warranty information, please refer to the warranty card included with your purchase or visit the official RYOBI websito. Conservare la prova d'acquisto per eventuali reclami in garanzia.
If you require technical assistance, have questions about installation, or need to report a defect, please contact RYOBI customer support through their official channels. Provide your product model number (S-122PC1) and a detailed description of the issue when contacting support.
Ufficiale RYOBI Websito: www.ryobi.com (Si prega di verificare la propria regione) websito per i dettagli di contatto specifici).


