Introduzione
This manual provides detailed instructions for the installation, setup, and operation of your JVC KD-X260BT Digital Media Receiver. This unit is designed to provide high-quality audio playback and hands-free communication in your vehicle, featuring Bluetooth connectivity, USB input, and a 13-band equalizer. Please note, this unit does not play CDs. Read this manual thoroughly before use to ensure proper operation and to prevent damage.

Immagine: Frontale view of the JVC KD-X260BT Digital Media Receiver, showing the display and control buttons.
Informazioni sulla sicurezza
- Non utilizzare l'unità in modo da distrarti dalla guida. Mantieni sempre l'attenzione sulla strada.
- Ensure proper wiring connections to prevent short circuits or damage to the vehicle's electrical system.
- Evitare di esporre l'unità a umidità o temperature estreme.
- Non tentare di smontare o modificare l'unità. Per qualsiasi intervento di manutenzione, rivolgersi a personale qualificato.
- Use only accessories specified by JVC.
Contenuto della confezione
Verificare che tutti gli articoli siano presenti nel pacco:
- Ricevitore multimediale digitale JVC KD-X260BT
- Cablaggio elettrico
- External Wired Microphone
- Hardware di montaggio
- Manuale di istruzioni (questo documento)
Installazione
Professional installation is recommended for this product. Incorrect installation can lead to damage to the unit or vehicle. The KD-X260BT features a short body design, which facilitates easier installation in various vehicle dashboards.
Collegamenti elettrici:
- Connect the wiring harness according to your vehicle's wiring diagram.
- Assicurarsi che tutti i collegamenti siano sicuri e isolati per evitare cortocircuiti.
- Connect the external microphone to the designated input for hands-free calling. Position the microphone in a location that provides clear voice pickup.
- Collegare il cavo dell'antenna.
- Se si utilizza esterno amplifiers, connect the 2.5V preamp outputs (rear/subwoofer selectable).
Montaggio:
- Installare il manicotto di montaggio nell'apertura del cruscotto.
- Far scorrere il ricevitore nel manicotto di montaggio finché non si blocca in posizione.
- Fissare l'anello di rifinitura.
Impostare
Accensione iniziale:
After installation, turn on your vehicle's ignition. The unit should power on. Follow any on-screen prompts for initial setup, such as language selection.
Accoppiamento Bluetooth:
The KD-X260BT supports Bluetooth 3.0+EDR and allows for two phones to be connected full-time. This enables receiving calls from either phone with a push of a key.
- Sul ricevitore, accedere al menu Bluetooth.
- Selezionare "Associazione" o "Ricerca dispositivo".
- Attiva il Bluetooth sul tuo smartphone e cerca i dispositivi disponibili.
- Select "KD-X260BT" from the list on your phone.
- Se richiesto, confermare il codice di associazione su entrambi i dispositivi.
- Una volta effettuata l'associazione, l'unità visualizzerà una conferma.
The unit supports Bluetooth profiles HFP (Hands-Free Profile 1.6 for wideband speech), HSP (Headset Profile), PBAP (Phone Book Access Profile), A2DP (Distribuzione audio avanzata Profile) e AVRCP (Audio/Video Remote Control Profile 1.5).
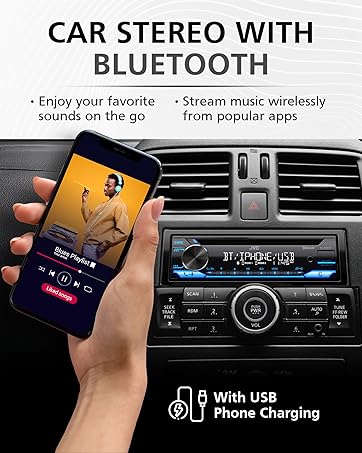
Image: JVC KD-X260BT display indicating Bluetooth connection, with a smartphone showing music playback, illustrating wireless audio streaming.
Applicazione remota JVC:
Download the "JVC Remote" app (available for iOS and Android) to control the receiver's source directly from your smartphone using simple finger gestures.
Istruzioni per l'uso
Controlli di base:
- Pulsante di accensione: Premere per accendere/spegnere l'unità.
- Manopola del volume: Ruotare per regolare il livello del volume. Premere per accedere alle opzioni del menu.
- Pulsante sorgente: Premere per scorrere le sorgenti audio disponibili (Sintonizzatore, USB, Audio Bluetooth, AUX).
- Pulsante di visualizzazione: Changes display information (e.g., clock, track title).
Sintonizzatore radio:
- Press the Source button to select "Tuner" (AM/FM).
- Use the seek buttons to find radio stations.
- Press and hold a preset button (1-6) to store a station.
Riproduzione USB:
Connect a USB device to the front USB port. The unit supports MP3/WMA/WAV/FLAC playback. The USB port also provides high current 1.5A charging for smartphones.
- Insert the USB device. The unit will automatically switch to USB source and begin playback.
- Use the track buttons to skip tracks.
- Use the folder buttons to navigate through folders.
- ID MP3 Tag Display (title/artist/album) is supported.
- Android music playback (AOA 2.0) is supported for Android phones (version 4.1 or later).
Streaming audio Bluetooth:
Once a Bluetooth device is paired, select "Bluetooth Audio" as the source to stream music wirelessly. Use the receiver's controls or the paired device to manage playback (play, pause, skip, search via AVRCP 1.5).
Chiamate in vivavoce:
When a call comes in on a paired phone, the unit will display the caller ID. Press the call button to answer, and the end call button to hang up. The external microphone ensures clear communication.
Audio Settings (Equalizer):
The unit features a 13-Band Graphic Equalizer with 10 preset EQ settings and 1 user-customizable setting. Access the audio menu to adjust:
- Equalizzatore: Select from preset curves or customize your own.
- Aumento dei bassi: Enhances low frequencies.
- Loudness: Compensates for perceived loss of bass and treble at low volumes.
- Bilanciamento/Fader: Adjusts sound distribution between left/right and front/rear speakers.
- Controllo subwoofer: Adjust subwoofer output level and frequency if connected.
Internet Radio/Digital Radio Control:
Control Pandora, iHeartRadio, and Spotify directly from the receiver when connected to a compatible Android device via Bluetooth.
Telecomando al volante:
Factory steering wheel control functions can be retained with a third-party adapter (sold separately).
Manutenzione
- Pulizia dell'unità: Utilizzare un panno morbido e asciutto per pulire il pannello frontale. Non utilizzare detergenti abrasivi o solventi.
- Porta USB: Mantenere la porta USB libera da polvere e detriti.
- Aggiornamenti del firmware: Controlla la JVC website periodically for any available firmware updates for improved performance and features.
Risoluzione dei problemi
| Problema | Soluzione |
|---|---|
| Nessun potere | Check vehicle's fuse. Ensure wiring harness is correctly connected. |
| Nessun suono | Check speaker connections. Verify volume level. Ensure correct source is selected. |
| Il Bluetooth non si connette | Ensure Bluetooth is enabled on both devices. Delete previous pairing and re-pair. Move devices closer. |
| Dispositivo USB non riconosciuto | Ensure USB device is formatted correctly (FAT16/32). Check for compatible file tipi. Prova un dispositivo USB diverso. |
| Scarsa ricezione radio | Check antenna connection. Ensure antenna is fully extended (if applicable). |
Specifiche
| Caratteristica | Dettaglio |
|---|---|
| Numero di modello | KD-X260BT |
| Potenza di uscita (picco) | 50 Watt x 4 canali |
| Potenza in uscita (RMS) | 22 Watt x 4 canali |
| Display | VA LCD Display, Spanish Text Display |
| Ingresso USB | Front USB, 1.5A Charging, MP3/WMA/WAV/FLAC Playback, Android AOA 2.0 |
| Ingresso ausiliario | 3.5mm Front Audio Auxiliary Input |
| Versione Bluetooth | 3.0+EDR Certified |
| Bluetooth professionalefiles | HFP 1.6, HSP, PBAP, A2DP, AVRCP 1.5 |
| Equalizzatore | 13-Band Graphic Equalizer (10 Preset x 1 User) |
| Preamp Risultati | 1 Set of 2.5V (Rear/Subwoofer Selectable) |
| Internet Radio Control | Pandora, Spotify, iHeartRadio (for Android) |
| Dimensioni (prodotto) | 4 x 9 x 8 pollici |
| Peso dell'articolo | 1.79 libbre |
Garanzia e supporto
This JVC KD-X260BT Digital Media Receiver comes with a 1-Year Manufacturer's Warranty. For warranty claims, technical support, or service inquiries, please contact JVC customer support or visit the official JVC websito. Conservare la prova d'acquisto per la convalida della garanzia.
Assistenza clienti JVC: Refer to the contact information provided with your product packaging or on the official JVC websito.