1. Introduzione
Thank you for choosing the Grifema G14001 Removable Kitchen Faucet. This manual provides essential information for the safe and efficient installation, operation, and maintenance of your new kitchen faucet. Please read these instructions carefully before installation and keep them for future reference.
2. Informazioni sulla sicurezza
- Chiudere sempre l'alimentazione idrica principale prima di iniziare qualsiasi lavoro di installazione o manutenzione.
- Assicurarsi che tutti i collegamenti siano ben saldi per evitare perdite.
- In caso di dubbi su qualsiasi fase del processo di installazione, consultare un idraulico qualificato.
- Non utilizzare detergenti abrasivi o prodotti chimici aggressivi sulla finitura del rubinetto, poiché potrebbero danneggiarla.
3. Contenuto della confezione
Verificare che tutti i componenti siano presenti prima di iniziare l'installazione:
- 1 x Grifema G14001 Kitchen Faucet
- 1 x Mixer tap washer kit
- 2 x 40 cm Connection Hoses (Hot and Cold)
- Mounting hardware (gasket, fixing nut, etc.)

Figura 3.1: All components included in the Grifema G14001 package. This image displays the main faucet body, two flexible connection hoses, a washer kit, and various mounting hardware pieces.
4. Specifiche
| Caratteristica | Dettaglio |
|---|---|
| Numero di modello | G14001 |
| Marca | GRIFEMA |
| Materiale | Ottone, Plastica |
| Fine | Cromo |
| Colore | Argento |
| Metodo di installazione | Montaggio in superficie |
| Numero di maniglie | 1 |
| Numero di fori richiesti | 1 |
| Portata | 2.2 litri al minuto |
| Lunghezza del tubo flessibile | 40 centimetri |
| Dimensioni del prodotto (L x P x A) | Dimensioni: 7.5 x 30 x 68 cm |
| Peso | 3.26 chilogrammi |
| Caratteristica speciale | Rotatable Spout, Pull-out Spray |

Figura 4.1: Dimensional drawing of the Grifema G14001 faucet, showing key measurements for height, reach, and base width.
5. Configurazione/Installazione
Follow these steps for proper installation of your Grifema G14001 kitchen faucet. Ensure the main water supply is turned off before starting.
- Preparare il foro del lavandino: Ensure your sink has a single mounting hole with a diameter of approximately Ø35mm.
- Inserire il rubinetto: Place the faucet body into the mounting hole on your sink or countertop. Ensure the base gasket is correctly positioned.
- Proteggere il rubinetto: From underneath the sink, slide the rubber gasket and metal washer onto the threaded shank of the faucet. Secure it tightly with the fixing nut.
- Collegare i tubi dell'acqua: Connect the hot (H) and cold (C) water supply hoses to the corresponding inlets on the faucet and to your hot and cold water supply lines. Ensure connections are hand-tightened, then use a wrench for a final quarter turn, being careful not to overtighten.
- Attach Pull-Out Hose Weight: Attach the counterweight to the pull-out spray hose underneath the sink. This ensures the spray head retracts smoothly.
- Test per perdite: Turn on the main water supply and check all connections for leaks. Operate the faucet to ensure proper water flow and temperature control.
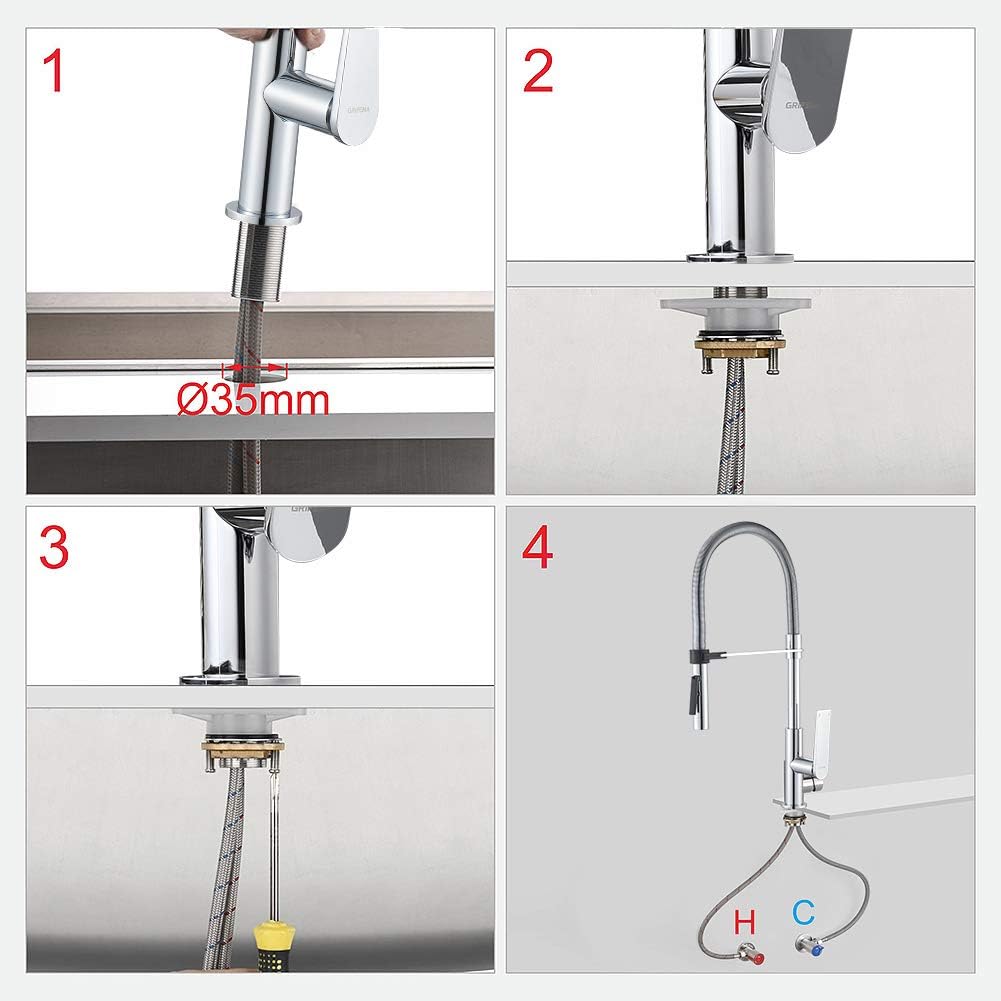
Figura 5.1: Step-by-step visual guide for installing the Grifema G14001 kitchen faucet, showing the insertion into the sink hole, securing the base, and connecting the water lines.
6. Istruzioni per l'uso
Your Grifema G14001 faucet is designed for ease of use and versatility.
- Controllo del flusso e della temperatura dell'acqua: La leva singola controlla sia il flusso che la temperatura dell'acqua. Sollevare la leva per aumentare il flusso, spostarla a sinistra per acqua calda o a destra per acqua fredda.
- Doppia modalità di spruzzo: The pull-out spray head features two distinct spray modes. Press the button on the spray head to switch between a powerful shower jet and a steady aerated stream.
- Flexible Pull-Out Hose: The ultra-flexible hose simplifies daily tasks, providing extended reach and greater operating space within your sink area.
- Rotazione a 360 gradi: The faucet spout can rotate 360 degrees, offering maximum flexibility and convenience for various sink configurations and tasks.

Figura 6.1: The Grifema G14001 faucet demonstrating its two spray modes: a concentrated stream and a wide spray pattern.
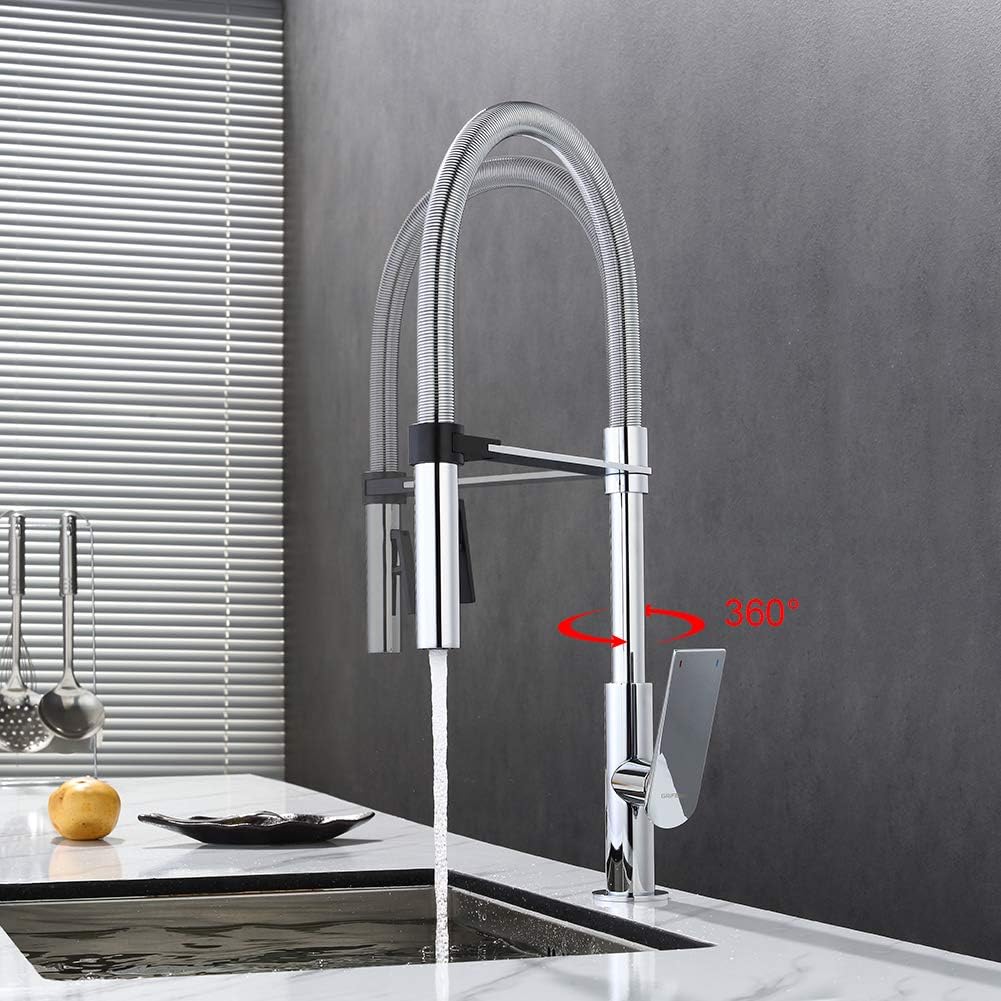
Figura 6.2: The Grifema G14001 faucet illustrating its 360-degree rotatable spout for enhanced flexibility.
7. Manutenzione
Proper care will ensure the longevity and appearance of your Grifema G14001 faucet.
- Pulizia della finitura: Clean the faucet regularly with a soft cloth and mild soap and water. Rinse thoroughly and dry with a soft cloth to prevent water spots. Avoid abrasive cleaners, ammonia, bleach, or acid-based cleaners, as these can damage the chrome finish.
- Pulizia dell'aeratore: If water flow becomes restricted, the aerator may be clogged. Unscrew the aerator from the spray head, clean any debris or mineral deposits, and rinse thoroughly before reattaching.
- Cartuccia in ceramica: The faucet is equipped with a durable ceramic cartridge designed for long-term, drip-free performance. No regular maintenance is typically required for the cartridge itself.

Figura 7.1: The Grifema G14001 faucet highlighting its water-saving aerator, which can be removed for cleaning.
8. Risoluzione Dei Problemi
Fare riferimento a questa sezione per i problemi più comuni e le relative soluzioni.
| Problema | Possibile causa | Soluzione |
|---|---|---|
| Basso flusso d'acqua | Aeratore intasato o detriti nelle condotte idriche. | Clean the aerator (see Section 7). Check water supply valves are fully open. |
| Perdite nei collegamenti | Loose connections or damaged washers. | Ensure all connections are tightened properly. Replace washers if damaged. |
| Spray Mode Not Switching | Debris in spray head mechanism or faulty switch. | Remove and clean the spray head. If the issue persists, contact customer support. |
| Il rubinetto gocciola | Cartuccia in ceramica usurata. | While the ceramic cartridge is designed for durability, if dripping occurs, it may need replacement. Contact customer support for assistance. |
| Pull-Out Spray Not Retracting | Contrappeso posizionato in modo errato o ostruito. | Check the position of the counterweight on the hose underneath the sink. Ensure it moves freely and is not obstructed. |
9. Garanzia e supporto
GRIFEMA products are manufactured to high-quality standards. For warranty information or technical support, please refer to the warranty card included with your product or visit the official GRIFEMA website. Please have your model number (G14001) and purchase date available when contacting support.


