1. Introduzione
Thank you for choosing the Antec P101S Silent Performance Mid-Tower PC Case. This manual provides essential information for the proper installation, operation, and maintenance of your new computer case. Please read this manual thoroughly before beginning assembly to ensure optimal performance and longevity of your system.
The Antec P101S is engineered for quiet computing, featuring sound-dampening panels and efficient cooling solutions, making it ideal for users who prioritize a silent and high-performance computing environment.
2. Caratteristiche principali
- Funzionamento silenzioso: Equipped with sound-dampening top, front, and side panels for quiet computing.
- Extensive Drive Bays: Supports 11 drive bays, including 1 x 5.25" ODD bay, 8 x 3.5" HDD/2.5" SSD removable bays, and 2 x dedicated 2.5" SSD bays.
- Raffreddamento avanzato: Includes 4 pre-installed 120/140mm cooling fans (3 front, 1 rear). Supports up to 4 fan mounts with a maximum of 360mm radiator support for enhanced cooling.
- Convenient I/O Panel: Features power/reset buttons, a fan speed controller (High/Stop/Low), Audio/Mic ports, 2 x USB 2.0, and 2 x USB 3.0 ports with white LED lighting.
- Ampia compatibilità con le schede madri: Supports E-ATX, ATX, Micro-ATX, and ITX motherboards.
- Generous Component Clearance: Accommodates CPU coolers up to 180mm, graphics cards up to 450mm, and PSUs up to 290mm in length.
3. Contenuto della confezione
Si prega di verificare che tutti gli articoli siano presenti nel pacco:
- Antec P101S Mid-Tower PC Case
- 3 x 120mm Front Fans (Pre-installed)
- 1 x 140mm Rear Fan (Pre-installed)
- Scatola degli accessori (viti, fascette, manuale utente)
4. Componente suview
Familiarize yourself with the various parts of your Antec P101S case.

Figure 1: Front, Back, Left, and Right views of the Antec P101S case, illustrating its external design and panel layout.

Figura 2: Interno view of the Antec P101S, showing the spacious layout, drive bays, and fan mounts.

Figure 3: Close-up of the top I/O panel, highlighting the power, reset, fan speed controller, audio, USB 2.0, and USB 3.0 ports.
5. Configurazione e installazione
Follow these steps to install your components into the Antec P101S case.
5.1 Preparazione del caso
- Rimuovere i pannelli laterali: Unscrew the thumbscrews on the rear of the side panels and slide them backward to remove.
- Accesso Interno: The interior is now accessible for component installation.
5.2 Installazione della scheda madre
- Installare i distanziatori: Ensure the correct motherboard standoffs are installed for your motherboard form factor (ATX, Micro-ATX, ITX, E-ATX).
- Posizionare la scheda madre: Allineare con attenzione la scheda madre con i distanziatori e l'apertura della schermatura I/O.
- Scheda madre sicura: Fasten the motherboard with the provided screws.
5.3 Installazione dell'unità
The P101S offers versatile drive mounting options.
5.3.1 3.5" HDD / 2.5" SSD Removable Bays

Figure 4: Illustration of the various drive bay locations within the Antec P101S case.
- Remove Drive Tray: Pull out an empty 3.5" drive tray from the drive cage.
- Unità di installazione: For a 3.5" HDD, flex the tray and insert the drive. For a 2.5" SSD, secure it to the bottom of the tray with screws.
- Reinserire il vassoio: Far scorrere il vassoio caricato nuovamente nel vano dell'unità finché non scatta in posizione.
5.3.2 Dedicated 2.5" SSD Bays
Two dedicated 2.5" SSD mounts are located behind the motherboard tray.
- SSD sicuro: Attach your 2.5" SSD to the dedicated mounting bracket using screws.
- Staffa di montaggio: Secure the bracket with the SSD to the chassis behind the motherboard tray.
5.3.3 5.25" ODD Bay
- Remove Front Bezel: Gently remove the 5.25" bay cover from the front bezel.
- Insert ODD: Slide your optical disc drive into the bay from the front until it aligns with the screw holes.
- Secure ODD: Fasten the ODD with screws.
5.4 Installazione della scheda grafica e della scheda di espansione
- Rimuovere le coperture degli slot PCIe: Unscrew and remove the necessary PCIe slot covers from the rear of the case.
- Inserisci carta: Carefully insert your graphics card or other expansion card into the appropriate PCIe slot on the motherboard.
- Carta sicura: Fasten the card with screws.
5.5 Installazione dell'unità di alimentazione (PSU).
- Posizione PSU: Inserire l'alimentatore nell'apposito scomparto nella parte inferiore posteriore del case.
- Alimentatore sicuro: Fasten the PSU to the rear of the chassis with screws.
5.6 Gestione dei cavi
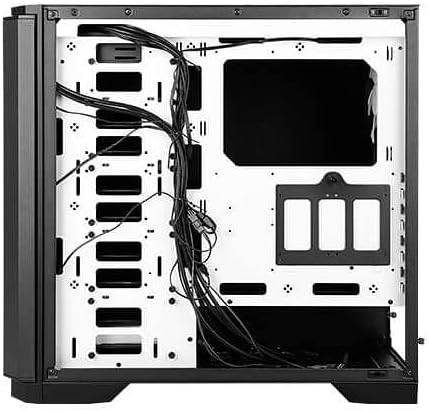
Figura 5: Posteriore view of the motherboard tray, showing cable routing channels and tie-down points for organized cable management.
Utilize the cable routing holes and tie-down points behind the motherboard tray to organize cables for improved airflow and aesthetics.
6. Utilizzo del case del PC
6.1 Accensione/spegnimento
Press the large power button on the top I/O panel to turn your system on or off.
6.2 controllo della velocità della ventola
Use the fan speed controller switch on the top I/O panel to adjust the speed of the pre-installed fans:
- Alto: Maximum fan speed for optimal cooling.
- Basso: Reduced fan speed for quieter operation.
- Stop: Fans are turned off.
7. Manutenzione
7.1 Pulizia dei filtri antipolvere
Regularly clean the dust filters located at the front, top, and bottom of the case to maintain optimal airflow and prevent dust buildup. The front filter is easily removable for cleaning.
7.2 Pulizia generale
Use a soft, dry cloth to clean the exterior of the case. For stubborn marks, a slightly damp È possibile utilizzare un panno e procedere all'asciugatura. Evitare detergenti abrasivi o solventi.
8. Risoluzione Dei Problemi
- Il sistema non si accende: Double-check all power connections, including the 24-pin ATX, 8-pin CPU, and GPU power cables. Ensure the PSU switch is in the 'On' position.
- I ventilatori non girano: Verify that the fan speed controller on the I/O panel is not set to 'Stop'. Check fan connections to the motherboard or fan hub.
- Surriscaldamento: Ensure all fans are spinning correctly and dust filters are clean. Verify proper component installation and thermal paste application.
- Porte USB non funzionanti: Check the internal USB header connections from the I/O panel to the motherboard.
9. Specifiche
| Caratteristica | Dettaglio |
|---|---|
| Nome del modello | P101S Silent |
| Tipo di caso | Torre media |
| Compatibilità della scheda madre | E-ATX, ATX, Micro-ATX, ITX |
| Dimensioni (LxWxH) | 20.74 x 9.13 x 19.92 pollici |
| Peso dell'articolo | 26.1 libbre |
| Materiale | Acciaio legato |
| Alloggiamenti unità | 1 x 5.25" ODD, 8 x 3.5" HDD/2.5" SSD, 2 x 2.5" SSD |
| Ventole preinstallate | 3 x 120 mm anteriori, 1 x 140 mm posteriori |
| Supporto radiatore | Front: Up to 360mm, Rear: Up to 140mm |
| Altezza massima del dissipatore della CPU | 180mm |
| Lunghezza massima della GPU | 450mm |
| Lunghezza massima dell'alimentatore | 290mm |
| Porte I / O anteriori | 2 x USB 2.0, 2 x USB 3.0, Audio/Mic, Power, Reset, Fan Speed Controller |
10. Garanzia e supporto
Per informazioni sulla garanzia e supporto tecnico, fare riferimento al sito ufficiale Antec website or contact your local Antec distributor. Keep your proof of purchase for warranty claims.
Antec Ufficiale Websito: www.antec.com