1. Introduzione
Grazie per l'acquistoasing the Mr. Coffee BVMC-DVX41 12-Cup Programmable Coffeemaker. This manual provides important information for the safe and efficient operation of your new appliance. Please read these instructions thoroughly before first use and retain them for future reference.
2. Importanti misure di sicurezza
Quando si utilizzano apparecchi elettrici, è necessario adottare sempre le seguenti precauzioni di sicurezza di base per ridurre il rischio di incendi, scosse elettriche e/o lesioni alle persone, tra cui:
- Leggere tutte le istruzioni prima di utilizzare questo apparecchio.
- Non toccare le superfici calde. Utilizzare maniglie o manopole.
- Per proteggersi dalle scosse elettriche, non immergere il cavo, la spina o la macchina per il caffè in acqua o altri liquidi.
- È necessaria un'attenta supervisione quando un elettrodomestico viene utilizzato da bambini o nelle loro vicinanze.
- Scollegare dalla presa quando non in uso e prima di pulire. Lasciare raffreddare prima di mettere o togliere parti e prima di pulire l'apparecchio.
- Do not operate any appliance with a damaged cord or plug, or after the appliance malfunctions or has been damaged in any manner. Return appliance to an authorized service facility for examination, repair, or adjustment.
- L'uso di accessori non consigliati dal produttore dell'apparecchio può causare incendi, scosse elettriche o lesioni alle persone.
- Non utilizzare all'aperto.
- Non lasciare che il cavo penda dal bordo del tavolo o del bancone o che tocchi superfici calde.
- Non posizionare sopra o vicino a un fornello a gas o elettrico caldo, oppure in un forno caldo.
- Per scollegarlo, posizionare un qualsiasi comando su "off", quindi rimuovere la spina dalla presa a muro.
- Non utilizzare l'apparecchio per scopi diversi da quelli previsti.
- La caraffa è progettata esclusivamente per l'uso con questo apparecchio. Non deve mai essere utilizzato su un top di gamma.
- Non posizionare una caraffa calda su una superficie bagnata o fredda.
- Non utilizzare una caraffa rotta o con il manico allentato o indebolito.
- Non pulire la caraffa con detergenti, pagliette di acciaio o altri materiali abrasivi.
- Se il coperchio viene rimosso durante il ciclo di infusione, si possono verificare scottature.
3. Parts of Your Coffeemaker
Familiarize yourself with the components of your Mr. Coffee BVMC-DVX41 coffeemaker before operation.

Figura 1: Davanti view of the Mr. Coffee BVMC-DVX41 coffeemaker. This image shows the control panel with digital display, buttons for programming and brewing, the brew basket area, and the glass carafe on the warming plate.
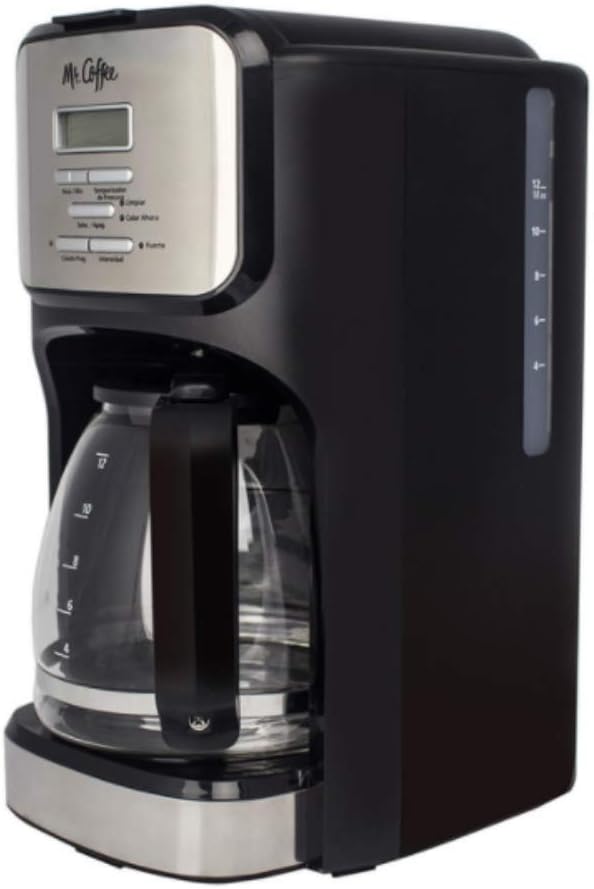
Figura 2: Lato view of the Mr. Coffee BVMC-DVX41 coffeemaker. This image highlights the water reservoir with its clear water level indicator, allowing users to easily see how much water is added.
- Coperchio: Covers the water reservoir and brew basket.
- Riserva d'acqua: Holds water for brewing. Features a clear level indicator.
- Cestello per la preparazione: Holds the coffee filter and ground coffee. Removable for easy cleaning.
- Pannello di controllo: Includes a digital clock/timer display and various function buttons.
- Caraffa di vetro: 12-cup capacity carafe with handle and lid.
- Piastra riscaldante: Mantiene caldo il caffè preparato.
- Cavo di alimentazione: Per il collegamento a una presa elettrica.
4. Configurazione e primo utilizzo
4.1 Prima del primo utilizzo
Before brewing your first pot of coffee, it is recommended to clean the coffeemaker to remove any dust or manufacturing residues.
- Wash the carafe and brew basket in warm, soapy water. Rinse thoroughly and dry.
- Riempire il serbatoio dell'acqua fino al segno delle 12 tazze con acqua fresca e fredda.
- Place an empty paper filter (basket-style) into the brew basket.
- Place the brew basket into its housing and close the lid.
- Posizionare la caraffa vuota sulla piastra riscaldante.
- Collegare la macchina per il caffè a una presa elettrica.
- Run a full brewing cycle with only water and the paper filter. Discard the water from the carafe and the used filter.
- Repeat this process once more for optimal cleaning.
4.2 Impostazione dell'orologio
The coffeemaker features a programmable clock. Set the current time for accurate programming.
- Collegare la macchina per il caffè. Il display lampeggerà "12:00".
- Press the "HOUR" button repeatedly until the correct hour is displayed. Pay attention to the AM/PM indicator.
- Press the "MINUTE" button repeatedly until the correct minute is displayed.
- The clock is now set. If you do not press any button for 5 seconds, the time will be set automatically.
5. Istruzioni per l'uso
5.1 Erogazione del caffè
- Assicurarsi che la macchina per il caffè sia collegata e che l'orologio sia impostato.
- Fill the water reservoir with fresh, cold water to your desired number of cups, using the water level indicator on the side. Do not exceed the 12-cup maximum fill line.
- Place a basket-style paper filter into the brew basket.
- Aggiungere la quantità desiderata di caffè macinato nel filtro. In generale, la dose consigliata è un cucchiaio di caffè macinato per tazza, ma è possibile variare a piacere.
- Slide the brew basket into its housing and close the lid securely.
- Place the empty carafe with its lid on the warming plate. Ensure it is seated correctly to activate the "Pause 'n Serve" feature.
- Press the "ON/OFF" button to start the brewing cycle. The indicator light will illuminate.
- Once brewing is complete, the coffeemaker will automatically switch to the "Keep Warm" mode. The warming plate will keep the coffee hot for approximately 2 hours before automatically shutting off.
5.2 Programmable Brewing (Delay Brew)
Set your coffeemaker to brew automatically at a later time.
- Seguire i passaggi da 1 a 6 del punto "5.1 Preparazione del caffè".
- Press the "PROGRAM" button. The display will show "PROGRAM" and flash "12:00".
- Press the "HOUR" and "MINUTE" buttons to set the desired brew time. Remember to observe the AM/PM indicator.
- Once the desired time is set, press the "PROGRAM" button again to confirm. The "PROGRAM" indicator light will illuminate.
- The coffeemaker will now start brewing automatically at the programmed time.
- To cancel the programmed brew, press the "ON/OFF" button.
5.3 Pause 'n Serve Feature
This feature allows you to pour a cup of coffee before the entire brewing cycle is complete.
- During the brewing cycle, you can temporarily remove the carafe from the warming plate. The flow of coffee will automatically stop.
- Versatevi il caffè.
- Immediately return the carafe to the warming plate. If the carafe is not returned within 30 seconds, the brew basket may overflow.
6. Cura e manutenzione
6.1 Pulizia giornaliera
Regular cleaning helps maintain the performance and longevity of your coffeemaker.
- Scollegare sempre la macchina per il caffè e lasciarla raffreddare completamente prima di pulirla.
- Remove the brew basket and discard the used coffee filter and grounds.
- Wash the carafe and brew basket in warm, soapy water. These parts are not dishwasher safe. Rinse thoroughly.
- Pulisci l'esterno della macchina per il caffè con un panno morbido eamp stoffa. Non utilizzare detergenti abrasivi o spugnette abrasive.
- Non immergere la macchina per il caffè in acqua o altri liquidi.
6.2 Decalcificazione (rimozione dei depositi minerali)
Mineral deposits (calcium and lime) can build up in your coffeemaker over time, affecting its performance. Descale your coffeemaker every 80 brew cycles or every 2-3 months, depending on water hardness.
- Versare 4 tazze di aceto bianco non diluito nel serbatoio dell'acqua.
- Inserire un filtro di carta vuoto nel cestello di infusione.
- Posizionare la caraffa vuota sulla piastra riscaldante.
- Press the "ON/OFF" button to start a brewing cycle. Allow half of the vinegar solution to brew into the carafe, then press "ON/OFF" to turn off the coffeemaker.
- Lasciare la macchina per il caffè in ammollo per almeno 15 minuti per consentire all'aceto di pulire i componenti interni.
- After soaking, press "ON/OFF" again to complete the brewing cycle with the remaining vinegar solution.
- Discard the vinegar solution from the carafe and the used filter.
- Fill the water reservoir with fresh, cold water (12 cups) and run two full brewing cycles with only water to rinse out any remaining vinegar taste.
7. Guida alla risoluzione dei problemi
Review the following common issues and their solutions before contacting customer service.
| Problema | Possibile causa | Soluzione |
|---|---|---|
| La caffettiera non si accende. | Non collegato; alimentazione spentatage; presa difettosa. | Ensure the coffeemaker is securely plugged into a working electrical outlet. Check your circuit breaker. |
| Il caffè non viene erogato. | Water reservoir empty; brew cycle not started; carafe not on warming plate. | Fill water reservoir. Press "ON/OFF" button. Ensure carafe is properly seated on the warming plate. |
| Il caffè ha un sapore debole o troppo forte. | Rapporto caffè-acqua errato; macinatura del caffè troppo grossa/fine. | Adjust the amount of ground coffee. Use a medium grind for drip coffeemakers. |
| Il cestello della birra trabocca. | Too much coffee grounds; filter not seated correctly; carafe removed too long during Pause 'n Serve; coffeemaker needs descaling. | Reduce coffee grounds. Ensure filter is properly seated. Return carafe quickly. Descale the coffeemaker. |
| Il caffè non è abbastanza caldo. | La piastra riscaldante non funziona; la macchina per il caffè deve essere decalcificata. | Ensure the warming plate is on. Descale the coffeemaker to improve heating efficiency. |
8. Specifiche del prodotto
- Numero modello: BVMC-DVX41
- Marca: Signor Caffè
- Capacità: 12 tazze
- Tipo di caffettiera: Macchina per caffè americano
- Caratteristica speciale: Programmabile
- Voltage: 120 Volt
- Modalità operativa: Completamente automatico
- Componenti inclusi: Caraffa, Filtro
- Dimensioni del prodotto: 15 x 14 x 9 pollici (circa)
- Peso dell'articolo: 5.06 libbre (circa)
- Finitura esterna: Metallico
- Input dell'interfaccia umana: Pulsanti
- È lavabile in lavastoviglie: No (for main unit, carafe and brew basket are hand-wash only)
9. Garanzia e assistenza clienti
For detailed warranty information, please refer to the warranty card included with your product packaging or visit the official Mr. Coffee website. If you experience any issues not covered in this manual, or require further assistance, please contact Mr. Coffee customer support.
Supporto online: Visit the official Mr. Coffee websito per FAQ e risorse di supporto.
Supporto telefonico: Fare riferimento alla confezione del prodotto o al sito ufficiale websito per i numeri di contatto attuali.


