1. Importanti istruzioni di sicurezza
Quando si utilizza un elettrodomestico, è necessario seguire sempre le precauzioni di sicurezza di base, tra cui le seguenti:
- Leggere tutte le istruzioni prima di utilizzare questa macchina da cucire.
- Keep these instructions in a convenient place near your machine.
- Unplug the machine from the electrical outlet immediately after using and before cleaning, removing covers, lubricating, or making any other user servicing adjustments mentioned in the instruction manual.
- Non permettere di essere usato come un giocattolo. È necessaria molta attenzione quando questo apparecchio è utilizzato da o vicino a bambini.
- Utilizzare questo apparecchio solo per l'uso previsto, come descritto nel presente manuale. Utilizzare solo gli accessori raccomandati dal produttore.
- Non utilizzare mai questo apparecchio se il cavo o la spina sono danneggiati, se non funziona correttamente, se è caduto o danneggiato o se è caduto in acqua.
- Non far cadere o inserire mai alcun oggetto in nessuna apertura.
- Non utilizzare all'aperto.
- Non operare in luoghi in cui vengono utilizzati prodotti aerosol (spray) o in cui viene somministrato ossigeno.
- Per scollegarlo, portare tutti i comandi in posizione off, quindi rimuovere la spina dalla presa.
- Tenere le dita lontane da tutte le parti in movimento. È necessaria una cura speciale intorno all'ago della macchina per cucire.
- Utilizzare sempre la piastra ago corretta. Una piastra sbagliata può causare la rottura dell'ago.
- Non utilizzare aghi piegati.
- Non tirare o spingere il tessuto durante la cucitura. Ciò potrebbe deviare l'ago e causarne la rottura.
- Indossare occhiali protettivi.
2. Introduzione e configurazione
2.1 Unpacking Your Machine
Carefully remove the Janome Sewist 721 from its packaging. Retain all packaging materials for future transport or storage. Ensure all accessories listed in the packing list are present.
2.2 Collegamento di alimentazione
Collegare il cavo di alimentazione alla macchina e poi a una presa elettrica idonea. Assicurarsi che la macchina sia posizionata su una superficie stabile e piana.
2.3 Avvolgimento della bobina
Proper bobbin winding is crucial for consistent stitch quality. Follow these steps to wind a bobbin:
- Posizionare il rocchetto di filo sul perno portarocchetto.
- Far passare il filo attraverso la guida del filo superiore e attorno al disco di tensione dell'avvolgimento della bobina.
- Insert the thread through one of the small holes in the bobbin from the inside out.
- Place the bobbin onto the bobbin winder spindle and push the spindle to the right until it clicks into place.
- Hold the thread end and gently press the foot pedal. The bobbin will start to wind. Once a few layers are wound, trim the excess thread tail.
- Continue winding until the bobbin is full. The machine will automatically stop or slow down when the bobbin is full.
- Push the bobbin winder spindle to the left and remove the wound bobbin.

Image: The bobbin winding area on the Janome Sewist 721, illustrating the thread path for winding a new bobbin.
Video: This video demonstrates the complete process of winding a bobbin and threading the upper thread on a Janome sewing machine. It highlights how to properly guide the thread through tension areas for a clean bobbin wind and the step-by-step upper threading process, including using the built-in needle threader.
2.4 Infilatura del filo superiore
Follow the numbered guides on your machine for correct upper threading:
- Sollevare l'alzapiedino.
- Posizionare la bobina di filo sul perno della bobina.
- Guide the thread through the upper thread guide (1).
- Bring the thread down the right channel (2) and up the left channel (3), ensuring it passes through the take-up lever.
- Thread the needle bar guide (4).
- Thread the needle from front to back. Use the built-in needle threader for convenience (see section 3.3).
- Pull about 6 inches of thread through the needle eye and pass it under the presser foot.
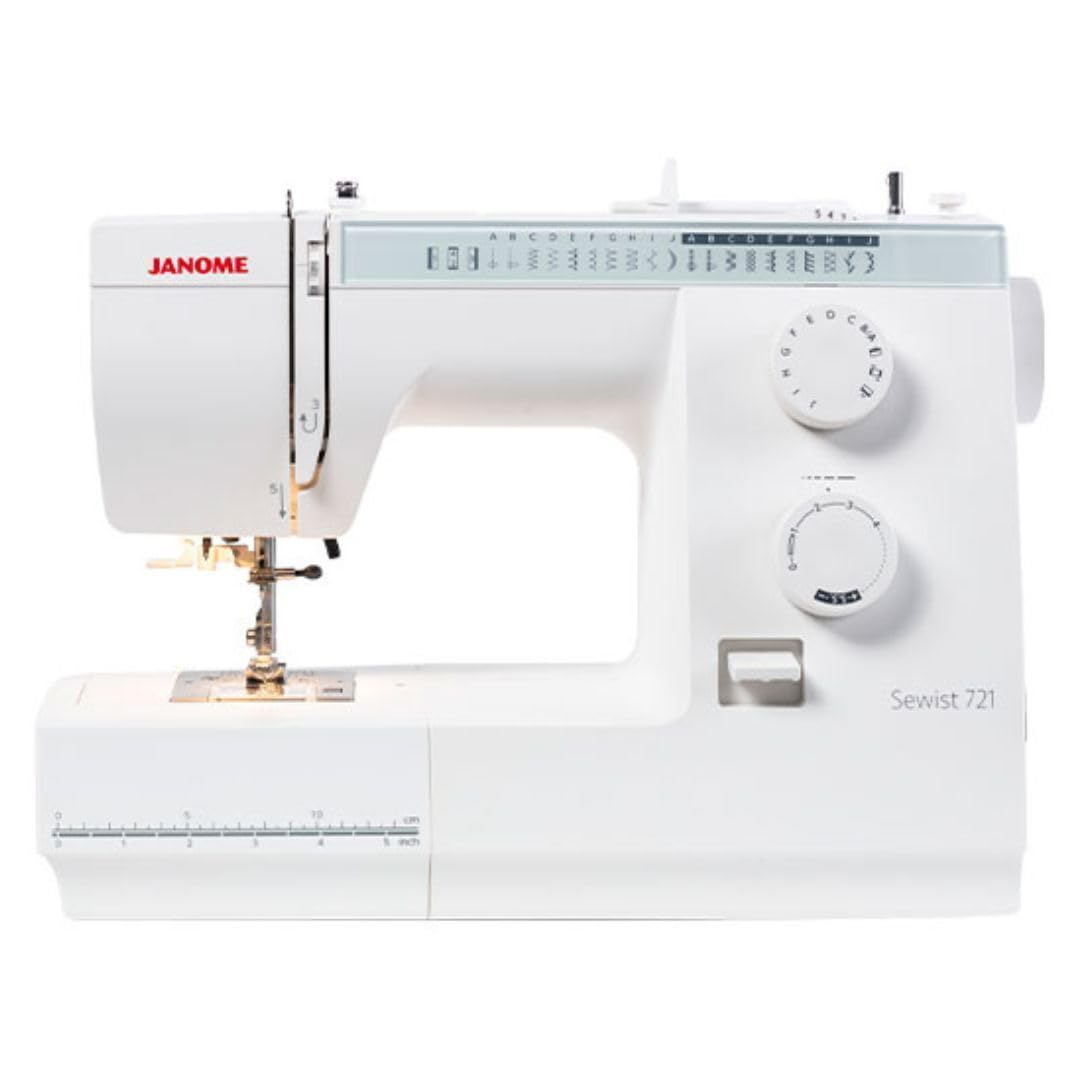
Immagine: Oltreview of the Janome Sewist 721, highlighting the main components and threading guides.
2.5 Inserimento della bobina
The Janome Sewist 721 features a top-loading full rotary hook bobbin system:
- Aprire la piastra di copertura della bobina situata sulla placca ago.
- Insert the wound bobbin into the bobbin case, ensuring the thread unwinds counter-clockwise.
- Far passare il filo della bobina attraverso la molla di tensione e nella fessura del guidafilo.
- Hold the upper thread lightly with one hand, and turn the handwheel towards you to lower and raise the needle. This will catch the bobbin thread and bring it up through the needle plate opening.
- Pull both upper and bobbin threads to the back under the presser foot.
- Chiudere la piastra di copertura della bobina.

Image: The needle plate and top-loading bobbin area of the Janome Sewist 721, with the clear cover allowing visibility of the bobbin.
3. Funzionamento della macchina
3.1 Selezione del punto
The Janome Sewist 721 offers 19 built-in stitches, including utility stitches, stretch stitches, and a 4-step buttonhole. Use the stitch selection dial to choose your desired stitch. The stitch patterns are clearly displayed on the front of the machine.

Image: The stitch selection dials and the visual guide for 19 built-in stitches on the Janome Sewist 721.
3.2 Regolazione della lunghezza e della larghezza del punto
Adjust the stitch length and width using the dedicated dials on the front of the machine. The maximum stitch width is 5mm and maximum stitch length is 4mm. For stretch stitches, refer to the gray section on the stitch pattern display and adjust the stitch length dial accordingly.
3.3 Using the Built-in Needle Threader
The built-in needle threader simplifies threading the needle. Ensure the needle is in its highest position. Lower the needle threader lever, align the small hook with the needle eye, and pass the thread through the hook. Release the lever, and a loop of thread will be pulled through the needle eye.
3.4 Sostituzione dei piedini premistoffa
The Janome Sewist 721 features snap-on presser feet for quick and easy changes. To remove a presser foot, lift the presser foot lifter and press the release button at the back of the presser foot holder. To attach a new foot, align it under the holder and lower the presser foot lifter until it snaps into place.
4. Manutenzione
Una manutenzione regolare garantisce la longevità e le prestazioni ottimali della tua macchina da cucire.
4.1 Pulizia
- Scollegare sempre la macchina prima della pulizia.
- Rimuovere l'ago, il piedino premistoffa e la placca ago.
- Use the brush provided with your machine to remove lint and dust from the bobbin case area and feed dogs.
- Pulire l'esterno della macchina con un panno morbido e asciutto. Non utilizzare prodotti chimici aggressivi o detergenti abrasivi.
4.2 Lubrificazione
The Janome Sewist 721 is designed for minimal lubrication. Refer to the detailed service manual or consult a qualified technician for any internal lubrication needs. Do not attempt to lubricate internal components unless specifically instructed.
5. Risoluzione Dei Problemi
This section addresses common issues you might encounter. For more complex problems, please contact Janome customer support.
- Punti saltati:
- Assicurarsi che l'ago sia inserito correttamente e che non sia piegato o smussato.
- Check if the needle size is appropriate for the fabric and thread.
- Re-thread the upper thread and bobbin, ensuring correct tension.
- Rottura del filo:
- Check for incorrect threading of the upper thread or bobbin.
- Ensure the thread tension is not too tight.
- Inspect the needle for burrs or damage.
- Utilizzare filo di buona qualità.
- Inceppamento del tessuto:
- Do not pull or push the fabric forcefully; let the feed dogs guide it.
- Ensure the presser foot is lowered before sewing.
- Check for tangled threads in the bobbin area.
- La macchina non si avvia:
- Verify the power cord is securely plugged in.
- Check if the foot pedal is properly connected.
- Ensure the bobbin winder spindle is pushed to the left (sewing position).
6. Specifiche
| Caratteristica | Dettaglio |
|---|---|
| Marca | Gianome |
| Numero di modello | Sewist 721 |
| Dimensioni del prodotto | 7 x 16 x 11.9 pollici (7"P x 16"L x 11.9"A) |
| Peso dell'articolo | 14.8 libbre |
| Punti incorporati | 19 (including stretch stitches and 4-step buttonhole) |
| Tipo di bobina | Top loading full rotary hook |
| Infila ago | Incorporato |
| Piedini premistoffa | A scatto |
| Larghezza massima del punto | 5mm |
| Lunghezza massima del punto | 4mm |
| Fonte di alimentazione | AC Electric |
| Materiale | Metallo |
| Colore | Bianco |
| Codice UPC | 732212371165 |
7. Garanzia e supporto
Your Janome Sewist 721 Sewing Machine comes with a manufacturer's warranty. Please refer to the warranty card included with your product for specific terms and conditions. For technical assistance, spare parts, or service, please contact Janome customer support through their official webin loco o presso centri di assistenza autorizzati.
Conservare la ricevuta d'acquisto come prova d'acquisto per eventuali reclami in garanzia.


