1. Introduzione
This manual provides detailed instructions for the installation, programming, and operation of your Orbit 2-Outlet Programmable Hose Faucet Timer, Model 24621. This device is designed to automate your watering schedule, ensuring efficient irrigation for your garden or lawn. Please read these instructions carefully before use to ensure proper function and longevity of the product.
2. Prodotto finitoview
The Orbit 2-Outlet Programmable Hose Faucet Timer features a large digital display and intuitive controls for easy programming. It allows for independent programming of two watering zones from a single faucet.

Immagine 2.1: Davanti view of the Orbit 2-Outlet Programmable Hose Faucet Timer, displaying the digital screen and control dial.
Caratteristiche principali:
- Doppie uscite: Controlla due zone di irrigazione separate in modo indipendente.
- Programmazione facile: Simple interface with a large, easy-to-read digital display.
- Orari flessibili: Program watering intervals from every hour up to every 7th day.
- Durata regolabile: Set watering times from 1 to 360 minutes.
- Ritardo pioggia: Pause your watering schedule for 1 to 7 days.
- Funzionamento manuale: Instant faucet use without interrupting programmed schedules.
- Alimentato a batteria: Operates on batteries for convenience.
3. Installazione
3.1. Installazione della batteria
- Individuare il vano batterie sul retro del timer.
- Rimuovere il coperchio della batteria.
- Insert two fresh AA alkaline batteries, ensuring correct polarity (+/-).
- Riposizionare saldamente il coperchio della batteria.
3.2. Fissaggio del timer al rubinetto
- Assicurarsi che il rubinetto sia chiuso.
- Thread the timer's inlet collar onto your outdoor hose faucet. Hand-tighten only; do not use tools.
- Connect your garden hoses to the two outlets at the bottom of the timer. Hand-tighten only.
- Slowly turn on the faucet completely.

Immagine 3.1: The timer connected to a water faucet with two hoses attached, ready for use in a garden setting.
4. Istruzioni di programmazione
The timer features a large dial and buttons for easy navigation through programming steps. Use the STAZIONE button to select which outlet (1 or 2) you are programming.
4.1. Imposta l'orologio
- Gira la manopola su IMPOSTA OROLOGIO.
- Utilizzare il < E > pulsanti per regolare l'ora corrente.
- Premere il tasto OK pulsante per confermare.
4.2. Imposta l'ora di inizio
- Gira la manopola su ORA DI INIZIO.
- Utilizzare il < E > pulsanti per impostare l'orario di inizio dell'irrigazione desiderato.
- Premere OK per confermare.
4.3. Set Watering Duration (How Long)
- Gira la manopola su PER QUANTO.
- Utilizzare il < E > buttons to set the watering duration (from 1 to 360 minutes).
- Premere OK per confermare.
4.4. Set Watering Frequency (How Often)
- Gira la manopola su QUANTE VOLTE.
- Utilizzare il < E > buttons to set the watering frequency (from every hour up to every 7th day).
- Premere OK per confermare.
4.5. Funzionamento manuale
Per irrigare manualmente senza modificare la programmazione:
- Gira la manopola su AUTO / MANUAL.
- Premere il tasto MANUALE pulsante.
- Utilizzare il < E > pulsanti per impostare la durata di irrigazione manuale desiderata.
- Premere OK per avviare l'irrigazione manuale.
- Per interrompere l'irrigazione manuale, premere il tasto MANUALE button again or turn the dial to SPENTO.
4.6. Funzione di ritardo pioggia
To temporarily pause your watering schedule due to rain or other reasons:
- Gira la manopola su AUTO / MANUAL.
- Premere e tenere premuto il tasto RITARDO PER PIOGGIA button (often integrated with AUTO/MANUAL or a dedicated button).
- Utilizzare il < E > pulsanti per selezionare la durata del ritardo (da 1 a 7 giorni).
- Premere OK to activate the rain delay. The timer will resume its programmed schedule after the delay period.
5. Manutenzione
5.1. Sostituzione della batteria
It is recommended to replace the batteries annually, or when the low battery indicator appears on the display, to ensure continuous operation. Refer to section 3.1 for battery installation steps.
5.2. Rimessaggio invernale
Before the first frost, remove the timer from the faucet. Drain any water from the timer and store it indoors in a dry, protected location. Freezing temperatures can damage the internal components of the timer.
6. Risoluzione Dei Problemi
| Problema | Possibile causa | Soluzione |
|---|---|---|
| Timer does not turn on or display is blank. | Batterie scariche o installate in modo errato. | Sostituire le batterie con batterie alcaline AA nuove, assicurandosi della corretta polarità. |
| L'acqua non scorre all'orario previsto. | Faucet is off; rain delay is active; incorrect programming; low water pressure. | Ensure faucet is fully open. Check if rain delay is active. Verify programming settings (start time, duration, frequency). Check water pressure. |
| Timer does not shut off. | Internal valve malfunction; low battery. | Replace batteries. If problem persists, the unit may require replacement. |
| Water leaks from faucet connection. | Collegamento allentato; rondella usurata. | Ensure connection is hand-tight. Check and replace the rubber washer inside the timer's inlet if it is worn or missing. |
| Timer resets or loses program. | Low batteries; power interruption. | Replace batteries. Reprogram the timer. |
7. Specifiche
- Modello: 24621
- Marca: Orbita
- Materiale: Plastica
- Colore: Grigio
- Dimensioni del prodotto: 3"P x 2"L x 4"A
- Peso dell'articolo: 1.2 libbre
- Fonte di energia: 2 batterie alcaline AA (non incluse)
- Numero di impostazioni: 3 (Start Time, How Long, How Often)
- Durata dell'irrigazione: Da 1 a 360 minuti
- Frequenza di irrigazione: Every hour up to every 7th day
- Opzioni di ritardo per pioggia: 1 a 7 giorni
- Codice UPC: 046878246218
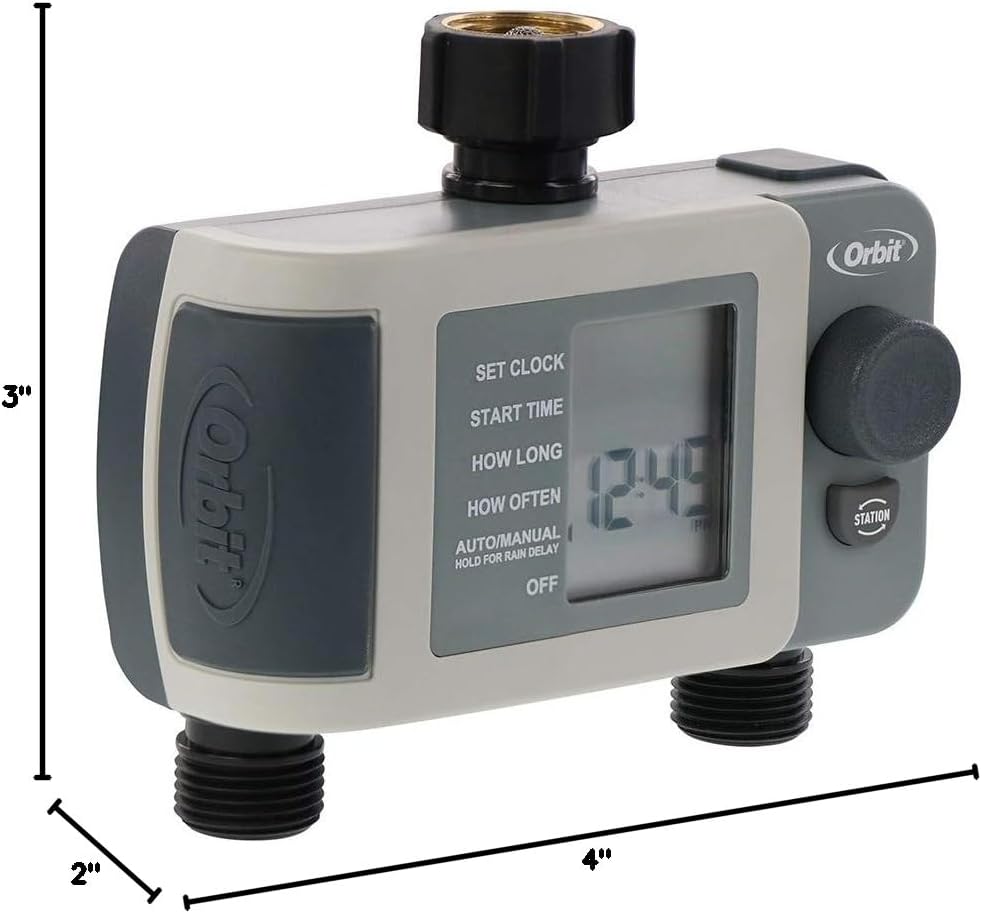
Immagine 7.1: Diagram showing the approximate dimensions of the timer: 3 inches deep, 2 inches wide, and 4 inches high.
8. Garanzia e supporto
Orbit products are designed for durability and performance. For specific warranty information or technical support, please refer to the official Orbit websito o contattare direttamente il servizio clienti. Conservare la ricevuta d'acquisto per eventuali reclami in garanzia.


