1. Introduzione
This manual provides comprehensive instructions for the operation and maintenance of your Fetcus Universal Remote Control, designed for various Hitachi Air Conditioner models. Please read this manual thoroughly before using the remote control to ensure proper function and longevity.
This remote control is a direct replacement or compatible alternative for original Hitachi air conditioner remote models including RAS-D10EX, RAR-5E1, RAS-10XH1, RAR-5E2, RAR-5E3, RAR-5E4, RAR-5E5, RAR-5E6, and RAS-D14EX2.
2. Caratteristiche del prodotto
- Compatibilità universale: Designed to work with a wide range of Hitachi air conditioner models.
- Connettività a infrarossi: Utilizes standard infrared signals for reliable communication with your AC unit.
- Dedicated AC Functions: Includes specific buttons for common air conditioner operations such as power, mode selection, temperature adjustment, fan speed, and more.
- Design compatto: Ergonomico e facile da maneggiare.
- Nessun supporto per l'app: Operates independently without the need for a smartphone application.
- Frequenza: Operates at 433 MHz for signal transmission.
3. Impostazione
3.1 Installazione della batteria
The remote control requires appropriate batteries for operation. Follow these steps to install or replace batteries:
- Individuare il vano batterie sul retro del telecomando.
- Far scorrere il coperchio del vano batteria verso il basso oppure premere il fermo per aprirlo.
- Insert new batteries, ensuring the positive (+) and negative (-) terminals align correctly with the markings inside the compartment. Typically, two AAA batteries are required, though specific battery type should be confirmed by checking the compartment markings.
- Chiudere saldamente il coperchio del vano batteria finché non scatta in posizione.

Figura 3.1: Posteriore view of the Fetcus remote control with the battery compartment open, revealing the two battery slots and a label with battery safety warnings. This image illustrates the correct orientation for battery insertion.
Importante: Rimuovere le batterie se il telecomando non viene utilizzato per un periodo prolungato, per evitare perdite e danni.
4. Istruzioni per l'uso
Familiarize yourself with the buttons on your remote control. The remote features a main display and various control buttons for your air conditioner.
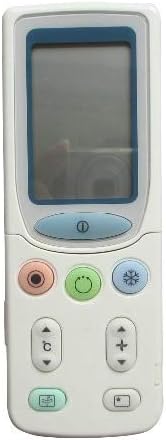
Figura 4.1: Davanti view of the Fetcus remote control, highlighting the LCD screen and the primary control buttons for power, mode, and temperature adjustment.
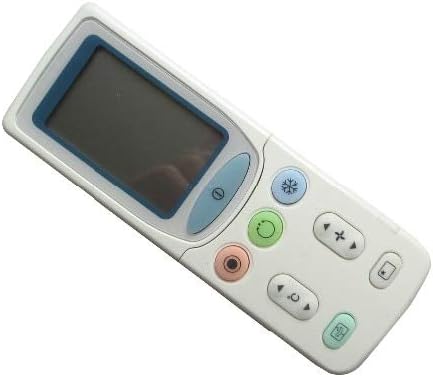
Figura 4.2: Angolato view of the Fetcus remote control, showing the main display and primary function buttons including power, mode, and fan speed controls.
4.1 Funzioni di base
- Pulsante di accensione (①): Premere per ACCENDERE o SPEGNERE il condizionatore.
- Pulsante Modalità (↻): Press repeatedly to cycle through operating modes: Auto, Cool, Dry, Fan, Heat (if applicable to your AC unit).
- Pulsanti di regolazione della temperatura (+ / -): Premere per aumentare o diminuire l'impostazione della temperatura desiderata.
- Pulsante velocità ventola (❄): Premere per regolare la velocità della ventola (ad esempio, Auto, Bassa, Media, Alta).
4.2 Funzioni avanzate (sotto la copertura scorrevole)
Some advanced functions are accessible by sliding down the cover on the remote control. This reveals additional buttons for more specific controls.

Figura 4.3: Angolato view of the Fetcus remote control with the sliding cover open, exposing additional advanced function buttons beneath the main display.
- Controllo oscillazione/persiane: Adjusts the direction of the airflow (vertical or horizontal swing).
- Timer/Sleep Mode: Sets a timer for the AC unit to turn on or off, or activates a sleep-friendly operating mode.
- C/F Switch (°C): Alterna la visualizzazione della temperatura tra Celsius e Fahrenheit.
- Pulsante di reset: Used to reset the remote control settings or clear certain functions. Consult your AC unit's manual for specific reset procedures if needed.
- Other Specific Buttons: Depending on your specific Hitachi AC model, other buttons may control functions like Quiet mode, Turbo mode, or Health functions. Refer to your AC unit's original manual for detailed explanations of these specific icons.
5. Manutenzione
- Pulizia: Pulisci il telecomando con un panno morbido e asciutto. Non utilizzare detergenti liquidi o materiali abrasivi, poiché potrebbero danneggiare la superficie o i componenti interni.
- Sostituzione della batteria: Replace batteries when the remote's range decreases or the display becomes dim. Always replace all batteries at the same time with new ones of the same type.
- Magazzinaggio: Conservare il telecomando in un luogo fresco e asciutto, lontano dalla luce solare diretta e da temperature estreme.
6. Risoluzione Dei Problemi
| Problema | Possibile causa | Soluzione |
|---|---|---|
| Il telecomando non risponde. | Batterie scariche o installate in modo errato. | Sostituire le batterie assicurandosi della corretta polarità (+/-). |
| La portata del telecomando è scarsa. | Batterie scariche; ostruzione tra il telecomando e l'unità CA. | Replace batteries. Ensure a clear line of sight to the AC unit's infrared receiver. |
| L'unità AC non risponde a funzioni specifiche. | Remote not fully compatible with all AC unit features; AC unit does not support the function. | Verify the function exists on your specific AC model. This remote is a universal replacement and may not support all obscure functions of every original remote. |
| Il display è scuro o vuoto. | Batteria scarica. | Sostituire le batterie. |
7. Specifiche
| Caratteristica | Dettaglio |
|---|---|
| Marca | punti calvi |
| Model Number (Internal) | CLS-D41D8CD98F00B204E9800998ECF8427E |
| Dispositivi compatibili | Air Conditioner (Hitachi RAS-D10EX, RAR-5E1, RAS-10XH1, RAR-5E2, RAR-5E3, RAR-5E4, RAR-5E5, RAR-5E6, RAS-D14EX2) |
| Tecnologia di connettività | Infrarossi |
| Frequenza | 433 MHz |
| Numero massimo di dispositivi supportati | 1 |
| Materiale | Other (Durable Plastic) |
| Descrizione della batteria | Lithium (Typically uses AAA batteries, please check compartment) |
| Caratteristiche speciali | Universal, Wireless |
| Quantità del pacchetto dell'articolo | 1 |
| Data prima disponibilità | 8 maggio 2019 |
8. Garanzia e supporto
This Fetcus Remote Control comes with a Garanzia di 90 giorni dalla data di acquisto. La presente garanzia copre i difetti di fabbricazione e assicura il corretto funzionamento del prodotto in condizioni di utilizzo normali.
For warranty claims or technical support, please contact your retailer or the manufacturer with your purchase details. Please retain your proof of purchase for warranty validation.


