1. Introduzione
This manual provides comprehensive instructions for the setup, operation, and maintenance of your Drawmer CMC2 Compact Monitor Controller. Please read this manual thoroughly before using the device to ensure proper functionality and to maximize its performance.
2. Informazioni sulla sicurezza
- Alimentazione elettrica: Use only the factory-supplied 15V DC power supply. Using an incorrect power supply may damage the unit and void the warranty.
- Ventilazione: Assicurare un'adeguata ventilazione attorno all'unità. Non ostruire le aperture di ventilazione.
- Umidità: Non esporre l'unità a pioggia, umidità o umidità eccessiva.
- Pulizia: Scollegare l'alimentazione prima della pulizia. Utilizzare un panno asciutto e morbido. Non utilizzare detergenti liquidi o spray.
- Manutenzione: Per qualsiasi intervento di assistenza, rivolgersi a personale qualificato. Non tentare di aprire o riparare l'unità da soli.
3. Contenuto della confezione
Verifica che il pacco contenga i seguenti articoli:
- Drawmer CMC2 Compact Monitor Controller
- Unità di alimentazione 15V CC
- Manuale dell'utente (questo documento)
4. Prodotto finitoview
4.1 Controlli del pannello frontale
The front panel provides all primary controls for audio monitoring and source selection.

Figura 4.1: Fronte view of the Drawmer CMC2 Compact Monitor Controller, showing all knobs and buttons for input selection, speaker selection, master volume, headphone control, and mix check functions.
- AUX INPUT Knob: Adjusts the level of the auxiliary input.
- SOURCE SELECT Buttons (I/P1, I/P2, AUX): Selects the active audio input source.
- SPEAKER SELECT Buttons (A, B, SUB): Activates the selected speaker outputs.
- MASTER VOLUME Knob: Controls the overall output level to the selected speakers.
- Tasto muto: Mutes all speaker outputs.
- Manopola CUFFIE: Regola il volume dell'uscita cuffie.
- MIX CHECK Buttons (ØREV, MONO, DIM): Provides phase reverse, mono sum, and dim functions for mix analysis.
- AUX INPUT (3.5mm Jack): Front panel auxiliary input for portable devices.
- HEADPHONE Output (6.35mm Jack): Front panel headphone output.
4.2 Collegamenti del pannello posteriore
The rear panel houses all audio input and output connectors, along with the power input.

Figura 4.2: Posteriore view of the Drawmer CMC2 Compact Monitor Controller, displaying the DC power input, speaker outputs (Mono/Sub, R-B-L, R-A-L), and inputs (R-2-L, R-1-L).
- DC=15V Input: Collegare qui l'adattatore di alimentazione da 15 V CC in dotazione.
- Interruttore di alimentazione: Toggles the unit's power on/off.
- SPEAKER OUTPUTS (MONO/SUB, R-B-L, R-A-L): Balanced XLR outputs for connecting up to two pairs of stereo monitors (A and B) and a mono subwoofer.
- INPUTS (R-2-L, R-1-L): Balanced XLR inputs for two stereo audio sources.
5. Impostazione
Follow these steps to set up your CMC2 controller:
- Collegamento elettrico: Connect the supplied 15V DC power adapter to the 'DC=15V' input on the rear panel. Plug the adapter into a suitable power outlet. Do not power on the unit yet.
- Connessioni di ingresso:
- Connect your primary audio source (e.g., audio interface, mixer) to the 'INPUTS R-1-L' using balanced XLR cables.
- Connect a secondary audio source to the 'INPUTS R-2-L' using balanced XLR cables.
- For portable devices, connect to the front panel 'AUX INPUT' (3.5mm jack) or the rear panel RCA auxiliary inputs (if available on your model, refer to specific product documentation).
- Collegamenti degli altoparlanti:
- Connect your main studio monitors to the 'SPEAKER OUTPUTS R-A-L' using balanced XLR cables.
- If using a second pair of monitors, connect them to 'SPEAKER OUTPUTS R-B-L'.
- If using a subwoofer, connect it to the 'SPEAKER OUTPUTS MONO/SUB'.
- Collegamento cuffie: If desired, connect your headphones to the front panel 'HEADPHONE' 6.35mm jack.
- Accensione: Once all connections are secure, press the power switch on the rear panel to turn on the CMC2.
6. Istruzioni per l'uso
This section details the functions of the CMC2's controls.
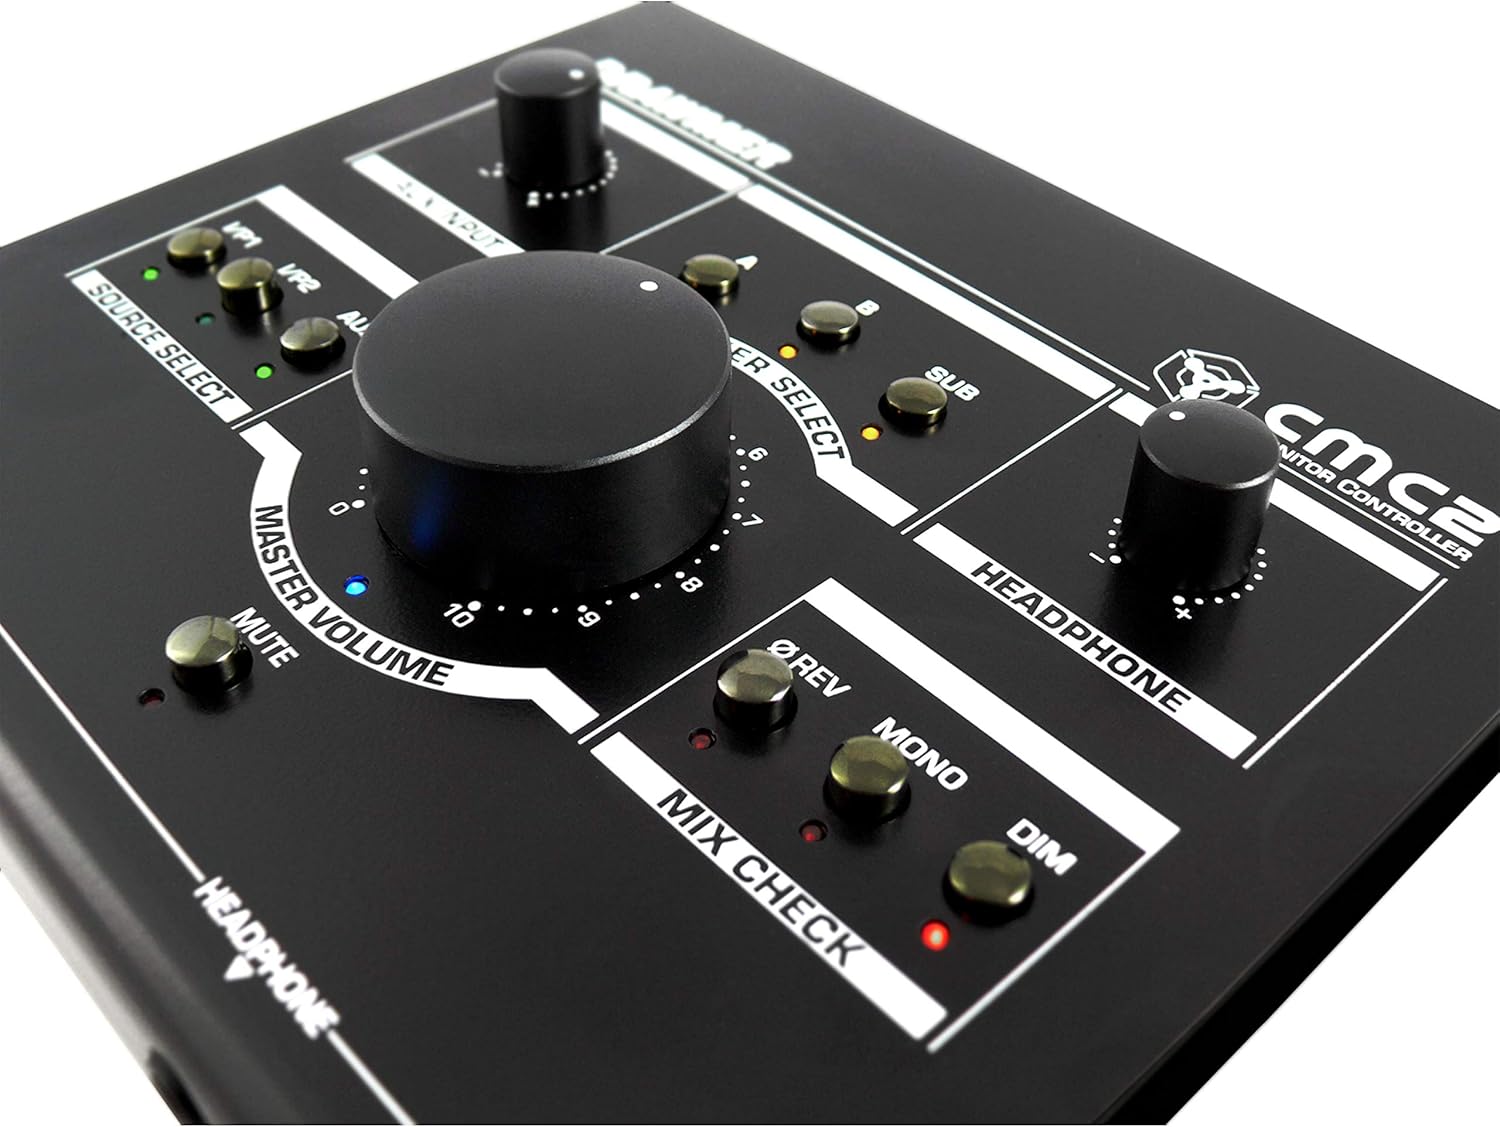
Figura 6.1: primo piano view of the Drawmer CMC2 front panel, highlighting the master volume, source select, speaker select, headphone, and mix check controls.
6.1 Selezione della sorgente
- Premere il tasto Io/P1 button to select the audio source connected to Input 1.
- Premere il tasto Io/P2 button to select the audio source connected to Input 2.
- Premere il tasto AUSILIARIO button to select the auxiliary input (front panel 3.5mm jack).
- Only one source can be active at a time. The LED next to the selected button will illuminate.
6.2 Selezione degli altoparlanti
- Premere il tasto A button to route the selected source to Speaker Output A.
- Premere il tasto B button to route the selected source to Speaker Output B.
- Premere il tasto SUB button to route the selected source to the Subwoofer Output.
- Multiple speaker outputs can be active simultaneously (e.g., A and SUB). The LEDs indicate active outputs.
6.3 Controllo del volume
- Ruota il grande VOLUME PRINCIPALE knob clockwise to increase the output level to the selected speakers, and counter-clockwise to decrease it.
- Ruotare il CUFFIA knob to adjust the listening level for connected headphones.
- Ruotare il INGRESSO AUX knob to adjust the input level of the auxiliary source.
6.4 Mix Check Functions
- Premere il tasto ØREV button to reverse the phase of the right channel, useful for checking phase compatibility.
- Premere il tasto MONO button to sum the stereo signal to mono, allowing you to check for mono compatibility issues in your mix.
- Premere il tasto DIM button to temporarily reduce the output volume by a fixed amount, useful for quick listening level changes without losing your main volume setting.
6.5 Funzione Mute
- Premere il tasto MUTE button to instantly silence all active speaker outputs. The LED will illuminate when mute is active. Press again to unmute.
7. Manutenzione
The Drawmer CMC2 is designed for reliable operation with minimal maintenance.
- Pulizia: Keep the unit clean by wiping it with a dry, soft, lint-free cloth. Avoid abrasive cleaners or solvents.
- Ambiente: Operate the unit in a clean, dry environment, away from direct sunlight, heat sources, and excessive dust.
- Ventilazione: Assicurarsi che le fessure di ventilazione non siano ostruite per evitare il surriscaldamento.
8. Risoluzione Dei Problemi
If you encounter issues with your CMC2, refer to the following common problems and solutions:
- Nessun potere:
- Ensure the 15V DC power adapter is securely connected to the unit and a working power outlet.
- Check that the rear panel power switch is in the 'ON' position.
- Nessuna uscita audio:
- Verify that the correct input source (I/P1, I/P2, or AUX) is selected and its LED is illuminated.
- Ensure that at least one speaker output (A, B, or SUB) is selected and its LED is illuminated.
- Check that the MASTER VOLUME knob is turned up and the MUTE button is not active (LED off).
- Confirm all audio cables are securely connected to both the CMC2 and your speakers/audio sources.
- Test with different cables or audio sources to isolate the problem.
- Audio distorto:
- Ridurre il livello di ingresso della sorgente audio.
- Lower the MASTER VOLUME on the CMC2.
- Controllare che i cavi audio non siano danneggiati.
- Headphone Output Not Working:
- Ensure headphones are fully plugged into the front panel jack.
- Adjust the HEADPHONE volume knob.
- Test with a different pair of headphones.
If the problem persists, contact Drawmer customer support or your authorized dealer for assistance.
9. Specifiche
| Nome del modello | CMC2 |
| Marca | Disegnatore |
| Usi consigliati | Monitoraggio audio |
| Tecnologia di connettività | XLR, RCA (Auxiliary) |
| Modalità di uscita audio | Stereo |
| Tipo di altoparlante | Monitor |
| Dimensioni del prodotto | 13 x 9 x 3 pollici (33 x 22.86 x 7.62 cm) |
| Peso dell'articolo | 3 libbre (1.36 kg) |
| Produttore | Disegnatore |
10. Garanzia e supporto
The Drawmer CMC2 Compact Monitor Controller is covered by a manufacturer's warranty. Please refer to the warranty card included with your product or visit the official Drawmer websito per termini e condizioni di garanzia dettagliati.
For technical support, service, or further inquiries, please contact your authorized Drawmer dealer or the Drawmer customer support team through their official channels.


