1. Introduzione
Welcome to your new Electrolux EES47320L fully integrated dishwasher. This manual provides essential information for the safe and efficient use of your appliance. Please read it thoroughly before installation and operation to ensure optimal performance and longevity of your dishwasher.
2. Informazioni sulla sicurezza
La tua sicurezza e quella degli altri sono fondamentali. Ti preghiamo di osservare tutte le avvertenze e le istruzioni di sicurezza fornite nel presente manuale.
2.1 Sicurezza generale
- Questo apparecchio è destinato esclusivamente all'uso domestico.
- Do not allow children to play with the appliance. Supervise children to ensure they do not tamper with the dishwasher.
- Ensure the appliance is properly earthed before use to prevent electrical shock.
- Do not open the dishwasher door during operation, especially during hot wash cycles, as hot water or steam may escape and cause burns.
- Use only detergents and rinse aids specifically designed for automatic dishwashers. Other products may damage the appliance or cause unsafe conditions.
- Gli oggetti affilati, come i coltelli, devono essere caricati con la punta rivolta verso il basso per evitare lesioni.
2.2 Sicurezza dell'installazione
- Installation and connection of the appliance must be performed by a qualified professional in accordance with local regulations and safety standards.
- Ensure all electrical and water connections are correctly made and comply with local codes.
- Do not install the appliance in areas where the temperature may fall below 0°C (32°F), as freezing water can damage internal components.
- After installation, ensure the appliance is stable and level to prevent vibrations and ensure proper operation.
3. Configurazione e installazione
3.1 Disimballaggio
Carefully remove all packaging materials from the dishwasher. Inspect the appliance for any signs of damage that may have occurred during transit. If damage is found, do not install or operate the appliance and contact your retailer.
3.2 Posizionamento e livellamento
Position the dishwasher in its designated cabinet opening. Adjust the adjustable feet at the bottom of the appliance to ensure it is perfectly level. Proper leveling is crucial for door alignment and efficient operation.

Image: The dishwasher is shown being carefully slid into its designated cabinet space, illustrating the installation process for a fully integrated model.
3.3 Collegamenti idrici ed elettrici
Connect the water inlet hose to a cold water supply tap and the drain hose to a suitable drain connection. Ensure all connections are tight to prevent leaks. The power cable should be connected to a grounded electrical outlet. These connections should be performed by a qualified technician to ensure safety and compliance.
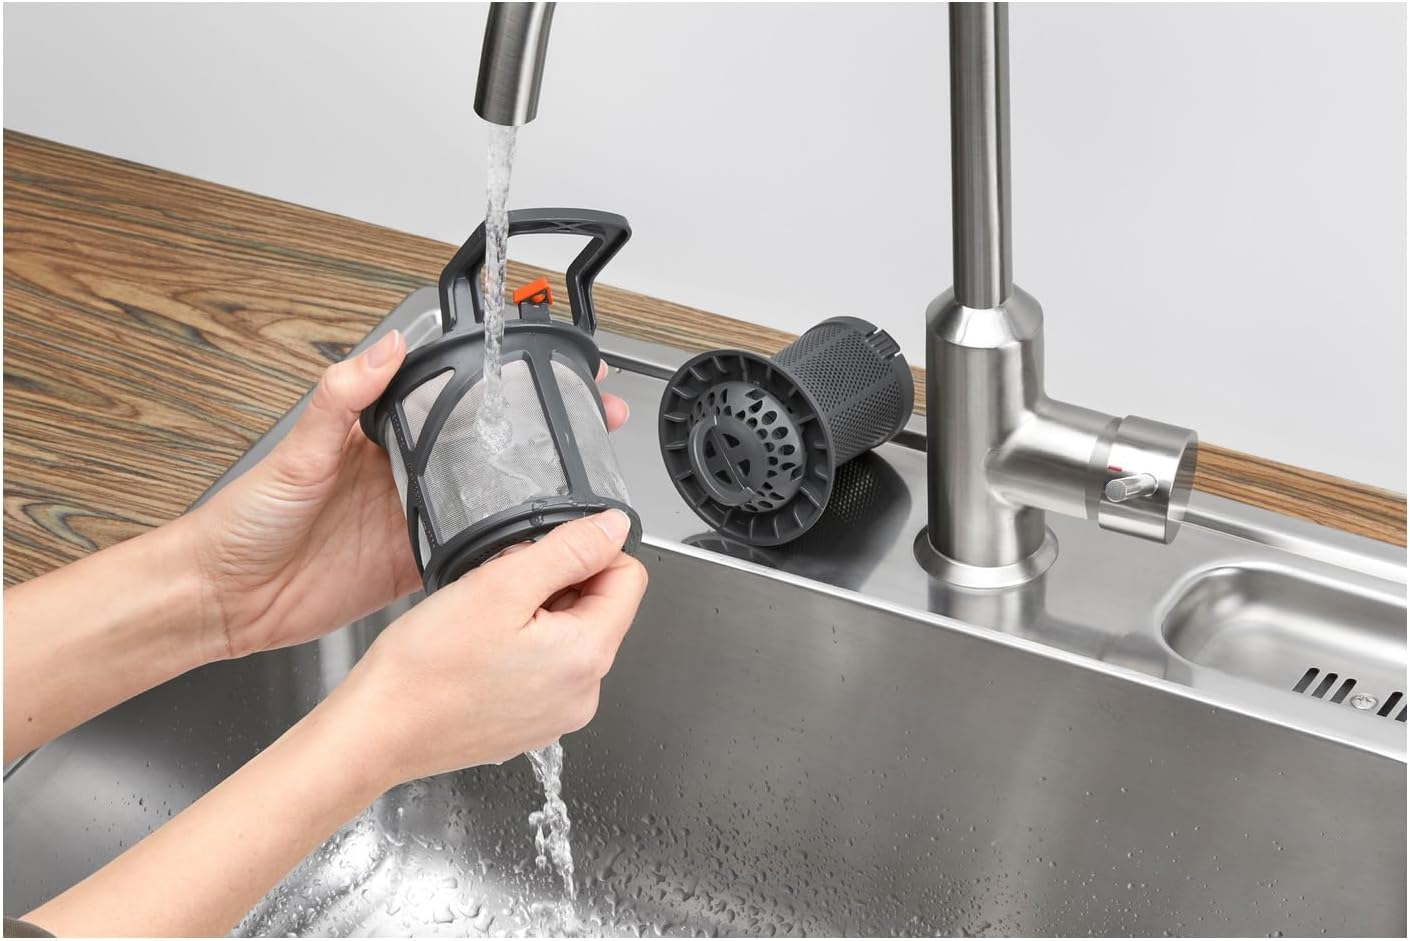
Image: A technical diagram displays the precise dimensions and required clearances for installing the Electrolux EES47320L dishwasher within a kitchen cabinet.
3.4 Preparazione al primo utilizzo
Before running the first wash cycle, it is essential to prepare the dishwasher:
- Fill the Salt Dispenser: Depending on your water hardness, fill the salt dispenser with dishwasher salt. This helps prevent limescale buildup. Refer to the full user manual for water hardness settings.
- Riempire il distributore del brillantante: Pour rinse aid into its designated dispenser. Rinse aid improves drying performance and prevents water spots.
4. Istruzioni per l'uso
4.1 Pannello di controllo Sopraview
The control panel, located on the top edge of the dishwasher door, features various buttons and indicators for program selection, delay start, and other functions. Familiarize yourself with its layout before operation.
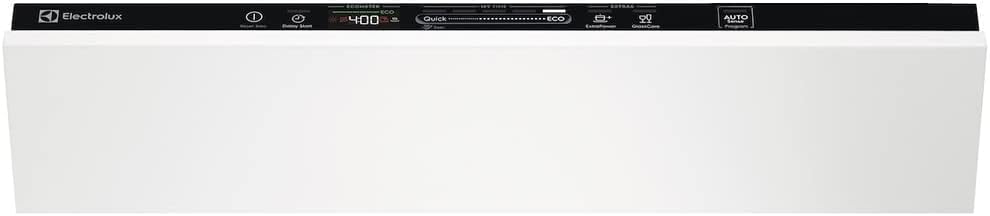
Immagine: un primo piano view of the Electrolux EES47320L dishwasher's top-mounted control panel, showing the LED display, program selection buttons, and indicators for various functions like delay start and eco mode.
4.2 Caricamento della lavastoviglie
Load dishes according to the rack design to ensure optimal cleaning and drying results. Place larger and heavily soiled items in the lower basket. Delicate items, glasses, and smaller plates should be placed in the upper basket. Ensure that spray arms can rotate freely and are not obstructed by dishes.

Image: The interior of the dishwasher is shown with both upper and lower racks filled with various dishes, demonstrating proper loading for efficient washing.
4.3 Aggiunta di detersivo e brillantante
Add the appropriate amount of dishwasher detergent to the dispenser located inside the door. The amount needed depends on the program selected and the soil level of your dishes. Ensure the rinse aid dispenser is filled to the indicated level for best drying results.
4.4 Selezione del programma
Select a wash program suitable for your dishes and soil level using the control panel. Available programs typically include:
- Normale: Per i piatti sporchi di tutti i giorni.
- Intensivo: Per pentole, padelle e piatti molto sporchi.
- Risciacquo: A short rinse cycle for pre-cleaning or holding dishes.
- Sensor Wash: Automatically adjusts program settings based on soil level.
4.5 Avvio di un ciclo
After loading dishes and adding detergent/rinse aid, close the dishwasher door firmly. Select your desired program and press the Start button to begin the cycle.
4.6 Fine del ciclo
At the end of the cycle, the dishwasher will signal completion. For improved drying and energy efficiency, the AirDry feature automatically opens the door slightly. Allow dishes to cool before unloading to prevent breakage and ensure better drying.

Image: A split image showing two yellow bowls and clear glasses. The left side depicts items with water spots, while the right side shows them clean and dry, illustrating the dishwasher's effective cleaning performance.
5. Cura e manutenzione
Regular care and maintenance will help keep your dishwasher performing optimally and extend its lifespan.
5.1 Pulizia dei filtri
The filter system should be cleaned regularly to prevent food particles from recirculating and affecting wash performance. To clean:
- Twist and remove the coarse filter.
- Separate the fine filter and microfilter.
- Rinse all filter components thoroughly under running water to remove any debris.
- Rimontare i filtri e rimetterli nella lavastoviglie, assicurandosi che siano ben bloccati in posizione.

Image: A person's hands are shown cleaning the dishwasher's filter assembly under a running faucet, demonstrating the proper method for maintenance.
5.2 Pulizia dei bracci irroratori
Periodically check the spray arm nozzles for blockages caused by food particles or mineral deposits. If necessary, remove the spray arms and clean the holes with a thin object like a toothpick. Ensure they are reattached securely and can rotate freely.
5.3 Pulizia esterna
Pulire le superfici esterne della lavastoviglie con un panno morbido eamp cloth. Do not use abrasive cleaners, scouring pads, or solvents, as these can damage the finish.
5.4 Decalcificazione
If you live in an area with hard water, mineral deposits can build up inside the dishwasher. Periodic descaling using a dishwasher descaling product is recommended. Follow the product manufacturer's instructions carefully.
6. Risoluzione Dei Problemi
This section addresses common issues you might encounter with your dishwasher. Before contacting customer service, please review queste soluzioni.
6.1 Piatti non puliti
- Improper Loading: Ensure dishes are loaded correctly, allowing water and detergent to reach all surfaces. Avoid overcrowding.
- Blocked Spray Arms: Check if the spray arms are blocked by dishes or debris and can rotate freely.
- Detergent Issues: Verify the detergent dispenser is not blocked and that sufficient, appropriate detergent was used. Check if detergent is old or clumpy.
- Filtri intasati: Clean the filter system as described in the Maintenance section.
- Insufficient Rinse Aid: Ensure the rinse aid dispenser is filled.
6.2 L'acqua non scarica
- Kinked or Blocked Drain Hose: Check the drain hose for any kinks or obstructions.
- Filtri intasati: Clean the filter system thoroughly.
- Blocked Sink Drain: Ensure your sink drain (if connected) is not blocked.
6.3 Appliance Not Starting
- Door Not Closed: Ensure the dishwasher door is fully closed and latched.
- Alimentazione elettrica: Check if the power cord is securely plugged into a working electrical outlet. Verify the circuit breaker has not tripped.
- Delay Start Active: Check if a delay start function has been activated.
6.4 Codici di errore
If an error code appears on the display, consult the full user manual (available online) for specific meanings and solutions. If the issue persists, contact customer support.
7. Specifiche tecniche
| Parametro | Valore |
|---|---|
| Nome del modello | EES47320L |
| Tipo | Lavastoviglie completamente integrata |
| Impostazioni luogo | 13 |
| Dimensioni (A x L x P) | Dimensioni: 81.8 x 59.6 x 55 cm |
| Livello di rumore | 44 dB |
| Classe di efficienza energetica | D |
| Consumo di acqua (programma ecologico) | 9.9 litri/ciclo |
| Consumo energetico (programma ecologico) | 0.835 kWh/ciclo |
| Program Duration (Eco Program) | 4:00 ore |
| Frequenza | Frequenza 50 Hz |
| Caratteristica speciale | Motore inverter |
7.1 Etichetta energetica e scheda informativa del prodotto
For detailed energy consumption and performance data, refer to the official EU Energy Label and Product Information Sheet for this model.
View EU Energy Label and Product Information Sheet: https://eprel.ec.europa.eu/qr/294356
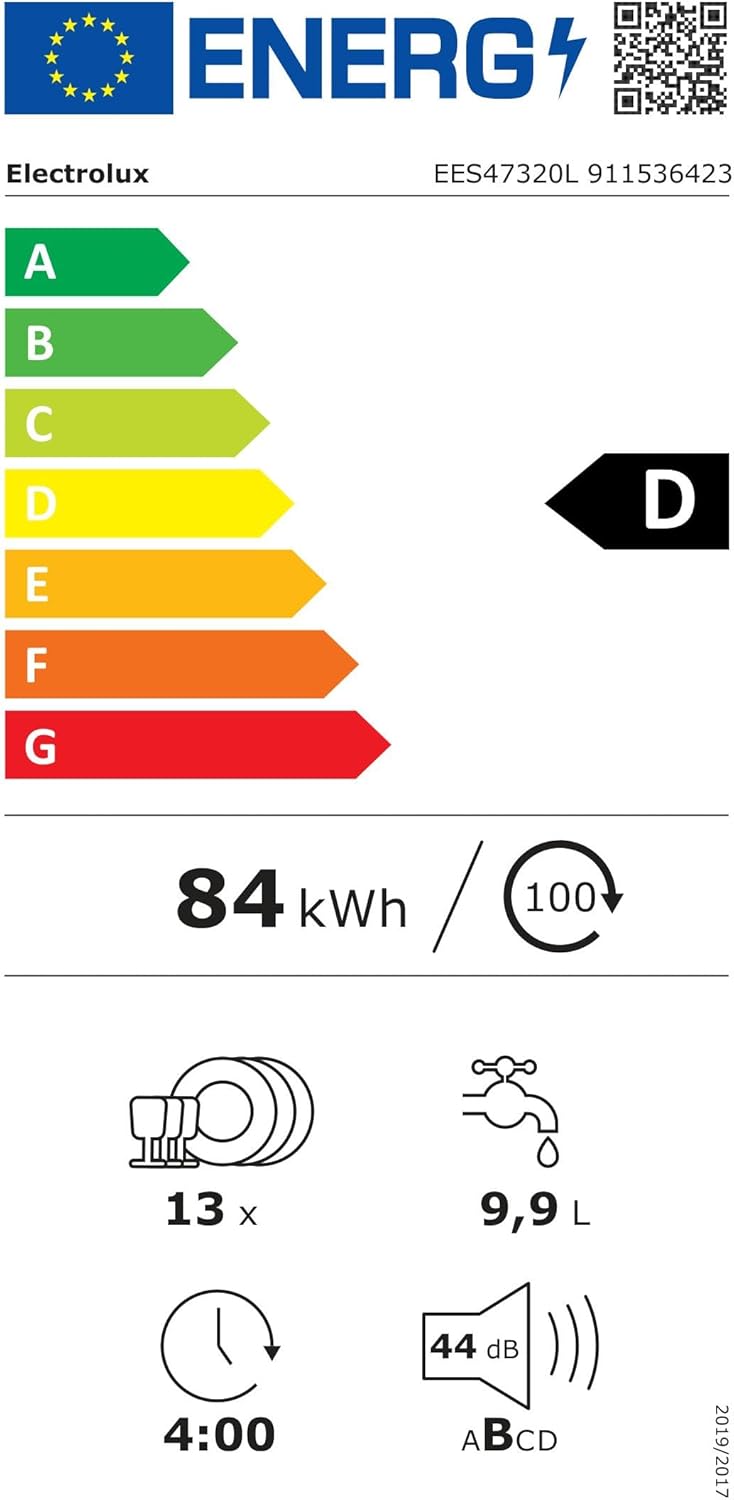
Image: The official EU Energy Label for the Electrolux EES47320L dishwasher, indicating its energy efficiency class D, water and energy consumption, and noise level.
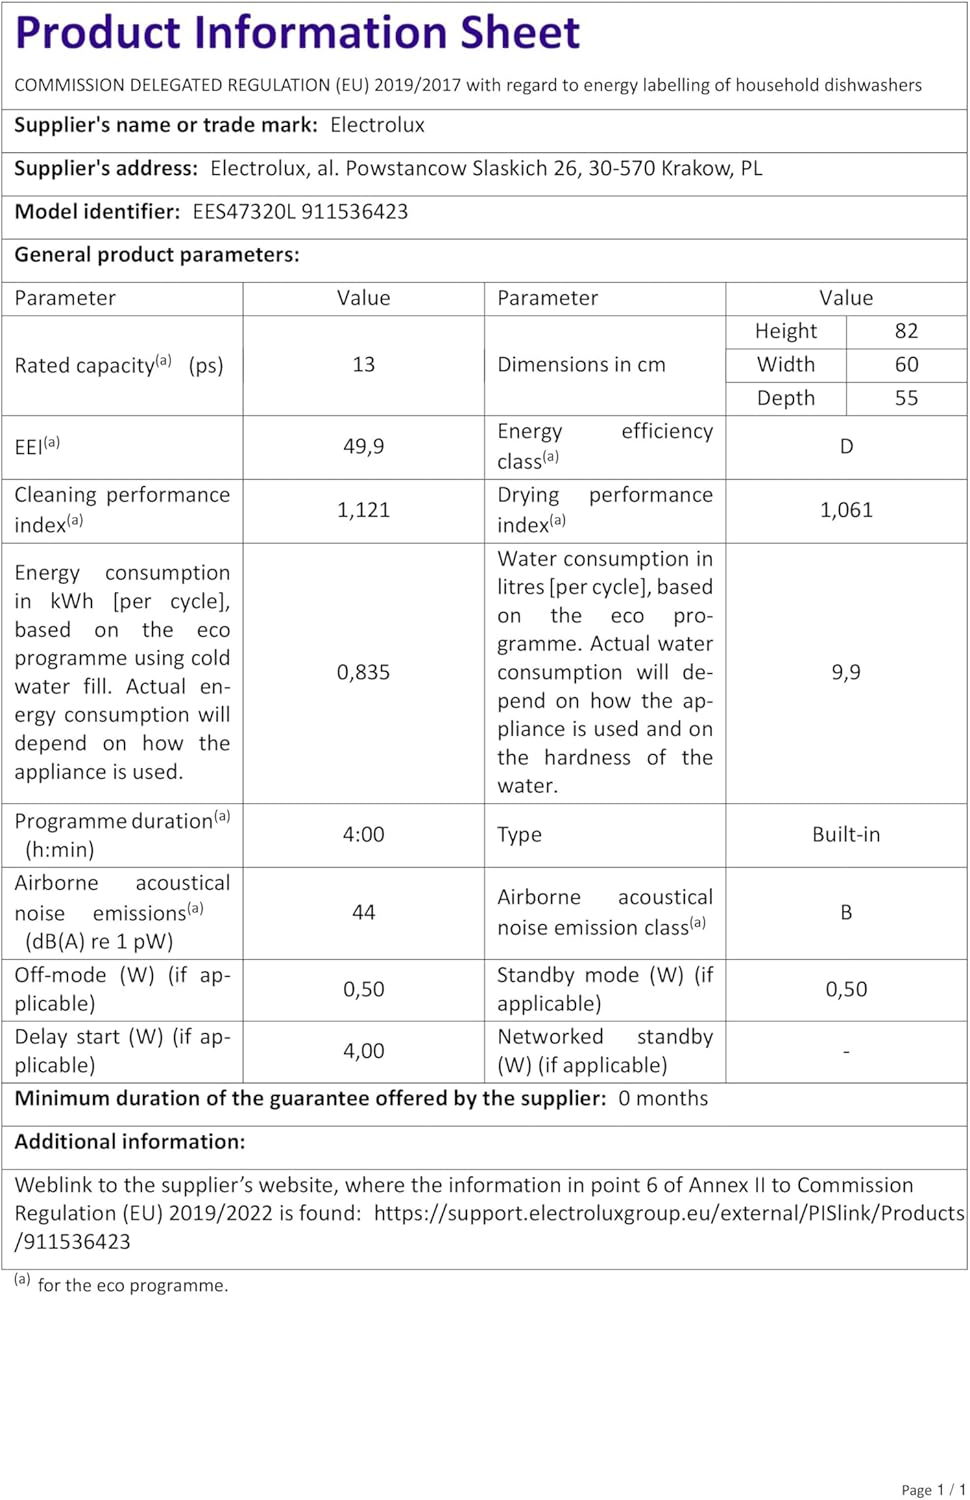
Image: A detailed product information sheet providing comprehensive technical data and performance metrics for the Electrolux EES47320L dishwasher.
8. Garanzia e supporto
8.1 Informazioni sulla garanzia
The minimum duration of the guarantee offered by the supplier for parts availability is indicated as 0 months in some documentation. However, for specific consumer warranty terms and conditions, please refer to your purchase documentation, the warranty card included with your appliance, or contact your retailer directly. Warranty periods can vary by region and retailer.
8.2 Assistenza clienti
For further assistance, technical support, or to order spare parts, please visit the official Electrolux support website or contact their customer service department. Ensure you have your model number (EES47320L) and serial number ready when contacting support.
Additional product information and support resources can be found on the supplier's websito: Supporto Electrolux