1. Introduzione
This manual provides detailed instructions for the installation, operation, and maintenance of your FERMAX Monitor Wifi Veo-Xs 4.3" Duox Plus. Please read this manual thoroughly before using the device to ensure proper functionality and safety. The FERMAX Veo-Xs monitor is a key component of your Duox Plus video intercom system, offering advanced communication and control features for your home or office.
2. Prodotto finitoview
The FERMAX Monitor Wifi Veo-Xs 4.3" Duox Plus is a state-of-the-art video intercom monitor designed for modern living. It features a 4.3-inch display, intuitive controls, and Wi-Fi connectivity for integration with smart home systems and mobile applications.
Caratteristiche principali:
- High-resolution display for clear video quality.
- User-friendly interface with clear audio transmission.
- Wi-Fi connectivity for remote access and smart integration.
- Integration capabilities with existing video systems.
- Customizable solutions to meet personal preferences and needs.
Componenti:
The FERMAX Monitor Wifi Veo-Xs 4.3" Duox Plus includes the monitor unit and necessary mounting hardware. Familiarize yourself with the various parts of the monitor:
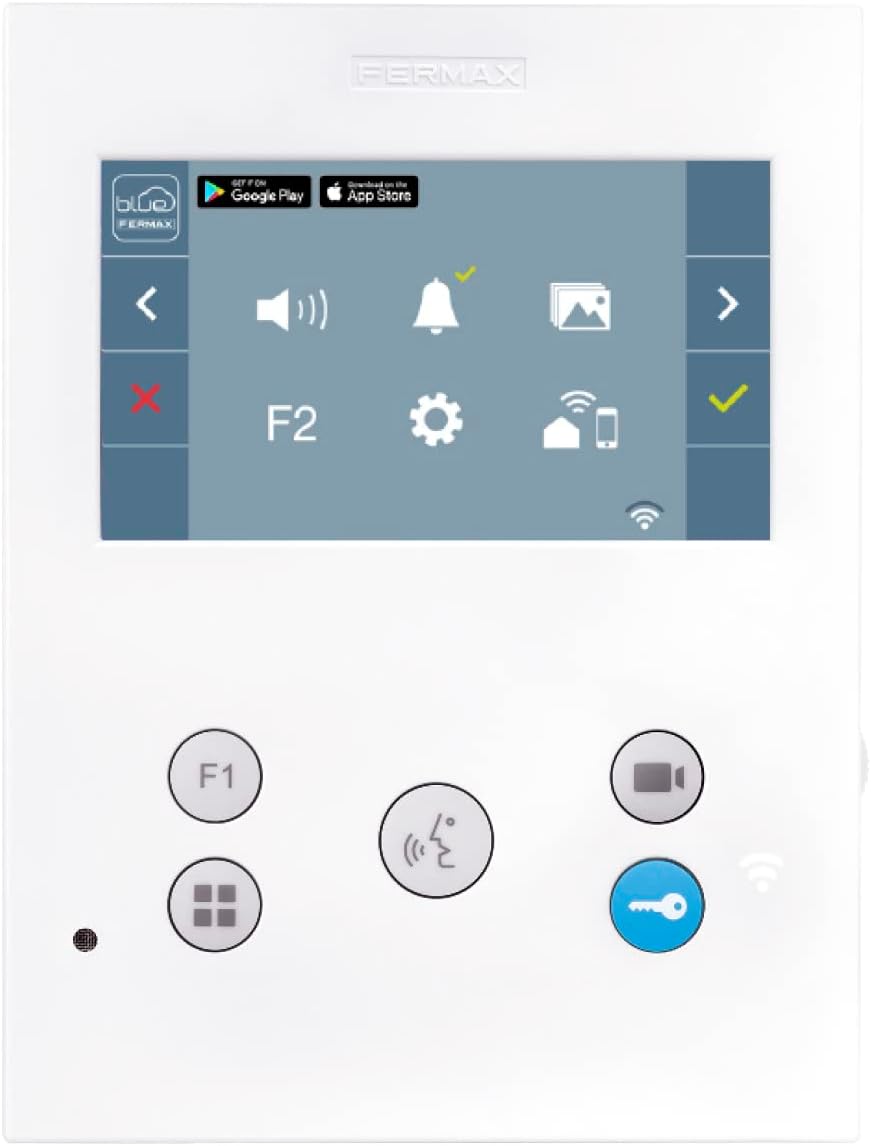
Figura 2.1: Fronte View del Monitor. This image displays the monitor's front panel, including the 4.3-inch screen, touch-sensitive controls for navigation, volume, settings, and call management, along with the FERMAX branding at the top.

Figura 2.2: Indietro View del Monitor. This image shows the rear of the monitor, highlighting the wiring terminals (A+, B-, Bout, Bin) for system connection, the product label with model number (REF 9448), voltage requirements (18-24 Vdc), and manufacturing details.

Figura 2.3: lato View del Monitor. This image illustrates the slim profile of the FERMAX Veo-Xs monitor from the side.
3. Configurazione e installazione
Proper installation is crucial for the optimal performance of your FERMAX Monitor. It is recommended that installation be performed by a qualified technician.
3.1 Montaggio del monitor
- Scegliere una posizione adatta su una parete interna, lontano dalla luce solare diretta o da fonti di calore.
- Secure the mounting bracket (not shown, typically included) to the wall using appropriate screws and anchors.
- Ensure the bracket is level before proceeding.
3.2 Collegamenti di cablaggio
Refer to Figure 2.2 for the location of the wiring terminals on the back of the monitor. The FERMAX Veo-Xs uses the Duox Plus system, which simplifies wiring.
- A+ / B- Terminals: Connect these to the main Duox Plus bus line from your building's intercom system. Ensure correct polarity.
- Bout / Bin Terminals: These are typically used for daisy-chaining multiple monitors in a single apartment or for specific accessory connections. Consult your system's overall wiring diagram for details.
- Alimentazione elettrica: The monitor operates on 18-24 Vdc. Ensure your system provides the correct voltage.
Attenzione: Incorrect wiring can damage the device and the intercom system. Always disconnect power before making any connections.
3.3 Initial Configuration and Wi-Fi Setup
- Once wired and mounted, restore power to the system. The monitor will power on.
- Seguire le istruzioni visualizzate sullo schermo per la selezione iniziale della lingua e le impostazioni di base.
- To enable Wi-Fi features and app connectivity, navigate to the "Settings" menu on the monitor (represented by a gear icon).
- Select "Wi-Fi" and connect to your home's wireless network. You will need your network name (SSID) and password.
- Download the official FERMAX app (available on Google Play and App Store, as indicated on the monitor's UI in Figure 2.1) to your smartphone or tablet.
- Follow the app's instructions to pair your mobile device with the monitor for remote access and control.
4. Istruzioni per l'uso
The FERMAX Veo-Xs monitor provides intuitive controls for daily use. The main screen displays various icons for quick access to functions.

Figure 4.1: Monitor Displaying Live Video. This image shows the monitor's screen actively displaying a video feed, likely from the outdoor panel, indicating an incoming call or monitoring function.
4.1 Ricezione di una chiamata
When someone calls from the outdoor panel, the monitor will ring, and the screen will automatically display the video feed from the outdoor camera (as seen in Figure 4.1).
- To answer the call: Press the Pulsante Chiama/Rispondi (typically a phone icon or a green checkmark on the screen).
- To end the call: Press the Pulsante Termina chiamata (typically a red 'X' on the screen).
- To open the door: During a call, press the Door Unlock button (key icon).
4.2 Monitoraggio dell'ingresso
È possibile attivare manualmente la telecamera esterna per view the entrance at any time.
- Premere il tasto Pulsante della fotocamera (video camera icon) on the monitor's control panel. The screen will display the live video feed.
- Press the button again to turn off monitoring.
4.3 Regolazione delle impostazioni
Access the settings menu to customize your monitor's behavior.
- Premere il tasto Pulsante Impostazioni (gear icon) on the screen.
- Use the navigation arrows (left/right chevrons) to browse through options such as:
- Volume: Adjust ringtone and conversation volume.
- Luminosità/Contrasto: Modify display settings.
- Wifi: Gestire le connessioni di rete.
- Data/Ora: Imposta l'ora di sistema.
- Impostazioni avanzate: For system-specific configurations (consult a technician if unsure).
- Premere il tasto Checkmark button to confirm changes or the Red X button annullare.
4.4 Using the F1/F2 Buttons
The F1 and F2 buttons are programmable function buttons. Their specific actions depend on your system's configuration. They can be used to activate secondary doors, turn on lights, or other auxiliary functions.
- Premere F1 or F2 to activate their assigned function.
5. Manutenzione
To ensure the longevity and optimal performance of your FERMAX Monitor, follow these simple maintenance guidelines:
- Pulizia: Utilizzare un panno morbido, asciutto e privo di lanugine per pulire lo schermo e l'esterno. Per macchie ostinate, leggermente dampen the cloth with water. Avoid abrasive cleaners, solvents, or aerosol sprays, as these can damage the finish and screen.
- Ambiente: Keep the monitor in a dry environment, away from excessive dust, humidity, and extreme temperatures.
- Energia: If the monitor will be unused for an extended period, it is advisable to disconnect it from the power supply.
6. Risoluzione Dei Problemi
If you encounter issues with your FERMAX Monitor, refer to the following common problems and solutions:
| Problema | Possibile causa | Soluzione |
|---|---|---|
| Il monitor non riceve alimentazione. | Power supply disconnected or faulty wiring. | Check power connections and ensure the system's power supply is active. Verify wiring to A+/B- terminals. |
| Nessun video o audio durante una chiamata. | Wiring issue, outdoor panel malfunction, or monitor settings. | Check A+/B- wiring. Ensure the outdoor panel is functioning. Check monitor volume and brightness settings. |
| Impossibile connettersi al Wi-Fi. | Password errata, segnale debole o problema di rete. | Verify Wi-Fi password. Ensure the monitor is within range of your router. Restart your router and the monitor. |
| La funzione di sblocco della porta non funziona. | Wiring issue to the door release, or system configuration. | Check wiring to the door release mechanism. Consult your system installer for configuration verification. |
| Problemi di connettività dell'app. | Monitor not connected to Wi-Fi, app not paired, or network firewall. | Ensure monitor has active Wi-Fi. Re-pair the app if necessary. Check router settings for any firewalls blocking communication. |
If the problem persists after attempting these solutions, please contact FERMAX technical support or a qualified technician.
7. Specifiche
Technical specifications for the FERMAX Monitor Wifi Veo-Xs 4.3" Duox Plus:
- Numero modello: 8424299094496
- Produttore: Fermax
- Dimensioni dello schermo: 4.3 pollici
- Tipo di sistema: Duox Plus
- Alimentazione elettrica: 18-24 Vdc
- Consumo energetico massimo: 6.5 L
- Materiale: Metallo, Plastica, Policarbonato
- Colore: Multicolore (Multicolor)
- Peso dell'articolo: 40 grammi
- Dimensioni: One Size (Specific dimensions not provided in detail, but implied by "Taglia unica")
- Connettività: Wifi
- Prima data disponibile: 5 agosto 2019
8. Garanzia e supporto
For warranty information, please refer to the documentation provided with your purchase or visit the official FERMAX website. FERMAX products typically come with a manufacturer's warranty covering defects in materials and workmanship.
For technical assistance, troubleshooting beyond this manual, or to inquire about repairs, please contact FERMAX customer support:
- Websito: www.fermax.com (Check for local support contacts)
- Informazioni sui contatti: Refer to the FERMAX websito per numeri di contatto regionali e indirizzi e-mail.
Quando contatti l'assistenza, tieni a portata di mano il numero di modello del tuo prodotto (8424299094496) e la data di acquisto.


