1. Introduzione
The AOPUTTRIVER AP-570C is a 4000-count auto-ranging digital clamp meter designed for precise electrical measurements. It offers a wide range of functions including AC/DC current, AC/DC voltage, resistance, capacitance, frequency, duty cycle, temperature, diode test, and continuity. This manual provides essential information for safe and effective operation of your device.
2. Informazioni sulla sicurezza
Rispettare sempre le precauzioni di sicurezza quando si utilizzano apparecchiature di prova elettriche. La mancata osservanza di queste precauzioni può causare scosse elettriche, lesioni o danni al misuratore o all'apparecchiatura sottoposta a prova.
- Prima dell'uso, assicurarsi che il misuratore sia in buone condizioni di funzionamento.
- Non applicare voltage o corrente superiore ai valori massimi nominali.
- Utilizzare dispositivi di protezione individuale (DPI) adeguati, come guanti isolanti e occhiali di sicurezza.
- Verify the function switch is in the correct position for the measurement being performed.
- Avoid touching exposed conductors or circuit components during measurements.
- Do not operate the meter in wet environments or in the presence of explosive gases or dust.
- Per garantire letture accurate, sostituire tempestivamente le batterie quando compare l'indicatore di batteria scarica.
- The AP-570C Clamp Meter meets IEC1010 Double Insulation, Pollution Degree 2, and Overvoltage Category III standards.
3. Componenti del prodotto
The AOPUTTRIVER AP-570C package includes the following items:
- AOPUTTRIVER AP-570C Clamp metro
- Puntali (2)
- Sonda di temperatura
- 9V (6F22) Battery
- Manuale d'uso
- Borsa portaoggetti
- Piccolo cacciavite

Image: AOPUTTRIVER AP-570C Digital Clamp Meter with test leads, temperature probe, battery, and storage bag.
4. Product Diagram and Key Functions
Familiarize yourself with the main parts and controls of the AP-570C clamp metro:

Image: Labeled diagram of the AP-570C showing the clamp, rotary switch, LCD display, D.HOLD/Back Light key, SELECT key, MAX/MIN key, REL key, Hz/DUTY key, COM Input Jack, and T+VΩHz Input Jack.
- Clamp: Utilizzato per la misurazione della corrente CA/CC senza contatto.
- Interruttore rotante: Seleziona la funzione di misurazione desiderata.
- Schermo LCD: Mostra le letture delle misurazioni e gli indicatori.
- D.HOLD/Back Light Key: Freezes the current reading on the display and activates/deactivates the backlight.
- Tasto SELECT: Toggles between different measurement modes within a single rotary switch position (e.g., AC/DC voltage, diodo/continuità).
- Tasto MAX/MIN: Registra i valori massimi e minimi durante una sessione di misurazione.
- Chiave REL: Attiva la modalità di misurazione relativa.
- Hz/DUTY Key: Seleziona la misurazione della frequenza o del ciclo di lavoro.
- Input Jacks (COM, T+VΩHz): Collegare i cavi di prova per voltage misure di resistenza, capacità, diodo, continuità e temperatura.
5. Impostazione
5.1. Installazione della batteria
The AP-570C requires one 9V (6F22) battery. To install or replace the battery:
- Assicurarsi che il misuratore sia spento.
- Use the provided small screwdriver to open the battery compartment cover on the back of the meter.
- Insert the 9V battery, observing the correct polarity (+/-).
- Riposizionare il coperchio del vano batteria e fissarlo con la vite.
5.2. Collegamento dei puntali di prova
Per la maggior parte delle misurazioni (voltage, resistance, capacitance, diode, continuity, temperature), connect the test leads:
- Inserire il puntale di prova nero nel jack di ingresso "COM" (comune).
- Insert the red test lead into the "T+VΩHz" input jack.
- For temperature measurements, connect the temperature probe to the same input jacks, ensuring correct polarity if applicable.
6. Istruzioni per l'uso
6.1. Misurazione della corrente CA/CC (Clamp)
il clamp function allows for non-contact current measurement. This is ideal for safely measuring current in live circuits.
- Turn the rotary switch to the desired current range (e.g., 400A or 1000A).
- Press the SELECT button to toggle between AC and DC current measurement if necessary.
- Aprire il clamp mascelle premendo il grilletto.
- Racchiudere un singolo conduttore (non un fascio di fili) all'interno del clamp ganasce. Assicurarsi che le ganasce siano completamente chiuse.
- Leggere il valore corrente sul display LCD.

Image: The AP-570C clamp meter measuring current on an electrical cable.
Video: Demonstration on how to measure DC current using a clamp metro.
6.2. Vol. AC/DCtage Misurazione
Per misurare il volumetage, use the test leads connected to the appropriate input jacks.
- Ruotare l'interruttore rotante su "V~" (Volume ACtage) o "V-" (Vol. DCtage) position. The meter may auto-range.
- Collegare i puntali di prova in parallelo al circuito o al componente che si desidera misurare.
- Leggi il vol.tage valore sul display LCD.

Image: The AP-570C clamp meter with test leads connected to an electrical outlet for voltage misurazione.
6.3. Resistance, Capacitance, Diode, and Continuity Measurement
These functions are accessed via the rotary switch and SELECT button.
- Turn the rotary switch to the "Ω" (Resistance), "CAP" (Capacitance), or "Diode/Continuity" position.
- Use the SELECT button to switch between Diode Test and Continuity Test if on the combined setting.
- Collegare i puntali di prova al componente da misurare.
- Read the value on the LCD display. For continuity, a buzzer will sound if continuity is detected.
Video: Demonstration on how to measure capacitance using a clamp metro.
6.4. Misurazione della temperatura
The AP-570C can measure temperature using the included temperature probe.
- Turn the rotary switch to the "°C" (Temperature) position.
- Connect the temperature probe to the "COM" and "T+VΩHz" input jacks.
- Posizionare la punta della sonda di temperatura sull'oggetto di cui si desidera misurare la temperatura o al suo interno.
- Read the temperature value on the LCD display. The range is -20°C to 1000°C.
6.5. Backlight and Data Hold
- Retroilluminazione: Press the "D.HOLD/Back Light" button briefly to turn the LCD backlight on or off, improving visibility in low-light conditions.
- Data Hold: Press and hold the "D.HOLD/Back Light" button to freeze the current reading on the display. Press again to release.

Immagine: Primo piano view of the AP-570C's bright LCD display and protective case.
6.6. Vol. senza contattotage (NCV) Rilevamento
La funzione NCV consente il rilevamento rapido della tensione CAtage senza contatto diretto.
- Ruotare l'interruttore rotante in posizione "NCV".
- Spostare la parte superiore del misuratore (vicino al clamp ganasce) vicino al conduttore o alla presa.
- Il misuratore indicherà la presenza di tensione alternatatage tramite un segnale acustico e/o un indicatore visivo.
7. Specifiche
Key technical specifications for the AOPUTTRIVER AP-570C:
- Display: 4000 Conteggi
- Corrente continua: Da 200 A a 1000 A
- Corrente AC: 400A~1000A (0.1A resolution for 0.1~400A)
- Volume DCtage: 400 mV ~ 1000 V.
- Volume ACtage: 4 V~750 V
- Resistenza: 400Ω, 4KΩ, 40KΩ, 400KΩ, 4MΩ, 40MΩ
- Capacità: 5.12nF~100µF
- Frequenza: SÌ
- Ciclo di lavoro: SÌ
- Prova del diodo: SÌ
- Cicalino di continuità: SÌ
- Intervallo di temperatura: -20°C a 1000°C
- Jaw Caliber: 45 mm (1.77 pollici)
- Valutazione di sicurezza: IEC1010 Double Insulation, Pollution Degree 2, Overvoltage Categoria III
- Fonte di energia: 1 batteria da 9 V (inclusa)
- Dimensioni del prodotto: Dimensioni: 22.35 x 9.65 x 3.81 cm
- Peso dell'articolo: 444.52 g (0.98 libbre)
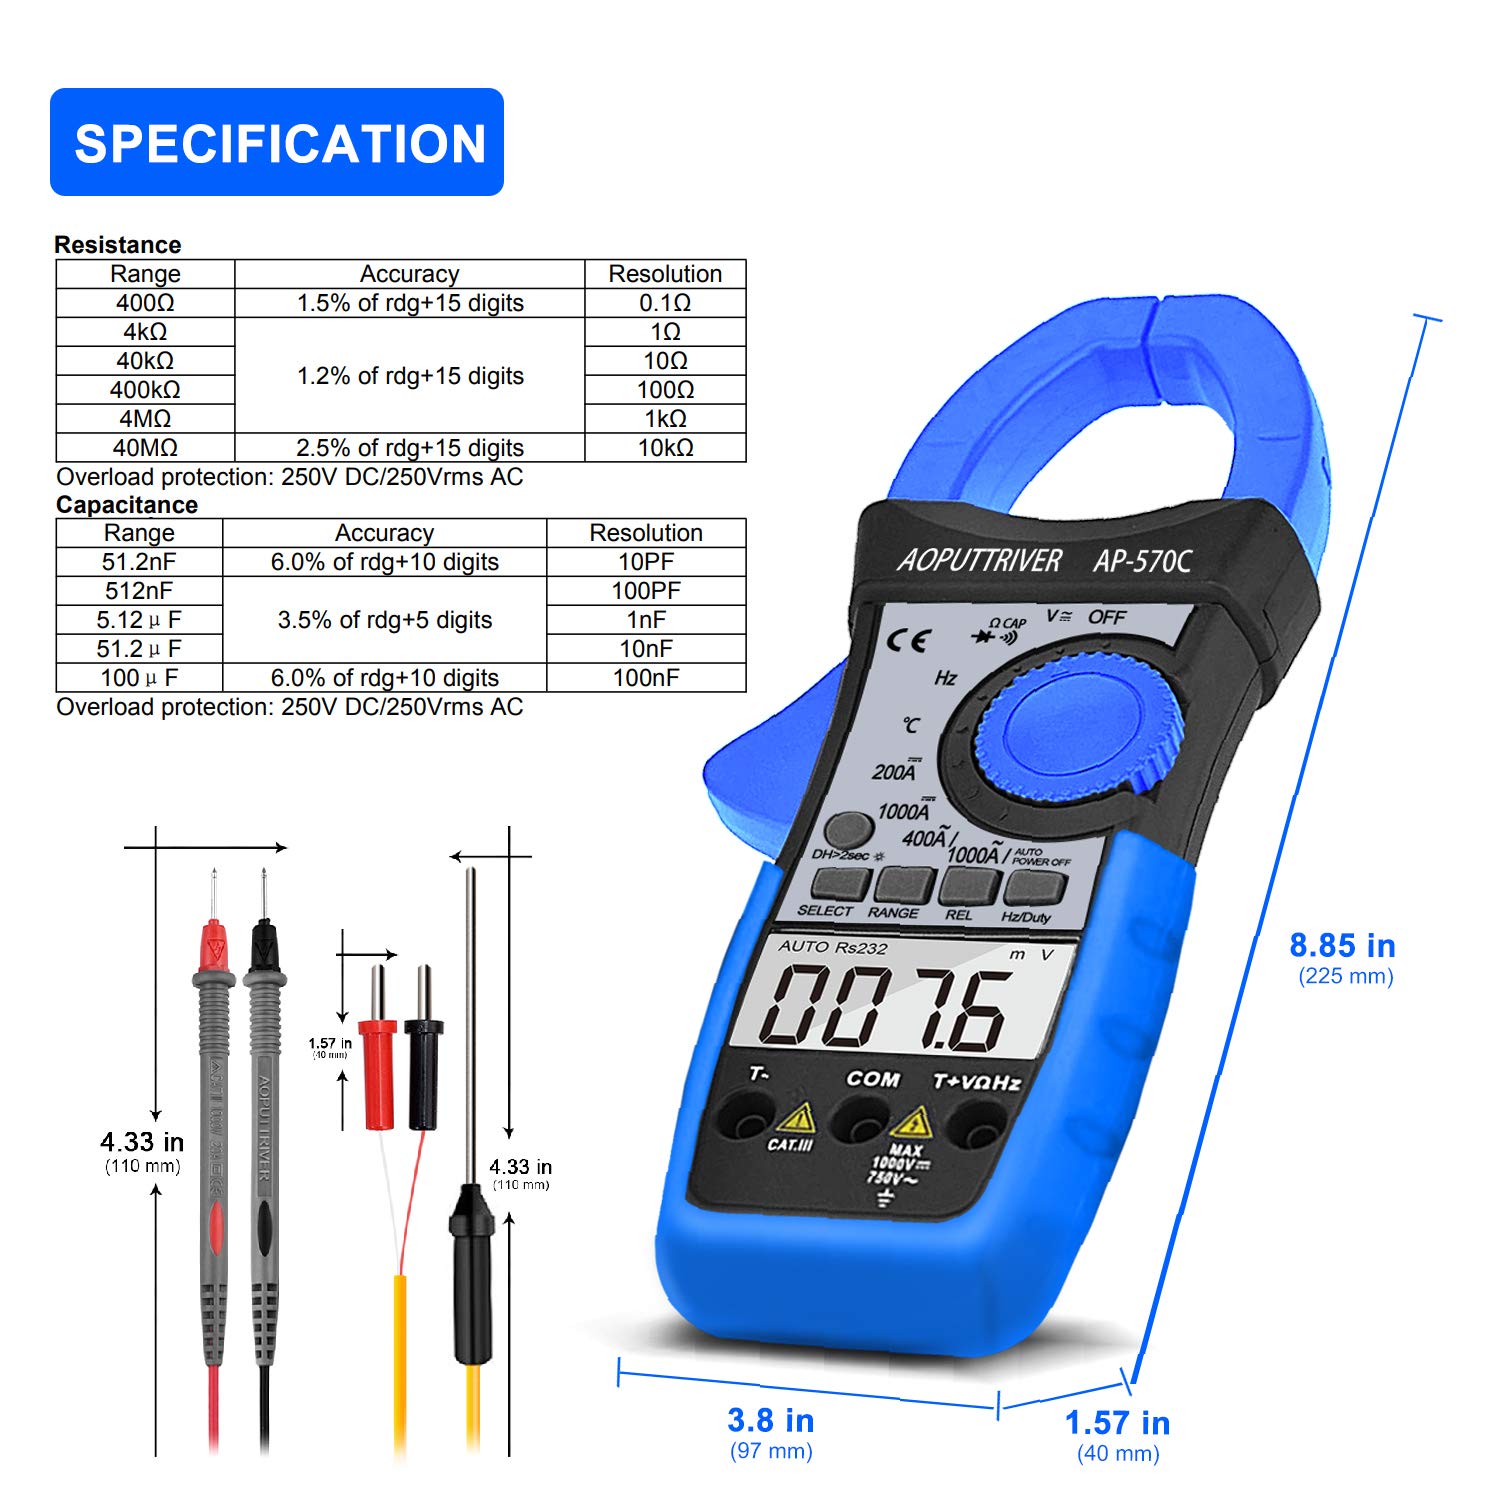
Image: Detailed specifications table for Resistance and Capacitance, along with physical dimensions of the meter and test leads.
8. Manutenzione
8.1. Pulizia
Per mantenere la precisione e la longevità del tuo misuratore:
- Pulisci la custodia con l'adamp panno e detersivo delicato. Non utilizzare abrasivi o solventi.
- Mantenere i terminali di ingresso e clamp ganasce pulite e prive di detriti.
8.2. Sostituzione della batteria
When the low battery indicator appears on the LCD, replace the 9V battery as described in the "Setup" section. Prompt replacement ensures continued accuracy.
8.3. Conservazione
When not in use, store the meter in its protective storage bag in a dry, cool place, away from direct sunlight and extreme temperatures.
9. Risoluzione Dei Problemi
If you encounter issues with your AP-570C, consider the following common solutions:
- Nessun display/Display debole: Controllare la carica della batteria e assicurarsi che sia installata correttamente. Sostituirla se necessario.
- "OL" sullo schermo: Indicates an over-range condition. The measured value exceeds the selected range. Switch to a higher range or verify the circuit.
- Letture imprecise:
- Assicurarsi che i puntali di prova siano completamente inseriti e che facciano buon contatto.
- Verificare che il selettore rotativo sia impostato sulla funzione e sull'intervallo corretti.
- Per le misurazioni di corrente, assicurarsi che solo un conduttore sia all'interno del clamp mascelle.
- Check for external electromagnetic interference.
- Cicalino di continuità non funzionante: Ensure the meter is in continuity mode and test leads are making proper contact. If the issue persists, the meter may require service.
10. Garanzia e supporto
The AOPUTTRIVER AP-570C comes with a Garanzia di 2 anno and lifetime technical support. For any questions or assistance with your product, please contact AOPUTTRIVER customer support.
You can visit the official AOPUTTRIVER store for more information: AOPUTTRIVER Store


