1. Introduzione
Thank you for choosing the Kungfuking Surge Protector Power Strip with USB Ports. This device is designed to provide convenient power access and surge protection for your electronic devices. It features two AC outlets and two USB ports, along with a 6.56 ft extension cord and a flat plug for versatile placement. This manual provides essential information for safe installation, operation, and maintenance of your power strip.

Figure 1: Kungfuking Surge Protector Power Strip (Model: Kungfuking 2AC+2USB)
2. Importanti istruzioni di sicurezza
Si prega di leggere attentamente tutte le istruzioni di sicurezza prima di utilizzare questo prodotto. Il mancato rispetto di queste istruzioni può causare scosse elettriche, incendi o lesioni gravi.
- NON FARE exceed the electrical ratings of 120V, 12A, 60Hz, and 2.1A for USB ports.
- NON FARE use in wet environments or near water.
- NON FARE disassemble or modify the device.
- NON FARE use with aquariums or other water-related products.
- NON FARE collegarlo a un'altra presa di corrente trasferibile.
- NON FARE use if the cord or plug is damaged.
- Tenere fuori dalla portata dei bambini.
- Assicurarsi che la spina sia completamente inserita nella presa a muro.
- Questo prodotto è destinato esclusivamente all'uso in ambienti interni.
3. Caratteristiche del prodotto
The Kungfuking Surge Protector Power Strip is designed for convenience and safety, offering multiple power options in a compact form factor.
- 2 prese CA: Provides standard power for electronic devices.
- 2 porte USB-A: Delivers 5V/2.1A for charging smartphones, tablets, and other USB-powered devices.
- Cavo di prolunga da 6.56 piedi: Offers flexibility in placement, reaching distant outlets.
- Design a spina piatta: Minimizes obstruction and allows furniture to be placed closer to the wall.
- Protezione contro le sovratensioni: Protegge i dispositivi collegati da sbalzi di tensione e picchi di tensione.
- Costruzione durevole: Built with fireproof ABS+PC materials for enhanced safety.
- Design montabile: Can be easily mounted on or under desks, walls, or other surfaces.

Figura 2: Caratteristiche principali e specifiche

Figure 3: All-in-One Charging Station in use
4. Configurazione e installazione
The power strip can be installed in various locations to suit your needs. Mounting screws are included for secure installation.
4.1 Opzioni di montaggio
The power strip offers flexible mounting options:
- Under Desk/Table: Mount horizontally or vertically under a desk or table to keep surfaces clear.
- Wall Mount: Secure to a wall for convenient access, such as near a TV or bedside.
- Side of Cabinets/Headboards: Install vertically on the side of furniture for discreet power access.

Figure 4: Installation Options and Dimensions
4.2 Passaggi di installazione
- Scegli una posizione: Select a flat, stable surface for mounting, ensuring it is within reach of a wall outlet and your devices.
- Segnare i fori per le viti: Place the power strip in the desired position and mark the locations for the mounting screws using a pencil.
- Drill Pilot Holes (Optional): For wood surfaces, you may pre-drill small pilot holes to prevent wood splitting.
- Secure the Power Strip: Use the provided screws to firmly attach the power strip to the surface. Ensure it is securely fastened before use.
- Connettiti all'alimentazione: Plug the power strip's flat plug into a standard 120V wall outlet. The flat plug design allows for placement behind furniture.
4.3 Esample Installazioni
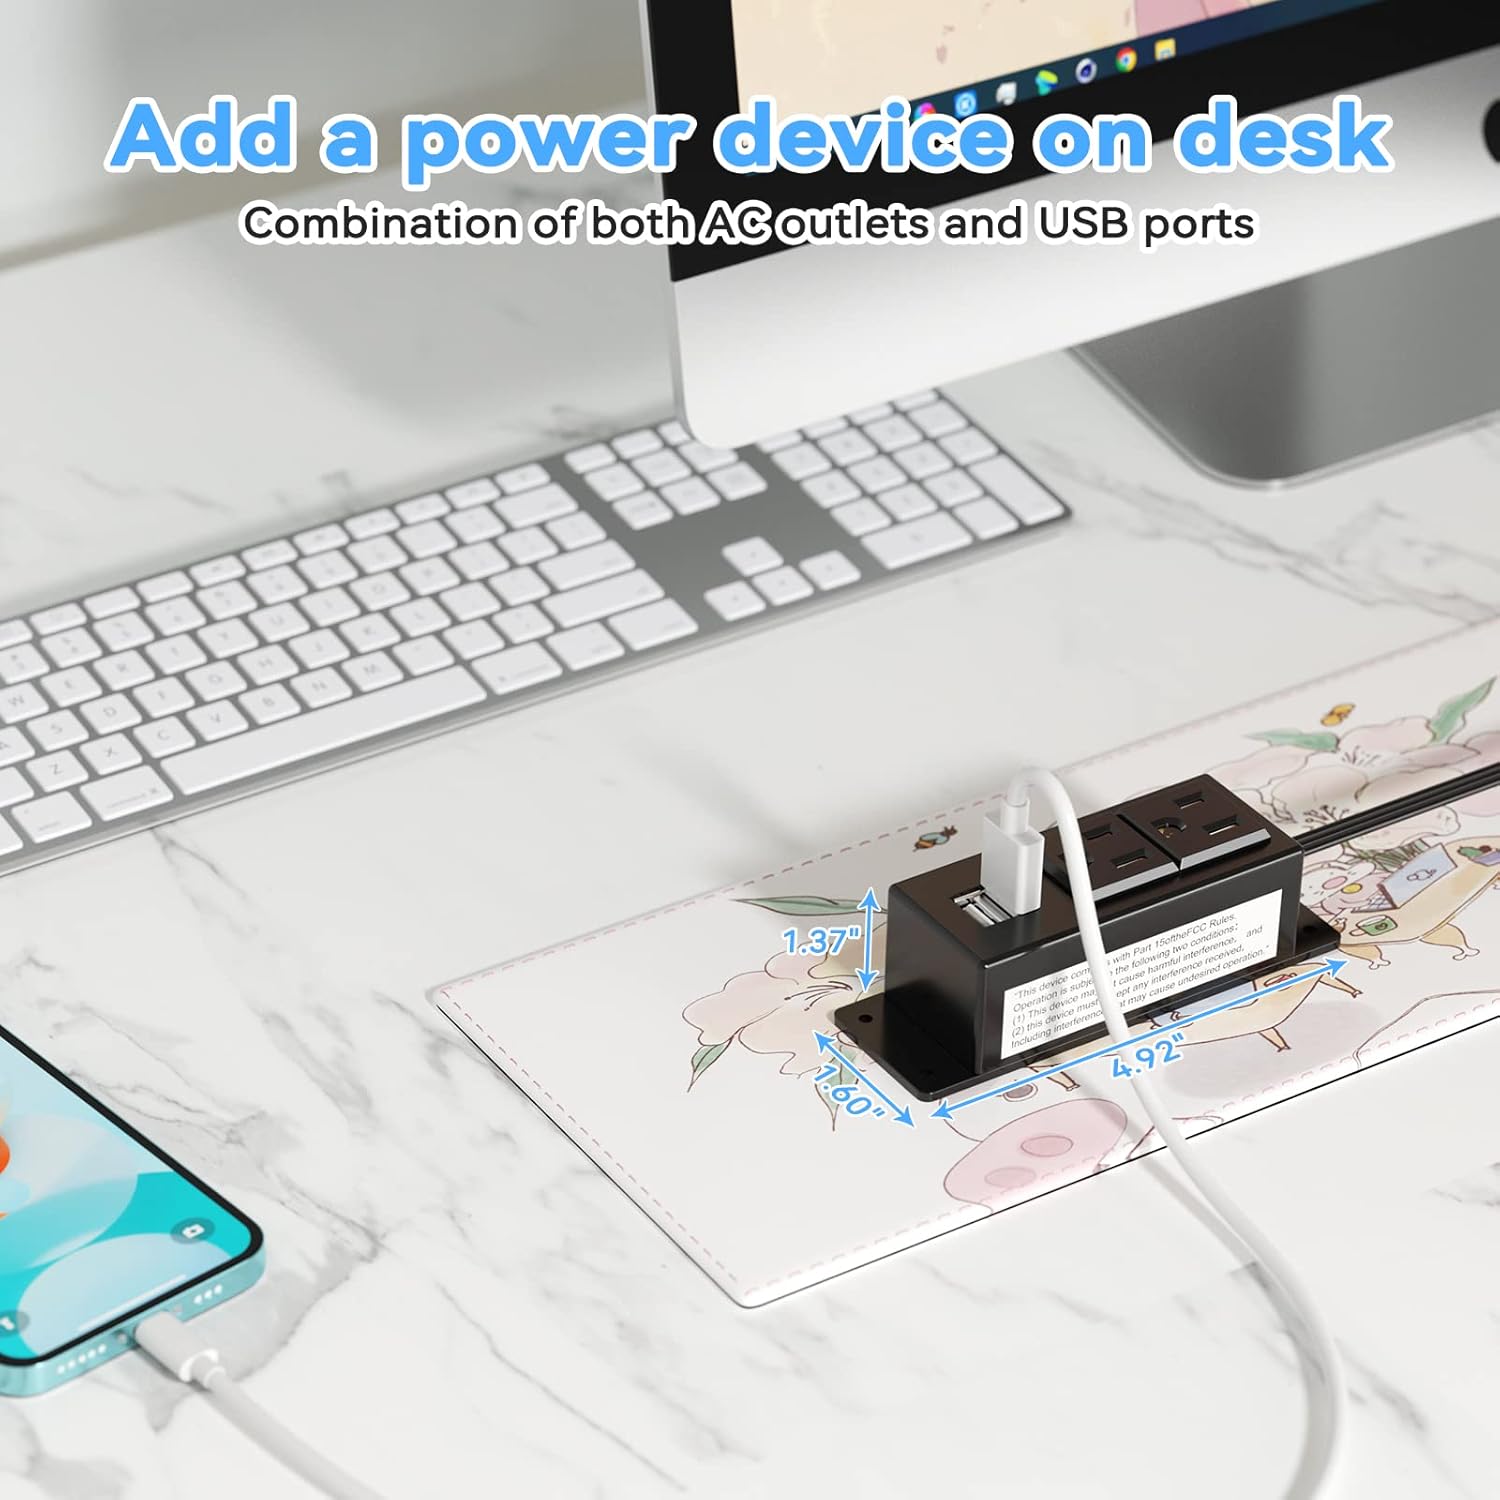
Figure 5: Desk Surface Installation

Figure 6: Under-Desk Installation

Figure 7: Wall-Mounted for TV

Figure 8: Nightstand Installation

Figure 9: Kitchen Cabinet Installation

Figure 10: Flat Plug for Space-Saving Placement
5. Istruzioni per l'uso
Using your Kungfuking Surge Protector Power Strip is straightforward:
- Collegare alla presa a muro: Ensure the power strip's flat plug is securely connected to a grounded 120V AC wall outlet.
- Collegare i dispositivi CA: Insert the power cords of your electronic devices into the two AC outlets.
- Connetti dispositivi USB: Plug your USB charging cables into the two USB-A ports to charge compatible devices.
- Accensione: The power strip is designed for continuous operation once plugged in. There is no on/off switch.
- Monitorare l'utilizzo: Avoid overloading the power strip by ensuring the total power consumption of connected devices does not exceed the rated capacity (12A, 120V).
6. Risoluzione Dei Problemi
Se riscontri problemi con la tua ciabatta, fai riferimento ai seguenti problemi comuni e alle relative soluzioni:
| Problema | Possibile causa | Soluzione |
|---|---|---|
| Nessuna alimentazione dalle prese CA o dalle porte USB. |
|
|
| I dispositivi USB non si caricano. |
|
|
| La ciabatta è calda. |
|
|
7. Specifiche
| Caratteristica | Dettaglio |
|---|---|
| Modello | Kungfuking 2AC+2USB |
| Prese AC | 2 |
| Porte USB | 2 (USB-A) |
| Ingresso volumetage | 120 V CA |
| Corrente nominale AC | 12A |
| Frequenza | 60 Hz |
| Uscita USB | 5 V / 2.1 A (totale) |
| Lunghezza del cavo | 6.56 piedi (2 metri) |
| Tipo di spina | Spina piatta |
| Materiale | ABS+PC ignifugo |
| Dimensioni (circa) | 4.92 x 3.74 x 1.37 pollici (L x L x A) |
| Peso (circa) | 10.5 once |
| Caratteristiche speciali | Surge Protection, Mountable Design |
8. Manutenzione
Proper maintenance ensures the longevity and safe operation of your power strip:
- Pulizia: Scollegare la ciabatta dalla presa a muro prima di pulirla. Utilizzare un panno asciutto e morbido per pulire l'esterno. Non utilizzare detergenti liquidi o spray.
- Ispezione: Periodically inspect the power cord, plug, and housing for any signs of damage, such as cuts, fraying, or cracks. If damage is found, discontinue use immediately.
- Magazzinaggio: Quando non viene utilizzata per lunghi periodi, conservare la ciabatta in un luogo fresco e asciutto, lontano dalla luce solare diretta e dall'umidità.
9. Garanzia e supporto
Kungfuking products are designed for reliability and performance. For warranty information, technical support, or any questions regarding your product, please refer to the contact information provided at the point of purchase or visit the official Kungfuking websito.
Conservare la prova d'acquisto per eventuali richieste di garanzia.


