1. Introduzione
This manual provides essential information for the safe and efficient operation of your OMNITRONIC PM-322P 3-Channel DJ Mixer. Please read these instructions thoroughly before using the device to ensure proper functionality and to prevent damage.
The OMNITRONIC PM-322P is a robust and versatile 3-channel DJ mixer designed for various audio mixing applications, featuring integrated Bluetooth connectivity and a USB MP3 player.

Figura 1: Angolato view of the OMNITRONIC PM-322P DJ Mixer, showcasing its compact design and accessible controls.
2. Istruzioni di sicurezza
- Leggere tutte le istruzioni prima di utilizzare il dispositivo.
- Conservare questo manuale per riferimento futuro.
- Non esporre il dispositivo a pioggia o umidità.
- Assicurare una ventilazione adeguata; non ostruire le aperture di ventilazione.
- Only connect to a grounded power outlet with the specified voltage (240 Volt).
- Non aprire il dispositivo casing; affidare ogni intervento di manutenzione a personale qualificato.
- Evitare di posizionare il dispositivo vicino a fonti di calore o alla luce diretta del sole.
- Pulire solo con un panno asciutto.
3. Caratteristiche principali
- 3 canali di ingresso: Each channel features gain control, a 3-band equalizer (High, Mid, Low), a Cue button for pre-listening, and a smooth channel fader.
- Integrated Bluetooth Audio Streaming: Seamlessly stream music wirelessly from your Bluetooth-enabled portable devices directly to the mixer.
- DJ Microphone Channel: Dedicated microphone input with independent volume control and a 2-band equalizer for vocal adjustments.
- MP3 Player with USB Port: Riproduci audio files directly from a USB storage device, with track information displayed on a clear blue LCD.
- Costruzione robusta: Progettato per garantire durata e prestazioni affidabili.
4. Controlli e collegamenti
4.1 Controlli del pannello frontale

Figura 2: Superiore view of the OMNITRONIC PM-322P DJ Mixer, highlighting the main control surface.
- Porta USB: For connecting USB storage devices to the integrated MP3 player.
- MP3/Bluetooth Module: Includes LCD display, playback controls (Play/Stop, Skip), and Pairing button for Bluetooth.
- Channel Gain Controls (CH 1-3): Regola il livello di ingresso per ciascun canale.
- 3-Band Equalizer (High, Mid, Low): Tone controls for each channel.
- Cue Buttons (CH 1-3): Activates pre-listening for the respective channel through headphones.
- Channel Faders (CH 1-3): Adjust the volume level of each channel in the mix.
- Microphone Level Control (MIC LEVEL): Regola il volume del microfono collegato.
- Microphone 2-Band Equalizer (MIC HIGH, MIC LOW): Controlli di tono per l'ingresso del microfono.
- X-Fader Reverse Switch: Reverses the direction of the crossfader.
- X-Fader Curve Control: Adjusts the crossfader curve from sharp to smooth.
- Crossfader (CH 2/CH 3): Blends between channels 2 and 3.
- Master Level Control: Regola il volume di uscita complessivo.
- Cue Level Control: Regola il volume dell'uscita cuffie.
- Cue Mix/PGM Control: Blends between the Cued signal and the Program (Master) signal in the headphones.
- Misuratori di livello LED: Visual indication of output levels.
- Uscita cuffie (TRS da 1/4"): For connecting headphones for monitoring.
4.2 Collegamenti del pannello posteriore
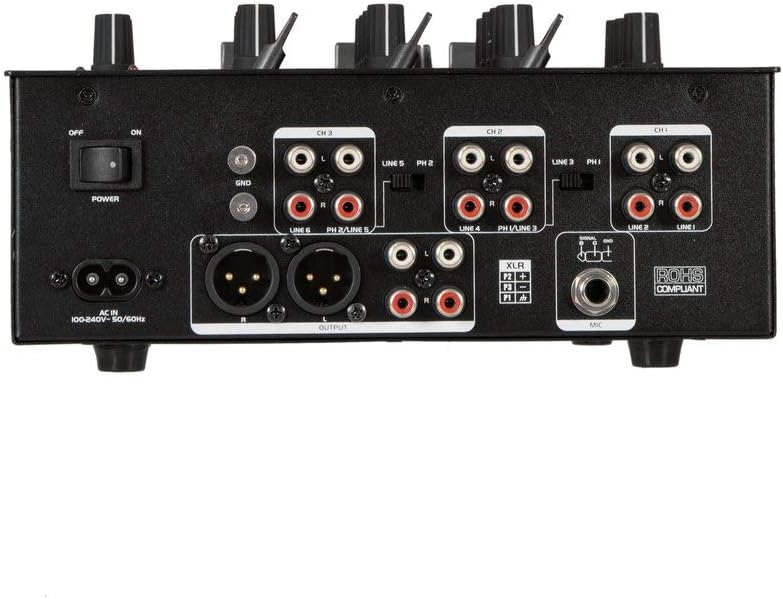
Figura 3: Rear panel of the OMNITRONIC PM-322P DJ Mixer, showing all input and output ports.
- Interruttore di alimentazione (ON/OFF): Accende o spegne il mixer.
- INGRESSO CA: Power input for the included power cable (100-240V AC, 50/60Hz).
- Terminale di terra (GND): Per collegare il filo di terra del giradischi.
- Channel 3 Inputs (LINE 5/PH 2, LINE 6): RCA inputs for line-level devices (CD players, media players) and phono-level devices (turntables).
- Channel 2 Inputs (LINE 3/PH 1, LINE 4): RCA inputs for line-level devices and phono-level devices.
- Channel 1 Inputs (PLAYER/LINE 1, LINE 2): RCA inputs for line-level devices.
- Master Output (XLR, RCA): Balanced XLR and unbalanced RCA outputs for connecting to a power ampdiffusori acustici o attivi.
- Ingresso microfono (XLR): Ingresso XLR bilanciato per il collegamento di un microfono dinamico.
5. Impostazione
- Collegamento elettrico: Connect the provided power cable to the AC IN socket on the rear panel and then to a suitable grounded power outlet (240V).
- Connessione di uscita: Connect the MASTER OUTPUT (XLR or RCA) to your amplifier or active speaker system.
- Dispositivi di input:
- Connect turntables to the PHONO inputs (CH 2 or CH 3) and ensure the PH/LINE switch is set to PH. Connect the turntable's ground wire to the GND terminal.
- Connect CD players, media players, or other line-level devices to the LINE inputs (CH 1, CH 2, or CH 3). Ensure the PH/LINE switch is set to LINE for channels 2 and 3.
- Connect a microphone to the XLR MIC input on the rear panel.
- Cuffie: Connect your headphones to the 1/4" TRS HEADPHONE output on the front panel.
- Impostazioni iniziali: Before powering on, ensure all channel faders are down, gain controls are at minimum, and the Master Level is at minimum.
- Accensione: Portare l'interruttore POWER sul pannello posteriore in posizione ON.
6. Funzionamento
6.1 Playing Audio from Input Channels
- Select the desired input source (LINE or PHONO) using the switch on the rear panel for Channels 2 and 3. Channel 1 is LINE only.
- Start playback on your connected audio source (turntable, CD player).
- Slowly increase the GAIN control for the selected channel until the LED level meter shows a strong signal without clipping (red LEDs).
- Adjust the 3-band EQ (HIGH, MID, LOW) to shape the sound of the channel.
- Raise the channel fader to bring the audio into the main mix.
- Adjust the MASTER LEVEL control to set the overall output volume.
- Use the CUE button to pre-listen to a channel through your headphones before fading it into the mix. Adjust CUE LEVEL and CUE MIX/PGM as needed.
6.2 Using the MP3 Player (USB)
- Insert a USB storage device (formatted as FAT32) containing MP3 files nella porta USB.
- The LCD display will show track information.
- Use the PLAY/STOP button to start or pause playback.
- Utilizzare i pulsanti SKIP (<< / >>) per navigare tra le tracce.
- The MP3 player typically routes to Channel 1. Adjust Channel 1's GAIN, EQ, and FADER controls as described above.
6.3 Streaming audio Bluetooth
- Press the PAIRING button on the MP3/Bluetooth module. The Bluetooth indicator will flash, indicating it's in pairing mode.
- On your Bluetooth-enabled device (smartphone, tablet), search for available Bluetooth devices and select "OMNITRONIC PM-322P".
- Once paired, the Bluetooth indicator will glow steadily.
- Start playing audio on your connected device. The Bluetooth audio will route to Channel 1.
- Adjust Channel 1's GAIN, EQ, and FADER controls to mix the Bluetooth audio.
6.4 Utilizzo del microfono
- Connect a dynamic microphone to the XLR MIC input on the rear panel.
- Speak into the microphone and slowly increase the MIC LEVEL control until the desired volume is achieved without distortion.
- Use the MIC HIGH and MIC LOW controls to adjust the tone of your voice.
7. Manutenzione
- Pulizia: Disconnect the device from power before cleaning. Use a soft, dry cloth to wipe the surface. Do not use liquid cleaners or solvents.
- Magazzinaggio: When not in use for extended periods, store the mixer in a dry, dust-free environment.
- Servizio: All'interno non sono presenti parti riparabili dall'utente. Affidare tutte le operazioni di manutenzione a personale di assistenza qualificato.
8. Risoluzione Dei Problemi
| Problema | Possibile causa | Soluzione |
|---|---|---|
| Nessun potere | Power cable disconnected; Power switch off; Outlet fault. | Controllare il collegamento del cavo di alimentazione; assicurarsi che l'interruttore di alimentazione sia acceso; testare la presa con un altro dispositivo. |
| Nessuna uscita audio | Master Level too low; Channel fader down; Gain too low; Amplifier/speakers off or disconnected. | Increase Master Level; Raise channel fader; Increase channel Gain; Check ampcollegamenti e alimentazione del filtro/altoparlante. |
| Suono distorto | Gain too high (clipping); Input signal too strong; Faulty cable. | Reduce channel Gain; Check input signal level; Replace cables. |
| Bluetooth non associato | Mixer not in pairing mode; Device too far; Device already paired to another unit. | Press PAIRING button; Move device closer; Disconnect from other Bluetooth devices. |
| Lettore MP3 USB non funzionante | USB device not formatted correctly (FAT32); No MP3 files; USB device faulty. | Ensure USB is FAT32 and contains MP3s; Try a different USB device. |
9. Specifiche
| Modello: | Modello PM-322P |
| Produttore: | Steinigke Showtechnic GmbH |
| Numero di canali: | 3 |
| Tecnologia di connettività: | Bluetooth, USB |
| Fonte di energia: | Cavo elettrico |
| Voltage: | 240 Volt CA |
| Peso dell'articolo: | 3.18 chilogrammi |
| Ingresso audio: | XLR (Microphone), RCA (Line/Phono) |
| Tipo connettore di uscita: | XLR, TRS 1/4", RCA |
| Numero di modello (produttore): | 8283410 |
| Codice UPC: | 04026397653403 |
10. Garanzia e supporto
For warranty information and technical support, please contact the manufacturer, Steinigke Showtechnic GmbH, or your authorized dealer. Keep your proof of purchase for any warranty claims.
For further assistance, please visit the official OMNITRONIC websito o consultare il distributore locale.