1. Introduzione
This user manual provides comprehensive instructions for the installation, operation, and maintenance of your Meross CS11 Combo Smoke and Carbon Monoxide Alarm. Please read this manual thoroughly before installation and keep it for future reference. This device is designed to detect both smoke and carbon monoxide (CO) to enhance your home safety.
The Meross CS11 alarm complies with European standards EN 14604 for smoke alarms and EN 50291 for carbon monoxide alarms.
2. Caratteristiche del prodotto
- Tecnologia a doppio sensore: Combines a photoelectric smoke sensor and an electrochemical carbon monoxide sensor for comprehensive protection.
- Durata della batteria di 10 anni: Equipped with a sealed 3V lithium battery designed to last for 10 years, providing continuous protection without battery replacement.
- Allarme forte da 85 dB: Emits a powerful 85-decibel alarm at 3 meters to alert occupants effectively in case of an emergency.
- Pulsante Test/Silenzio: Allows for easy testing of the alarm's functionality and silencing false alarms.
- Tri-Color LED Indicator: Provides clear visual status indications for normal operation (green), fault/low battery/end-of-life (amber), and alarm/test/silence (red).
- Automatic Self-Verification: The device performs regular self-checks to ensure proper functioning.
- Installazione semplice: Comes with a mounting bracket and screws for quick and simple ceiling or wall installation.
- Ampia area di rilevamento: Detects carbon monoxide over an area of up to 40 square meters.
3. Contenuto della confezione
Dopo aver disimballato, verificare che tutti gli articoli elencati di seguito siano presenti e in buone condizioni:
- 1 x Meross CS11 Combo Smoke and Carbon Monoxide Alarm
- Staffa di montaggio 1 x
- 2 x Viti
- 1 x Manuale utente
4. Informazioni sulla sicurezza
Please read and understand all safety instructions before installing and operating the alarm. Failure to follow these instructions may result in property damage, injury, or death.
- This alarm is designed for indoor use only.
- Do not paint the alarm. Paint can clog the sensor openings and interfere with the alarm's ability to detect smoke or CO.
- Non installare in aree con elevata umidità, temperature estreme o polvere eccessiva.
- Test the alarm monthly and after any battery change or relocation.
- The 10-year battery is sealed and non-replaceable. Do not attempt to open the unit or replace the battery.
- This device is not intended to replace proper installation and maintenance of fuel-burning appliances, nor the ventilation systems of these appliances.
- Carbon monoxide is invisible, odorless, and tasteless. This alarm is designed to detect CO gas from any source of combustion.
5. Configurazione e installazione
Proper placement and installation are crucial for the effective operation of your Meross CS11 alarm.
5.1 Recommended Locations
- Install at least one alarm on every level of your home, including basements.
- Place alarms in hallways outside of sleeping areas.
- For best CO detection, install an alarm in or near rooms where fuel-burning appliances are located.
- For best smoke detection, install in the center of the ceiling. If ceiling installation is not possible, install on a wall, at least 10-30 cm (4-12 inches) from the ceiling.
5.2 Luoghi da evitare
- Within 1 meter (3 feet) of cooking appliances, heating vents, or ceiling fans.
- In extremely dusty, dirty, or greasy areas.
- In direct sunlight or areas with extreme temperature fluctuations.
- In areas with high humidity, such as bathrooms.
5.3 Passaggi di installazione
- Preparare la posizione di montaggio: Choose a suitable location according to the guidelines above.
- Fissare la staffa di montaggio: Use the provided screws to securely attach the mounting bracket to the ceiling or wall.
- Mount the Alarm: Align the alarm with the mounting bracket and twist clockwise until it clicks into place. The alarm will automatically activate upon proper installation.
- Testare l'allarme: After installation, press and hold the Test/Silence button for a few seconds to ensure the alarm sounds. Refer to the "Operating Instructions" section for more details on testing.

Figure 5.3.1: Easy Installation of the Meross CS11 Alarm. The image depicts a person on a ladder installing the alarm on a ceiling, with an inset showing the mounting bracket and screws.
6. Istruzioni per l'uso
6.1 Stato dell'indicatore LED
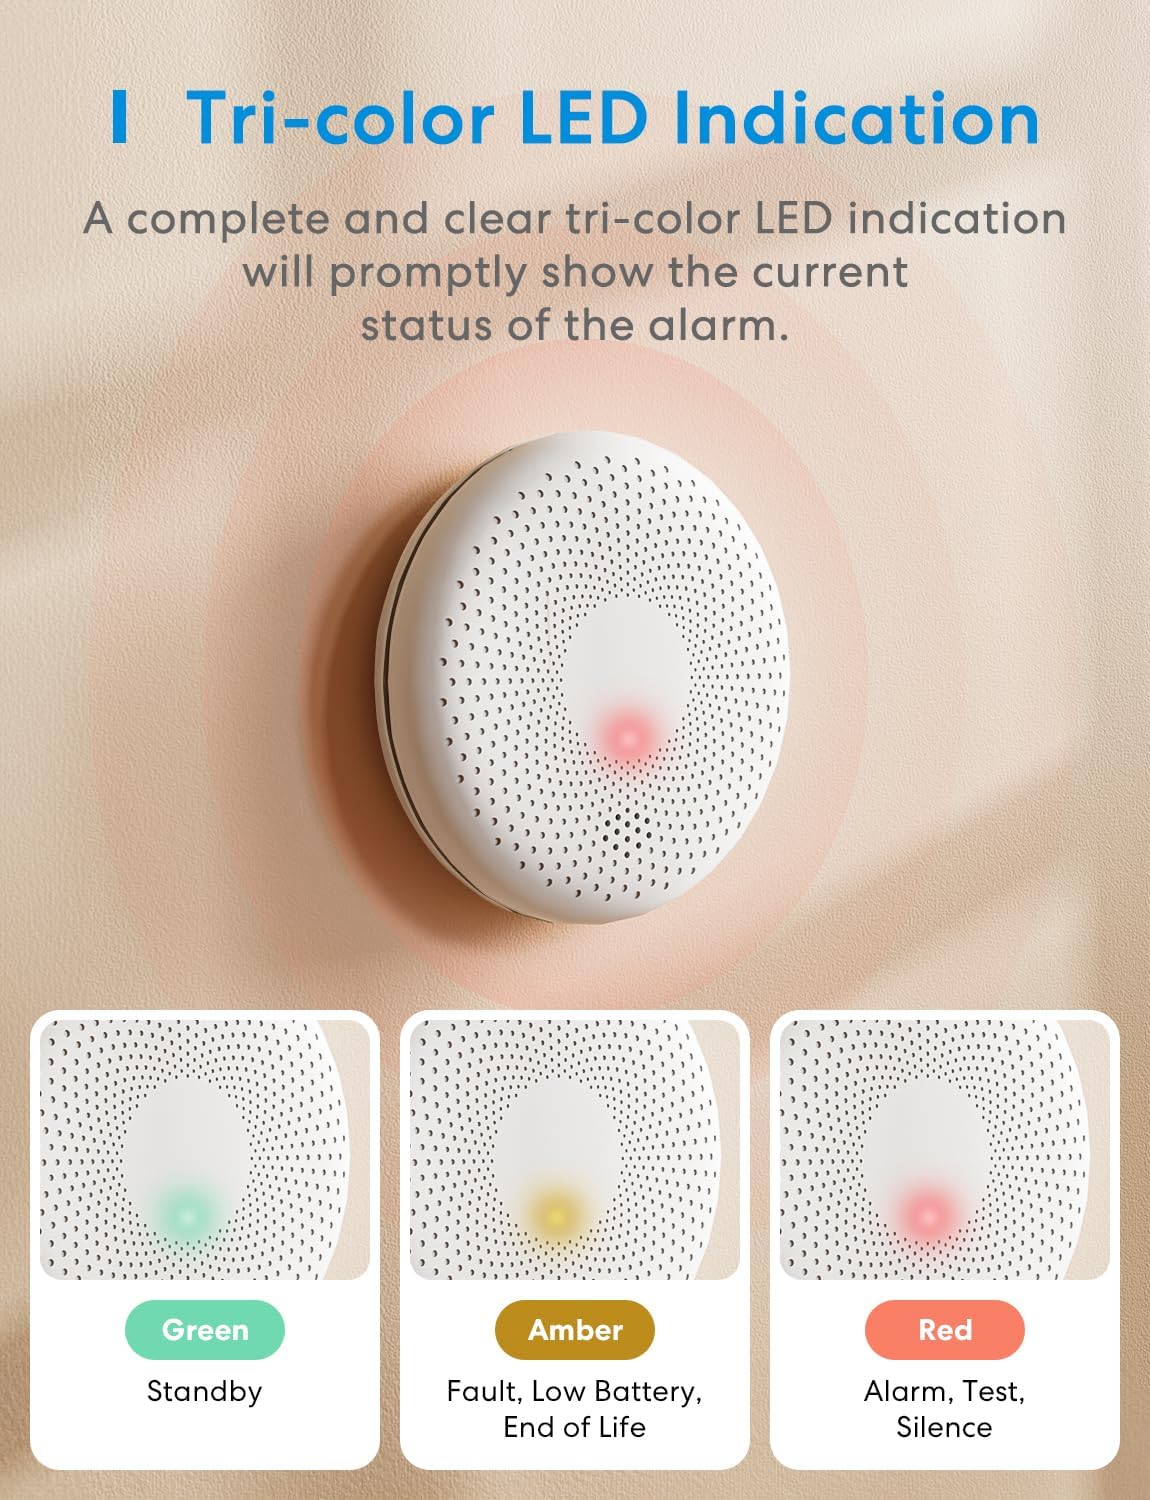
Figure 6.1.1: Tri-color LED Indication. This image illustrates the different LED colors and their corresponding alarm statuses.
- LED verde: Flashes once every 60 seconds – Indicates normal operation (Standby).
- LED ambra: Flashes once every 60 seconds with a chirp – Indicates a fault, low battery, or end-of-life.
- LED rosso: Flashes rapidly with loud alarm – Indicates smoke or CO detection (Alarm).
- LED rosso: Flashes during test or silence mode.
6.2 Test dell'allarme
It is recommended to test your alarm monthly to ensure it is functioning correctly.
- Press and hold the Test/Silence button located on the front of the alarm.
- The alarm will emit a series of loud beeps, and the red LED will flash. This indicates the alarm is working.
- Release the button. The alarm will return to normal operation.

Figure 6.2.1: Loud Buzzer Alarm. This image visually represents the 85dB alarm sound emitted by the device.
6.3 Disattivazione dell'allarme
In caso di allarme non di emergenza (ad esempio fumo di cottura), è possibile silenziare temporaneamente l'allarme:
- Premere una volta il pulsante Test/Silenzia.
- The alarm will enter a temporary silence period (typically 5-10 minutes). The red LED will continue to flash during this period.
- Se la concentrazione di fumo o di CO rimane elevata dopo il periodo di silenzio, l'allarme si riattiverà.
Warning: Do not silence the alarm without first investigating the cause of the alarm. If the cause is unknown, evacuate the premises immediately.
7. Manutenzione
Regular maintenance ensures the longevity and reliability of your Meross CS11 alarm.
- Test mensile: Test the alarm monthly using the Test/Silence button.
- Pulizia: Gently vacuum the alarm cover once a month using a soft brush attachment to remove dust and debris. Do not use cleaning agents or solvents.
- Batteria: The battery is sealed and designed for 10 years of operation. Do not attempt to replace it. When the battery is low or the unit reaches its end-of-life, the amber LED will flash with a chirp. Replace the entire unit.
8. Risoluzione Dei Problemi
| Problema | Possibile causa | Soluzione |
|---|---|---|
| Alarm chirps every 60 seconds (Amber LED). | Low battery, fault, or end-of-life. | The battery is sealed. If the alarm is chirping, it indicates the unit needs to be replaced. |
| L'allarme suona frequentemente senza fumo/CO apparente. | False alarm due to cooking fumes, steam, dust, or improper placement. | Press the Test/Silence button. Relocate the alarm if false alarms persist due to environmental factors. Clean the alarm. |
| L'allarme non suona durante il test. | Unit not activated, battery depleted, or unit malfunction. | Ensure the alarm is properly mounted and activated. If it still doesn't work, the unit may be faulty and needs replacement. |
| Il LED verde non lampeggia. | Unità non attivata o malfunzionante. | Ensure the alarm is properly mounted and activated. If the issue persists, the unit may be faulty and needs replacement. |
9. Specifiche
| Numero di modello | CS11 |
| Fonte di alimentazione | Sealed 3V Lithium Battery (non-replaceable, 10-year life) |
| Tipo di sensore | Fotoelettrico (fumo), elettrochimico (CO) |
| Volume dell'allarme | ≥ 85 dB at 3 meters |
| Intervallo di rilevamento del CO | Fino a 40 mq |
| Temperatura di esercizio | da 0°C a 40°C (da 32°F a 104°F) |
| Umidità di esercizio | ≤ 95% UR (senza condensa) |
| Dimensioni (diametro x altezza) | 120 mm x 28 mm (approx. 4.72 in x 1.1 in) |
| Peso | 135 grammi (circa 4.76 once) |
| Certificazioni | EN 14604:2005/AC:2008 (Smoke), EN 50291-1:2010 (CO) |
| Materiale | addominali |

Figure 9.1.1: Elegant and Compact Design with Component Overview. This image highlights the key external features and dimensions of the alarm.
10. Informazioni sulla garanzia
Specific warranty details are not provided in the product information. Please refer to the official Meross website or contact Meross customer support for detailed warranty terms and conditions applicable to your region.
11. Assistenza clienti
For technical assistance, troubleshooting, or general inquiries, please visit the official Meross support page or contact their customer service. Contact information can typically be found on the Meross websito o sulla confezione del prodotto.
Puoi anche visitare il Meross Brand Store on Amazon per ulteriori informazioni sul prodotto.


