Introduzione
This manual provides detailed instructions for the installation, operation, and maintenance of your ESX VN1015-MA-DAB-1DIN 1-DIN Touchscreen Navigation System. This advanced car multimedia unit features a 10.1-inch multi-angle touchscreen, Android operating system, DAB+ digital radio, Bluetooth hands-free and audio streaming, GPS navigation, and extensive media connectivity. Please read this manual thoroughly before using the device to ensure proper operation and to maximize your user experience.
Configurazione e installazione
Proper installation is crucial for the optimal performance of your ESX navigation system. It is recommended that installation be performed by a qualified professional.
1. Disimballaggio e ispezione
- Rimuovere con attenzione tutti i componenti dalla confezione.
- Verificare che tutti gli accessori elencati siano presenti.
- Ispezionare l'unità per verificare la presenza di eventuali segni di danneggiamento.
2. Collegamenti elettrici
Refer to the wiring diagram for detailed connections. Ensure all connections are secure to prevent malfunctions.
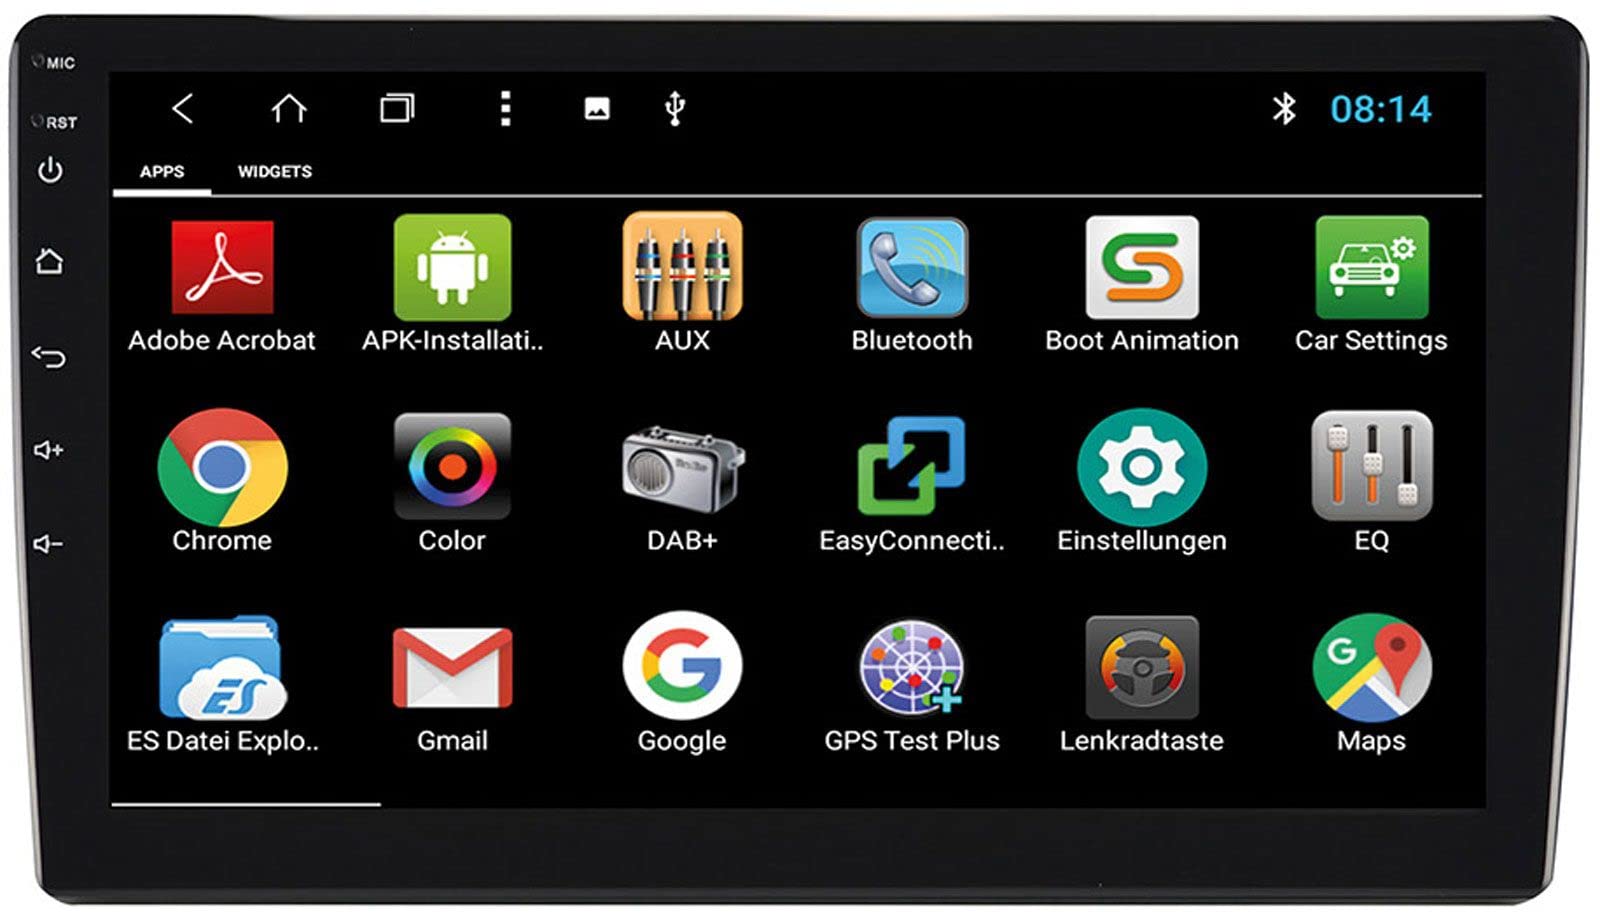
Image: Rear Connection Ports. This image displays the rear panel of the ESX VN1015-MA-DAB-1DIN unit, highlighting the various input and output ports. Key connections visible include GPS antenna input, WiFi antenna input, microphone input, USB ports, AV inputs, and the main power/speaker harness connector. A DAB+ antenna input is also present, along with a "PASSED" quality control sticker.
- Collegamento elettrico: Connect the main power harness to your vehicle's power supply (constant 12V, ignition 12V, and ground).
- Collegamenti degli altoparlanti: Collegare i cavi degli altoparlanti agli altoparlanti del veicolo, assicurandosi che la polarità sia corretta.
- Antenna GPS: Connect the GPS antenna to the dedicated GPS input. Position the antenna in a location with a clear view del cielo per una ricezione ottimale del segnale.
- Antenna DAB+: Connect the included DAB+ antenna to the DAB+ input. Ensure proper placement for best digital radio reception.
- Antenna Wi-Fi: Connect the WiFi antenna for internet connectivity via a mobile hotspot.
- Porte USB: Collega dispositivi USB per la riproduzione multimediale o la ricarica dello smartphone.
- Microfono: Connect the internal microphone or an optional external microphone (VNA-MIC-AND) for Bluetooth hands-free calling.
- AUX/Video Input: Connect external audio/video sources.
- Ingresso telecamera: Collegare una parte posterioreview camera to the camera input. The system supports adjustable parking lines.
- Pre-amp Risultati: Collega esterno ampamplificatori per i canali anteriori, posteriori e subwoofer.
- Controllo del volante: If your vehicle supports steering wheel controls, an optional adapter may be required. Connect the steering wheel control wires as per the adapter's instructions.
3. Montaggio dell'unità
- Install the 1-DIN chassis into your vehicle's dashboard opening.
- Attach the 10.1-inch touchscreen display to the chassis. The display is multi-angle adjustable (height and viewing angle) for optimal visibility.
- Secure the unit firmly to prevent movement during driving.
4. Accensione iniziale
- After all connections are made, turn on your vehicle's ignition.
- The unit should power on and display the ESX logo.
- Seguire le istruzioni visualizzate sullo schermo per la configurazione iniziale, come la selezione della lingua e del fuso orario.
Istruzioni per l'uso
Your ESX navigation system runs on an Android operating system, offering a familiar and intuitive user interface.
1. Interfaccia touchscreen
The 10.1-inch high-resolution touchscreen allows for easy control of all functions. Tap, swipe, and pinch-to-zoom gestures are supported.
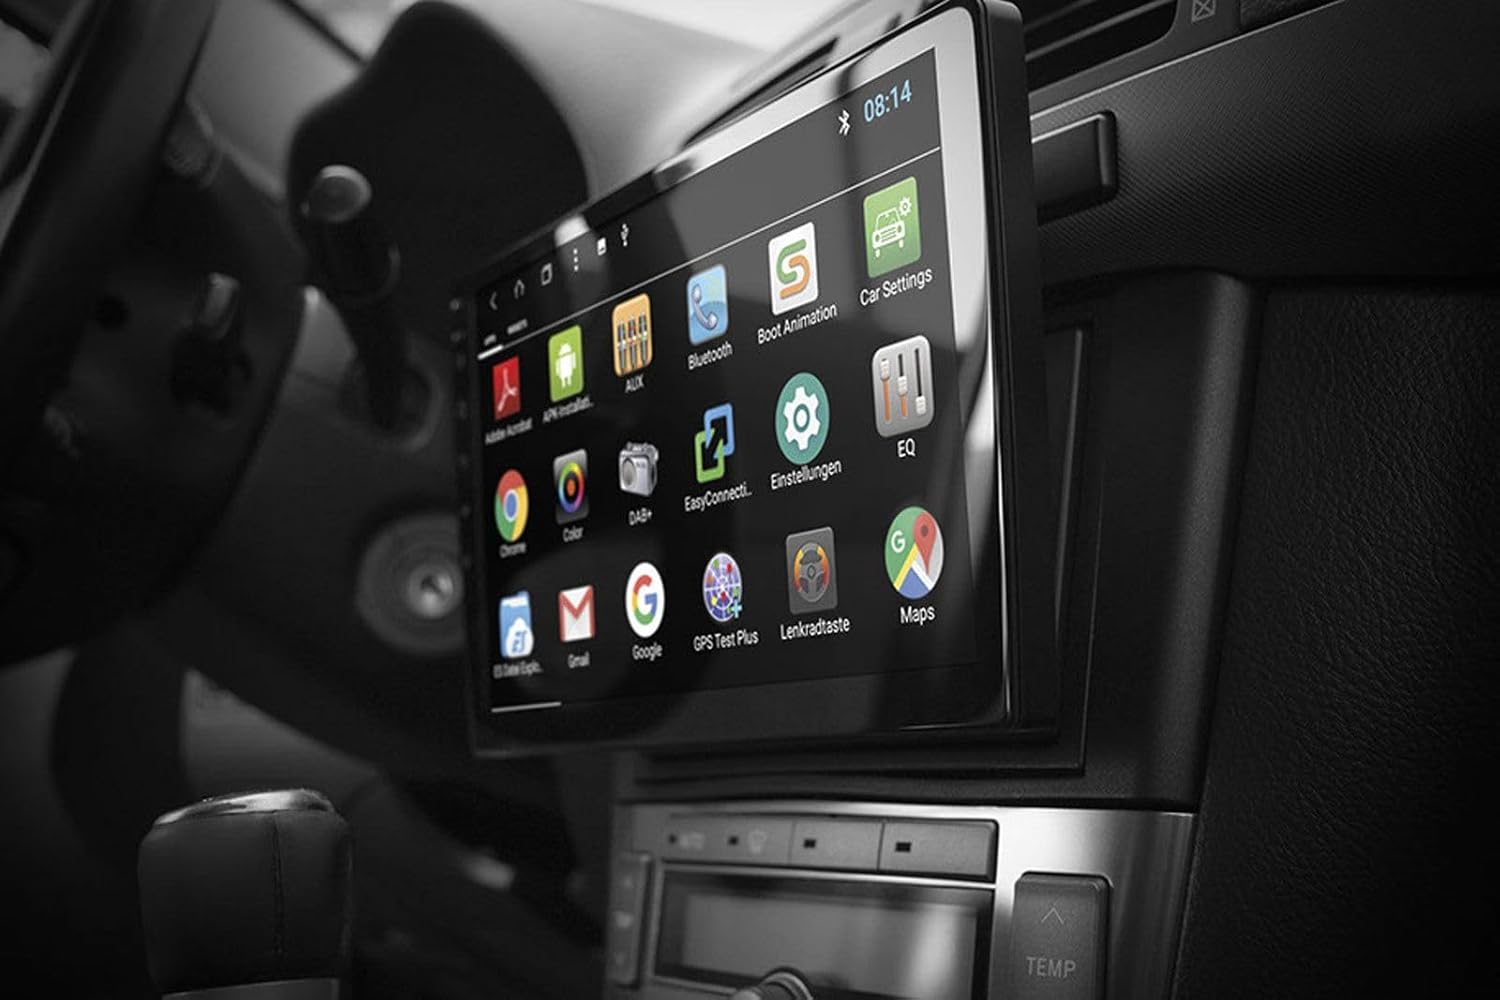
Image: Android App Interface. This image shows the ESX VN1015-MA-DAB-1DIN unit installed in a car, with its screen displaying a grid of Android application icons. Visible apps include Bluetooth, DAB+, EQ, Google, Maps, and various system settings, indicating the unit's smart functionality.
2. Navigazione (GPS)
- The system uses Google Maps for navigation, supporting both online and offline modes.
- Assicurarsi che l'antenna GPS sia collegata e posizionata correttamente.
- For offline maps, download the required map data via a WiFi connection.
- To start navigation, open the Maps application and enter your destination.

Image: Navigation Display. This image illustrates the ESX VN1015-MA-DAB-1DIN unit's screen showing a detailed navigation map. The map displays street names and routes, indicating active GPS guidance within a vehicle's interior.
3. Radio Functions (DAB+/AM/FM)
- Radio digitale DAB+: Access high-quality digital radio broadcasts. The system displays station logos. Ensure the DAB+ antenna is connected.
- Radio AM/FM: Tune into analog radio stations. RDS (Radio Data System) functionality provides station information.
- To switch between radio modes, select the appropriate option in the radio application.
- Scan for stations and save your favorites for quick access.

Image: Radio Interface. This image shows the ESX VN1015-MA-DAB-1DIN unit's screen displaying the FM radio interface. It features a frequency tuner, station presets, and controls for functions like REG, TA, AF, and PTY, indicating comprehensive radio capabilities.
4. Connettività Bluetooth
- Abbinamento: Go to the Bluetooth settings on the unit and your smartphone. Cercare available devices and select "ESX VN1015-MA-DAB-1DIN" (or similar). Enter the PIN if prompted (usually 0000 or 1234).
- Chiamate in vivavoce: Once paired, you can make and receive calls directly from the unit. Use the internal microphone or an optional external microphone for clear communication.
- Streaming audio (A2DP): Stream music from your smartphone to the unit wirelessly.
5. Riproduzione multimediale
- USB/MicroSD: Insert USB drives or MicroSD cards containing audio or video files into the respective ports. The system will automatically detect and allow playback through the media player application.
- Ingresso AUX: Collegare dispositivi audio/video esterni tramite l'ingresso AUX.
- Connessione smartphone: Connect Android or iPhone devices via USB for charging. Some Android devices may support mirroring or data transfer depending on the phone and app.
6. Impostazioni di sistema
- Access the Android settings menu to customize various aspects of the unit, including display, sound, network, and system information.
- You can adjust display brightness, sound equalizer settings, and connect to a WiFi hotspot for internet access.
- Customize boot logos and background images from the settings.
Manutenzione
Regular maintenance ensures the longevity and optimal performance of your ESX navigation system.
- Pulizia dello schermo: Utilizzare un panno morbido e privo di lanugine per pulire delicatamente il touchscreen. Per le macchie ostinate, strofinare leggermenteampPulisci il panno con acqua o un detergente per schermi. Evita prodotti chimici aggressivi o materiali abrasivi.
- Aggiornamenti software: Controllare periodicamente la presenza di aggiornamenti software dal produttore websito o tramite le impostazioni di sistema dell'unità (se disponibili). Gli aggiornamenti possono migliorare le prestazioni e aggiungere nuove funzionalità.
- Cura generale: Evitare di esporre l'unità a temperature estreme, alla luce solare diretta per periodi prolungati o a umidità eccessiva. Assicurarsi che vi sia una ventilazione adeguata attorno all'unità.
Risoluzione dei problemi
If you encounter issues with your ESX navigation system, refer to the following common problems and solutions.
| Problema | Possibile soluzione |
|---|---|
| L'unità non si accende. | Check all power connections (constant 12V, ignition 12V, ground). Verify the vehicle's fuse box and the unit's inline fuse. Ensure the ignition is on. |
| Nessun suono. | Check speaker connections. Ensure volume is not muted or set too low. Verify ampconnessioni del lifier se esterne amplifiers are used. Check audio source selection. |
| Il segnale GPS è debole o non disponibile. | Assicurarsi che l'antenna GPS sia collegata saldamente e posizionata in un luogo con una vista libera view of the sky (e.g., dashboard, under windshield). Avoid obstructions. |
| Il Bluetooth non si connette o è instabile. | Ensure Bluetooth is enabled on both the unit and your smartphone. Delete previous pairings and try re-pairing. Move the phone closer to the unit. Restart both devices. |
| DAB+ radio reception is poor. | Check the DAB+ antenna connection and its placement. Ensure you are in an area with DAB+ coverage. Rescan for stations. |
| Il touchscreen non risponde. | Perform a soft reset of the unit (refer to the system settings for a reset option, or press and hold the power button if available). Ensure the screen is clean and free of debris. |
Specifiche
Key technical specifications for the ESX VN1015-MA-DAB-1DIN navigation system:
- Display: 10.1-inch high-resolution multi-angle LCD touchscreen
- Sistema operativo: Android
- Navigazione: Google Maps (online and offline)
- Connettività: WiFi Hotspot (requires compatible smartphone), Bluetooth (hands-free, audio streaming), USB (2 ports), MicroSD card slot (for navigation and media), AUX/Video input, AUX/Audio input
- Radio: DAB+ Digital Radio (with station logos, DAB antenna included), AM/FM Radio (with RDS function)
- Uscite audio: Front/Rear/Subwoofer pre-amp uscite
- Ingressi: 1 Camera input (adjustable lines), 1 AUX/Video input, 1 AUX/Audio input
- Caratteristiche speciali: Adjustable boot logos and background images, Internal microphone, Connector for optional external microphone (VNA-MIC-AND), Steering wheel control support (optional adapter required)
- Metodo di controllo: Schermo tattile
- Tipo di servizio del veicolo: Auto
- Produttore: ESX
- Paese di origine: Cina
Informazioni sulla garanzia
The ESX VN1015-MA-DAB-1DIN unit includes a Certificate of Authenticity. For specific warranty terms and conditions, please refer to the documentation provided with your purchase or contact your retailer. Information regarding spare parts availability and guaranteed software updates is not explicitly provided.
Assistenza clienti
If you require further assistance or have questions not covered in this manual, please contact your authorized ESX dealer or the retailer from whom you purchased the product. They can provide specialized support and service.


