Introduzione
This user manual provides detailed instructions for the installation, operation, maintenance, and troubleshooting of the Aruba AP-555 Wireless Access Point. Please read this manual thoroughly before using the device to ensure proper setup and optimal performance.
Prodotto finitoview
The Aruba AP-555 is an advanced 802.11ax (Wi-Fi 6) wireless access point designed for high-density environments. It supports aggregate peak data rates of up to 5.95 Gbit/s across 2.4 GHz and 5 GHz bands, leveraging MIMO and Beamforming technologies for enhanced performance. This access point is ideal for accommodating a large number of mobile and IoT devices, ensuring robust and efficient wireless connectivity.
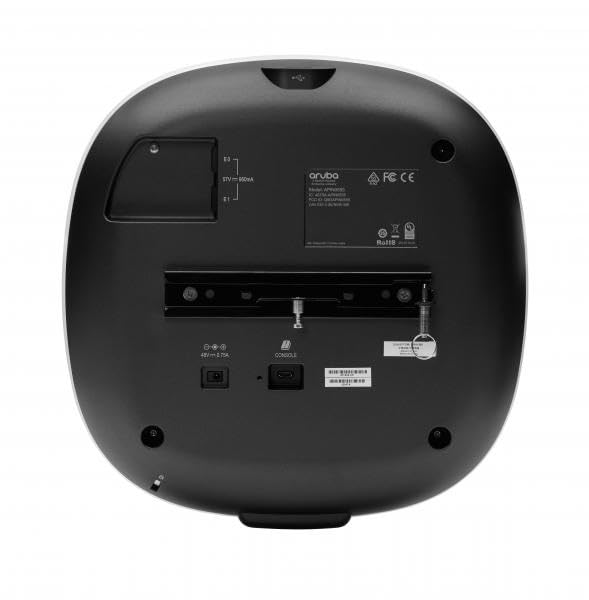
This image displays the rear panel of the Aruba AP-555 Wireless Access Point. Visible features include the mounting bracket, Ethernet ports (E0, E1), a USB port, a console port, and the power input (48V – 0.75A). Regulatory markings such as Aruba logo, FCC, CE, and RoHS are also present.
Impostare
1. Disimballaggio
Carefully remove all components from the packaging. Verify that all items listed in the packing list are present and undamaged. Retain the packaging for future transport or storage.
2. Montaggio
The Aruba AP-555 can be mounted on a wall or ceiling. Use the provided mounting bracket and hardware. Ensure the mounting surface is sturdy enough to support the access point's weight (approximately 3.46 pounds).
- Montaggio a parete: Secure the bracket to the wall using appropriate screws and anchors.
- Montaggio a soffitto: Attach the bracket to a ceiling tile rail or a solid ceiling structure.
3. Connecting Power and Network
Connect the power adapter to the 48V – 0.75A power input port on the rear of the access point. Connect an Ethernet cable from your network switch or router to one of the RJ-45 network ports (E0 or E1) on the AP-555. Power over Ethernet (PoE) can also be used if supported by your network infrastructure.
4. Configurazione iniziale
Upon powering on, the access point will initiate its boot sequence. Access the device's management interface via a web browser or a dedicated management software (e.g., Aruba Central, AirWave) to perform initial configuration, including setting up SSIDs, security protocols, and network parameters.
Istruzioni per l'uso
Indicatori LED
The AP-555 features LED indicators that provide status information:
- LED di potenza: Indicates power status (e.g., solid green for normal operation, blinking for boot-up).
- LED radio: Indicate activity on the 2.4 GHz and 5 GHz radios.
Collegamento dei dispositivi
Once configured, wireless clients can connect to the SSIDs broadcast by the AP-555 using the specified security credentials.
Configurazione di rete
Further network configurations, such as VLAN tagging, QoS settings, and guest access, can be managed through the access point's web interface or centralized management platform.
Manutenzione
Aggiornamenti del firmware
Regularly check for and apply firmware updates from the Hewlett Packard Enterprise support websito. Gli aggiornamenti del firmware spesso includono miglioramenti delle prestazioni, patch di sicurezza e nuove funzionalità.
Pulizia
Clean the exterior of the access point with a soft, dry cloth. Do not use liquid cleaners or aerosols. Ensure ventilation openings are free from dust and obstructions.
Considerazioni ambientali
Ensure the access point is operated within its specified temperature and humidity ranges. Avoid placing it near heat sources or in direct sunlight.
Risoluzione dei problemi
Nessun potere
- Verify the power adapter is securely connected to the AP and a working power outlet.
- Check if the power LED is illuminated.
Nessuna connettività di rete
- Ensure the Ethernet cable is properly connected to a functional network port.
- Check the status of the network switch port.
- Verify network settings in the AP's configuration interface.
Prestazioni lente
- Check for channel interference and adjust channel settings if necessary.
- Assicurarsi che sia installato il firmware più recente.
- Review client density and network traffic.
Ripristino del dispositivo
To perform a factory reset, locate the reset button (often recessed) and press it for a specified duration (refer to the device's quick start guide or online documentation for exact timing, typically 5-10 seconds) while the device is powered on.
Specifiche
| Caratteristica | Dettaglio |
|---|---|
| Numero di modello | JZ366A |
| Dimensioni del prodotto | 10.2 x 10.2 x 2.3 pollici |
| Peso dell'articolo | 3.46 libbre |
| Produttore | Azienda Hewlett Packard |
| standard wireless | 802.11ax (Wi-Fi 6) |
| Aggregate Data Rate | Fino a 5.95 Gbit/s |
| Bande di frequenza | 2.40 GHz, 5 GHz |
| Configurazione MIMO | 8x8 MIMO (5GHz), 4x4 MIMO (2.4GHz) |
| Porti | 2 x Network (RJ-45), 1 x USB, 1 x Console |
| Potenza in ingresso | 48 V – 0.75 A |
| Opzioni di montaggio | Wall Mountable, Ceiling Mountable |
Garanzia e supporto
For detailed warranty information, please refer to the warranty card included with your product or visit the official Hewlett Packard Enterprise support website. Technical support, drivers, and additional documentation can be found on the manufacturer's websito.
Produttore Websito: www.hpe.com/aruba


