1. Introduzione
Thank you for choosing the ErGear Laptop and Monitor Arm, Model EGCM16. This product is designed to enhance your workspace by providing a versatile and ergonomic solution for mounting your laptop or monitor. It allows for flexible positioning, helping to reduce strain and improve productivity. Please read this manual carefully before installation and use to ensure proper setup and operation.

Figure 1: ErGear Laptop and Monitor Arm (Model EGCM16) with laptop tray and clamp montare.
Caratteristiche del prodotto:
- Doppia compatibilità: Supports laptops up to 15.6 inches (max 10kg) and monitors from 13 to 27 inches (max 10kg) with VESA 75x75mm or 100x100mm patterns.
- Ergonomia regolabile: Offers height, tilt, swivel, and rotation adjustments for optimal viewangoli di inclinazione.
- Design salvaspazio: Elevates your device, freeing up valuable desk space.
- Due opzioni di montaggio: Includes both C-clamp and grommet mounting hardware for versatile installation.
- Gestione cavi integrata: Keeps your workspace tidy by routing cables along the arm.
2. Informazioni sulla sicurezza
Per evitare lesioni o danni al prodotto, osservare le seguenti precauzioni di sicurezza:
- Do not exceed the maximum weight capacity of 10kg (22 lbs) for either laptop or monitor.
- Ensure the mounting surface (desk) is stable and strong enough to support the combined weight of the arm and your device.
- Tighten all screws securely during installation. Loose connections can cause instability.
- Tenere bambini e animali domestici lontani dall'area di installazione.
- Do not attempt to disassemble or modify the product. Contact customer support if you encounter issues.
- Exercise caution when adjusting the arm to avoid pinching fingers or damaging devices.
3. Contenuto della confezione
Verificare che tutti i componenti siano presenti prima di iniziare l'installazione:
- Polo principale
- Braccio girevole
- Vassoio per laptop
- C-Clamp Assemblea
- Gruppo di montaggio passacavo
- Piastra VESA
- Fermacavi
- Kit hardware (viti, rondelle, chiavi a brugola)
- Manuale d'uso
4. Configurazione e installazione
This arm supports two installation methods: C-clamp and Grommet mount. Choose the method suitable for your desk.

Figure 2: Illustration of C-clamp e opzioni di montaggio tramite passacavo.
4.1 Compatibilità con la scrivania
- C-Clamp: Compatible with desk thickness from 10mm to 78mm.
- Supporto passacavo: Compatible with desk thickness from 10mm to 60mm. Requires a pre-drilled hole in the desk.

Figure 3: Product dimensions and compatible desk thickness for mounting.
4.2 C-clamp Installazione
- Allega il C-clamp assembly to the bottom of the main pole.
- Position the main pole on your desk edge.
- Stringere il C-clamp screw until the pole is securely fastened to the desk.
4.3 Grommet Mount Installation
- Smontare il C-clamp from the main pole and attach the grommet mount assembly.
- Insert the main pole through the pre-drilled hole in your desk.
- Secure the grommet plate and tighten the nut from underneath the desk until the pole is stable.
4.4 Attaching the Arm and Device
- Slide the swivel arm onto the main pole at your desired height and secure it with the provided collar and screw.
- Per il computer portatile: Attach the laptop tray to the end of the swivel arm. Place your laptop on the tray.
- Per il monitor: Remove the laptop tray. Attach the VESA plate to the back of your monitor using the appropriate screws from the hardware kit. Ensure your monitor is VESA 75x75mm or 100x100mm compatible.

Figure 4: VESA mounting patterns (75x75mm and 100x100mm) for monitor installation.

Figure 5: Compatibility for laptops up to 17 inches and monitors from 15-32 inches, both up to 10kg.
- Slide the monitor (with VESA plate attached) onto the end of the swivel arm.
- Assicurarsi che tutti i collegamenti siano ben saldi e sicuri.
5. Funzionamento e regolazioni
The ErGear arm offers multiple adjustment points to customize your viewesperienza di acquisizione.

Figure 6: Demonstrates the tilt (±90°), swivel (±90°), and 360° rotation capabilities of the arm.
5.1 Regolazione dell'altezza
To adjust the height of your device, loosen the collar on the main pole, slide the arm to the desired height, and then re-tighten the collar securely.
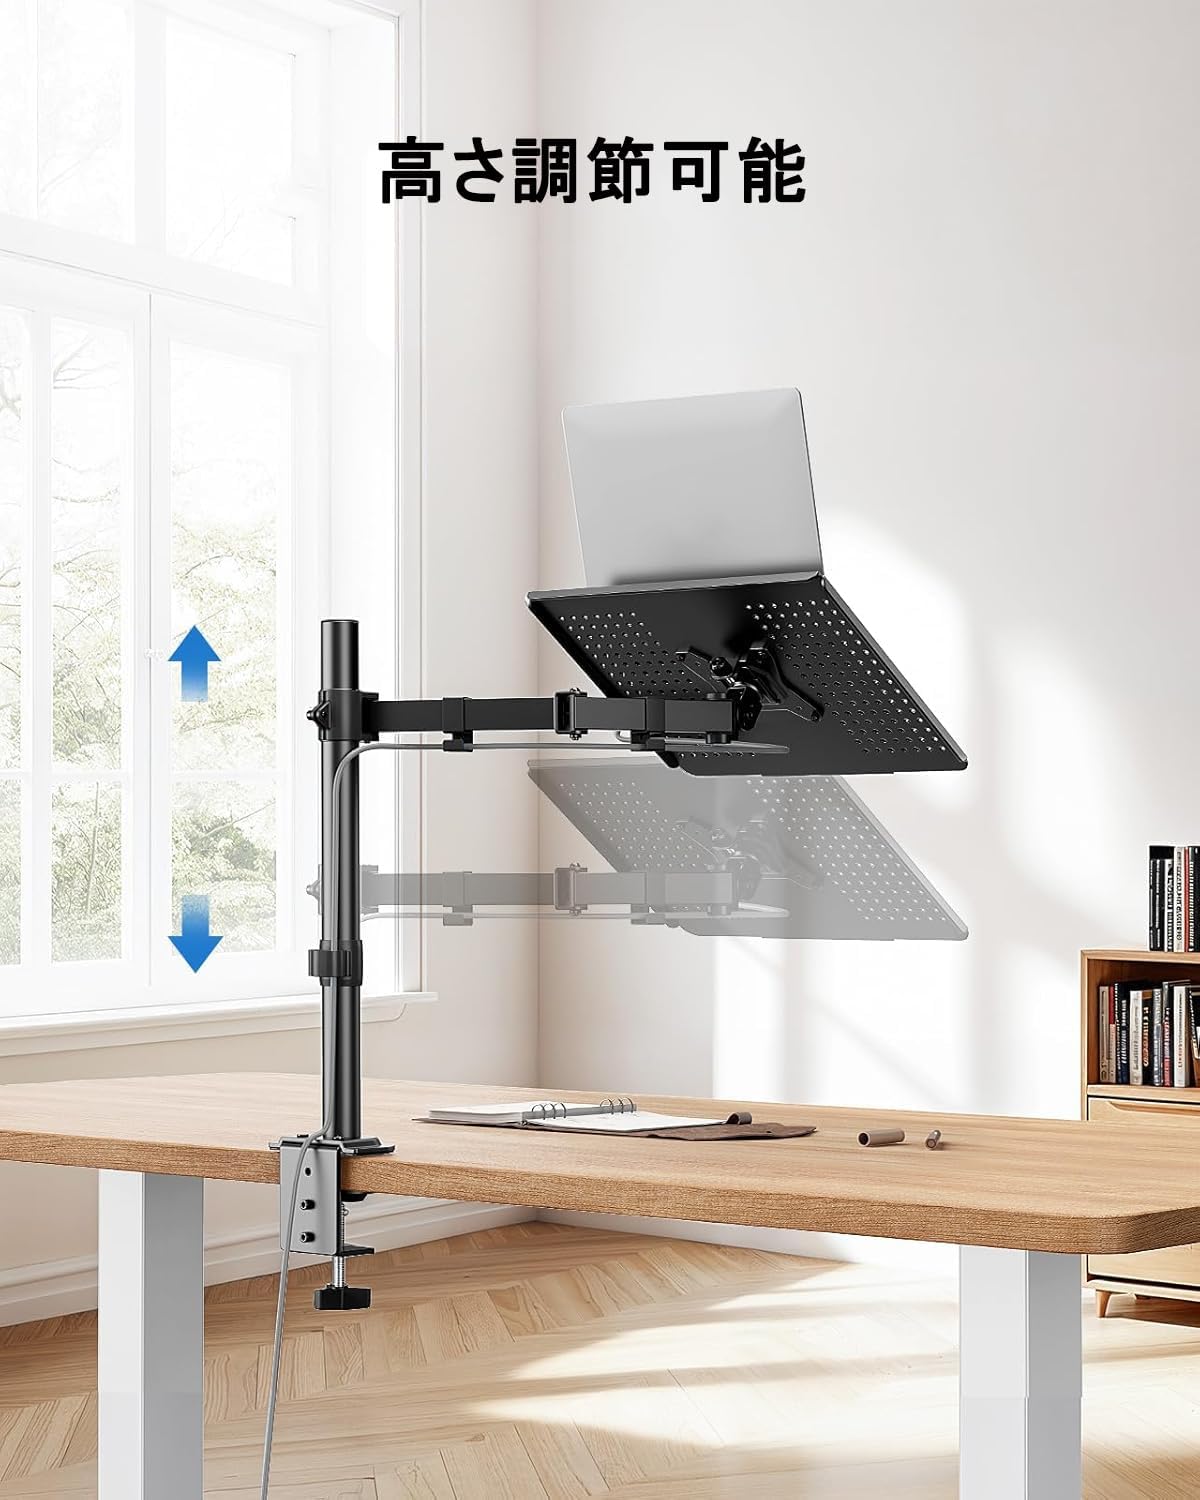
Figure 7: The arm allows for vertical height adjustment along the main pole.
5.2 Inclinazione, rotazione e rotazione
- Inclinazione: The laptop tray or monitor can be tilted up or down by ±90 degrees to reduce glare and find a comfortable viewing angle. Adjust the tilt mechanism on the arm.
- Girevole: The arm can swivel left or right by ±90 degrees, allowing you to share your screen or adjust your position.
- Rotazione: The VESA plate (for monitors) allows for 360-degree rotation, enabling portrait or landscape orientation.
5.3 Gestione dei cavi
Utilize the integrated cable clips along the arm to route your power and data cables. This helps maintain a clean and organized workspace.

Figure 8: Cables can be neatly routed along the arm using the integrated clips.
5.4 Ventilation Design
The laptop tray features a perforated design to promote airflow and prevent your laptop from overheating during extended use.

Figure 9: The laptop tray's ventilated surface helps dissipate heat from your device.
5.5 Benefici ergonomici
Proper adjustment of the arm can significantly improve your posture and reduce discomfort. Position your screen so that the top of the display is at or slightly below eye level, and your arms are comfortable when typing.

Figure 10: Illustrates how proper arm adjustment can lead to a more comfortable and ergonomic desk setup.
6. Manutenzione
Regular maintenance ensures the longevity and optimal performance of your ErGear arm.
- Pulizia: Wipe the arm and tray with a soft, damp panno. Evitare detergenti abrasivi o solventi.
- Controllo di tenuta: Controllare periodicamente tutte le viti e i collegamenti per assicurarsi che siano ben serrati. Serrare nuovamente se necessario.
- Lubrificazione: Solitamente per questo prodotto non è richiesta alcuna lubrificazione.
7. Risoluzione Dei Problemi
In caso di problemi, fare riferimento ai seguenti problemi comuni e alle relative soluzioni:
- Arm is unstable/wobbly:
- Assicurare il C-clamp o il supporto passacavo sia fissato saldamente alla scrivania.
- Verify that the swivel arm is properly secured to the main pole.
- Check that the laptop tray or VESA plate is firmly attached to the arm.
- Device is too heavy/arm sags:
- Confirm that your device's weight does not exceed the 10kg (22 lbs) capacity.
- Ensure all adjustment points are tightened sufficiently to hold the weight.
- Difficulty adjusting arm:
- Loosen the relevant screws slightly before attempting to adjust, then re-tighten.
- Do not force adjustments.
- Cables are not neat:
- Re-route cables through the provided cable clips.
- Ensure cables have enough slack for full arm movement.
Se i problemi persistono, contattare l'assistenza clienti ErGear.
8. Specifiche
| Caratteristica | Specificazione |
|---|---|
| Numero di modello | GEGCM16 |
| Marca | Ingranaggio Er |
| Colore | Grigio |
| Materiale | Acciaio inossidabile |
| Tipo di montaggio | Desk Mount (C-Clamp, Occhiello) |
| Tipo di movimento | Adjustable (Height, Tilt, Swivel, Rotation) |
| Capacità di carico massima | 10 kg (22 libbre) |
| Compatibilità del computer portatile | Fino a 15.6 pollici |
| Monitorare la compatibilità | 13-27 pollici |
| Compatibilità VESA | 75x75mm, 100x100mm |
| Angolo di inclinazione massimo | ±90 gradi |
| Angolo di rotazione | ±90 gradi |
| Rotazione | 360 gradi |
| C-Clamp Spessore scrivania | 10-78 millimetri |
| Spessore della scrivania con occhielli | 10-60 millimetri |
| Dimensioni del prodotto (L x P x A) | Dimensioni: 52 x 31 x 10 cm |
| Peso del prodotto | 3.55 kg |
| Codice UPC | 619191841493 |
9. Garanzia e supporto
ErGear products are manufactured with quality and reliability in mind. This product comes with a standard manufacturer's warranty against defects in materials and workmanship. Please refer to the product packaging or the ErGear official websito per termini e durata specifici della garanzia.
For technical assistance, troubleshooting, or warranty claims, please contact ErGear customer support through the retailer where you purchased the product or visit the official ErGear websito per le informazioni di contatto.


