Introduzione
This manual provides comprehensive instructions for the installation, operation, and maintenance of your Emtek 220306 Modern Rectangular 6-Inch Flush Door Pull. Please read these instructions carefully before beginning installation to ensure proper function and longevity of the product. This flush pull is designed for applications where a handle with no projection is desired, such as on pocket doors or cabinet doors that open into a wall.
Informazioni sulla sicurezza
Always exercise caution when handling tools and hardware. Wear appropriate personal protective equipment, such as safety glasses, during installation. Keep small parts away from children. Ensure the installation surface is stable and suitable for mounting the hardware.
Contenuto della confezione
Verify that all components are present before beginning installation. Your package should contain:
- Emtek 220306 Modern Rectangular Flush Door Pull (Quantity: 2, as per unit count)
- Hardware di installazione (viti)
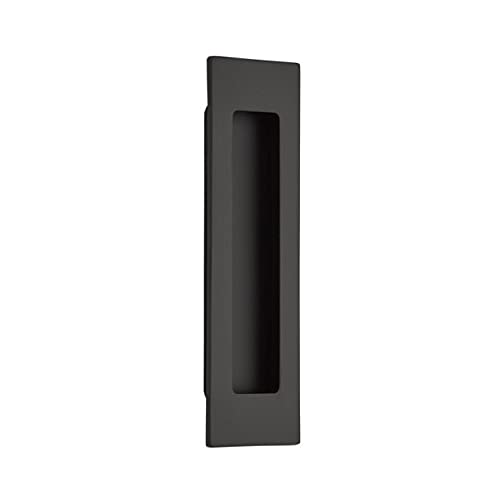
Image: The Emtek 220306 Modern Rectangular Flush Door Pull in Flat Black finish. This image shows the front view of the rectangular pull, which is designed to sit flush with the door surface.
Configurazione e installazione
Strumenti necessari:
- Metro a nastro o righello
- Matita
- Trapano
- Punte da trapano appropriate
- Chisel (for mortising)
- Cacciavite (manuale o elettrico)
- Occhiali di sicurezza
Fasi di installazione:
- Preparare la superficie della porta: Determine the desired location for the flush pull on your door or cabinet. Mark the outline of the pull accurately using a pencil.
- Mortise the Opening: The Emtek 220306 is a flush pull and requires a mortise (recessed opening) in the door. Carefully use a chisel or router to create a recess that matches the dimensions of the pull. Ensure the depth of the mortise allows the pull to sit perfectly flush with the door surface. Note: This step requires precision. If you are unsure, consult a professional.
- Praticare i fori pilota: Once the mortise is complete, position the flush pull in the recess. Mark the locations for the screw holes. Remove the pull and drill pilot holes for the mounting screws. Ensure pilot holes are of appropriate size to prevent wood splitting.
- Secure the Pull: Place the flush pull back into the mortise, aligning the screw holes. Insert the provided screws and tighten them securely. Avoid over-tightening, which can damage the door or the pull's finish.
- Controllo finale: Test the door or cabinet operation to ensure the pull is securely mounted and does not interfere with movement.

Immagine: un primo piano view of an Emtek 220306 flush door pull, showing the mounting holes. This image helps visualize the hardware for installation.
Istruzioni per l'uso
The Emtek 220306 Flush Door Pull is designed for simple manual operation. To open or close the door, place your fingers into the recessed area of the pull and apply gentle force in the desired direction. The pull provides a grip point for moving sliding doors or opening cabinet doors.
Manutenzione
To maintain the appearance and functionality of your Emtek flush door pull:
- Pulizia: Pulire la superficie con un panno morbido, damp cloth. Avoid abrasive cleaners, harsh chemicals, or polishes that may damage the finish.
- Ispezione: Periodically check the mounting screws for tightness. If any screws are loose, gently tighten them to ensure the pull remains secure.
- Cura finale: The Flat Black finish is durable, but care should be taken to avoid scratching. Do not use sharp objects near the pull.
Risoluzione dei problemi
| Problema | Possibile causa | Soluzione |
|---|---|---|
| Pull feels loose | Le viti di montaggio sono allentate. | Stringere le viti di montaggio con un cacciavite. Non serrare eccessivamente. |
| Scratches on finish | Accidental contact with sharp objects or abrasive cleaning. | Avoid using sharp tools during installation. Clean with soft cloths only. Minor scratches may be permanent. |
| Difficile da afferrare | Design characteristic of a flush pull. | Flush pulls are designed for minimal projection. This is inherent to the design. Ensure fingers are clean and dry for best grip. |
Specifiche
- Numero modello: 220306 (Specific variant: 220306US19)
- Marca: EMTEK
- Materiale: Metallo (ottone)
- Colore: Nero piatto
- Dimensioni del prodotto: 6"L x 1.75"W
- Peso dell'articolo: 7.8 once (0.22 chilogrammi)
- Handle Attachment Mechanism: Vite
- Tipo di blocco: No Lock
- Conteggio unità: 2.0 Count (implies 2 pulls per package)
- Caratteristica speciale: Facile da installare
- Codice UPC: 738505030825
Informazioni sulla garanzia
Emtek products are manufactured to high-quality standards. For specific warranty details regarding your Emtek 220306 Flush Door Pull, please refer to the official Emtek website or contact Emtek customer service directly. Keep your proof of purchase for warranty claims.
Supporto
If you encounter any issues or have questions not covered in this manual, please contact Emtek customer support. Visit the official Emtek websito per informazioni di contatto, FAQ e risorse aggiuntive.
Websito: www.emtek.com (Exampil collegamento (il collegamento effettivo può variare)


