1. Introduzione e oltreview
The Docooler JINGSHA X99-8D3 is a high-performance ATX gaming motherboard designed for LGA2011 V3 processors. It features four-channel DDR3 memory support, an M.2 NVME slot for high-speed storage, and multiple PCI-E expansion slots, making it suitable for demanding computing tasks and gaming setups. This manual will guide you through the installation, configuration, and maintenance of your motherboard.
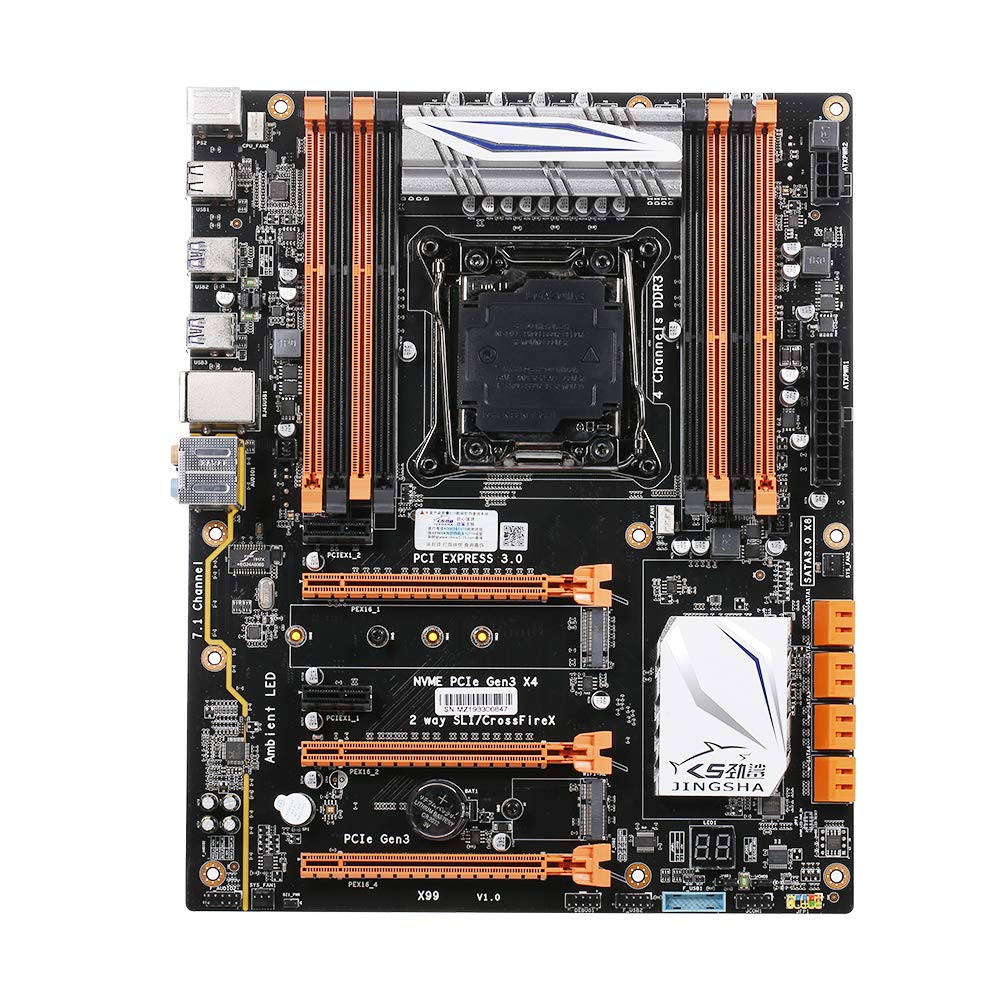
Figura 1.1: Dall'alto verso il basso view of the Docooler JINGSHA X99-8D3 Motherboard, showcasing its layout with CPU socket, RAM slots, and various expansion slots.
2. Caratteristiche principali
- M.2 NVME Support: Equipped with an M.2 hard disk port, supporting high-speed PCI-E NVME X4 for optimal operating system and application driver performance.
- Quad-Channel DDR3 Memory: Features 8 DDR3 memory slots across 4 channels, significantly improving capacity and performance, supporting up to 256GB.
- Scheda diagnostica digitale: Integrated digital diagnostic card automatically tests hardware devices to ensure proper operation and assist in troubleshooting.
- Multiple PCI-E Expansion Slots: Provides 3 PCI-E expanded slots, configurable as X16/X8 to handle various workloads and multi-GPU setups.
- Costruzione durevole: Built with a 10-layer PCB and high-quality capacitors for enhanced stability and heat resistance.

Figure 2.1: Diagram illustrating the six core technologies and features of the motherboard, including 4-channel DDR3*8, M.2 hard disk interface, digital diagnostic card, 7.1 channel audio, SATA3.0*8 interface, and Crossfire support.
3. Contenuto della confezione
Si prega di verificare che tutti gli articoli elencati di seguito siano presenti nel pacco:
- 1x Docooler JINGSHA X99-8D3 Motherboard
- 1x cavo SATA
- 1x I/O Baffle (Backplate)
- 1x CPU Fan Board
- A bag of screws
4. Specifiche
| Caratteristica | Specificazione |
|---|---|
| Modello | X99-8D3 |
| Fattore di forma | ATX |
| Graphic Slot | PCIE3.0 16X*3 |
| Scheda di rete | Scheda di rete Gigabit |
| Canale audio | 7.1 canali |
| CPU Type Support | LGA2011 V3 (2629V3/2649V3/2669V3/2678V3/2696V3/2676V3/2673V3) |
| Strati PCB | 10 strati |
| Slot di memoria | DDR3*8 |
| Capacità massima di memoria | 256 GB |
| Interfaccia SATA | SATA3.0*8, M.2 NVME |
| Interfaccia PS/2 | Mouse / Tastiera |
| Alimentazione elettrica | 8 PIN*1, 24 PIN*1 |
| Interfaccia USB | USB3.0*6, USB2.0*6 |
| Expanded Interface | PCIE 1X*2, M.2 WIFI*1 |
| Dimensioni dell'articolo | 30.2 x 24.4 cm (11.89 x 9.61 pollici) |
| Peso dell'articolo | 930.5 g (32.82 once) |

Figura 4.1: dettagliata view of the motherboard's rear I/O panel, showing PS/2 ports, USB 2.0, USB 3.0, Gigabit Network Port, and 7.1 Audio Ports.
5. Configurazione e installazione
Prima di iniziare l'installazione, assicurarsi che il sistema sia spento e scollegato dalla presa a muro. Afferrare la scheda madre dai bordi per evitare scariche elettrostatiche.
5.1 Installazione della CPU
- Locate the LGA2011 V3 CPU socket on the motherboard.
- Gently push down the CPU retention lever and swing it open.
- Align the triangular mark on your CPU with the corresponding mark on the socket. Carefully place the CPU into the socket without forcing it.
- Chiudere la leva di fissaggio per fissare la CPU.
- Applicare uno strato sottile e uniforme di pasta termica sulla parte superiore della CPU.
- Installare il dissipatore della CPU seguendo le istruzioni del produttore, assicurandosi che il contatto e la pressione siano corretti.

Figura 5.1: primo piano view of the LGA2011 V3 CPU socket on the motherboard, ready for CPU installation.
5.2 Installazione dei moduli RAM
- Aprire le clip su entrambe le estremità degli slot di memoria DDR3.
- Allineare la tacca sul modulo RAM con la chiave nello slot di memoria.
- Press down firmly on both ends of the RAM module until the clips snap into place, securing the module.
- For optimal performance, install RAM modules in matching pairs across the four channels as indicated in the motherboard manual or silkscreen.

Figura 5.2: View of the eight DDR3 RAM slots on the motherboard, showing their arrangement for quad-channel memory configuration.
5.3 Installing Storage Devices (M.2 NVME & SATA)
- SSD M.2 NVMe: Locate the M.2 slot. Insert the M.2 SSD at an angle into the slot, then gently push it down and secure it with the provided screw.
- Unità SATA: Connect your SATA SSDs or HDDs to the SATA 3.0 ports using SATA data cables. Ensure the power supply SATA power connectors are also attached to the drives.

Figure 5.3: Close-up of the M.2 interface on the motherboard, highlighting its position and the PCI-E Gen3 X4 connection for high-speed data transfer.
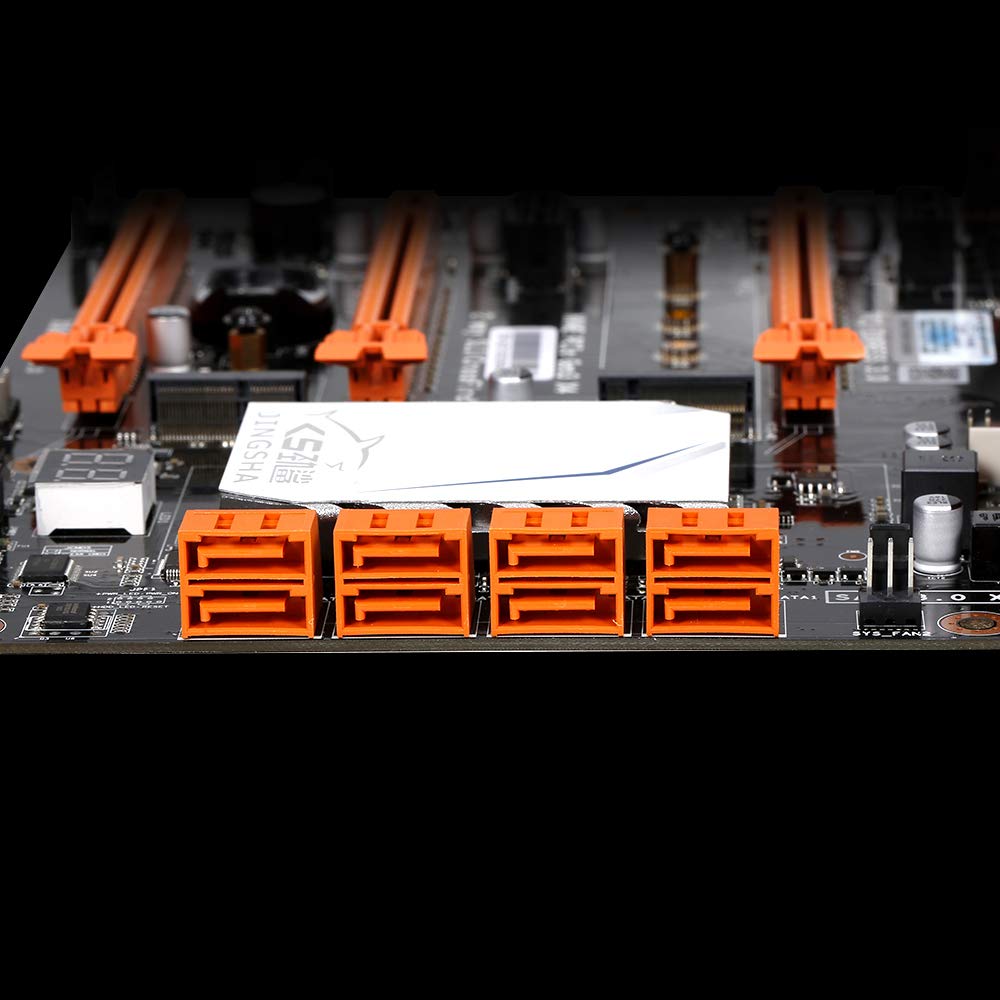
Figura 5.4: View of the eight orange SATA 3.0 ports on the motherboard, providing ample connectivity for storage devices.
5.4 Collegamento dell'alimentazione
- Collegare il connettore di alimentazione ATX a 24 pin dell'alimentatore (PSU) alla porta corrispondente sulla scheda madre.
- Connect the 8-pin CPU power connector (EPS12V) from your PSU to the 8-pin port near the CPU socket.
5.5 Installazione delle schede di espansione (PCIe)
- Locate the desired PCI-E 3.0 x16 or x1 slots.
- Rimuovere il coperchio dello slot di espansione corrispondente dal case del PC.
- Align the expansion card with the slot and press down firmly until it is fully seated. Secure the card with a screw to the case.

Figura 5.5: Angolato view of the motherboard, highlighting the three PCI Express 3.0 x16 slots and the smaller PCIe x1 slots, ready for graphics cards and other expansion cards.
6. Funzionamento della scheda madre
6.1 Primo avvio e configurazione del BIOS
- Dopo aver assemblato tutti i componenti, collega il monitor, la tastiera e il mouse.
- Power on your system. During the initial boot sequence, repeatedly press the DEL or F2 key (common for JINGSHA motherboards) to enter the BIOS/UEFI setup utility.
- Nel BIOS, verificare che tutti i componenti installati (CPU, RAM, storage) siano rilevati correttamente.
- Configura l'ordine di avvio per dare priorità al supporto di installazione del sistema operativo (unità USB o DVD).
- Salvare le modifiche ed uscire dal BIOS. Il sistema verrà riavviato.
6.2 Installazione del sistema operativo
Follow the instructions provided with your operating system (e.g., Windows, Linux) to complete the installation process. Ensure you install all necessary drivers for the motherboard's chipsets, network, audio, and other components from the manufacturer's websito o disco driver incluso.
7. Manutenzione
Una corretta manutenzione garantisce la longevità e il funzionamento stabile della scheda madre.
- Rimozione della polvere: Pulire regolarmente la scheda madre e i componenti dalla polvere utilizzando aria compressa. Assicurarsi che il sistema sia spento e scollegato prima di procedere alla pulizia.
- Aggiornamenti del BIOS: Periodically check the Docooler or JINGSHA official website for BIOS updates. BIOS updates can improve compatibility, stability, and performance. Follow update instructions carefully to avoid damaging the motherboard.
- Aggiornamenti driver: Mantieni aggiornati i driver del tuo sistema per garantire prestazioni ottimali e compatibilità con nuovi software e hardware.
- Condizioni ambientali: Operate the motherboard in a well-ventilated environment with stable temperature and humidity to prevent overheating and component degradation.
8. Risoluzione Dei Problemi
Questa sezione affronta i problemi più comuni che potresti incontrare.
8.1 Nessuna alimentazione / Nessun avvio
- Assicurarsi che i connettori di alimentazione ATX a 24 pin e CPU a 8 pin siano saldamente collegati alla scheda madre.
- Check if the power supply unit (PSU) is switched on and connected to a working power outlet.
- Verify that the front panel power button cable is correctly connected to the motherboard's header.
8.2 Nessuna uscita di visualizzazione
- Ensure your graphics card (if dedicated) is properly seated in its PCI-E slot and has all necessary power cables connected.
- Check that your monitor cable is securely connected to the graphics card or motherboard (if integrated graphics are used, though X99 typically requires a dedicated GPU).
- Try reseating your RAM modules. Incorrectly seated RAM is a common cause of no display.
8.3 POST Code Display (Digital Diagnostic Card)
The motherboard is equipped with a digital diagnostic card (POST code display) that shows a two-digit code during boot-up. Refer to the motherboard's detailed technical documentation (often available on the manufacturer's website) for a list of POST codes and their meanings. This can help pinpoint the exact component causing a boot failure.

Figura 8.1: primo piano view showing the integrated digital diagnostic card (POST code display) on the motherboard, which assists in identifying hardware issues during boot.
9. Garanzia e supporto
For warranty information and technical support, please refer to the documentation provided with your purchase or visit the official Docooler or JINGSHA websito. Conservare la prova d'acquisto per eventuali reclami in garanzia.


