1. Introduzione
This manual provides comprehensive instructions for the installation, operation, and maintenance of the SINOTIMER TM919B 30A Programmable Electronic Timer Switch. This device is designed to automatically control the ON/OFF switching of various electrical appliances based on user-defined daily or weekly programs. Please read this manual carefully before installation and use to ensure proper function and safety.
2. Informazioni sulla sicurezza
WARNING: Risk of electric shock. Installation should only be performed by a qualified electrician or trained personnel.
- Prima di installare o effettuare la manutenzione dell'interruttore temporizzato, scollegare sempre l'alimentazione dall'interruttore automatico.
- Assicurarsi che tutti i collegamenti elettrici siano sicuri e conformi alle normative elettriche locali.
- Non superare il carico massimo nominale di 30A.
- This device is intended for indoor use only. Avoid exposure to moisture or extreme temperatures.
- Non tentare di smontare o riparare l'unità da soli. Contattare personale di assistenza qualificato.
3. Prodotto finitoview
The SINOTIMER TM919B is a digital timer switch featuring a large LCD display, multiple programming options, and a manual override function. It is designed for DIN rail mounting.
3.1. Componenti e controlli
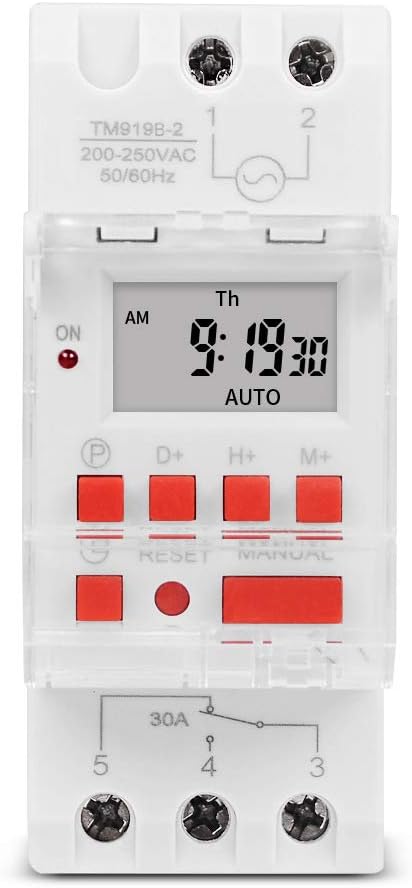
Figura 1: Davanti view of the TM919B timer switch, showing the LCD display, control buttons, and terminal connections.

Figura 2: Angolato view of the TM919B with the transparent protective cover open, revealing the programming buttons (P, D+, H+, M+, RESET, MANUAL).
- Schermo LCD: Mostra l'ora corrente, il giorno e lo stato del programma.
- Pulsante P (Programma): Entra/esce dalla modalità di impostazione del programma.
- Pulsante D+ (Giorno): Adjusts day of the week in setting modes.
- Pulsante H+ (Ora): Adjusts hour in setting modes.
- Pulsante M+ (Minuti): Adjusts minute in setting modes.
- Pulsante di reset: Clears all settings and resets the timer to factory defaults.
- Pulsante MANUALE: Alterna tra le modalità ON, AUTO e OFF.
- Connessioni terminali: For power input and load output.
4. Specifiche
| Caratteristica | Specificazione |
|---|---|
| Modello | TM919B |
| Voltage | 220 V (CA 200-250 V) |
| Frequenza | Frequenza 50/60 Hz |
| Carico massimo | 30A (carico resistivo) |
| Programmi | 16 ON/OFF programs per day/week |
| Intervallo minimo | 1 minuto |
| Batteria di backup | Built-in rechargeable battery (for memory retention) |
| Montaggio | Guida DIN da 35 mm |
| Dimensioni | Fare riferimento alla Figura 3 |

Figura 3: Detailed dimensions of the TM919B timer switch, showing height, width, and depth measurements.
5. Configurazione e installazione
Follow these steps for safe and correct installation of your timer switch.
5.1. Montaggio
- Assicurarsi che l'alimentazione sia scollegata dall'interruttore principale.
- Mount the TM919B onto a standard 35mm DIN rail. The device features a clip mechanism on the back for secure attachment.
- Press the orange clip at the bottom of the unit to release it from the DIN rail if removal is necessary.

Figura 4: Lato view of the TM919B, highlighting the orange DIN rail mounting clip.

Figura 5: Indietro view of the TM919B, illustrating the DIN rail mounting mechanism.
5.2. Schema elettrico
Refer to the diagram below for correct wiring connections. Ensure all connections are tight and insulated.

Figura 6: Lato view of the TM919B showing the wiring diagram printed on the casing. Terminals 1 and 2 are for power input (L and N). Terminals 3, 4, and 5 are for load output (Common, Normally Open, Normally Closed).
- Terminal 1 e 2: Power Input (L - Live, N - Neutral). Connect your 220V AC supply here.
- Terminale 3: Common (COM) for the output relay.
- Terminale 4: Normally Open (NO) output. The load will be powered when the timer is ON.
- Terminale 5: Normally Closed (NC) output. The load will be powered when the timer is OFF.
For typical applications where the load is switched ON by the timer, connect the load between Terminal 3 (COM) and Terminal 4 (NO).
6. Istruzioni per l'uso
6.1. Initial Setup and Reset
- After connecting power, the display may be blank or show random characters. Press the RESET button with a pointed object (e.g., a pen tip) to clear all memory and reset the timer. The display will show "0:00" and "MO".
- Allow the internal battery to charge for at least 30 minutes before programming for optimal performance and memory retention during power outages.
6.2. Impostazione dell'ora e del giorno correnti
- Premere e tenere premuto il tasto D+ button to set the current day of the week (MO, TU, WE, TH, FR, SA, SU).
- Premere e tenere premuto il tasto H+ button to set the current hour (0-23).
- Premere e tenere premuto il tasto M+ button to set the current minute (0-59).
- Release the buttons when the correct time and day are displayed. The timer will automatically save the settings.
6.3. Programmazione dei cicli di accensione/spegnimento
The TM919B supports up to 16 ON/OFF programs. Each program consists of an ON time and an OFF time.
- Premere il tasto P button once. The display will show "1 ON". This is for the first ON program.
- Utilizzo D+ to select the day(s) for this program. Options include:
- MO TU WE TH FR SA DO (Tutti i giorni)
- MO (Monday only)
- TU (Tuesday only)
- ...
- LU MAR WE TH FR (giorni feriali)
- SA SU (Fine settimana)
- MO TU WE (Mon-Wed)
- TH FR SA (Thu-Sat)
- MO WE FR (Mon, Wed, Fri)
- TU TH SA (Tue, Thu, Sat)
- LU TU WE TH FR SA (lun-sab)
- Utilizzo H+ E M+ per impostare l'ora e il minuto di accensione desiderati.
- Premere il tasto P button again. The display will show "1 OFF". This is for the first OFF program.
- Utilizzo D+, H+, E M+ to set the desired OFF day, hour, and minute. Ensure the OFF time is after the ON time for the same program.
- Repeat steps 1-5 for additional ON/OFF programs (up to 16). If you don't need all 16 programs, simply press P to cycle through unused programs until you return to the current time display.
- To exit programming mode and save settings, press the clock button (usually labeled with a clock icon, or simply wait for 30 seconds without input).
6.4. Azionamento manuale
Premere il tasto MANUALE pulsante per scorrere le modalità operative:
- SOPRA: L'uscita del timer è sempre attiva, ignorando tutti i programmi.
- AUTO: Il timer funziona secondo i cicli di accensione/spegnimento programmati. Questa è la modalità di funzionamento standard.
- OFF: L'uscita del timer è sempre disattivata, ignorando tutti i programmi.
Assicurarsi che il timer sia impostato su AUTO for programmed operation.
7. Manutenzione
- The TM919B is designed for maintenance-free operation.
- Pulire l'esterno con un panno morbido e asciutto. Non utilizzare detergenti abrasivi o solventi.
- Ensure the internal battery is charged by keeping the unit powered for at least 24 hours initially, and periodically thereafter, to maintain time and program memory during power outages.
8. Risoluzione Dei Problemi
| Problema | Possibile causa | Soluzione |
|---|---|---|
| Il display è vuoto. | Nessuna alimentazione; batteria interna scarica. | Check power connections. Allow unit to charge for 30 minutes. |
| Timer not switching load. | Incorrect wiring; timer in MANUAL ON/OFF mode; incorrect program settings. | Verify wiring (refer to Figure 6). Ensure timer is in AUTO mode. Check program times and days. |
| I programmi vengono persi dopo lo spegnimentotage. | Batteria interna non completamente carica o difettosa. | Ensure unit is powered for at least 24 hours to fully charge the battery. If problem persists, contact support. |
| I pulsanti non rispondono. | Unit frozen; temporary glitch. | Premere il tasto RESET pulsante. |
9. Garanzia e supporto
I prodotti SINOTIMER sono realizzati secondo elevati standard qualitativi. Per informazioni sulla garanzia o per assistenza tecnica, consultare la documentazione fornita con l'acquisto o visitare il sito ufficiale SINOTIMER. websito. Conserva la ricevuta d'acquisto come prova d'acquisto.
For further assistance, you may contact SINOTIMER customer service through their official channels.


