1. Introduzione
Thank you for choosing the Rebel RB-0005 Weather Station. This device provides accurate indoor and outdoor temperature readings, indoor humidity, and features a clock, calendar, and alarm function. This manual will guide you through the setup, operation, and maintenance of your new weather station to ensure optimal performance.
2. Informazioni sulla sicurezza
- Non esporre il dispositivo a temperature estreme, alla luce solare diretta o a elevata umidità.
- Evitare di far cadere o sottoporre il dispositivo a forti impatti.
- Tenere il dispositivo lontano dall'acqua e da altri liquidi.
- Smaltire le batterie usate in modo responsabile secondo le normative locali.
- Non tentare di smontare o riparare il dispositivo da soli. Contattare personale qualificato per l'assistenza.
- The outdoor sensor cable should be handled with care to prevent damage.
3. Contenuto della confezione
Al momento del disimballaggio, controllare il contenuto della confezione:
- 1x Rebel RB-0005 Weather Station Main Unit
- 1x Wired Outdoor Temperature Sensor
- 1x Manuale utente (questo documento)
Note: 1x AAA battery is required for operation and is not included in the package.
4. Caratteristiche del prodotto
- Indoor and Outdoor Temperature Measurement
- Indoor Humidity Measurement
- Funzione calendario
- Funzione di allarme
- Visualizzazione dell'orologio 12/24 ore
- Memory Function for Highest and Lowest Temperature Readings
- Clear and Easy-to-Read LCD Display
- Funziona a batteria per la portabilità
5. Prodotto finitoview
Familiarize yourself with the main components of your Rebel RB-0005 Weather Station.
5.1 Display frontale
L'ampio schermo LCD visualizza contemporaneamente diverse informazioni:
- IN Temperature: Temperatura interna attuale.
- OUT Temperature: Current outdoor temperature from the wired sensor.
- Tempo: Current time in 12-hour (AM/PM) or 24-hour format.
- RH%: Current indoor relative humidity.
- Calendario: Date display (day, month).
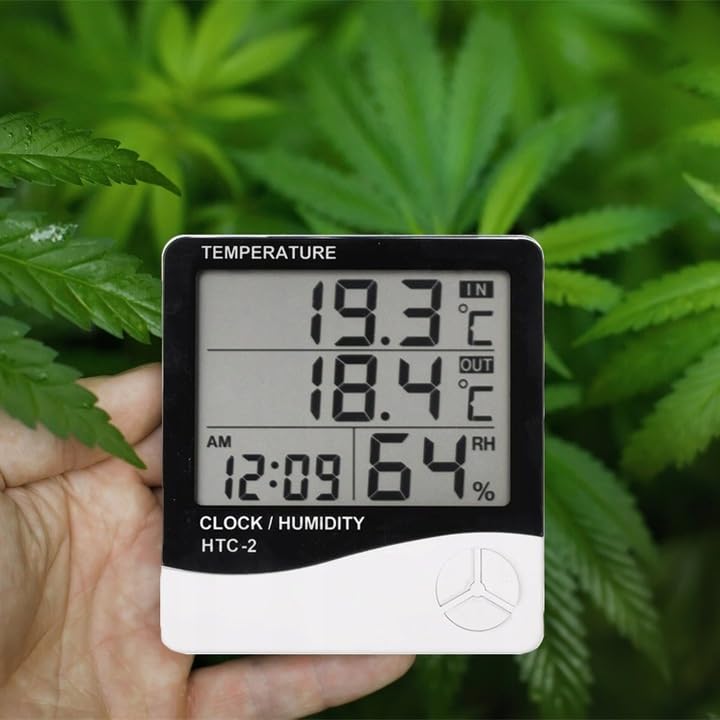
Figure 1: Front display of the weather station showing temperature, time, and humidity readings.

Figura 2: dettagliata view del display e dei pulsanti di controllo.
5.2 pulsanti di controllo
The device features three control buttons located on the front, below the display:
- DIREZIONI: Used to switch between display modes (e.g., time, alarm, calendar) and to enter/exit setting modes.
- ADJ (Regola): Used to adjust values (e.g., hours, minutes, date) when in setting mode.
- MEMORIA: Abituato a view the highest and lowest recorded temperature and humidity values.
5.3 Posteriore View e sensore
The back of the unit houses the battery compartment, a foldable stand, and the input for the wired outdoor temperature sensor.

Figura 3: Posteriore view of the weather station with battery compartment and wired sensor.
6. Impostazione
6.1 Installazione della batteria
- Aprire il coperchio del vano batterie sul retro dell'unità principale.
- Insert one (1) AAA battery, ensuring the correct polarity (+/-).
- Close the battery compartment cover securely. The device should power on automatically.
6.2 Posizionamento del sensore esterno
- Connect the wired outdoor temperature sensor to the designated port on the back of the main unit.
- Carefully route the sensor cable to the desired outdoor location. Ensure the cable is not pinched or damaged.
- Place the sensor in a shaded area, protected from direct sunlight and precipitation, to ensure accurate readings. Avoid placing it near heat sources or vents.

Figura 4: Esample placement of the weather station for indoor temperature monitoring.
7. Istruzioni per l'uso
7.1 Impostazione di data e ora
- Premere e tenere premuto il tasto MODALITÀ per circa 3 secondi finché il display dell'ora non inizia a lampeggiare.
- Utilizzare il AGG. pulsante per regolare il valore lampeggiante (ad esempio, ore, minuti).
- Premere il tasto MODALITÀ button again to confirm the setting and move to the next value (e.g., minutes, 12/24 hour format, year, month, day).
- Repeat step 2 and 3 until all time and date settings are configured.
- Premere MODALITÀ un'ultima volta per uscire dalla modalità di impostazione.
7.2 Impostazione dell'allarme
- Dalla visualizzazione normale dell'ora, premere il tasto MODALITÀ button once to enter alarm display mode (usually indicated by an alarm icon).
- Premere e tenere premuto il tasto MODALITÀ button for approximately 3 seconds until the alarm time starts flashing.
- Utilizzare il AGG. pulsante per impostare l'ora desiderata per la sveglia.
- Premere il tasto MODALITÀ button to confirm the hour and move to set the minutes.
- Utilizzare il AGG. pulsante per impostare i minuti di sveglia desiderati.
- Premere il tasto MODALITÀ pulsante per confermare e uscire dalla modalità di impostazione della sveglia.
- Per attivare/disattivare l'allarme, premere il tasto AGG. button once while in alarm display mode. An alarm icon will appear/disappear on the display.
7.3 Viewing Min/Max Temperature and Humidity
- Dalla visualizzazione normale, premere il tasto MEMORIA button once to show the maximum recorded indoor/outdoor temperature and indoor humidity.
- Premere il tasto MEMORIA button again to show the minimum recorded indoor/outdoor temperature and indoor humidity.
- Premere il tasto MEMORIA premere il pulsante una terza volta per tornare alle letture correnti.
- To clear the min/max memory, press and hold the MEMORIA pulsante per circa 3 secondi mentre viewing the min/max values.
7.4 Commutazione delle unità di temperatura (°C/°F)
In modalità di visualizzazione normale, premere il tasto AGG. premere una volta il pulsante per passare dalle unità di temperatura Celsius (°C) a Fahrenheit (°F) e viceversa.
8. Manutenzione
- Pulizia: Pulire il dispositivo con un panno morbido e asciutto. Non utilizzare detergenti abrasivi o solventi.
- Sostituzione della batteria: Replace the AAA battery when the display becomes dim or the device stops functioning. Follow the battery installation steps in Section 6.1.
- Cura del sensore: Ensure the outdoor sensor cable is not damaged. Periodically check the sensor's placement to ensure it remains protected from elements for accurate readings.
9. Risoluzione Dei Problemi
| Problema | Possibile causa | Soluzione |
|---|---|---|
| Nessun display o display poco luminoso. | Low or depleted battery. Incorrect battery polarity. | Sostituire la batteria AAA con una nuova, assicurandosi della corretta polarità. |
| Outdoor temperature reading is incorrect or "---". | Outdoor sensor cable is disconnected or damaged. Sensor is exposed to direct sunlight or heat source. | Check if the sensor cable is securely connected. Ensure the sensor is placed in a shaded, protected area. Inspect the cable for damage. |
| L'ora/data non è corretta. | Time/Date not set correctly after battery installation. | Refer to Section 7.1 "Setting Time and Date" to adjust. |
| L'allarme non suona. | Alarm is not activated. Alarm volume is too low (if adjustable, though this model likely isn't). | Ensure the alarm icon is displayed, indicating it is active (refer to Section 7.2). |
10. Specifiche
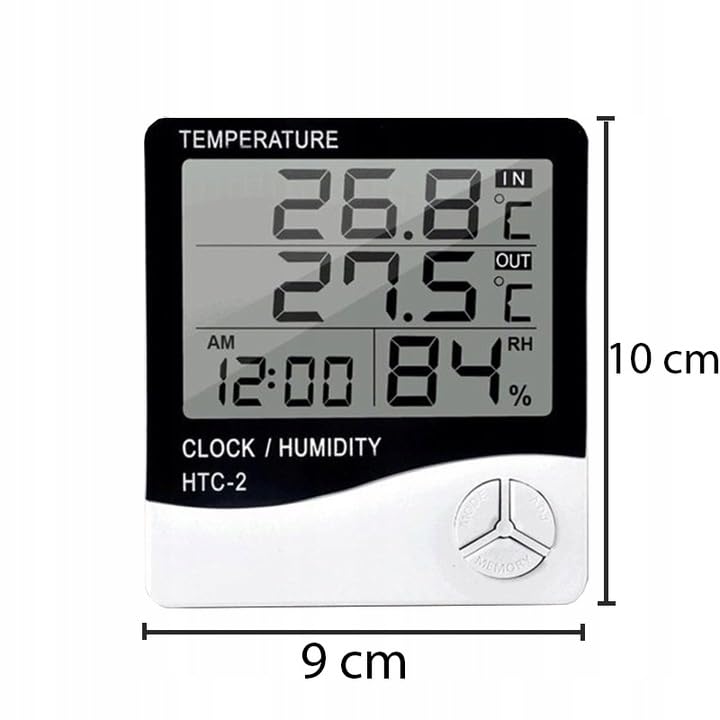
Figure 5: Approximate dimensions of the weather station.
- Modello: RB-0005
- Marca: Ribelle
- Fonte di energia: 1 batterie AAA (non incluse)
- Materiale: Plastica
- Caratteristiche speciali: Alarm, Calendar, Min/Max Memory
- Dimensioni della confezione: Dimensioni: 18 x 12 x 10 cm
- Dimensioni del prodotto (circa): 9 cm (larghezza) x 10 cm (altezza)
- Prima data disponibile: 23 novembre 2020
11. Garanzia e supporto
Questo prodotto è coperto dalla garanzia standard del produttore. Per termini e condizioni di garanzia specifici, fare riferimento alla documentazione fornita al momento dell'acquisto o contattare il rivenditore.
For technical support or inquiries, please contact the Rebel customer service department through their official websito o le informazioni di contatto fornite dal tuo rivenditore.


