1. Introduzione
The Blackmagic Design ATEM Mini Pro ISO is a compact and powerful live production switcher designed for multi-camera live streaming and recording. This device integrates a professional switcher with advanced features for creating broadcast-quality programs from multiple video sources. It is ideal for content creators, educators, businesses, and live event producers seeking a streamlined workflow.
This manual provides essential information for setting up, operating, maintaining, and troubleshooting your ATEM Mini Pro ISO to ensure optimal performance.
2. Caratteristiche principali
- 4 HDMI Inputs: Connect up to four cameras, computers, or gaming consoles.
- USB Webcam Output: Connects to a computer for live streaming via any video software.
- Uscita HDMI: Per multiview monitoring or program output.
- Fairlight Audio Mixer: Integrated 6-input, 2-channel audio mixer with EQ and dynamics.
- DVE (Digital Video Effects): For picture-in-picture effects.
- Transitions and Effects: Includes Cut, Mix, Dip, Wipe transitions, Luma, Linear, Chroma, and Pattern Upstream keys, and Downstream Keyer.
- Green Screen Chroma Key: For professional background removal.
- 20 Stills Media Pool: Store graphics and titles for quick recall.
- Real-time H.264 Recording: Direct recording of up to 5 separate H.264 video streams (program feed + 4 inputs) to a USB flash disk.
- Direct Streaming: Stream directly via Ethernet to platforms like YouTube Live.
- Multiview: Monitor all inputs, preview, program, media players, and recording/streaming status on a single HDMI display.
3. Impostazione
Follow these steps to set up your ATEM Mini Pro ISO for operation.
3.1. Collegamento dell'alimentazione
Connect the included power adapter to the 'POWER' input on the rear panel of the ATEM Mini Pro ISO and then to a power outlet. The unit does not have a power switch and will power on automatically.
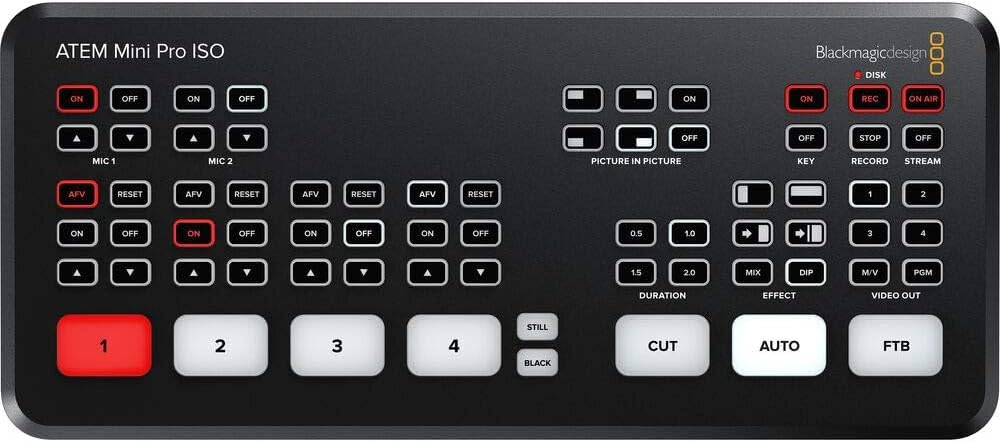
Image: Rear panel connections including power input.
3.2. Video Input Connections
Connect your HDMI video sources (cameras, computers, game consoles) to the HDMI inputs labeled '1' through '4' on the rear panel. The ATEM Mini Pro ISO features standards converters on all inputs, allowing it to automatically adapt different video formats.
Image: Rear panel with four HDMI inputs clearly visible.
3.3. Collegamenti di ingresso audio
For external audio, connect microphones or other audio devices to the 'MIC 1' and 'MIC 2' 3.5mm stereo analog audio inputs. Each HDMI input also supports embedded audio.
Image: Rear panel highlighting the two 3.5mm microphone inputs.
3.4. Connessioni di uscita
- Uscita HDMI: Connect an HDMI display to the 'HDMI OUT' port for multiview monitoring or program output.
- Uscita USB di tipo C: Connect the 'USB OUT' port to a computer for webcam functionality (streaming) or to an external SSD for recording.
- Collegamento Ethernet: Connect an Ethernet cable to the 'ATEM CONTROL' port for direct streaming or software control from a computer.
Image: Rear panel showing HDMI output, USB Type-C, and Ethernet ports.
3.5. Installazione del software
Download and install the latest ATEM Software Control from the Blackmagic Design website. This software provides advanced control over all features of the ATEM Mini Pro ISO.
4. Istruzioni per l'uso
4.1. Switching Video Inputs
Use the numbered buttons (1-4) on the front panel to select which HDMI input is sent to the program output. The 'CUT' button performs an instant cut, while the 'AUTO' button executes a smooth transition based on the selected transition type and duration.

Image: Front panel showing the numbered input buttons and transition controls.
4.2. Controllo audio
The ATEM Mini Pro ISO features a Fairlight audio mixer. You can control audio levels for each input (HDMI 1-4, Mic 1-2) using the dedicated audio buttons and controls on the front panel or through the ATEM Software Control. Ensure microphones are turned on for audio capture.
4.3. Picture-in-Picture (DVE)
Activate the Picture-in-Picture (DVE) feature using the dedicated buttons. This allows you to overlay one video source onto another, commonly used for displaying a presenter over a presentation slide.
4.4. registrazione
The ATEM Mini Pro ISO can record up to five separate H.264 video streams (program feed + all 4 inputs) simultaneously to an external USB flash disk connected to the USB-C port. This ISO recording feature allows for post-production editing of individual camera angles.
Importante: Use a compatible SSD drive (e.g., Samsung T5) for reliable recording. Refer to Blackmagic Design's website for a list of recommended drives. Incompatible drives may lead to recording interruptions.
4.5. Trasmissione in streaming
Connect the ATEM Mini Pro ISO to your network via the Ethernet port. Configure your streaming settings using the ATEM Software Control to stream directly to platforms like YouTube Live. The 'ON AIR' button initiates the live stream.
4.6. Multiploview Monitoraggio
Connect an HDMI monitor to the 'HDMI OUT' port to view il multiploview display. This display shows all camera inputs, media players, preview, program, and status indicators for recording and streaming, allowing for comprehensive monitoring of your production.

Immagine: Example of the multiview display showing multiple camera feeds and status.
5. Manutenzione
- Pulizia: Utilizzare un panno morbido e asciutto per pulire l'esterno dell'unità. Evitare detergenti liquidi o materiali abrasivi.
- Ventilazione: Assicurarsi che l'unità abbia una ventilazione adeguata per evitare il surriscaldamento. Non ostruire le fessure di ventilazione.
- Aggiornamenti del firmware: Regularly check the Blackmagic Design websito per gli aggiornamenti del firmware per garantire prestazioni ottimali e accesso a nuove funzionalità.
6. Risoluzione Dei Problemi
- Nessuna uscita video:
- Verificare che tutti i cavi HDMI siano collegati saldamente.
- Ensure input sources are powered on and outputting a signal.
- Check that the correct input is selected on the ATEM Mini Pro ISO.
- Nessun audio:
- Confirm microphones are connected and powered (if required).
- Ensure audio inputs are enabled and levels are adjusted in ATEM Software Control or via front panel buttons.
- Problemi di registrazione:
- Use a recommended and properly formatted SSD drive.
- Check available storage space on the SSD.
- Ensure the USB-C cable is securely connected and supports the required data transfer speed.
- Problemi di streaming:
- Verify Ethernet cable connection and network connectivity.
- Check streaming settings in ATEM Software Control (platform, stream key, bitrate).
- Ensure sufficient internet upload speed.
7. Specifiche
| Caratteristica | Dettaglio |
|---|---|
| Numero di modello | SWATEMMINIBPRISO-BUNDLE |
| Ingressi video | 4 x HDMI Type A (10-Bit 4:2:2 YUV) |
| Ingressi audio | 2 x 3.5mm Stereo Analog Audio |
| Uscite video | 1 x HDMI Type A (10-Bit 4:2:2 YUV), Multiview Produzione |
| Interfaccia del computer | 1 x USB Type-C 3.1 Gen 1 (webcam out, panel connection, external drive recording) |
| Etereo | 1 x RJ45 (ATEM Control, Direct Streaming) |
| Formato di registrazione | H.264 (up to 5 separate streams) |
| Dimensioni | 12.2 x 8.46 x 6.73 pollici |
| Peso | 3.12 libbre |
8. Garanzia e supporto
For warranty information and technical support, please refer to the official Blackmagic Design websito o contattare il servizio clienti. Conservare la prova d'acquisto per eventuali reclami in garanzia.
Online resources, including detailed manuals and FAQs, are available on the Blackmagic Design support page.