1. Introduzione
Welcome to the user manual for your Ulefone Armor X9 Rugged Phone. This guide provides essential information on setting up, operating, maintaining, and troubleshooting your device. The Ulefone Armor X9 is designed for durability and performance, featuring robust protection and advanced functionalities.
Key features of your Ulefone Armor X9 include:
- IP68/IP69K Grade 360 All Round Protection: Costruito per resistere ad ambienti difficili.
- Sistema operativo Android 11: Enjoy the latest Android experience.
- 4 GB di RAM + 128 GB di ROM: Ampmemoria e spazio di archiviazione per le tue applicazioni e i tuoi dati.
- 16MP Triple Rear Camera: Cattura foto e video di alta qualità.
- Massive 5580mAh Battery Capacity: Extended usage time.
- Triple Navigation System: Enhanced positioning accuracy.
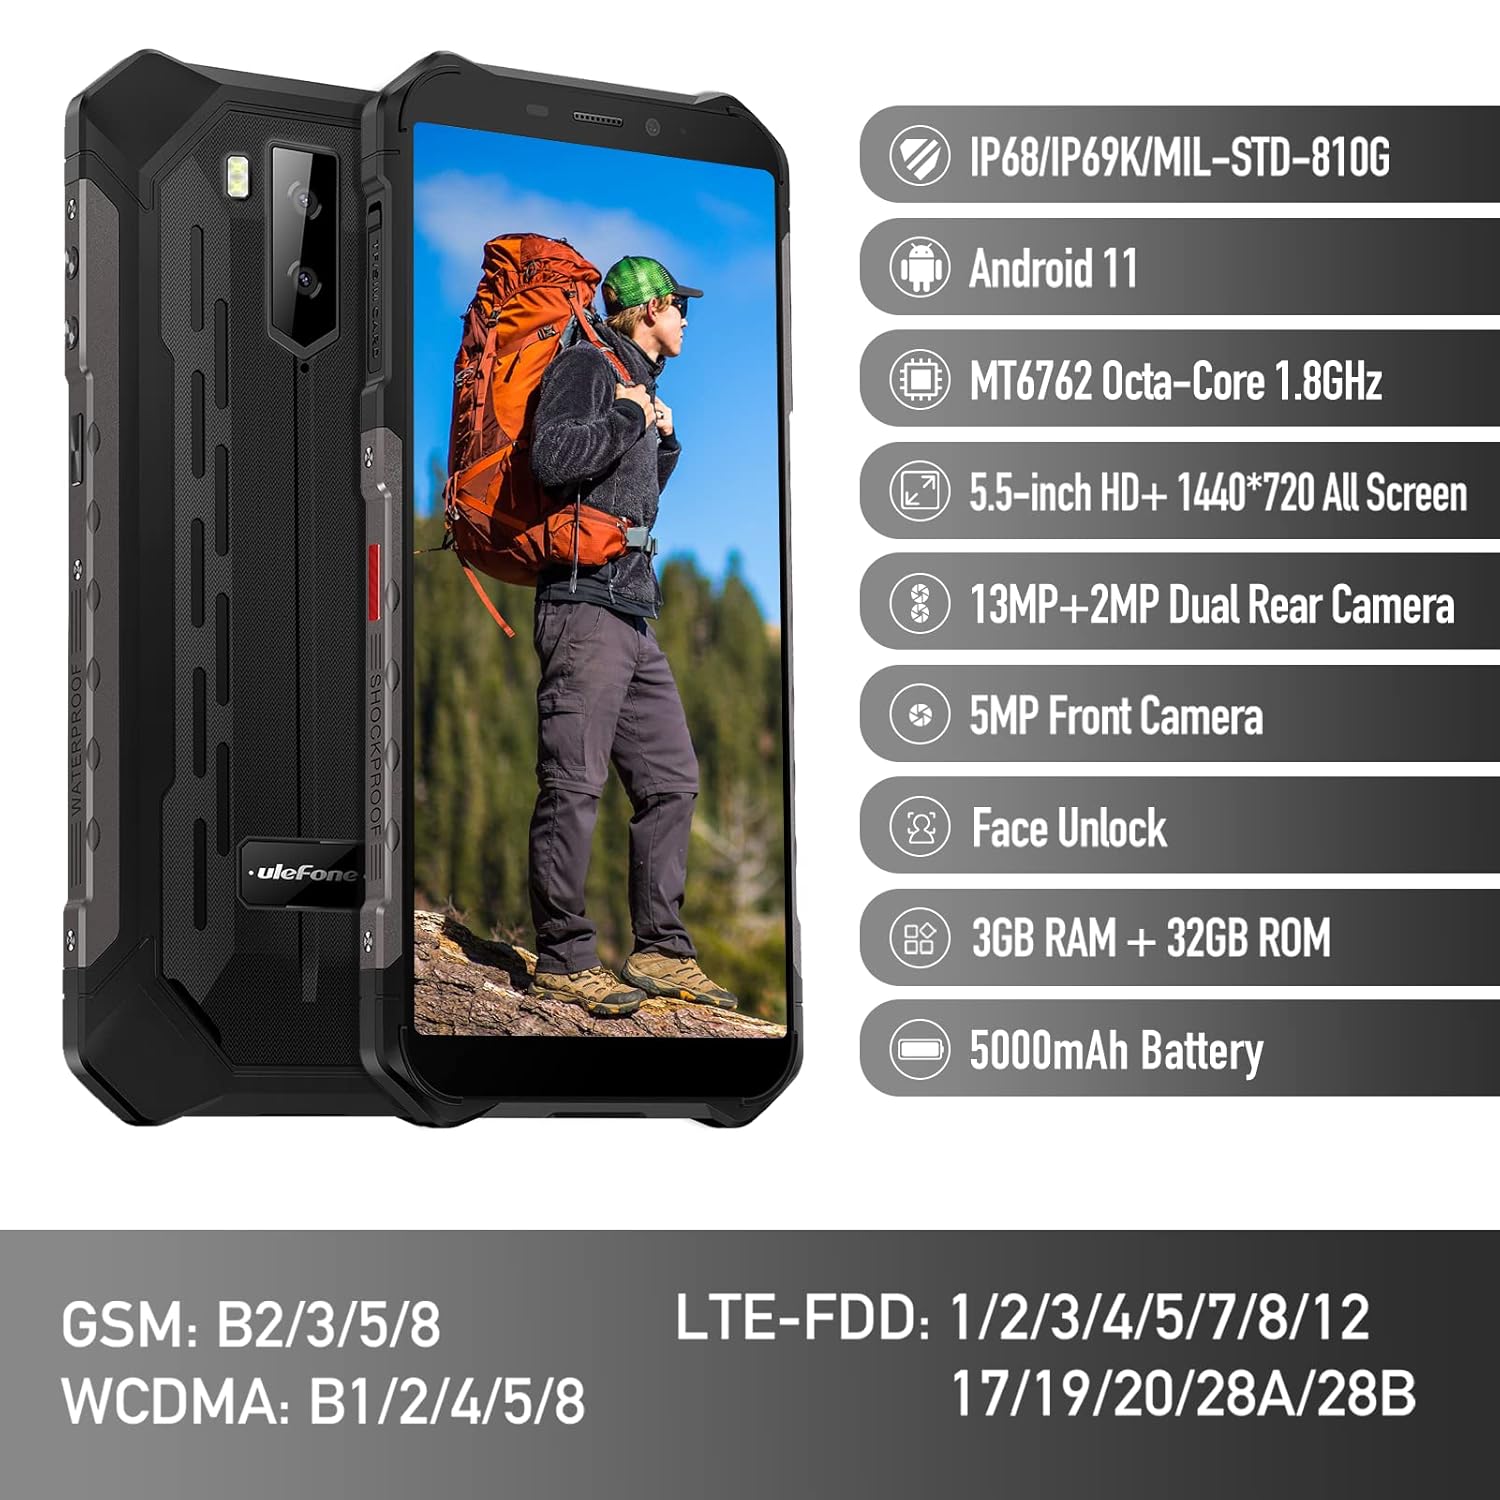
Figure 1: Ulefone Armor X9 Rugged Phone overview, highlighting its robust design and core specifications like IP68/IP69K rating, Android 11, Octa-Core processor, 5.5-inch HD+ screen, 13MP+2MP dual rear camera, 5MP front camera, Face Unlock, 3GB RAM + 32GB ROM, and 5000mAh battery.
2. Impostazione
2.1. Installazione della scheda SIM e della scheda TF
The Ulefone Armor X9 supports dual SIM cards and a TF (microSD) card for expandable storage. Follow these steps to install them:
- Individuare il vassoio della scheda SIM sul lato del telefono.
- Utilizzare lo strumento di espulsione SIM in dotazione per aprire il vassoio.
- Inserire con attenzione le schede Nano-SIM negli slot designati (SIM1 e SIM2).
- If using a TF card, place it into the dedicated TF card slot. Note that some configurations may share a slot between SIM2 and the TF card.
- Gently push the tray back into the phone until it is flush with the device body. Ensure the tray is properly sealed to maintain water and dust resistance.

Figure 2: Illustration of the dual SIM and TF card tray, showing how to insert SIM1, SIM2, and a TF card into the Ulefone Armor X9.
2.2. Ricarica iniziale
Before first use, it is recommended to fully charge your Ulefone Armor X9. Use the provided USB cable and power adapter.
- Collegare il cavo USB alla porta di ricarica del telefono.
- Collega l'altra estremità del cavo USB all'alimentatore.
- Collegare l'adattatore di corrente a una presa a muro.
- L'indicatore di carica apparirà sullo schermo. Lasciare caricare il telefono finché l'icona della batteria non indica che è completamente carica.
2.3. Accensione/Spegnimento
- Per accendere: Tenere premuto il pulsante di accensione (solitamente sul lato destro) finché non viene visualizzato il logo Ulefone.
- Per spegnere: Tieni premuto il pulsante di accensione finché non appare sullo schermo il menu delle opzioni di alimentazione. Seleziona "Spegni" e conferma.
- Ricominciare: Dal menu delle opzioni di risparmio energia, seleziona "Riavvia" e conferma.
3. Istruzioni per l'uso
3.1. Navigazione di base (Android 11)
Your Ulefone Armor X9 runs on Android 11, offering an intuitive user interface. Common gestures and navigation include:
- Scorrere verso l'alto: Accedi al cassetto delle app.
- Scorri verso il basso: Aprire il pannello delle notifiche e le impostazioni rapide.
- Rubinetto: Seleziona un elemento o apri un'app.
- Premere a lungo: Accedi ai menu contestuali o sposta le icone.
- Pizzica per ingrandire: Ingrandisci o rimpicciolisci le immagini e web pagine.

Figure 3: Screenshots of the Android 11 interface on the Ulefone Armor X9, showing settings menus, quick toggles, and the sound recorder application.

Figure 4: The 5.5-inch 18:9 All Screen display of the Ulefone Armor X9, showcasing its immersive viewing experience with an image of a skier.
3.2. Utilizzo della fotocamera
Your phone is equipped with a 16MP Triple Rear Camera and a Front Camera. To use the camera:
- Apri l'applicazione "Fotocamera" dalla schermata iniziale o dal cassetto delle applicazioni.
- Tocca il pulsante di scatto per scattare una foto.
- Passa dalla modalità foto a quella video a seconda delle tue esigenze.
- Tap the icon to switch between the front and rear cameras.
- Esplora le diverse modalità e impostazioni della fotocamera per risultati ottimali.
3.3. Connettività
The Ulefone Armor X9 supports various connectivity options:
- Wifi: Vai su Impostazioni > Rete e Internet > Wi-Fi per connetterti alle reti disponibili.
- Bluetooth: Go to Settings > Connected devices > Bluetooth to pair with Bluetooth devices.
- Posizione GPS: The phone features AGPS for accurate location services. Ensure location services are enabled in Settings > Location.
- USB: Collega il telefono al computer tramite un cavo USB per trasferire dati o ricaricarlo.
3.4. Sblocco facciale
For convenient and secure unlocking, your Ulefone Armor X9 supports Face Unlock:
- Vai su Impostazioni > Sicurezza > Sblocco facciale.
- Segui le istruzioni visualizzate sullo schermo per registrare il tuo volto.
- Assicuratevi che l'illuminazione sia adeguata e tenete il telefono all'altezza degli occhi durante la registrazione.
- Una volta effettuata la registrazione, puoi sbloccare il telefono semplicemente guardando la fotocamera frontale.
4. Manutenzione
4.1. Pulizia e cura
To maintain the performance and appearance of your rugged phone:
- Pulire lo schermo e il corpo con un panno morbido e privo di lanugine.
- Per lo sporco ostinato utilizzare una spugna leggermente damp panno. Evitare prodotti chimici aggressivi o materiali abrasivi.
- Ensure all port covers are securely closed to maintain water and dust resistance, especially after charging or using headphones.

Figure 5: The Ulefone Armor X9's 360° All Protection Design, showcasing its superior materials and superb durability against impacts and harsh conditions.
4.2. Resistenza all'acqua e alla polvere (IP68/IP69K)
The Ulefone Armor X9 is rated IP68/IP69K, meaning it is resistant to dust and water immersion. However, this resistance is not permanent and may decrease over time with normal wear. To ensure optimal protection:
- Do not intentionally submerge the phone in water for extended periods or beyond specified depths.
- Avoid exposing the phone to high-pressure water or extreme temperatures.
- Ensure all port covers are tightly sealed before exposure to water or dust.
- Se il telefono si bagna, asciugarlo accuratamente prima di caricarlo o di aprire qualsiasi porta.
4.3. Cura della batteria
To prolong the life of your 5580mAh Lithium Polymer battery:
- Evitare temperature estreme (calde o fredde) in quanto possono ridurre le prestazioni della batteria.
- Utilizzare solo il caricabatterie e il cavo originali o accessori compatibili certificati.
- Non lasciare che la batteria si scarichi completamente frequentemente. Caricarla prima che raggiunga livelli molto bassi.
5. Risoluzione Dei Problemi
If you encounter issues with your Ulefone Armor X9, try the following troubleshooting steps:
5.1. Il telefono non si accende
- Assicurati che la batteria sia carica. Collega il telefono a un caricabatterie per almeno 30 minuti.
- Per forzare il riavvio, tenere premuto il pulsante di accensione per 10-15 secondi.
5.2. Problemi di ricarica
- Verify that the charging cable and adapter are working correctly. Try a different charger if available.
- Assicurarsi che la porta di ricarica sia pulita e priva di detriti.
- Make sure the charging cable is fully inserted into the port. Some rugged phone ports may require a firm connection due to protective covers.
5.3. SIM/TF Card Not Detected
- Ensure the SIM/TF card is correctly inserted into the tray and the tray is fully seated.
- Riavviare il telefono.
- Controlla se la scheda SIM è attiva con il tuo operatore di rete.
5.4. Arresti anomali o blocchi dell'app
- Chiudere e riaprire l'app problematica.
- Cancella la cache e i dati dell'app (Impostazioni > App > [Nome app] > Archiviazione e cache).
- Assicurati che l'app sia aggiornata all'ultima versione.
- Riavviare il telefono.
5.5. Ripristino delle impostazioni di fabbrica
Se i problemi persistono, un ripristino delle impostazioni di fabbrica potrebbe risolverli. Attenzione: questa operazione cancellerà tutti i dati presenti sul telefono. Esegui il backup dei dati importanti prima di procedere.
- Vai su Impostazioni > Sistema > Opzioni di ripristino.
- Selezionare "Cancella tutti i dati (ripristino impostazioni di fabbrica)".
- Conferma la tua decisione e inserisci il tuo PIN/password se richiesto.
6. Specifiche
Below are the detailed specifications for the Ulefone Armor X9:

Figure 6: Details of the Ulefone Armor X9's Octa-Core Processor, highlighting its power-efficient yet powerful performance, along with 3GB RAM and 32GB ROM, and support for up to 256GB TF card extendable storage.
| Caratteristica | Specificazione |
|---|---|
| Sistema operativo | Androide 11.0 |
| Memoria RAM | 3 GB (Note: Feature bullets mention 4GB RAM, please verify actual model) |
| Capacità di archiviazione della memoria | 32 GB (Expandable with TF card up to 256GB. Feature bullets mention 128GB ROM, please verify actual model) |
| Modello CPU | MT6762 Octa-core 1.8 GHz (Note: Specifications list 'Snapdragon', but image indicates MT6762. Please verify actual model) |
| Dimensioni del prodotto | Dimensioni: 15.8 x 7.75 x 1.38 cm |
| Peso dell'articolo | 472 grammi |
| Batterie | 1 batteria ai polimeri di litio (5580 mAh, inclusa) |
| Comunicazione senza fili | Cellulare, Bluetooth, USB, Wi-Fi |
| GPS | AGP |
| Caratteristiche speciali | Rear Camera, Face Unlock, IP68/IP69K, MIL-STD-810G |
| Display | 5.5-inch HD+ 1440*720 All Screen |
| Telecamera posteriore | 13MP+2MP Dual Rear Camera (Note: Feature bullets mention 16MP Triple Rear Camera, please verify actual model) |
| Fotocamera frontale | Fotocamera frontale da 5 MP |
| Colore | Nero |
| Produttore | Ulefone |
Note: Specifications are based on available product data and may vary slightly. Please refer to your product packaging for the most accurate information. There are discrepancies between feature bullets, specifications, and image text regarding RAM, ROM, CPU, and camera megapixels. This manual uses the most frequently cited or detailed information, with notes for clarification.
7. Garanzia e supporto
7.1. Informazioni sulla garanzia
Your Ulefone Armor X9 is covered by a manufacturer's warranty. The specific terms and duration of the warranty may vary by region and retailer. Please refer to the warranty card included in your product packaging or contact your point of purchase for detailed information regarding warranty coverage and claims.
7.2. Assistenza clienti
For technical assistance, troubleshooting beyond this manual, or warranty inquiries, please contact Ulefone customer support or your authorized dealer. You can typically find contact information on the official Ulefone websito o nella documentazione del prodotto.
- Visit the official Ulefone website for FAQs, software updates, and support contact details.
- Quando contatti l'assistenza, tieni a portata di mano la ricevuta d'acquisto e il numero di serie del prodotto.