1. Introduzione
Thank you for choosing the DEXTER 1500W SDS Plus Hammer Drill. This manual provides essential information for the safe and effective operation, maintenance, and troubleshooting of your new tool. Please read this manual thoroughly before first use and keep it for future reference.

Figure 1: The DEXTER 1500W SDS Plus Hammer Drill, showcasing its robust design and ergonomic features.
2. Istruzioni di sicurezza
Quando si utilizzano utensili elettrici, seguire sempre le precauzioni di sicurezza di base per ridurre il rischio di incendi, scosse elettriche e lesioni personali.
- Sicurezza dell'area di lavoro: Mantenere l'area di lavoro pulita e ben illuminata. Non utilizzare utensili elettrici in atmosfere esplosive, ad esempio in presenza di liquidi, gas o polveri infiammabili.
- Sicurezza elettrica: Le spine degli elettroutensili devono essere adatte alla presa. Non modificare mai la spina in alcun modo. Evitare il contatto del corpo con superfici messe a terra.
- Sicurezza personale: Always wear eye protection, hearing protection, and suitable work gloves. Dress properly; do not wear loose clothing or jewelry.
- Uso e cura dello strumento: Non forzare l'utensile elettrico. Utilizzare l'utensile elettrico corretto per l'applicazione desiderata. Scollegare la spina dalla presa di corrente prima di effettuare qualsiasi regolazione, sostituire accessori o riporre l'utensile elettrico.
3. Prodotto finitoview e componenti
Familiarize yourself with the various parts of your DEXTER Hammer Drill and its included accessories.
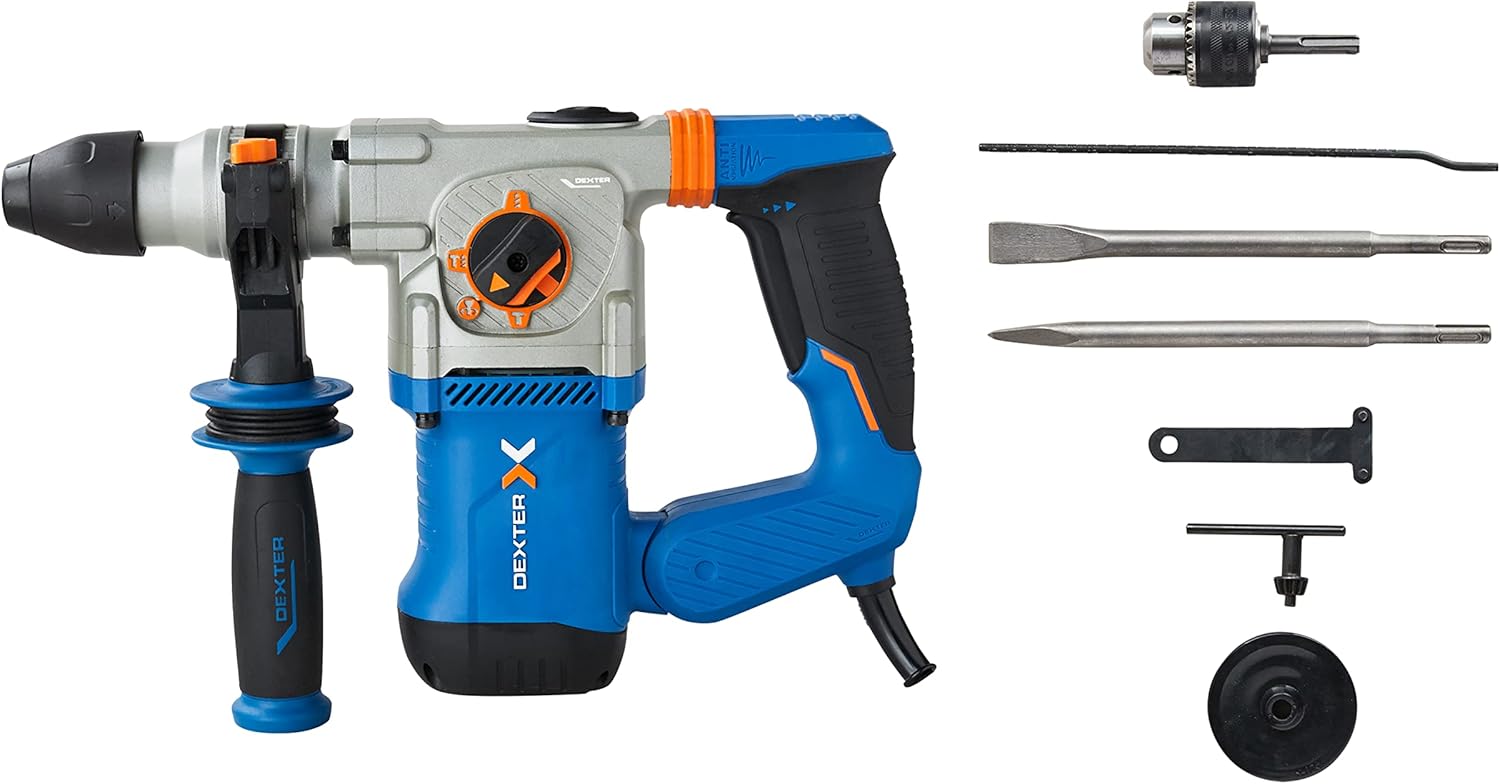
Figure 2: The hammer drill along with its standard accessories, including the SDS Plus chuck, pointed chisel, flat chisel, side handle, key, and depth gauge.
Componenti chiave:
- Mandrino SDS Plus: Per cambi di punta rapidi e sicuri.
- Selettore di modalità: Allows selection between drilling, hammer drilling, chiseling, and chiseling with free accessory adjustment.
- Trigger a velocità variabile: For precise control over drilling and chiseling speed.
- Anti-Vibration Handles: Designed to absorb shocks and reduce user fatigue.
- Maniglia laterale: Fornisce maggiore presa e controllo durante il funzionamento.
- Profondimetro: For setting precise drilling depths.
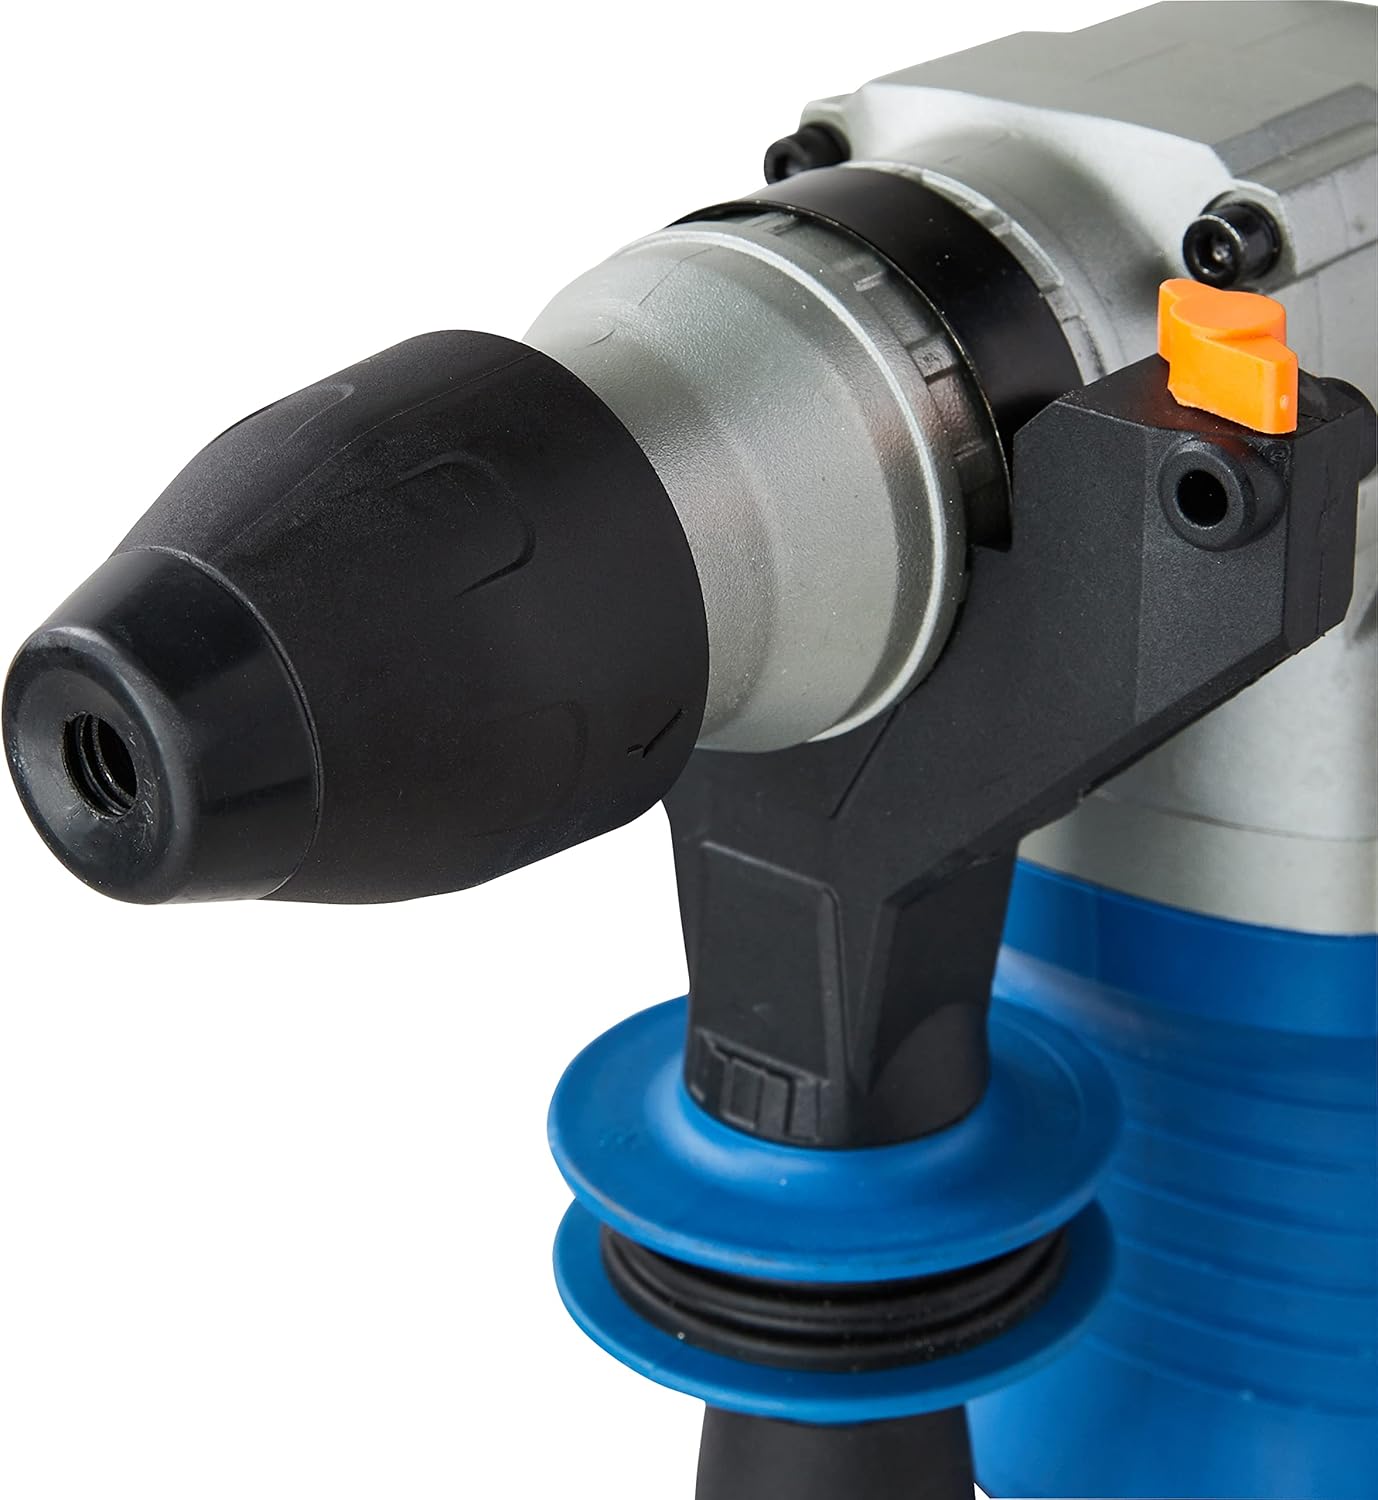
Figura 3: dettagliata view of the SDS Plus chuck, designed for quick and secure bit insertion.

Figure 4: Close-up of the mode selector switch, indicating the different operational modes of the hammer drill.

Figura 5: View of the anti-vibration handle, highlighting its design for improved user comfort and reduced fatigue.
4. Impostazione
4.1 Fissaggio della maniglia laterale
- Allentare la maniglia laterale ruotandola in senso antiorario.
- Slide the handle onto the front of the tool until it is in the desired position.
- Rotate the handle clockwise to tighten and secure it.
4.2 Inserting and Removing SDS Plus Bits
- Pulire il gambo della punta SDS Plus.
- Inserire la punta nel mandrino fino a sentire uno scatto. Tirare la punta per assicurarsi che sia bloccata saldamente.
- Per rimuoverlo, tirare indietro il collare del mandrino ed estrarre la punta.
4.3 Attaching the Key Chuck (for standard drill bits)
For drilling with standard, non-SDS bits (e.g., for wood or metal), attach the included key chuck adapter to the SDS Plus chuck.
- Insert the key chuck adapter into the SDS Plus chuck as described in 4.2.
- Insert the desired standard drill bit into the key chuck.
- Tighten the key chuck using the provided chuck key to secure the bit.
4.4 Impostazione del misuratore di profondità
- Inserire il calibro di profondità nel foro sull'impugnatura laterale.
- Regolare il calibro alla profondità di foratura desiderata.
- Tighten the side handle to secure the depth gauge in place.
5. Operativo
Your DEXTER Hammer Drill offers four primary functions for various applications.

Figura 6: Oltreview of the hammer drill's capabilities, including maximum drilling diameters and power specifications.
5.1 Selezione della modalità operativa
Ruotare il selettore di modalità per scegliere la funzione appropriata:
- Drilling Mode (Drill Bit Symbol): For drilling in wood (up to 40mm) and metal (up to 13mm). Use with the key chuck and standard drill bits.
- Hammer Drilling Mode (Drill Bit + Hammer Symbol): For drilling in concrete or brick (up to 26mm). Use with SDS Plus drill bits.
- Chiseling Mode (Hammer Symbol): For chiseling applications, such as breaking concrete or removing tiles. The accessory is fixed in position.
- Chiseling with Free Accessory Adjustment (Hammer + Rotating Arrow Symbol): Allows the chisel to rotate freely, useful for adjusting the angle when removing tiles or similar tasks.
5.2 Controllo della velocità variabile
The trigger features variable speed control. Press the trigger lightly for lower speeds and press harder for higher speeds. This allows for precise control depending on the material and application.
5.3 Funzionamento continuo
For extended use, the tool can be set to continuous operation. Press the trigger and then engage the lock-on button (if present, typically on the handle). To disengage, press the trigger again.
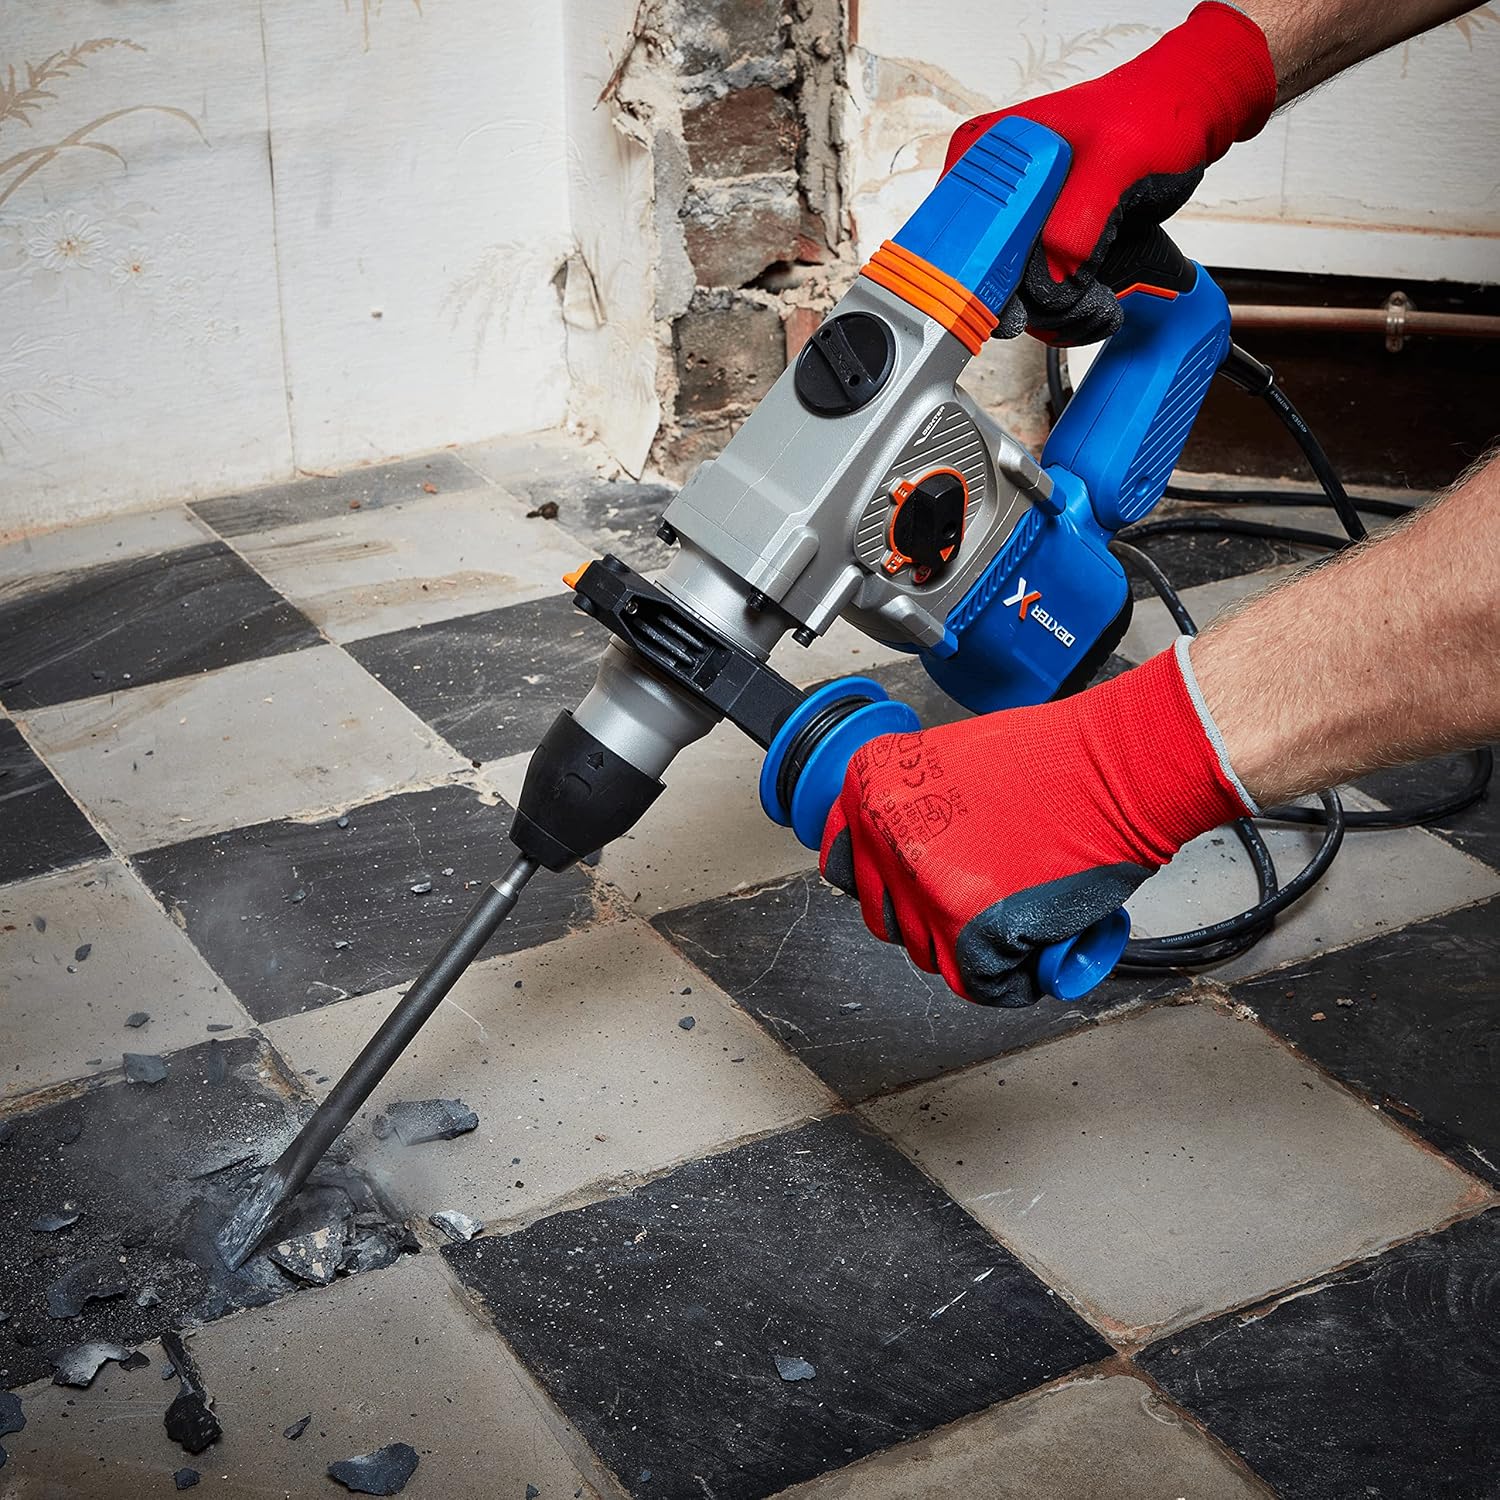
Figure 7: The hammer drill being used to chisel and break up a concrete floor, demonstrating its power in demolition tasks.

Figure 8: An operator using the hammer drill to efficiently remove floor tiles, utilizing the chiseling function.

Figure 9: The hammer drill in action, drilling into a brick wall, showcasing its capability for masonry work.
6. Manutenzione
Una manutenzione regolare garantisce la longevità e le prestazioni ottimali del tuo utensile.
- Pulizia: Dopo ogni utilizzo, pulire l'utensile con un panno morbido eamp panno. Non utilizzare prodotti chimici aggressivi o detergenti abrasivi. Mantenere le aperture di ventilazione libere da polvere e detriti.
- Manutenzione del mandrino: Periodically clean and lightly lubricate the SDS Plus chuck to ensure smooth bit insertion and removal.
- Spazzole di carbone: If the tool experiences reduced power or excessive sparking, the carbon brushes may need inspection or replacement. This should ideally be done by a qualified service technician.
- Magazzinaggio: Conservare l'utensile in un luogo asciutto e sicuro, fuori dalla portata dei bambini.
7. Risoluzione Dei Problemi
Di seguito sono riportati i problemi più comuni e le loro possibili soluzioni.
| Problema | Possibile causa | Soluzione |
|---|---|---|
| Lo strumento non si avvia | No power supply; Faulty power cord/plug | Check power outlet and connections; Inspect power cord for damage. |
| Potenza/prestazioni ridotte | Worn carbon brushes; Overload; Incorrect mode selection | Have carbon brushes checked/replaced; Reduce load; Ensure correct mode is selected. |
| La punta non si blocca nel mandrino | Chuck dirty; Bit shank damaged | Clean chuck and bit shank; Use a new bit if damaged. |
| Vibrazione eccessiva | Damaged bit; Internal issue | Replace bit; If problem persists, seek professional service. |
8. Specifiche
| Caratteristica | Specificazione |
|---|---|
| Numero di modello | 3276007131802 |
| Potenza in ingresso | 1500 L |
| Energia d'impatto | 5.1 Joule |
| Tasso di impatto massimo | 4500 battiti al minuto |
| Velocità a vuoto | 0-850 giri/min |
| Tipo di Chuck | Scheda di sicurezza più |
| Capacità di perforazione (legno) | 40 millimetri |
| Capacità di perforazione (metallo) | 13 millimetri |
| Drilling Capacity (Concrete/Brick) | 26 millimetri |
| Voltage | 230 Volt |
| Dimensioni del prodotto | Dimensioni: 12 x 12 x 32 cm |
| Peso dell'articolo | 8.2 kg |
| Lunghezza del cavo | 4 metri |
9. Garanzia e supporto
DEXTER products are manufactured to high-quality standards. For warranty information, please refer to the warranty card included with your purchase or contact DEXTER customer support. Keep your proof of purchase for any warranty claims.
For technical assistance, spare parts, or service, please contact your local DEXTER authorized service center or visit the official DEXTER websito per i contatti.


