1. Introduzione
The Labelife D210S Portable Label Maker is designed for easy and efficient labeling in various environments, including home, office, and school. Featuring a QWERTY keyboard and one-touch smart keys, it simplifies the creation of durable, laminated labels. This manual provides detailed instructions for setting up, operating, and maintaining your label maker to ensure optimal performance.

Image: The Labelife D210S Portable Label Maker being used for home, office, and school organization, demonstrating its versatility.
2. Contenuto della confezione
Si prega di verificare che tutti gli articoli elencati di seguito siano inclusi nel pacchetto:
- 1 x Labelife D210S Label Maker (Green)
- 1 x JM Label Tape JM-231 (Black on White)
- Adattatore di alimentazione 1 x
- 1 x Replacement Cutter Holder
- 1 x Manuale utente
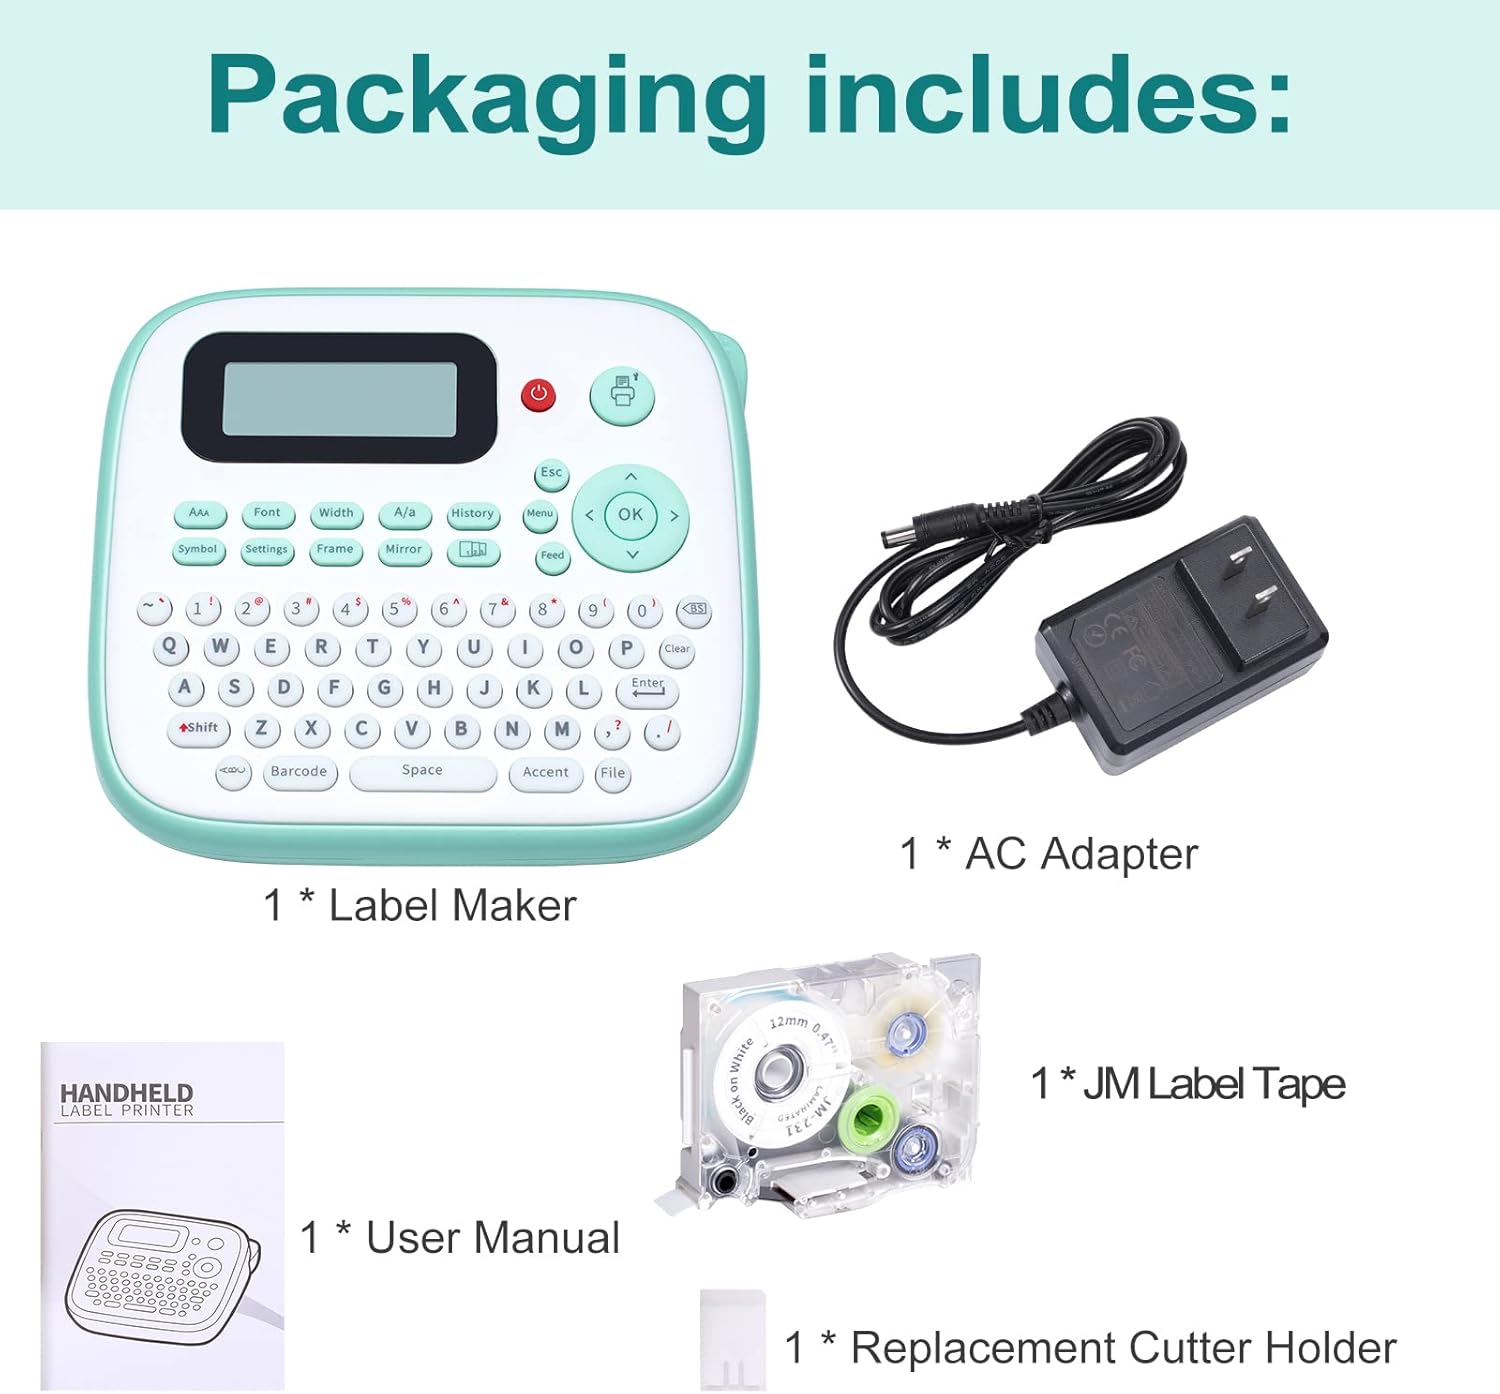
Image: A visual representation of the Labelife D210S package contents, showing the label maker, AC adapter, JM label tape, replacement cutter holder, and user manual.
3. Impostazione
3.1 Opzioni di alimentazione
The Labelife D210S can be powered using the included AC adapter or 6 AAA batteries (not included). The device cannot be charged; it operates directly from the power source.
- Utilizzo dell'adattatore CA: Connect the AC adapter to the power port on the side of the label maker and plug it into a wall outlet.
- Utilizzo di batterie AAA: Open the battery compartment on the underside of the label maker. Insert 6 AAA batteries, ensuring the positive (+) and negative (-) terminals are aligned correctly as indicated in the compartment. Note that the electrodes of the upper and lower batteries are in opposite directions. Close the battery compartment securely.

Image: The Labelife D210S label maker illustrating its two power supply options: connection to an AC adapter and the open battery compartment for 6 AAA batteries.
3.2 Installazione del nastro per etichette
Follow these steps to install the label tape cartridge:
- Aprire il coperchio del vano nastro dell'etichettatrice.
- Take the label tape cartridge (e.g., JM-231) and ensure the end of the tape passes through both tape guides correctly. Extend approximately 1.5 inches (3cm to 4cm) of label tape.
- Turn the green gear on the tape cartridge in the direction of the arrow until the carbon ribbon is tight.
- Install the label tape cartridge into the compartment in the correct direction. Ensure the extended label tape passes through the outlet of the label maker.
- Chiudere il coperchio del vano nastro.
- If you install the label tape after turning on the label maker, the device will prompt you to choose the label width. Select "12mm" for the included JM-231 label tape.
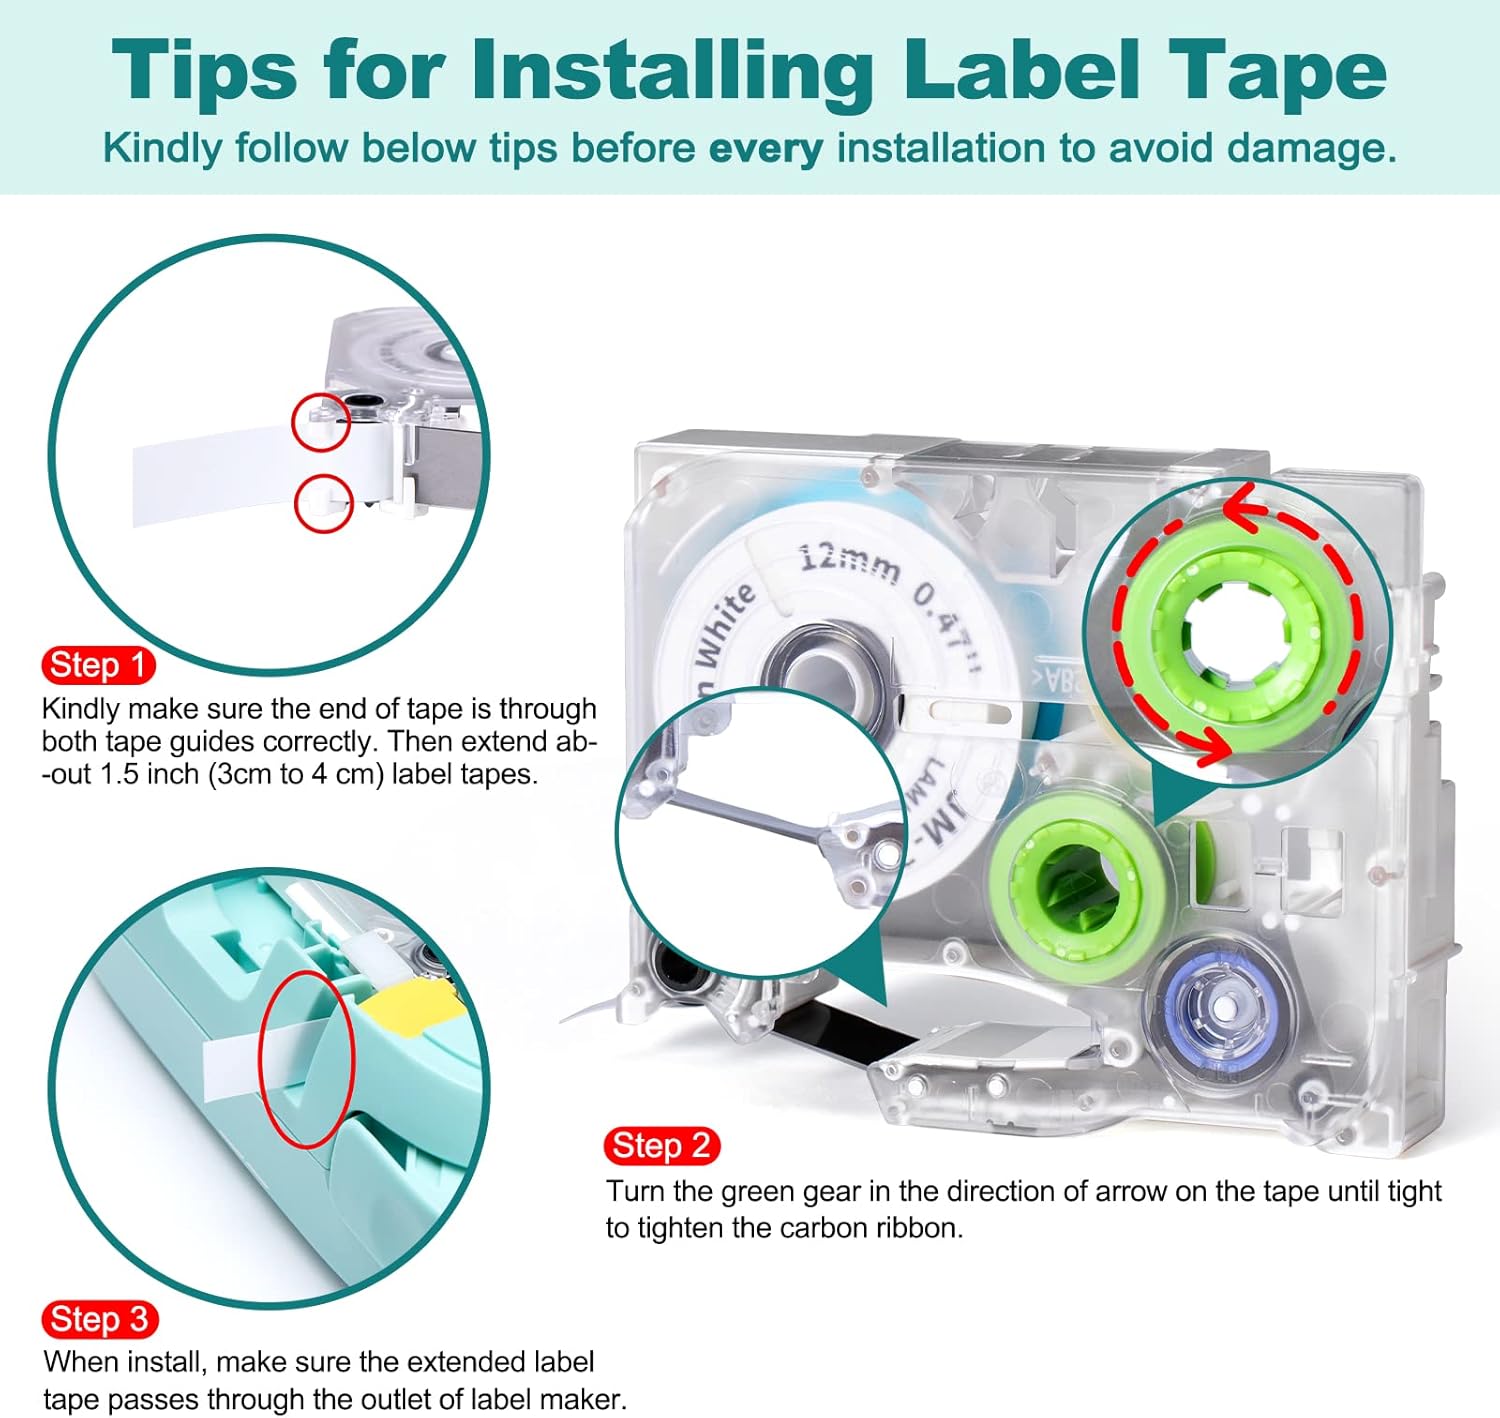
Image: A step-by-step visual guide for installing the label tape, showing how to thread the tape, tighten the carbon ribbon, and correctly place the cartridge into the label maker.
Video: This video demonstrates the correct procedure for installing both the label tape and batteries into the Labelife D210S label maker.
4. Istruzioni per l'uso
4.1 Funzionamento di base
- Accensione/spegnimento: Long press the red power button to turn the label maker on or off.
- Clear Text: Press the "Clear" one-touch key to erase any previously entered text or formatting.
- Capital/Lowercase: Use the "A/a" key to switch between capital and lowercase letters.
- Digitando: Use the QWERTY keyboard to input your desired text.
- Simboli e cornici: Access over 500 symbols and 4 frames using the "Symbol" and "Frame" keys respectively.
- Impostazioni: Use the "Settings" key to adjust label margins and other print options.

Immagine: un primo piano view of the Labelife D210S QWERTY keyboard, highlighting its user-friendly layout for easy text input.
Video: This video demonstrates the ease of use of the Labelife D210S label maker, showing basic text input and printing.
4.2 Saving Label Tape
To minimize tape waste, consider the following tips:
- Set Label Margin to "Narrow": Navigate to the "Settings" menu and select "Narrow" for the label margin. This reduces the blank space at the beginning and end of each label.
- Taglio manuale: Turn on the "Cutting" option in the menu for manual cutting. After printing the first label, the screen will show "Please Cut!". Cut the first label, then print the next. This allows for more precise cutting and reduces wasted tape between labels.
- Modifica multicopia: If printing several different labels, use the multi-copy editing one-touch key to continuously edit and print up to 55 different labels in one batch. This optimizes tape usage by printing them consecutively.
- Batch Printing Same Labels: If you need multiple copies of the same label, print them all at once and then cut them individually. The label maker can print up to 9 labels each time.

Image: The Labelife D210S label maker highlighting its multi-edit key feature, which allows continuous editing and printing of up to 55 different labels to save tape.
Video: This video demonstrates how to use the Labelife D210S label maker to save label tape by adjusting settings and utilizing multi-label editing.
4.3 Automatic vs. Fixed Length Labels
The D210S supports both automatic and fixed length label printing:
- Automatic Length: The label maker automatically adjusts the label length based on the text entered.
- Fixed Length: You can set a specific length for your labels, useful for consistent sizing.

Image: A visual comparison of labels printed with automatic length adjustment versus fixed length settings, demonstrating the flexibility of the Labelife D210S.
5. Manutenzione
To ensure the longevity and optimal performance of your Labelife D210S label maker, follow these maintenance guidelines:
- Pulizia della testina di stampa: Se la qualità di stampa peggiora, pulire delicatamente la testina di stampa con un batuffolo di cotone.ampened with isopropyl alcohol. Ensure the device is off and disconnected from power before cleaning.
- Cleaning the Cutter: Periodically check the cutter blade for any adhesive residue or tape fragments. Use the included replacement cutter holder to carefully remove and clean the cutter if necessary.
- Magazzinaggio: Store the label maker in a cool, dry place away from direct sunlight and extreme temperatures. Remove batteries if the device will not be used for an extended period.
- Compatibilità del nastro: Only use genuine Labelife JM label tapes to prevent damage and ensure proper functioning.
6. Risoluzione Dei Problemi
If you encounter issues with your Labelife D210S, refer to the following common problems and solutions:
| Problema | Possibile causa | Soluzione |
|---|---|---|
| Il dispositivo non si accende. |
|
|
| Poor print quality (faint, incomplete). |
|
|
| Tape jams or does not feed. |
|
|
| Excessive tape waste. |
|
|
7. Specifiche
| Caratteristica | Dettaglio |
|---|---|
| Numero di modello | I moduli D210S |
| Marca | Etichettavita |
| Tecnologia di connettività | Tastiera QWERTY |
| Tecnologia di stampa | Trasferimento termico |
| Caratteristica speciale | Portable, QWERTY Keyboard |
| Colore | Verde |
| Uscita della stampante | Monocromo |
| Massima risoluzione di stampa | 300 dpi (bianco e nero) |
| Dimensione massima del supporto | 0.47 pollici (12 mm) |
| Cartuccia compatibile | JM Label Tape |
| Fonte di alimentazione | AC Adapter (included) or 6 AAA Batteries (not included) |
| Dimensioni del prodotto | 6.7 x 6.2 x 3.15 pollici |
| Peso dell'articolo | 1.63 libbre |
| Usi specifici | Enterprise, Home, Office |
8. Garanzia e supporto
8.1 Informazioni sulla garanzia
The Labelife D210S Portable Label Maker comes with a Limited Warranty. Please refer to the warranty card included in your package for specific terms and conditions, including coverage duration and claim procedures.
8.2 Assistenza clienti
For technical assistance, troubleshooting, or any questions regarding your Labelife D210S label maker, please contact Labelife customer support. Contact details can typically be found on the official Labelife websito o sulla scheda di garanzia fornita con il prodotto.
When contacting support, please have your product model number (D210S) and purchase information readily available.


