1. Introduzione
The Keychron Q7 is a wired custom mechanical keyboard featuring a 70% layout. It is designed for users seeking a compact yet fully functional keyboard with advanced customization options. The Q7 supports QMK/VIA open-source firmware for key remapping and macro creation, and features a hot-swappable design for easy switch replacement. Its double-gasket mount structure and CNC machined aluminum case contribute to a premium typing experience. This manual provides instructions for setting up, operating, and maintaining your Keychron Q7 keyboard.
2. Contenuto della confezione
Please verify that all items listed below are included in your package. If any items are missing or damaged, contact Keychron support.

Image: Contents of the Keychron Q7 package, including the keyboard, cables, and tools.
- Tastiera:
- 1x Tastiera completamente assemblata
- Including: 1x Aluminum Case, 1x PCB, 1x Steel Plate, 1x Sound Absorbing Foam, 1x Case Foam, 10x Gaskets (6 Installed and 4 in the Box)
- Tasti: 1 set di tasti (PBT a doppio scatto)
- Interruttori: 1 set x Interruttori (Gateron G Pro)
- Stabilizzatori: 5 set x stabilizzatori
- Cavo:
- 1x Cavo da Tipo-C a Tipo-C
- 1x adattatore da tipo A a tipo C
- Utensili:
- 1x Estrattore per interruttori
- 1x estrattore per keycap
- 1x Cacciavite
- 1x chiave esagonale
Note: All tools are typically located at the bottom of the product box.
3. Impostazione
3.1 Collegamento della tastiera
The Keychron Q7 is a wired keyboard. To connect it to your computer:
- Individuare la porta USB Type-C sul retro della tastiera.
- Connect one end of the provided Type-C to Type-C cable to the keyboard.
- Connect the other end of the cable to a compatible USB Type-C port on your computer. If your computer only has USB Type-A ports, use the provided Type-A to Type-C adapter.
- La tastiera dovrebbe essere riconosciuta automaticamente dal sistema operativo.

Image: The Keychron Q7 keyboard with its USB-C cable connected, ready for use.
3.2 Switching Between Mac and Windows Layouts
The Keychron Q7 is compatible with both macOS and Windows operating systems. A physical switch on the back of the keyboard allows you to toggle between the two layouts, ensuring correct key functionality for your system.
- Locate the "Win/Mac" toggle switch on the rear edge of the keyboard, near the USB-C port.
- Slide the switch to the "Mac" position if you are using a macOS device.
- Slide the switch to the "Win" position if you are using a Windows or Linux device.

Image: Close-up of the Keychron Q7's rear, showing the physical switch to select between Windows and macOS modes.
4. Istruzioni per l'uso
4.1 QMK and VIA Support for Customization
The Keychron Q7 fully supports QMK (Quantum Mechanical Keyboard) and VIA firmware, allowing for extensive customization of key functions, macros, and backlighting without requiring programming knowledge. VIA is a graphical user interface that works with QMK firmware.
- Download the VIA software or access the Keychron Launcher Web App from the official Keychron websito.
- Connect your Keychron Q7 keyboard to your computer.
- Launch the VIA application or web app. The software should automatically detect your keyboard.
- Use the interface to remap keys, create custom macros, adjust RGB lighting effects, and configure different keyboard layers.

Immagine: Screenshot del Keychron Launcher Web App, demonstrating the interface for key remapping, macro creation, and shortcut customization via QMK/VIA.
4.2 Switch sostituibili a caldo
The Keychron Q7 features a hot-swappable PCB, allowing you to change mechanical switches without soldering. This enables easy customization of your typing feel.
- The PCB supports both 3-pin and 5-pin MX-style mechanical switches (e.g., Cherry, Gateron, Kailh).
- The keyboard comes pre-installed with factory-lubed Gateron G Pro Brown switches, known for their tactile feedback.

Immagine: Primo piano view of the keyboard's PCB with keycaps and switches removed, showing the hot-swappable sockets ready for switch installation.
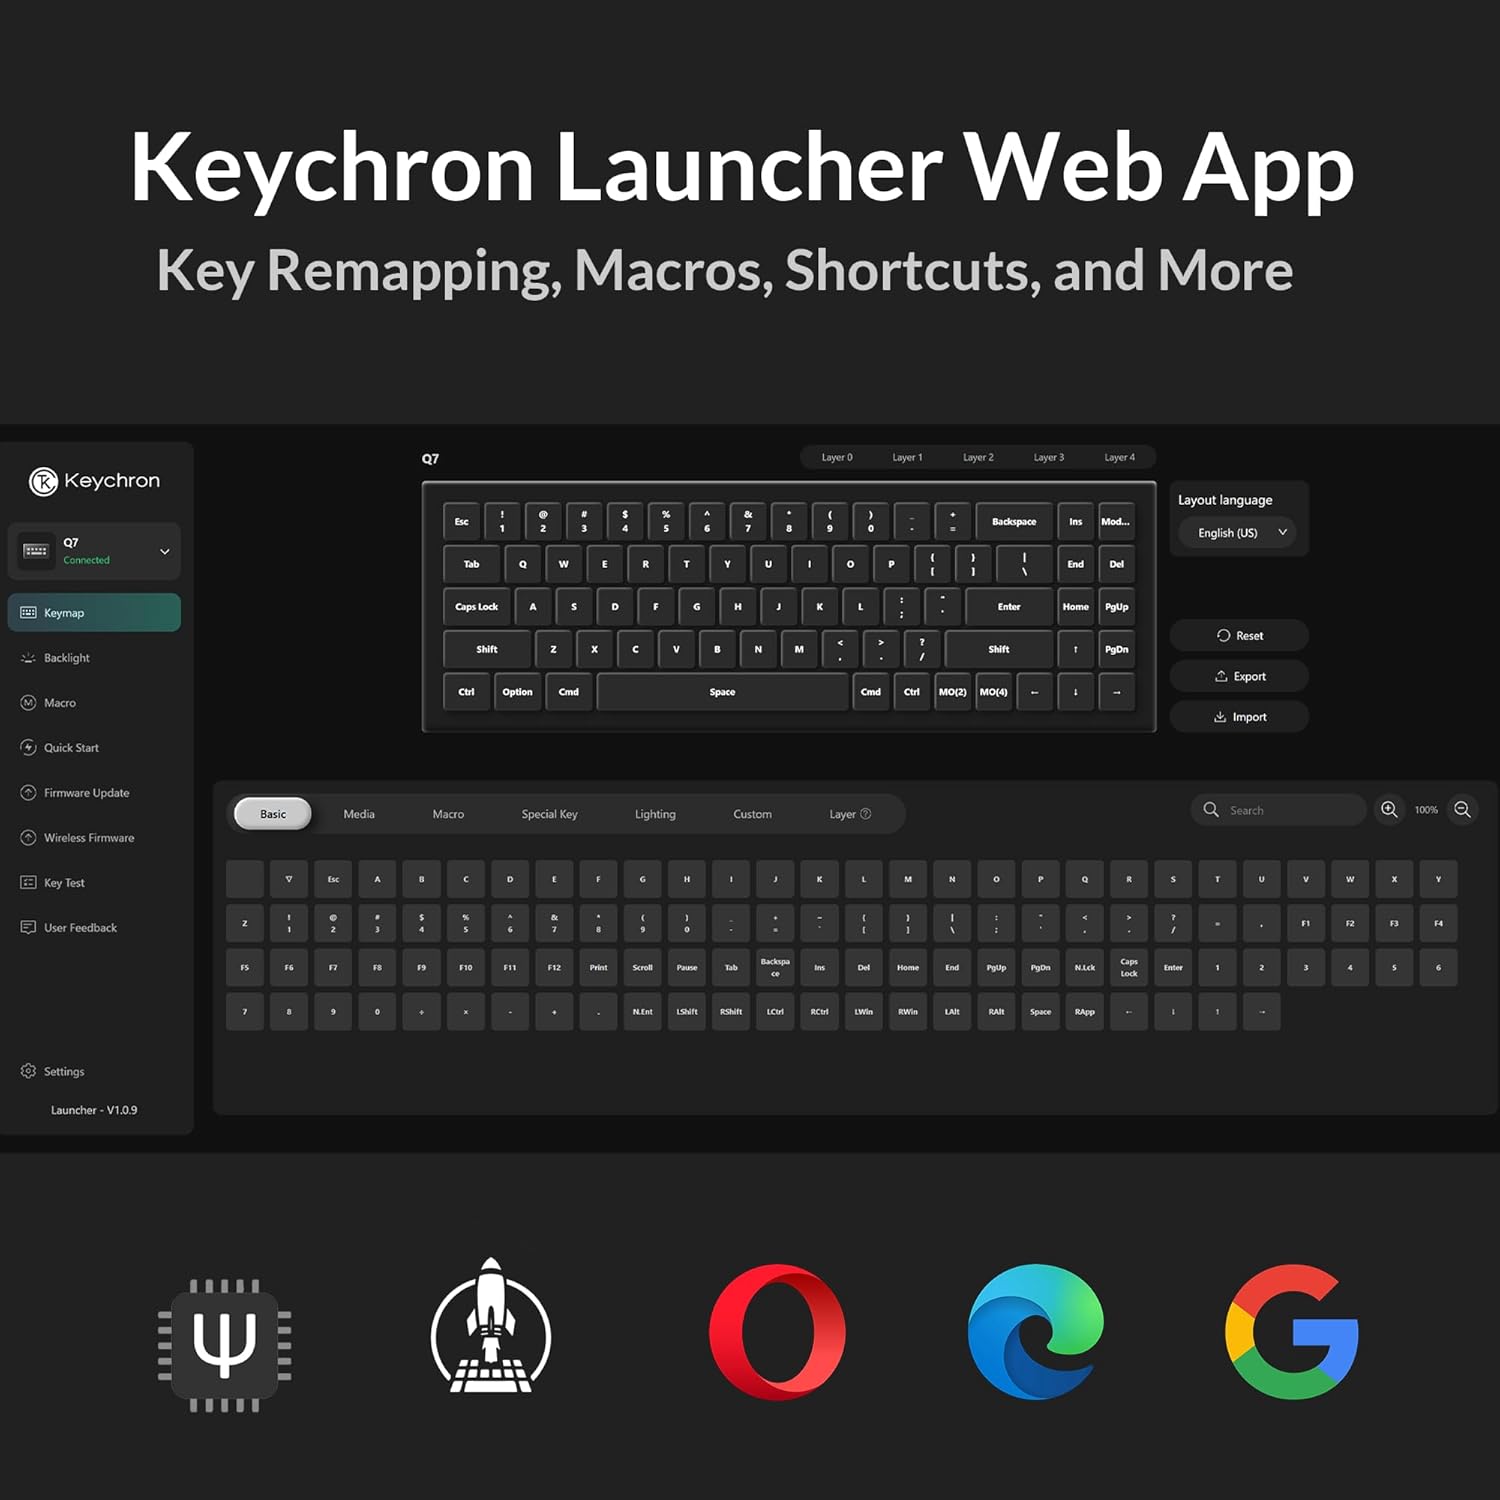
Image: Diagram detailing the specifications of the Gateron G Pro Brown switch, including operating force, pre-travel, travel distance, behavior, lubrication, and sound level.
4.3 Double-Gasket Design
The Keychron Q7 incorporates a double-gasket mount design with silicone pads. This construction enhances typing feel and sound by allowing for more flexibility and dampening vibrations within the aluminum case.

Image: An exploded diagram illustrating the various layers and components of the Keychron Q7 keyboard, including keycaps, switches, plate, gaskets, sound absorbing foam, PCB, and bottom case.
4.4 Tasti PBT Double-Shot
The keyboard is equipped with durable double-shot PBT keycaps. This material and manufacturing process ensure that the legends will not fade or wear over time, and the keycaps resist shine from prolonged use.

Immagine: Primo piano view of the Keychron Q7's keycaps, highlighting their texture and legends.
4.5 South-Facing RGB Backlighting
The Keychron Q7 features south-facing RGB LEDs. This design provides even backlighting and ensures compatibility with most custom keycap sets, as it prevents interference with Cherry-profile copritasti.

Image: Close-up of several switches on the Keychron Q7, showing the vibrant RGB backlighting emanating from beneath the keycaps.
4.6 70% Layout
The 70% layout of the Keychron Q7 retains essential function keys while offering a significantly reduced footprint compared to full-size keyboards. This design optimizes desk space for mouse movement and promotes a cleaner workspace.

Image: A visual comparison illustrating the compact 70% layout of the Keychron Q7 next to a standard full-size keyboard, highlighting the space-saving benefits.
5. Manutenzione
5.1 Pulizia generale
Una pulizia regolare aiuta a mantenere le prestazioni e l'aspetto della tastiera.
- Rimozione della polvere: Utilizzare una bomboletta di aria compressa per soffiare via polvere e detriti dagli spazi tra i tasti.
- Pulizia delle superfici: Gently wipe the keycaps and keyboard case with a soft, lint-free cloth dampcon una piccola quantità di acqua o una soluzione detergente delicata e non abrasiva. Evitare l'eccessiva umidità.
- Pulizia profonda: For thorough cleaning, keycaps can be removed (see 5.2 Keycap Removal/Replacement) and cleaned separately.
5.2 Keycap Removal/Replacement
Per rimuovere i tasti:
- Use the provided keycap puller.
- Gently hook the puller onto opposite sides of the keycap.
- Tirare verso l'alto con una pressione uniforme finché il tasto non si stacca dallo stelo dell'interruttore.
Per sostituire i tasti:
- Align the keycap's cross-shaped stem with the switch's stem.
- Press down firmly and evenly until the keycap clicks into place.
5.3 Sostituzione dell'interruttore (sostituibile a caldo)
The hot-swappable design allows for easy switch replacement without soldering.
- Rimuovere il tasto: First, remove the keycap from the switch you wish to replace using the keycap puller (refer to 5.2).
- Rimuovi interruttore: Use the provided switch puller. Align the prongs of the switch puller with the two clips on the top and bottom of the switch housing. Squeeze the clips and gently pull the switch straight up from the PCB.
- Installa nuovo switch: Ensure the pins on the new switch are straight. Align the pins with the holes on the PCB. Gently push the switch straight down until it clicks into place. Do not force it; if resistance is met, check the pins for bending.
- Sostituisci il tasto: Riposizionare il tasto sul nuovo interruttore.
6. Risoluzione Dei Problemi
6.1 La tastiera non risponde
- Verifica il cavo di connessione: Assicurati che il cavo USB-C sia collegato saldamente sia alla tastiera che al computer. Prova una porta USB o un cavo diverso.
- Cambio del sistema operativo: Verify that the "Win/Mac" toggle switch on the back of the keyboard is set to the correct operating system (Windows/macOS).
- Riavvia il computer: A volte un semplice riavvio del computer può risolvere i problemi di connettività.
- Prova su un altro computer: Se possibile, prova la tastiera su un computer diverso per determinare se il problema riguarda la tastiera stessa o la configurazione originale del computer.
6.2 Tasti non registrati o digitati due volte
- Controllare gli interruttori: Since the keyboard is hot-swappable, a switch might not be fully seated or could be faulty. Carefully remove the keycap and then the switch (refer to 5.3) and re-seat it firmly. If the issue persists, try replacing the switch with a spare one.
- Pulisci sotto il tasto: Debris under the keycap or around the switch stem can interfere with key presses. Remove the keycap and clean the area.
6.3 Problemi di retroilluminazione RGB
- Check VIA Settings: Ensure that backlighting is enabled and configured correctly within the VIA software.
- Regolazione della luminosità: Use the keyboard's default function keys (if any) or VIA to adjust brightness levels.
- Aggiornamento del firmware: Ensure your keyboard's firmware is up to date. Check the Keychron websito per il firmware più recente e le istruzioni per l'aggiornamento.
6.4 Il software QMK/VIA non rileva la tastiera
- Ensure Wired Connection: VIA requires a direct wired connection to function.
- Re-plug Keyboard: Scollegare e ricollegare la tastiera.
- Riavvia il software: Close and reopen the VIA application or web applicazione.
- Installazione del driver: For some operating systems, specific drivers might be required. Refer to the Keychron support page for your model.
7. Specifiche
| Modello | Chiavetta Q7 |
| Numero modello articolo | Keychron Q7M3 |
| Disposizione | 70% |
| Tecnologia di connettività | USB-C (cablato) |
| Dispositivi compatibili | Laptop, Mac, PC (Windows, macOS, Linux) |
| Interruttori | Hot-swappable Gateron G Pro Brown (pre-installed) |
| keycaps | PBT a doppio colpo |
| Retroilluminazione | RGB esposto a sud |
| Materiale della cassa | Alluminio lavorato CNC |
| Stile di montaggio | Double-Gasket Mount |
| Dimensioni del prodotto | 13.44 x 4.76 x 1.33 pollici |
| Peso dell'articolo | 5.21 libbre |
| Produttore | Chiave di cronaca |
8. Garanzia e supporto
8.1 Informazioni sulla garanzia
Keychron products typically come with a limited warranty against manufacturing defects. The specific warranty period and terms may vary by region and product. Please refer to the official Keychron websito o nella documentazione di acquisto per informazioni dettagliate sulla garanzia.
Per richiedere il servizio di garanzia:
- Retain your proof of purchase (e.g., invoice, order number).
- Contact Keychron customer support through their official channels.
8.2 Assistenza clienti
For technical assistance, troubleshooting, or general inquiries regarding your Keychron Q7 keyboard, please visit the official Keychron support page:
The Keychron website also provides FAQs, firmware updates, and additional resources for product customization and maintenance.


