1. Introduzione
IL Weber Genesis Smart SX-335 LP SS Liquid Propane Grill is designed to provide a comprehensive outdoor cooking experience. This manual provides essential information for the safe and efficient operation, maintenance, and troubleshooting of your new grill.

Figura 1: Il Weber Genesis Smart SX-335 LP SS Liquid Propane Grill. This image shows the full grill unit with its stainless steel finish and black cabinet.
2. Informazioni importanti sulla sicurezza
AVVERTIMENTO: La mancata osservanza di queste istruzioni potrebbe causare incendi, esplosioni o ustioni, con conseguenti danni alla proprietà, lesioni personali o morte.
- Utilizzare sempre la griglia all'aperto, in un'area ben ventilata.
- Non conservare o utilizzare benzina o altri vapori e liquidi infiammabili nelle vicinanze di questo o di altri apparecchi.
- Mantenere l'area dell'elettrodomestico libera e priva di materiali combustibili, benzina e altri vapori e liquidi infiammabili.
- Non ostruire il flusso dell’aria di combustione e di ventilazione.
- Keep any electrical supply cord and fuel supply hose away from heated surfaces.
- Controllare sempre che non vi siano perdite di gas prima di ogni utilizzo.
- Non lasciare mai la griglia incustodita durante la cottura.
- Tenere sempre bambini e animali domestici lontani dal barbecue.
- Indossare guanti protettivi quando si maneggiano componenti caldi.
3. Cosa c'è nella scatola
Tuo Weber Genesis Smart SX-335 LP SS grill package includes the following components:
- Weber Genesis Smart SX-335 LP SS Gas Grill Unit
- Cooking Grates (porcelain-enameled cast iron)
- Flavorizer Bars
- Grease Management System (including drip tray and catch pan)
- Side Burner (integrated)
- Weber Connect Smart Grilling Hub (integrated)
- Propane Tank (sold separately, but required for operation)
- Manuale di istruzioni

Figura 2: Il Weber Genesis Smart SX-335 LP SS grill with its lid closed, showcasing the stainless steel finish and control panel.
4. Impostazione
4.1 Montaggio
Assembly of your Weber Genesis Smart SX-335 LP SS grill is required. For detailed, step-by-step interactive 3D instructions, download the free BILT app on your mobile device. This app provides visual guidance for each step of the assembly process.
Video 1: BILT App - Step by Step Interactive Assembly Instructions. This video demonstrates the interactive 3D assembly guide available through the BILT app for the Webla griglia Genesis.
Ensure all parts are accounted for before beginning assembly. It is recommended to have a second person assist with assembly due to the size and weight of some components.
4.2 Collegamento del serbatoio del propano liquido
- Assicurarsi che tutte le manopole di controllo dei bruciatori siano in posizione OFF.
- Open the cabinet doors located beneath the grill.
- Place the liquid propane tank securely in the designated tank holder.
- Connect the regulator hose from the grill to the propane tank valve. Hand-tighten the connection firmly.
- Slowly open the propane tank valve fully.
- Check for any gas leaks using a soapy water solution on all connections. Bubbles indicate a leak. If a leak is detected, close the tank valve, tighten connections, and re-test. If the leak persists, do not use the grill and contact customer service.

Figure 3: A hand connecting the liquid propane tank to the grill's regulator hose inside the cabinet.
The grill cabinet features a hook that indicates the propane level by weight, helping you monitor remaining fuel.
4.3 Avvio iniziale
Before first use, operate the grill on high heat for 15 minutes with the lid closed to burn off any manufacturing residues. This process is called "seasoning" the grill.
5. Istruzioni per l'uso
5.1 Accensione dei bruciatori principali
- Aprire il coperchio della griglia.
- Assicurarsi che la valvola della bombola del propano sia completamente aperta.
- Turn the leftmost main burner control knob to the START/HIGH position.
- Tenere immediatamente premuto il pulsante di accensione elettronica finché il bruciatore non si accende.
- Once the first burner is lit, turn on adjacent burners to the desired heat setting.
- Se l'accensione non avviene entro 5 secondi, spegnere il/i bruciatore/i, attendere 5 minuti e ripetere la procedura di accensione.

Figura 4: Primo piano del Weber Genesis grill's control knobs, showing the ignition button and burner controls.
5.2 Temperature Control and Smart Features
IL Weber Genesis Smart SX-335 LP SS features integrated Weber Connect smart technology for precise temperature monitoring. The digital display on the side table shows real-time food temperatures from connected probes.
- Weber Connect App: Scarica il Weber Connect app to your smartphone for remote monitoring, temperature alerts, and flip & serve notifications.
- Capacità della sonda: The grill supports up to 2 temperature probes for monitoring different food items simultaneously.
- Alimentazione del display: The grill display can be powered by plugging it into an electrical outlet or by using a USB-certified, 10,000mAh rechargeable power bank (sold separately) clipped under the side table.

Figura 5: Il Weber Connect smart display on the grill's side table, showing temperature readings, alongside a smartphone displaying the Weber Connect app with temperature alerts.
5.3 Utilizzo della zona di scottatura
The extra-large sear zone is designed for high-heat searing to achieve perfect grill marks and lock in juices. To activate the sear zone, turn the dedicated sear zone burner knob to the HIGH position. Allow it to preheat for 5-10 minutes before placing food directly over it.
5.4 Utilizzo del fornello laterale
The integrated side burner allows you to sauté vegetables, boil corn, or heat up sauces while grilling. To light the side burner, open its cover, turn the control knob to the START/HIGH position, and press the electronic ignition button until it ignites.

Figura 6: Il Weber Genesis grill with the side burner cover open, revealing the burner grate.
5.5 Weber Crafted Outdoor Kitchen Collection
Expand your culinary possibilities with the Weber Crafted Outdoor Kitchen Collection. By replacing a cooking grate with custom-fit grillware (sold separately), you can sear, roast, bake, steam, and stir-fry. The grill locker provides convenient storage for these accessories.

Figura 7: Il Weber Crafted grillware frame installed in the grill, ready to accommodate various inserts.

Figure 8: A person stir-frying vegetables and rice in a wok insert on the Webla griglia Genesis.
5.6 Cooking Techniques
- Calore diretto: Use direct heat for searing, grilling smaller items, or cooking foods that require quick cooking.
- Calore indiretto: For larger cuts of meat, poultry, or delicate items, use indirect heat. Turn off the burners directly beneath the food and use adjacent burners to maintain the desired temperature. The expandable top cooking grate provides additional space for indirect cooking.

Figure 9: Two whole chickens cooking on the main grates, with temperature probes inserted, demonstrating indirect cooking.

Figure 10: Grilled shrimp, mixed vegetables in a basket, and toasted bread on the upper warming rack, illustrating diverse cooking options.
6. Manutenzione
6.1 Pulizia delle griglie di cottura
After each use, while the grates are still warm, use a grill brush to scrape off any food residue. For a deeper clean, remove the grates and wash them with warm, soapy water.
6.2 Sistema di gestione del grasso
The improved grease management system simplifies cleaning. Simply pull the grease tray out from the front of the grill and scrape away accumulated grease and debris. Replace the disposable catch pan as needed.
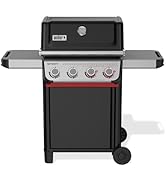
Figure 11: A hand demonstrating the removal and cleaning of the grease management system's pull-out tray.
6.3 Coperchio della griglia
Protect your grill from the elements by using a weather-resistant grill cover when not in use. This helps prolong the life and appearance of your grill.
7. Risoluzione Dei Problemi
| Problema | Possibile causa | Soluzione |
|---|---|---|
| Il bruciatore non si accende | Nessun flusso di gas, bruciatore intasato, accenditore difettoso. | Check propane tank connection and fuel level. Clean burner ports. Check igniter electrode. |
| Riscaldamento non uniforme | Clogged burner ports, low fuel, wind. | Clean burner ports. Ensure adequate fuel. Position grill away from strong winds. |
| Fiamma bassa o nessuna fiamma | Low fuel, regulator bypass, gas leak. | Check fuel level. Reset regulator by turning off all gas, disconnecting, waiting 1 minute, and reconnecting. Check for leaks. |
| Weber Connect display not working | No power, battery low (if using power bank). | Ensure plugged into outlet or power bank is charged and connected. |
For further assistance, refer to the full troubleshooting guide in your printed manual or contact Webil nostro servizio clienti.
8. Specifiche
| Caratteristica | Dettaglio |
|---|---|
| Marca | Weber |
| Nome del modello | Genesis Smart SX-335 LP SS |
| Numero modello articolo | 35600001 |
| Dimensioni del prodotto | 35.5"P x 31"L x 30.75"A |
| Peso dell'articolo | 209 libbre |
| Colore | Acciaio inossidabile |
| Tipo di carburante | Propano liquido (LP) |
| Conteggio del bruciatore principale | 3 |
| Potenza di riscaldamento | 13000 unità termiche britanniche (BTU) |
| Superficie di cottura | 787 pollici quadrati |
| Caratteristica speciale | Grease Management System, Weber Connect Smart Technology, Sear Zone, Side Burner, Expandable Top Cooking Grate, Grill Locker |
| Materiale | Acciaio inossidabile |
| Assemblaggio richiesto | SÌ |
9. Garanzia e supporto
IL Weber Genesis Smart SX-335 LP SS Liquid Propane Grill comes with a Garanzia limitata di 12 anno. For detailed warranty information, please refer to the warranty card included with your product or visit the official Weber websito.
For customer support, technical assistance, or to order replacement parts, please visit the WebNegozio su Amazon o contattare Weber directly through their official channels.
Documenti correlati - SX-335
 |
WebGuida al montaggio del barbecue a gas Genesis S-335 LP Istruzioni di montaggio complete per il WebGriglia a gas propano liquido Genesis S-335 LP. Questa guida fornisce passaggi dettagliati, elenchi di componenti, requisiti degli strumenti e importanti informazioni sulla sicurezza, con tutti i contenuti presentati in inglese per chiarezza e accessibilità. |
 |
WebGuida rapida per Genesis E-325, E-335, EP-335: Istruzioni per la cottura al barbecue Questa guida rapida fornisce istruzioni essenziali per WebBarbecue Genesis E-325, E-335 ed EP-335. Scopri i metodi di cottura diretta e indiretta, le impostazioni dei bruciatori e l'utilizzo degli accessori per risultati ottimali di grigliatura e arrostitura. Include legende delle icone e tabelle di cottura. |
 |
WebGuida all'assemblaggio del Genesis II EX-335 SX-335 Guida completa al montaggio per Weber Genesis II EX-335 and SX-335 LP gas grills, providing step-by-step instructions, safety tips, and essential setup information for a successful build. |
 |
WebGuida all'assemblaggio del Genesis II EX-335 SX-335 Guida completa al montaggio per WebBarbecue a gas propano Genesis II EX-335 e SX-335. Include istruzioni dettagliate ed elenchi dei componenti. |
 |
Weber Genesis II EX-335 / SX-335 Manuale dell'utente - Guida alla grigliatura Manuale completo del proprietario per il Weber Genesis II EX-335 e SX-335 grill a gas. Scopri di più sul sistema di cottura GS4, WEBTecnologia ER CONNECT, sicurezza, installazione, funzionamento, manutenzione e risoluzione dei problemi per una cottura ottimale all'aperto. |
 |
Weber Genesis E-315/E-415 LP Assembly Guide Comprehensive step-by-step assembly instructions for the Weber Genesis E-315 and E-415 LP gas grills, including parts identification, assembly procedures, and important pre-assembly and post-assembly information. |