1. Introduzione
This manual provides detailed instructions for the assembly, operation, and maintenance of your Giantex Free-Standing Floor Storage Cabinet. Please read this manual thoroughly before assembly and use to ensure proper function and safety. Keep this manual for future reference.
The Giantex storage cabinet is designed to offer practical storage and display solutions for various rooms, including living rooms, entryways, and kitchens. It features a spacious top, two enclosed doors, and three drawers, along with an adjustable inner shelf.
Informazioni sulla sicurezza
- Montare sempre il prodotto su una superficie morbida e pulita per evitare graffi.
- Prima di iniziare il montaggio, assicurarsi che tutti i componenti siano presenti e integri.
- Non stringere eccessivamente le viti durante il montaggio per evitare di danneggiare il materiale.
- The cabinet is equipped with an anti-tipping device. It is highly recommended to fix the cabinet to the wall using this device to prevent accidental falling and ensure a safe environment, especially in households with children or pets.
- Do not exceed the weight capacity of the top (77 lbs), drawers (11 lbs), or interior shelf (11 lbs).
2. Elenco delle parti
Before assembly, verify that all components are included in your package. If any parts are missing or damaged, please contact customer service.
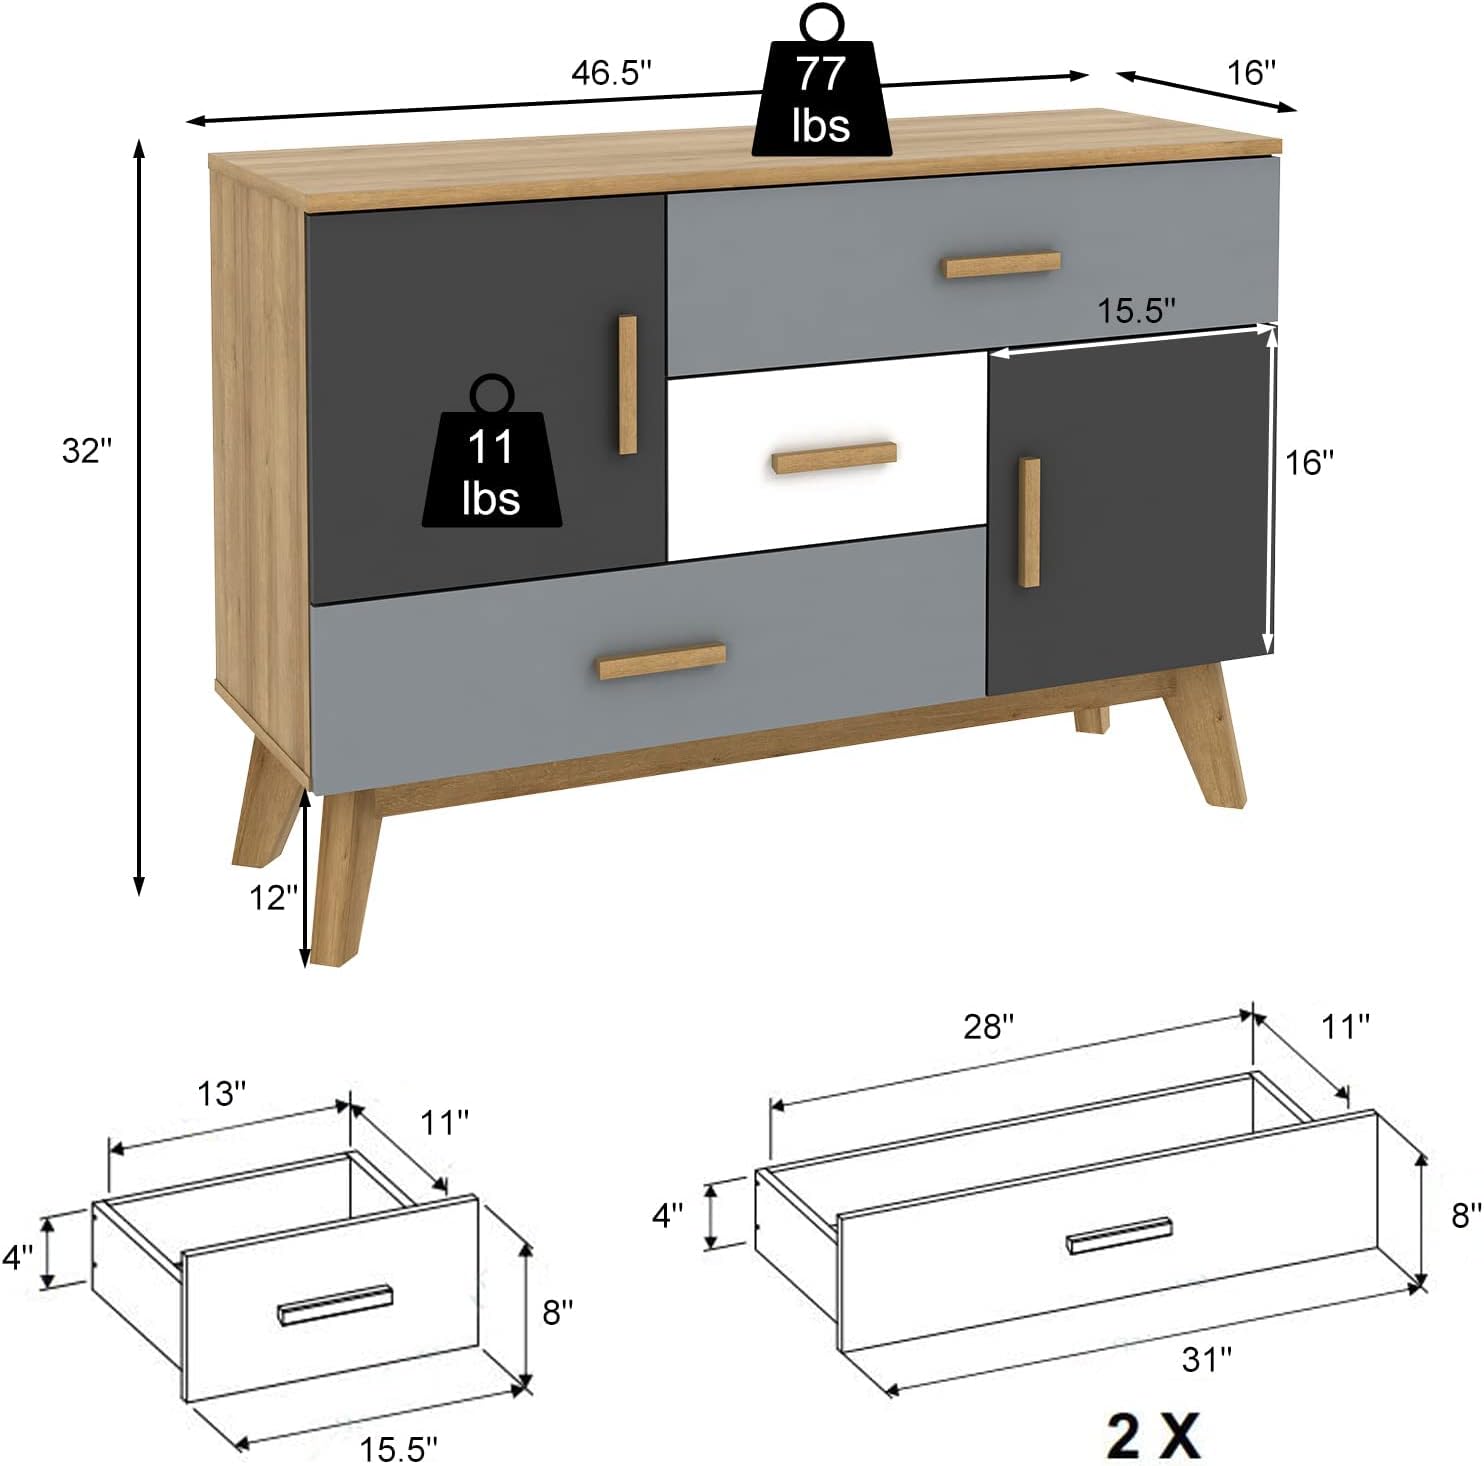
Figura 2.1: Cabinet Dimensions and Components Overview
This image illustrates the overall dimensions of the cabinet (46.5" L x 16" W x 32" H), the weight capacity of the top (77 lbs), and the drawers (11 lbs). It also shows the dimensions of the small drawers (13" x 11" x 4") and the large drawer (28" x 11" x 4").
Il pacchetto include:
- Pannello superiore dell'armadio
- Pannelli laterali (sinistro e destro)
- Pannello inferiore
- Pannelli posteriori
- Ripiano regolabile
- Drawer Components (Fronts, Sides, Backs, Bottoms for 3 drawers)
- Door Panels (2)
- Wooden Handles (for drawers and doors)
- Metal Slide Rails (for drawers)
- Supporting Legs (4) with Non-slip Foot Pads
- Anti-toppling Device (Wall anchor kit)
- Hardware Pack (screws, dowels, cam locks, hinges, etc.)
- Guida per l'utente (questo manuale)
3. Installazione e assemblaggio
Assembly is required for this product. Please follow the included detailed instructions in the user guide. It is recommended to have two people for assembly.
- Disimballare e identificare le parti: Carefully unpack all components and hardware. Refer to the parts list and diagrams to identify each piece.
- Assemblare il telaio principale: Connect the side panels to the bottom and top panels using the provided hardware (e.g., dowels, cam locks). Ensure all connections are secure.
- Installare le guide dei cassetti: Attach the metal slide rails to the cabinet's interior side panels according to the instructions. Ensure they are level and aligned.
- Montare i cassetti: Construct the three drawers by attaching the front, side, and back panels to the drawer bottoms. Install the remaining metal slide rails onto the drawer sides. Attach the wooden handles to the drawer fronts.
- Inserisci cassetti: Carefully slide the assembled drawers into their respective compartments, ensuring smooth operation.
- Porte di collegamento: Install hinges to the door panels and then attach the doors to the cabinet frame. Adjust hinges as needed for proper door alignment. Attach wooden handles to the door fronts.
- Installare il ripiano regolabile: Place the adjustable shelf into the desired position within the lower cabinet section. The shelf has 3 height adjustable options.
- Attach Supporting Legs: Securely attach the four supporting legs to the bottom of the cabinet. Ensure the non-slip foot pads are in place.
- Installare il dispositivo antiribaltamento: This is a critical safety step. Attach the anti-toppling device to the back of the cabinet and secure it to a wall stud using appropriate wall anchors and screws. This prevents the cabinet from tipping over.

Figura 3.1: Key Features for Assembly and Stability
This image highlights the design elements that contribute to the cabinet's functionality and stability, including the wooden handles for easy access, metal slide rails for smooth drawer operation, sturdy supporting legs, and non-slip foot pads to protect floors.

Figura 3.2: Anti-tilt Screws for Stability
This diagram emphasizes the critical safety feature of the anti-toppling device. It visually demonstrates how securing the cabinet to the wall prevents it from accidentally falling, ensuring safety, especially for children.
4. Istruzioni per l'uso
Your Giantex storage cabinet is designed for versatile storage and display.
- Parte superiore del mobile: Use the wide cabinet top to display decorative items, photo frames, or to hold frequently used items. Ensure the weight does not exceed 77 lbs.
- Cassetti: The three drawers (two small, one large) provide enclosed storage for various items. Pull the wooden handles to open and push to close. The metal slide rails ensure smooth operation. Do not overload drawers; each has a weight capacity of 11 lbs.
- Porte: The two enclosed cabinet sections offer additional storage. Open and close the doors using the wooden handles.
- Ripiano regolabile: The lower cabinet features an adjustable shelf. To change its height, remove the shelf, reposition the shelf pins to one of the 3 available height settings, and then place the shelf back on the pins. This allows for customized storage of items of different sizes.

Figura 4.1: Sufficient Storage Space and Adjustable Shelf
This image illustrates the various storage options provided by the cabinet: a wide top for display, three drawers for concealed storage, and two spacious cabinets. It specifically shows the adjustable shelf in the lower cabinet, indicating its 1.3-inch height adjustment increments for flexible storage.
5. Manutenzione
Proper care will extend the life and appearance of your storage cabinet.
- Pulizia: Pulire la superficie con un panno morbido, damp panno. Evitare l'uso di prodotti chimici aggressivi o detergenti abrasivi, poiché possono danneggiare la finitura.
- Fuoriuscite: Pulire immediatamente eventuali fuoriuscite per evitare macchie o danni al legno ingegnerizzato.
- Hardware: Controllare periodicamente tutte le viti e i collegamenti per assicurarsi che siano ben serrati. Serrare nuovamente se necessario.
- Ambiente: Avoid placing the cabinet in direct sunlight or near heat sources, which can cause fading or warping. Maintain a stable humidity level to prevent material changes.
6. Risoluzione Dei Problemi
Se riscontri problemi con il tuo mobile, fai riferimento ai seguenti problemi comuni e alle relative soluzioni:
| Problema | Possibile causa | Soluzione |
|---|---|---|
| Il mobile traballa o è instabile. |
|
|
| I cassetti non scorrono agevolmente. |
|
|
| Le porte sono disallineate o non si chiudono correttamente. |
|
|
7. Specifiche
Detailed specifications for the Giantex Free-Standing Floor Storage Cabinet:
| Caratteristica | Dettaglio |
|---|---|
| Numero di modello | GT10176-JV |
| Dimensioni complessive (L x P x A) | 46.5" x 16" x 32" |
| Dimensioni del cassetto piccolo (L x P x A) | 13" x 11" x 4" |
| Dimensioni cassetto grande (L x P x A) | 28" x 11" x 4" |
| Cabinet Size (L x D x H) | 15.5" x 13.5" x 18" |
| Peso netto | 40 libbre |
| Weight Capacity of Top | 77 libbre |
| Capacità di peso del cassetto | 11 libbre |
| Weight Capacity of Interior Shelf | 11 libbre |
| Materiale | Legno ingegnerizzato, MDF |
| Colore | Grey, White, Black (as per product variant) |
| Assemblaggio richiesto | SÌ |
| Tipo di montaggio | Montaggio a pavimento (con ancoraggio a parete per stabilità) |
8. Garanzia e supporto
For any questions regarding assembly, missing parts, or product issues, please contact Giantex customer service. Please have your model number (GT10176-JV) and purchase information ready when contacting support.
While specific warranty details are not provided in this manual, Giantex is committed to customer satisfaction. Please refer to your purchase receipt or the retailer's website for warranty information and return policies.
Per maggiori informazioni puoi visitare il negozio ufficiale Giantex: Negozio Giantex


