1. Introduzione
This manual provides detailed instructions for the installation, configuration, and operation of your Hikvision DS-7104HGHI-K1 4-Channel Digital Video Recorder (DVR). Please read this manual thoroughly before using the product to ensure correct and safe operation. Keep this manual for future reference.
2. Prodotto finitoview e Caratteristiche
The Hikvision DS-7104HGHI-K1 is a 4-channel 1080p Lite DVR designed for reliable surveillance recording. It supports various camera types and features advanced video compression technology.

Figura 2.1: Superiore view of the Hikvision DS-7104HGHI-K1 DVR, showing its compact design and branding.
Caratteristiche principali:
- 4-Channel Video Input: Supports up to 4 analog cameras.
- 1080p Lite Recording: Provides high-definition recording at 1080p Lite resolution.
- Compressione H.265+: Advanced video compression technology for efficient storage and reduced bandwidth usage.
- Multi-format Input: Compatible with HDTVI, AHD, CVI, CVBS, and up to 5 IP camera inputs (up to 2MP).
- Uscita HDMI/VGA: Per il monitoraggio locale.
- Accesso remoto: Supporta il telecomando viewing via Hik-Connect app.

Figura 2.2: Anteriore e posteriore views of the Hikvision DVR, highlighting various ports and connectivity options, along with icons representing H.265 Pro, Mobile access, 5-in-1 compatibility, and IP/Analog XVR capabilities.
H.265+ Compression Benefits:
H.265+ compression significantly reduces the required storage space and bandwidth compared to older compression standards like H.264, without compromising video quality.

Figura 2.3: A bar graph illustrating the reduction in 24-hour recording file size (GB) when using H.265+ compression compared to H.264 and H.265, showing up to an 83% gap in storage requirements.
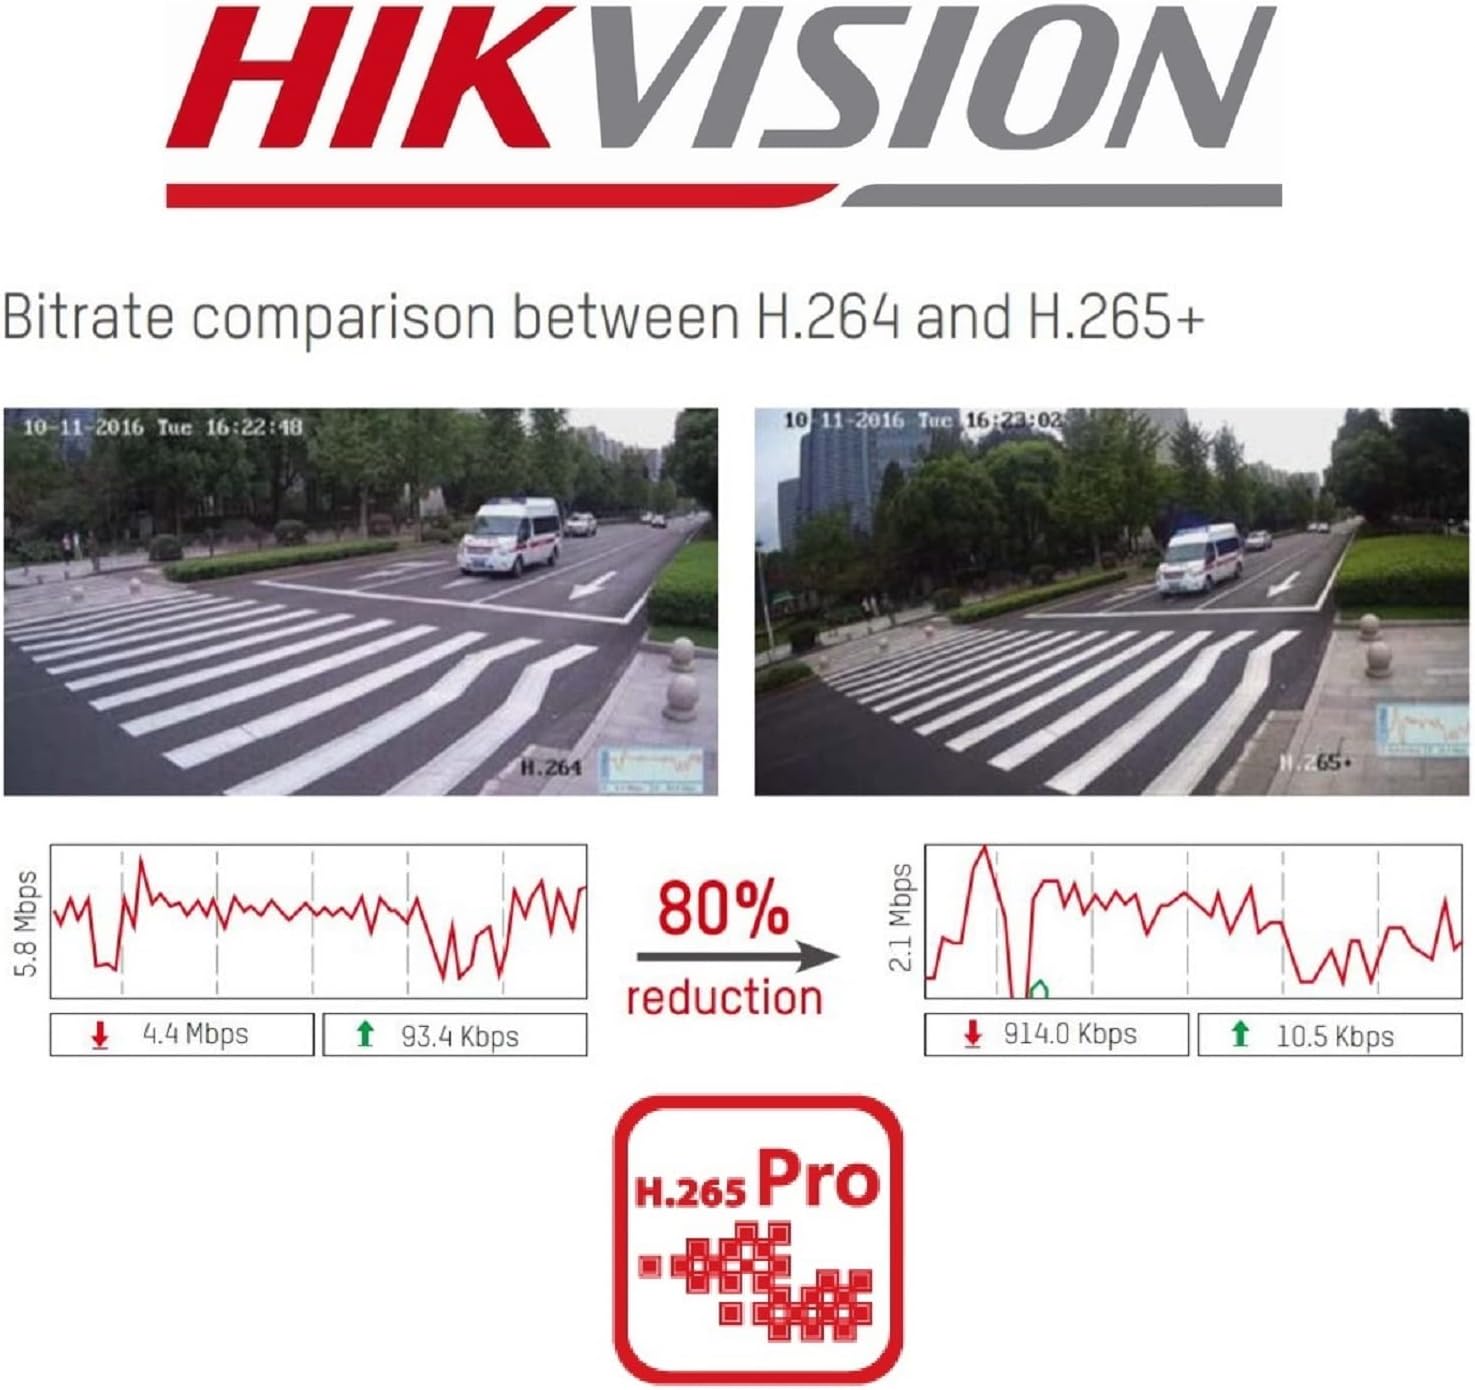
Figura 2.4: A visual comparison of bitrate usage between H.264 and H.265+ compression, demonstrating an 80% reduction in bitrate with H.265+ while maintaining similar video quality in sample surveillance footage.
3. Contenuto della confezione
Verifica che tutti gli articoli siano presenti nel tuo pacco:
- Hikvision DS-7104HGHI-K1 DVR Unit
- Adattatore di alimentazione
- Mouse USB
- Cavi SATA (per la connessione dell'HDD)
- Guida rapida
- Note: Hard drive is not included and must be purchased separately.
4. Informazioni sulla sicurezza
- Assicurarsi che l'alimentazione sia conforme ai requisiti del DVR.
- Non esporre il DVR all'acqua o all'umidità.
- Evitare di posizionare il DVR alla luce diretta del sole o vicino a fonti di calore.
- Garantire una ventilazione adeguata per evitare il surriscaldamento.
- Utilizzare solo gli accessori specificati dal produttore.
5. Impostazione
5.1 Installazione hardware
- Hard Drive Installation (HDD not included):
- Svitare e rimuovere il coperchio superiore del DVR.
- Connect the SATA power and data cables from the DVR to the hard drive.
- Secure the hard drive inside the DVR using the provided screws.
- Riposizionare il coperchio superiore e fissarlo con le viti.
- Collega le telecamere: Connect your analog cameras to the BNC video input ports on the rear panel of the DVR.
- Connetti il monitor: Collegare un monitor alla porta di uscita HDMI o VGA.
- Connetti rete: Connect an Ethernet cable from the DVR's LAN port to your router or network switch.
- Collegare il mouse USB: Collegare il mouse USB a una porta USB del DVR.
- Accensione: Collegare l'adattatore di alimentazione al DVR e poi a una presa di corrente. Il DVR si accenderà automaticamente.
5.2 Configurazione iniziale
- First-Time Startup: Upon first boot, the DVR will guide you through a setup wizard.
- Impostare la password: Create a strong password for the admin user. This is crucial for security.
- Impostazioni di rete: Configurare le impostazioni di rete (DHCP è solitamente sufficiente per la maggior parte delle reti domestiche).
- Inizializzazione HDD: The DVR will prompt you to initialize the newly installed hard drive. This step is necessary for recording.
- Data e ora: Imposta la data e l'ora corrette.
6. Funzionamento
6.1 Vivere View
Dopo la configurazione iniziale, il DVR visualizzerà le immagini in diretta view from connected cameras on the monitor. You can switch between single-camera view e griglia multi-camera view utilizzando i controlli sullo schermo o il mouse.
6.2 Registrazione
The DVR is typically configured to record continuously by default once the HDD is initialized. You can customize recording schedules, motion detection recording, and alarm recording settings through the DVR's menu:
- Vai a Menu > Registra > Pianifica to adjust recording times.
- Vai a Menu > Allarme > Rilevamento movimento to configure motion-triggered recording.
6.3 Riproduzione
A view registrato footage:
- Vai a Menu > Riproduzione.
- Seleziona la/le telecamera/e e l'intervallo di data/ora che desideri riprendereview.
- Utilizzare i controlli di riproduzione (riproduzione, pausa, avanzamento rapido, riavvolgimento) per navigare attraverso il footage.
6.4 Accesso remoto (Hik-Connect)
The Hik-Connect app allows you to view cibo vivotage, play back recordings, and receive alerts on your smartphone or tablet from anywhere with an internet connection.

Figura 6.1: The Hik-Connect application icon alongside a smartphone displaying a multi-camera live view, illustrating the remote monitoring capabilities of the DVR system.
- Download the Hik-Connect app from your device's app store.
- Create a Hik-Connect account.
- Aggiungi il tuo DVR all'app scansionando il codice QR sul DVR o inserendo manualmente il suo numero di serie.
- Ensure your DVR is connected to the internet and Hik-Connect service is enabled in the DVR's network settings.
7. Manutenzione
- Pulizia regolare: Keep the DVR free from dust. Use a soft, dry cloth for cleaning.
- Aggiornamenti del firmware: Controllare periodicamente il sito ufficiale Hikvision websito per gli aggiornamenti del firmware per garantire prestazioni e sicurezza ottimali.
- Backup dei dati: Eseguire regolarmente il backup delle registrazioni importanti su un dispositivo di archiviazione esterno.
- Sicurezza della password: Change your DVR password periodically to enhance security.
8. Risoluzione Dei Problemi
- Nessuna uscita video:
- Controllare i collegamenti dei cavi HDMI/VGA.
- Assicurarsi che il monitor sia acceso e impostato sull'ingresso corretto.
- Nessuna registrazione:
- Verify that a hard drive is installed and initialized.
- Check recording schedules and ensure they are active.
- Assicurarsi che le telecamere siano collegate correttamente e funzionino.
- Cannot Access Remotely:
- Assicurarsi che il DVR sia connesso a Internet.
- Check network settings and Hik-Connect status on the DVR.
- Verify your Hik-Connect account and device binding in the app.
- DVR Unresponsive:
- Riavviare il DVR scollegando e ricollegando l'alimentazione.
- If issues persist, consider a factory reset (note: this will erase configurations).
9. Specifiche
| Caratteristica | Dettaglio |
|---|---|
| Numero di modello | DS-7104HGHI-K1 |
| Ingresso video | 4-channel BNC (HDTVI/AHD/CVI/CVBS) + up to 5 IP channels (up to 2MP) |
| Compressione video | H.265 Pro+/H.265+/H.265/H.264+/H.264 |
| Risoluzione codifica | 1080p Lite @ 25/30 fps |
| Uscita video | 1 HDMI, 1 VGA (simultaneous output) |
| Ingresso audio | RCA a 1 canale |
| Uscita audio | RCA a 1 canale |
| Supporto disco rigido | 1 interfaccia SATA, capacità fino a 4 TB |
| Interfaccia di rete | 1 interfaccia Ethernet autoadattativa RJ45 10M/100M |
| Interfaccia USB | 2 interfacce USB 2.0 |
| Dimensioni (L x P x A) | Dimensioni: 20 x 20 x 4.5 cm |
| Peso | 1.01 kg (senza HDD) |
10. Garanzia e supporto
Per informazioni sulla garanzia e supporto tecnico, fare riferimento al sito ufficiale Hikvision website or contact your authorized Hikvision dealer. Keep your purchase receipt as proof of purchase.


