Introduzione
This manual provides comprehensive instructions for the setup, operation, maintenance, and troubleshooting of your X9 Colorful Wireless Keyboard and Mouse Combo. Designed for comfort and efficiency, this combo offers a seamless wireless experience for your computer, PC, laptop, or Chromebook.

Figure 1: X9 Colorful Wireless Keyboard and Mouse Combo (Brown)
This image displays the complete X9 wireless keyboard and mouse set in a brown color scheme, highlighting its aesthetic design and compact form factor.
Impostare
- Disimballare il contenuto: Carefully remove the keyboard, mouse, and USB receiver from the packaging. Batteries (1 AAA for keyboard, 1 AA for mouse) are included and may be pre-installed or require insertion.
- Insert Batteries (if necessary):
- For the keyboard, locate the battery compartment on the underside and insert 1 AAA battery, ensuring correct polarity.
- For the mouse, locate the battery compartment on the underside and insert 1 AA battery, ensuring correct polarity.
- Collegare il ricevitore USB: Locate the 2.4G USB dongle, typically stored in the mouse's battery compartment. Insert this single USB dongle into an available USB-A port on your computer, PC, laptop, or Chromebook.
- Connessione automatica: The keyboard and mouse are designed for plug-and-play functionality. They should automatically connect to your device within seconds. No additional drivers are required.
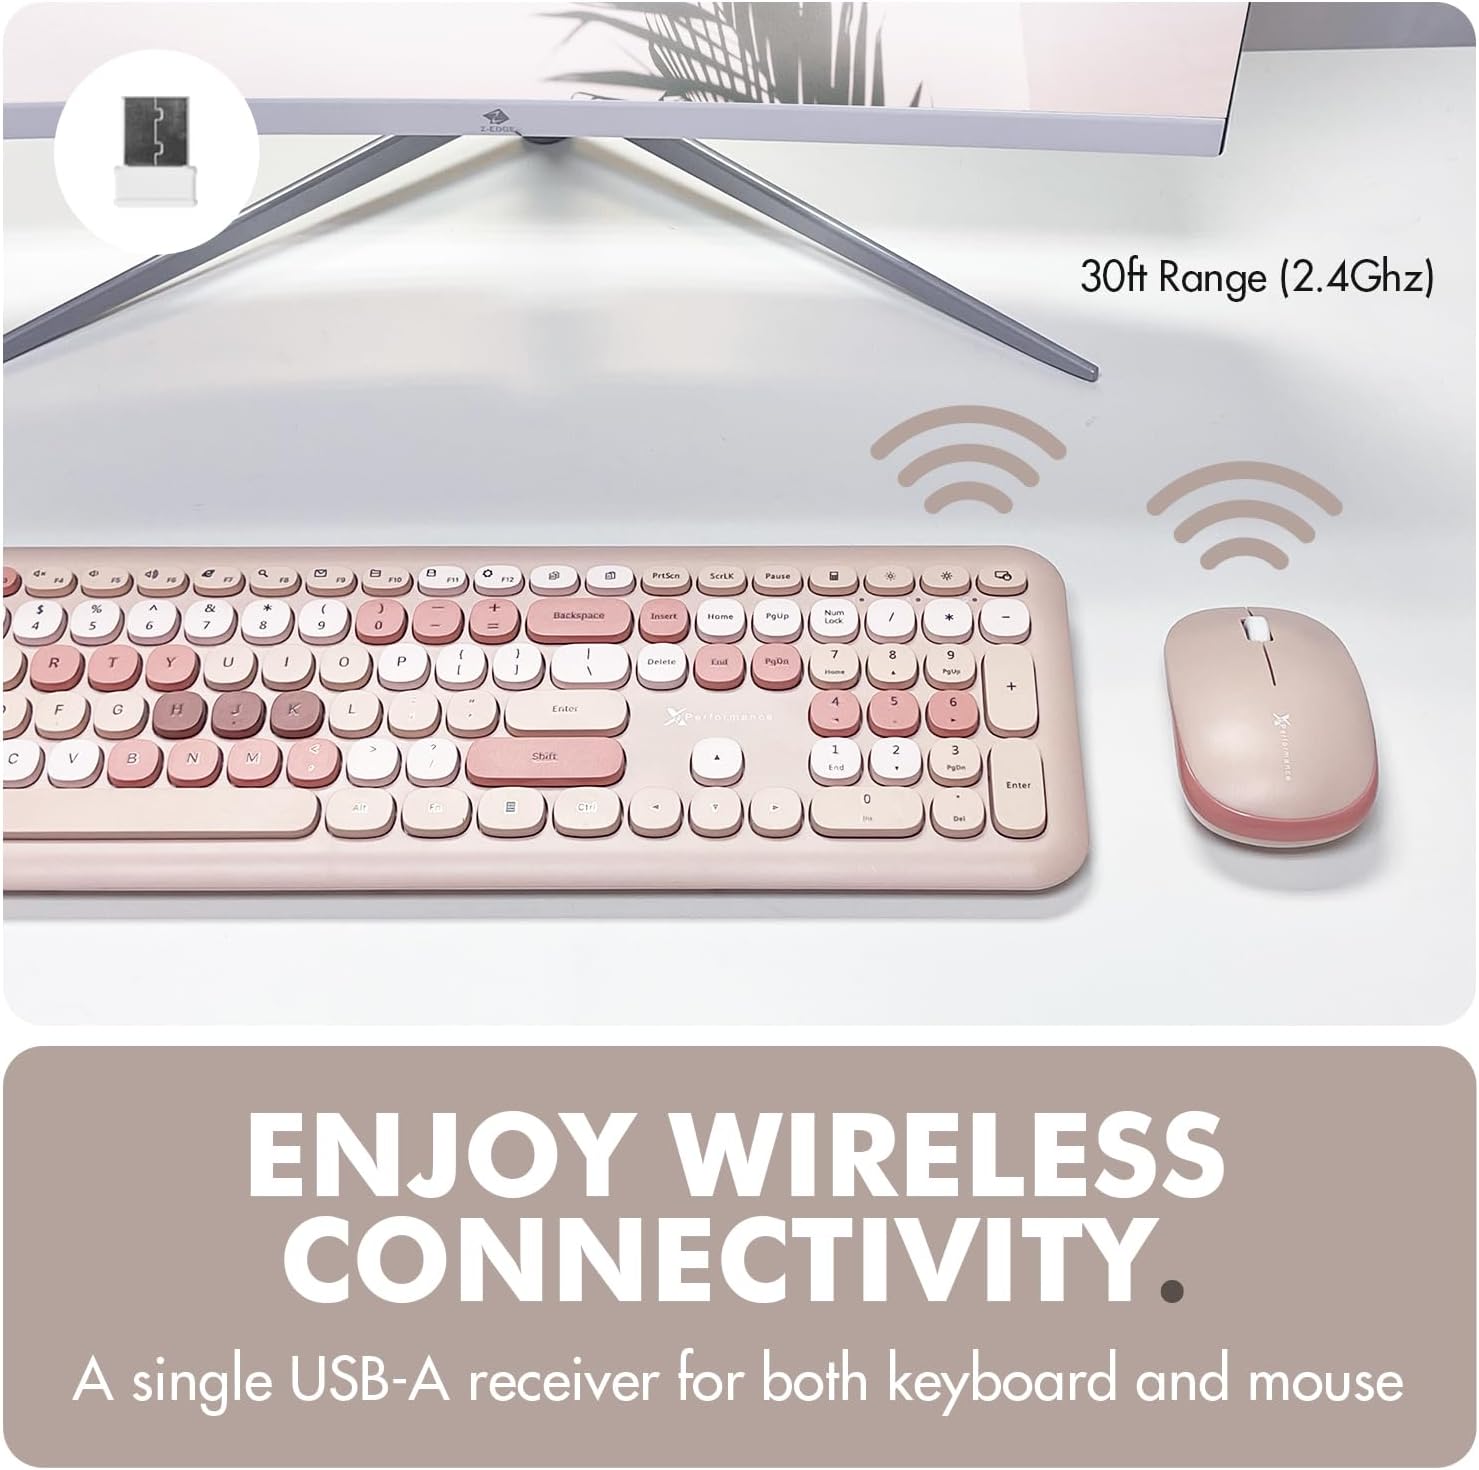
Figure 2: Wireless Connectivity Setup
This image illustrates the 2.4GHz wireless connection between the keyboard and mouse and the computer via a single USB-A receiver, emphasizing the 30ft operating range.

Figura 3: Compatibilità del dispositivo
This image shows the keyboard and mouse combo on a desk, with icons indicating compatibility with Windows PC and Chrome OS devices.
Istruzioni per l'uso
Operazione da tastiera
The X9 keyboard features a full-size layout with 110 rounded keys, providing a comfortable and tactile typing experience. It includes 18 shortcut/media keys for quick access to common functions.
- Digitazione standard: Utilizzare i tasti alfanumerici per l'inserimento del testo.
- Tasti funzione (F1-F12): These keys often have dual functions. The primary function is typically accessed directly, while the secondary (media/shortcut) function is accessed by pressing the Fn key simultaneously with the desired function key. Refer to the keycap legends for specific shortcut functions (e.g., volume control, media playback, brightness adjustment).
- Angolo di digitazione integrato: The keyboard features an integrated kickstand for a comfortable typing angle, reducing strain during long hours of use.
- Anti-Scratch Rubber Inserts: The underside of the keyboard includes rubber inserts to improve stability and prevent scratches on your desk surface.

Figure 4: Multi-functional Shortcut Keys
This image highlights the various shortcut and media keys available on the X9 keyboard, such as volume control, media playback, and system functions.

Figure 5: Integrated Typing Angle
Questa immagine illustra il lato profile of the keyboard, showing its integrated kickstand which provides an ergonomic typing angle for user comfort.

Figure 6: Anti-Scratch Rubber Inserts
This image displays the underside of the keyboard, highlighting the rubber inserts designed to prevent slipping and protect surfaces.
Operazione del mouse
The X9 mouse features a familiar 3-button layout with a scroll wheel and a 1200 DPI optical sensor for precise navigation.
- Clic sinistro: Selezione e attivazione primaria.
- Clic destro: Accede ai menu contestuali.
- Rotella di scorrimento: Utilizzato per lo scorrimento verticale, può anche funzionare come pulsante centrale.
- Sensore ottico da 1200 DPI: Provides balanced cursor sensitivity for smooth and accurate movement.
- Design ambidestro: The mouse features a small, ambidextrous body designed to fit comfortably in various hand sizes.

Figure 7: Mouse Power States
This image illustrates the different operational states of the mouse: working, stand-by, auto-sleep, and how to activate it by pressing a button.

Figure 8: 1200 DPI Optical Sensor
This image shows the underside of the mouse, highlighting the optical sensor that provides precise tracking and movement.
Funzione di risparmio energetico automatico
Both the keyboard and mouse are equipped with an auto power-saving feature to conserve battery life. They will enter a sleep mode after a period of inactivity. To wake them up, simply press any key on the keyboard or click any button on the mouse.

Figure 9: Auto Power Saving
This image displays the keyboard and mouse on a desk, with a battery icon indicating the auto power-saving function that helps extend battery life.
Manutenzione
- Pulizia:
To clean the keyboard and mouse, use a soft, lint-free cloth slightly dampened with water or a mild cleaning solution. Avoid excessive moisture and abrasive cleaners. For the keyboard, you can use compressed air to remove debris from between the keys.
- Sostituzione della batteria:
When the keyboard or mouse becomes unresponsive or exhibits intermittent connectivity, it may be time to replace the batteries. The keyboard uses 1 AAA battery, and the mouse uses 1 AA battery. Ensure correct polarity when inserting new batteries.
- Magazzinaggio:
Store the keyboard and mouse in a cool, dry place away from direct sunlight and extreme temperatures when not in use for extended periods.
Risoluzione dei problemi
| Problema | Possibile causa | Soluzione |
|---|---|---|
| Tastiera/mouse non rispondono | Low batteries; USB receiver not properly connected; device in sleep mode. | Replace batteries. Ensure USB receiver is firmly plugged into a working USB port. Press any key/button to wake the device. |
| Connessione intermittente o ritardo | Interference; USB receiver too far from devices; USB receiver plugged into laptop instead of dock (if applicable). | Move devices closer to the USB receiver (within 30ft). Try plugging the USB receiver into a different USB port, especially on a docking station if using external monitors, to minimize interference. Ensure no large metal objects are between the devices and receiver. |
| Keys or mouse buttons feel sticky/unresponsive | Debris under keys; worn-out components. | Clean the keyboard and mouse as per maintenance instructions. If the issue persists, contact customer support. |
| Il cursore del mouse è irregolare o non si muove fluidamente | Dirty optical sensor; unsuitable surface; low battery. | Clean the optical sensor on the underside of the mouse. Use the mouse on a clean, non-reflective surface or a mouse pad. Replace batteries. |
Specifiche
| Caratteristica | Dettaglio |
|---|---|
| Marca | Prestazioni X9 |
| Numero di modello | HU-XI-201 |
| Tecnologia di connettività | 2.4GHz Wireless RF |
| wireless Range | Fino a 30 piedi |
| Tasti della tastiera | 110 (Rounded Keys, 18 Shortcut/Media Keys) |
| DPI del mouse | Sensore ottico da 1200 DPI |
| Batteria della tastiera | 1 batteria AAA (inclusa) |
| Batteria del mouse | 1 batteria AA (inclusa) |
| Dispositivi compatibili | Laptop, Personal Computer (Windows & Chrome OS) |
| Dimensioni del pacco | 17.6 x 5.6 x 2.5 pollici |
| Peso dell'articolo | 1.52 libbre |

Figure 10: Key Features at a Glance
This image provides a quick summary table of the product's key features, including power source, connectivity, backlight, key type, and compatibility.

Figura 11: Dimensioni del prodotto
This image provides detailed measurements for both the keyboard and the mouse, indicating their physical size.
Garanzia e supporto
X9 Performance stands behind its products. Your X9 Colorful Wireless Keyboard and Mouse Combo is backed by a Supporto di 2 anni periodo.
For any questions, technical assistance, or warranty claims, please contact X9 Performance customer support through the retailer's platform or visit the official X9 Performance websito per i contatti.
Si prega di conservare la prova d'acquisto ai fini della garanzia.


