1. Introduzione
Grazie per l'acquistoasing the Heinner Kopy 350WH HEM-350WH Espresso Machine. This manual provides essential information for the safe operation, maintenance, and troubleshooting of your appliance. Please read these instructions carefully before first use and keep them for future reference.
The Heinner Kopy 350WH HEM-350WH is designed to prepare espresso and cappuccino beverages. It features 3.5 bar pressure, 800 W power, a 240 ml capacity, a stainless steel filter, an aluminum boiler, and a glass carafe.
2. Istruzioni di sicurezza
Per garantire un funzionamento sicuro, seguire sempre queste precauzioni di sicurezza di base:
- Leggere tutte le istruzioni prima di mettere in funzione l'apparecchio.
- Non immergere l'apparecchio, il cavo di alimentazione, né collegare l'acqua o altri liquidi.
- Scollegare la macchina dalla presa di corrente quando non è in uso e prima di pulirla.
- Non utilizzare l'apparecchio se il cavo o la spina sono danneggiati, se l'apparecchio non funziona correttamente o è stato danneggiato in qualsiasi modo.
- È necessaria un'attenta supervisione quando un elettrodomestico viene utilizzato da bambini o nelle loro vicinanze.
- Utilizzare l'apparecchio solo per l'uso domestico a cui è destinato.
- Evitare il contatto con superfici calde. Utilizzare maniglie o manopole.
3. Prodotto finitoview
Familiarize yourself with the components of your Heinner Kopy 350WH HEM-350WH Espresso Machine.
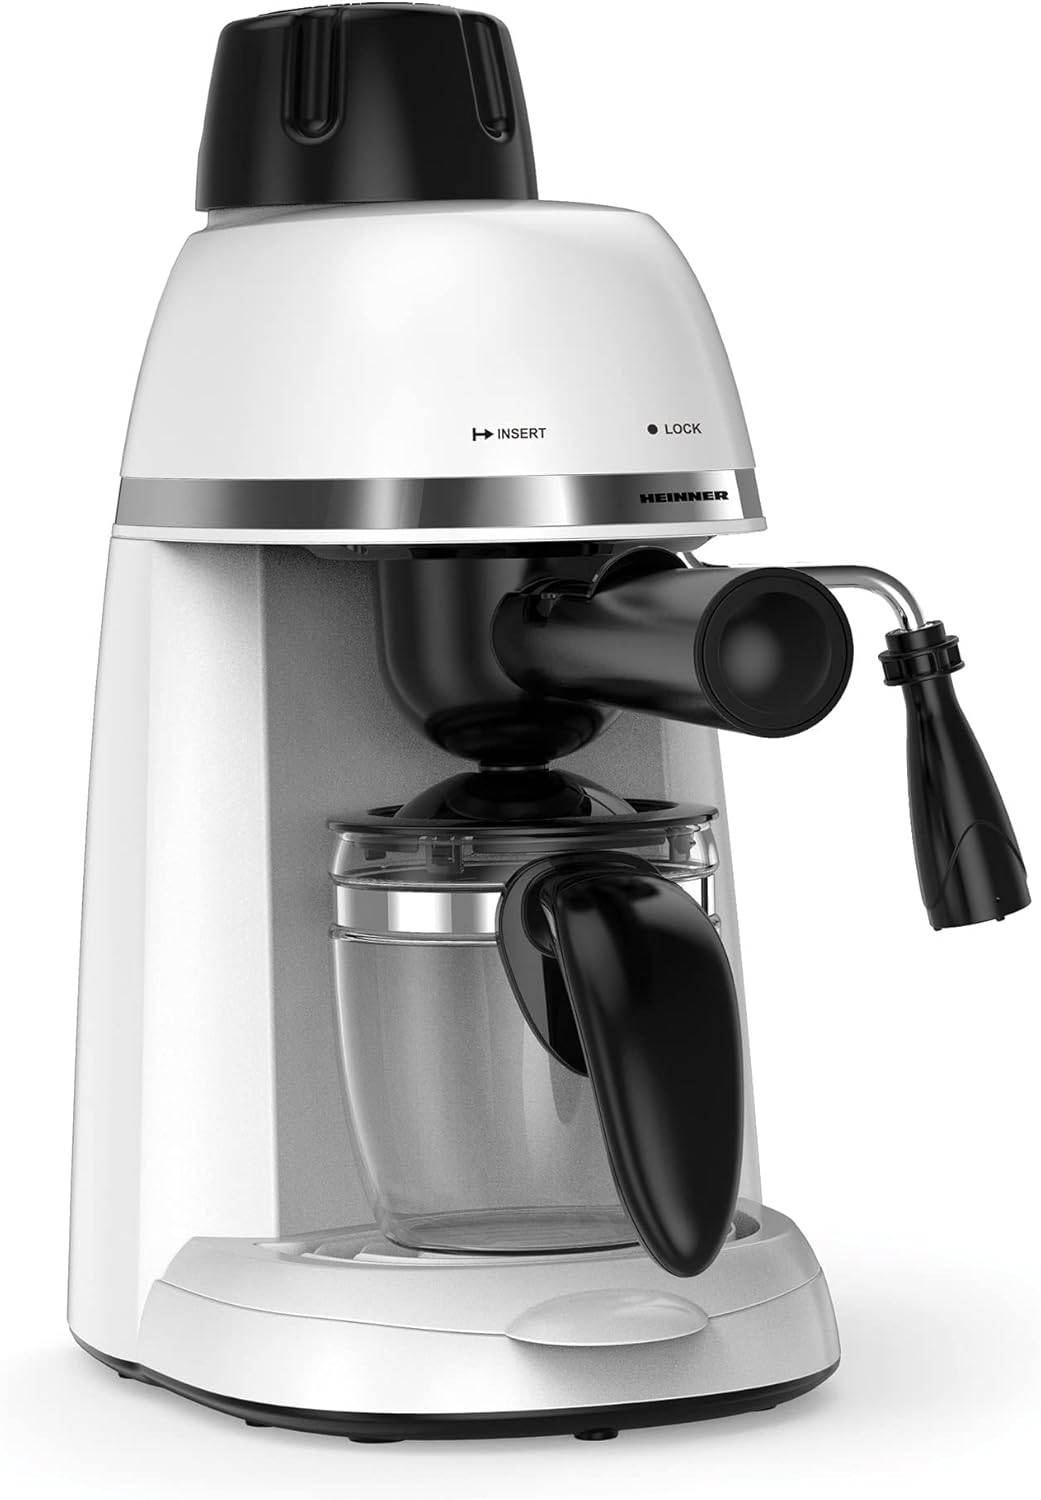
Figure 1: Heinner Kopy 350WH HEM-350WH Espresso Machine, front view. This image shows the espresso machine from the front, highlighting its compact design, white and black color scheme, and the portafilter assembly.

Figure 2: Heinner Kopy 350WH HEM-350WH Espresso Machine with two cups of coffee. This image displays the espresso machine in a kitchen setting, with two prepared coffee beverages (espresso and cappuccino) in glass cups, demonstrating its output.
Componenti principali:
- Serbatoio dell'acqua
- Manopola di controllo
- Maniglia Portafiltro
- Filtro in acciaio inossidabile
- Steam Wand (Milk Frother)
- Caraffa di vetro
- Vassoio raccogli gocce
4. Configurazione e primo utilizzo
4.1 Disimballaggio
Rimuovere con cura tutto il materiale di imballaggio e assicurarsi che tutti i componenti siano presenti. Smaltire l'imballaggio in modo responsabile.
4.2 Pulizia iniziale
Before first use, wash the glass carafe, portafilter, and stainless steel filter in warm, soapy water. Rinse thoroughly and dry. Wipe the exterior of the machine with a damp stoffa.
4.3 Riempimento del serbatoio dell'acqua
Open the water tank lid and fill the tank with fresh, cold water up to the MAX level indicated. Do not overfill.
4.4 Adescamento della pompa
Per adescare la pompa e rimuovere l'aria dal sistema:
- Assicurarsi che il serbatoio dell'acqua sia pieno.
- Posizionare la caraffa di vetro sulla vaschetta raccogli-gocce.
- Collegare la macchina ad una presa di corrente adeguata.
- Turn the control knob to the coffee brewing position. Water will start to flow into the carafe.
- Let approximately 100ml of water flow through, then turn the control knob to the OFF position. The machine is now primed.
5. Istruzioni per l'uso
5.1 Preparare l'Espresso
- Preriscaldamento: Ensure the water tank is filled. Turn the control knob to the preheat position (usually indicated by a coffee cup symbol or a heating element symbol). Wait for the indicator light to show the machine is ready (typically 3-5 minutes).
- Aggiungere caffè macinato: Place the stainless steel filter into the portafilter. Add desired amount of finely ground espresso coffee (approximately 7g per shot). Tamp il caffè in modo leggero e uniforme.
- Collegare il portafiltro: Align the portafilter with the group head on the machine and twist it firmly to the right until it is securely locked.
- Fermentazione: Place the glass carafe under the portafilter. Turn the control knob to the coffee brewing position. Coffee will begin to flow.
- Smetti di preparare: Once the desired amount of espresso is brewed (e.g., 30-60ml per shot), turn the control knob to the OFF position.
- Servire: Togliere con cautela la caraffa e servire l'espresso.
5.2 Making Cappuccino (Using Steam Wand)
To make cappuccino, you will first brew espresso as described above, then froth milk using the steam wand.
- Preparare l'espresso: Brew your espresso into a heat-resistant cup.
- Preparare il latte: Fill a small pitcher with cold milk (dairy or non-dairy) to about one-third full.
- Attiva Steam: Turn the control knob to the steam position (usually indicated by a steam cloud symbol). Wait for the indicator light to show the machine is ready for steaming.
- Latte schiumato: Submerge the tip of the steam wand just below the surface of the milk. Open the steam valve (if applicable, or turn the knob further to steam). Move the pitcher up and down gently to create foam. Continue until the milk reaches the desired temperature and consistency.
- Pulisci la lancia del vapore: Immediately after frothing, turn off the steam and wipe the steam wand with a damp panno per evitare che i residui di latte si asciughino.
- Combina: Versare il latte schiumato sull'espresso preparato.
6. Manutenzione e pulizia
Una pulizia regolare garantisce prestazioni ottimali e prolunga la durata della macchina per l'espresso.
6.1 Pulizia giornaliera
- Portafilter and Filter: After each use, remove the portafilter, discard used coffee grounds, and rinse the portafilter and filter under running water.
- Caraffa di vetro: Wash the glass carafe after each use.
- vassoio antigoccia: Svuotare e pulire regolarmente il vassoio raccogligocce per evitare traboccamenti.
- Esterno: Pulire l'esterno della macchina con un panno morbido, damp stoffa. Non utilizzare detergenti abrasivi o pagliette.
6.2 Decalcificazione
Con il tempo, i depositi minerali (calcare) possono accumularsi nella macchina, compromettendone le prestazioni. Decalcificare la macchina ogni 2-3 mesi, o più frequentemente se l'acqua è dura.
- Prepare a descaling solution according to the descaler product instructions (or use a mixture of white vinegar and water).
- Riempire il serbatoio dell'acqua con la soluzione decalcificante.
- Place the glass carafe under the portafilter.
- Run the machine through a brewing cycle until half of the solution has passed through.
- Spegnere la macchina e lasciarla riposare per 15-20 minuti.
- Run the remaining solution through the machine.
- Rinse the water tank and fill it with fresh water. Run several cycles with fresh water to thoroughly rinse out any descaling solution.
7. Risoluzione Dei Problemi
Se riscontri problemi con la tua macchina per l'espresso, fai riferimento ai seguenti problemi comuni e alle relative soluzioni:
| Problema | Possibile causa | Soluzione |
|---|---|---|
| Nessun flusso di caffè | Water tank empty; Clogged filter; Machine not primed; Limescale buildup | Fill water tank; Clean filter; Prime the pump; Descale the machine |
| Caffè debole | Insufficient coffee grounds; Coarse grind; Not tamped abbastanza | Aumentare la quantità di caffè; Utilizzare una macinatura più fine; Tamp coffee more firmly |
| Perdita dal portafiltro | Portafilter not securely attached; Gasket worn; Too much coffee grounds | Ensure portafilter is locked tightly; Contact support for gasket replacement; Reduce coffee grounds |
| Nessun vapore dalla lancia | Steam wand clogged; Machine not heated to steam temperature | Clean steam wand; Wait for steam indicator light |
Se il problema persiste dopo aver provato queste soluzioni, contattare l'assistenza clienti.
8. Specifiche
| Caratteristica | Dettaglio |
|---|---|
| Marca | HINNER |
| Numero di modello | HEM-350WH |
| Colore | Bianco |
| Dimensioni del prodotto (L x P x A) | Dimensioni: 15 x 22 x 30.1 cm |
| Peso dell'articolo | 1.61 chilogrammi |
| Energia | 800 Watt |
| Voltage | 240 Volt |
| Materiale | Plastica, Metallo, Vetro |
| Funzione di spegnimento automatico | SÌ |
| Caratteristiche | Stainless steel filter, Milk Frother, Removable reservoir |
| Tipo di caffettiera | Macchina per caffè espresso |
| Stile | Moderno |
| Usi specifici del prodotto | Domestico |
| Usi consigliati del prodotto | Al chiuso |
9. Garanzia e supporto
Per informazioni sulla garanzia e sull'assistenza clienti, consultare la documentazione fornita con l'acquisto o contattare direttamente il rivenditore/produttore. Conservare la prova d'acquisto per eventuali reclami in garanzia.


