1. Introduzione
Grazie per l'acquistoasing the DUAL DL-DAB3-001 DAB+/Bluetooth Alarm Clock Radio. This device combines a digital radio (DAB+ and FM), Bluetooth connectivity for audio streaming, a dual alarm clock, and convenient induction charging for compatible smartphones. This manual provides essential information for safe operation, setup, and maintenance of your device. Please read it thoroughly before use and retain it for future reference.
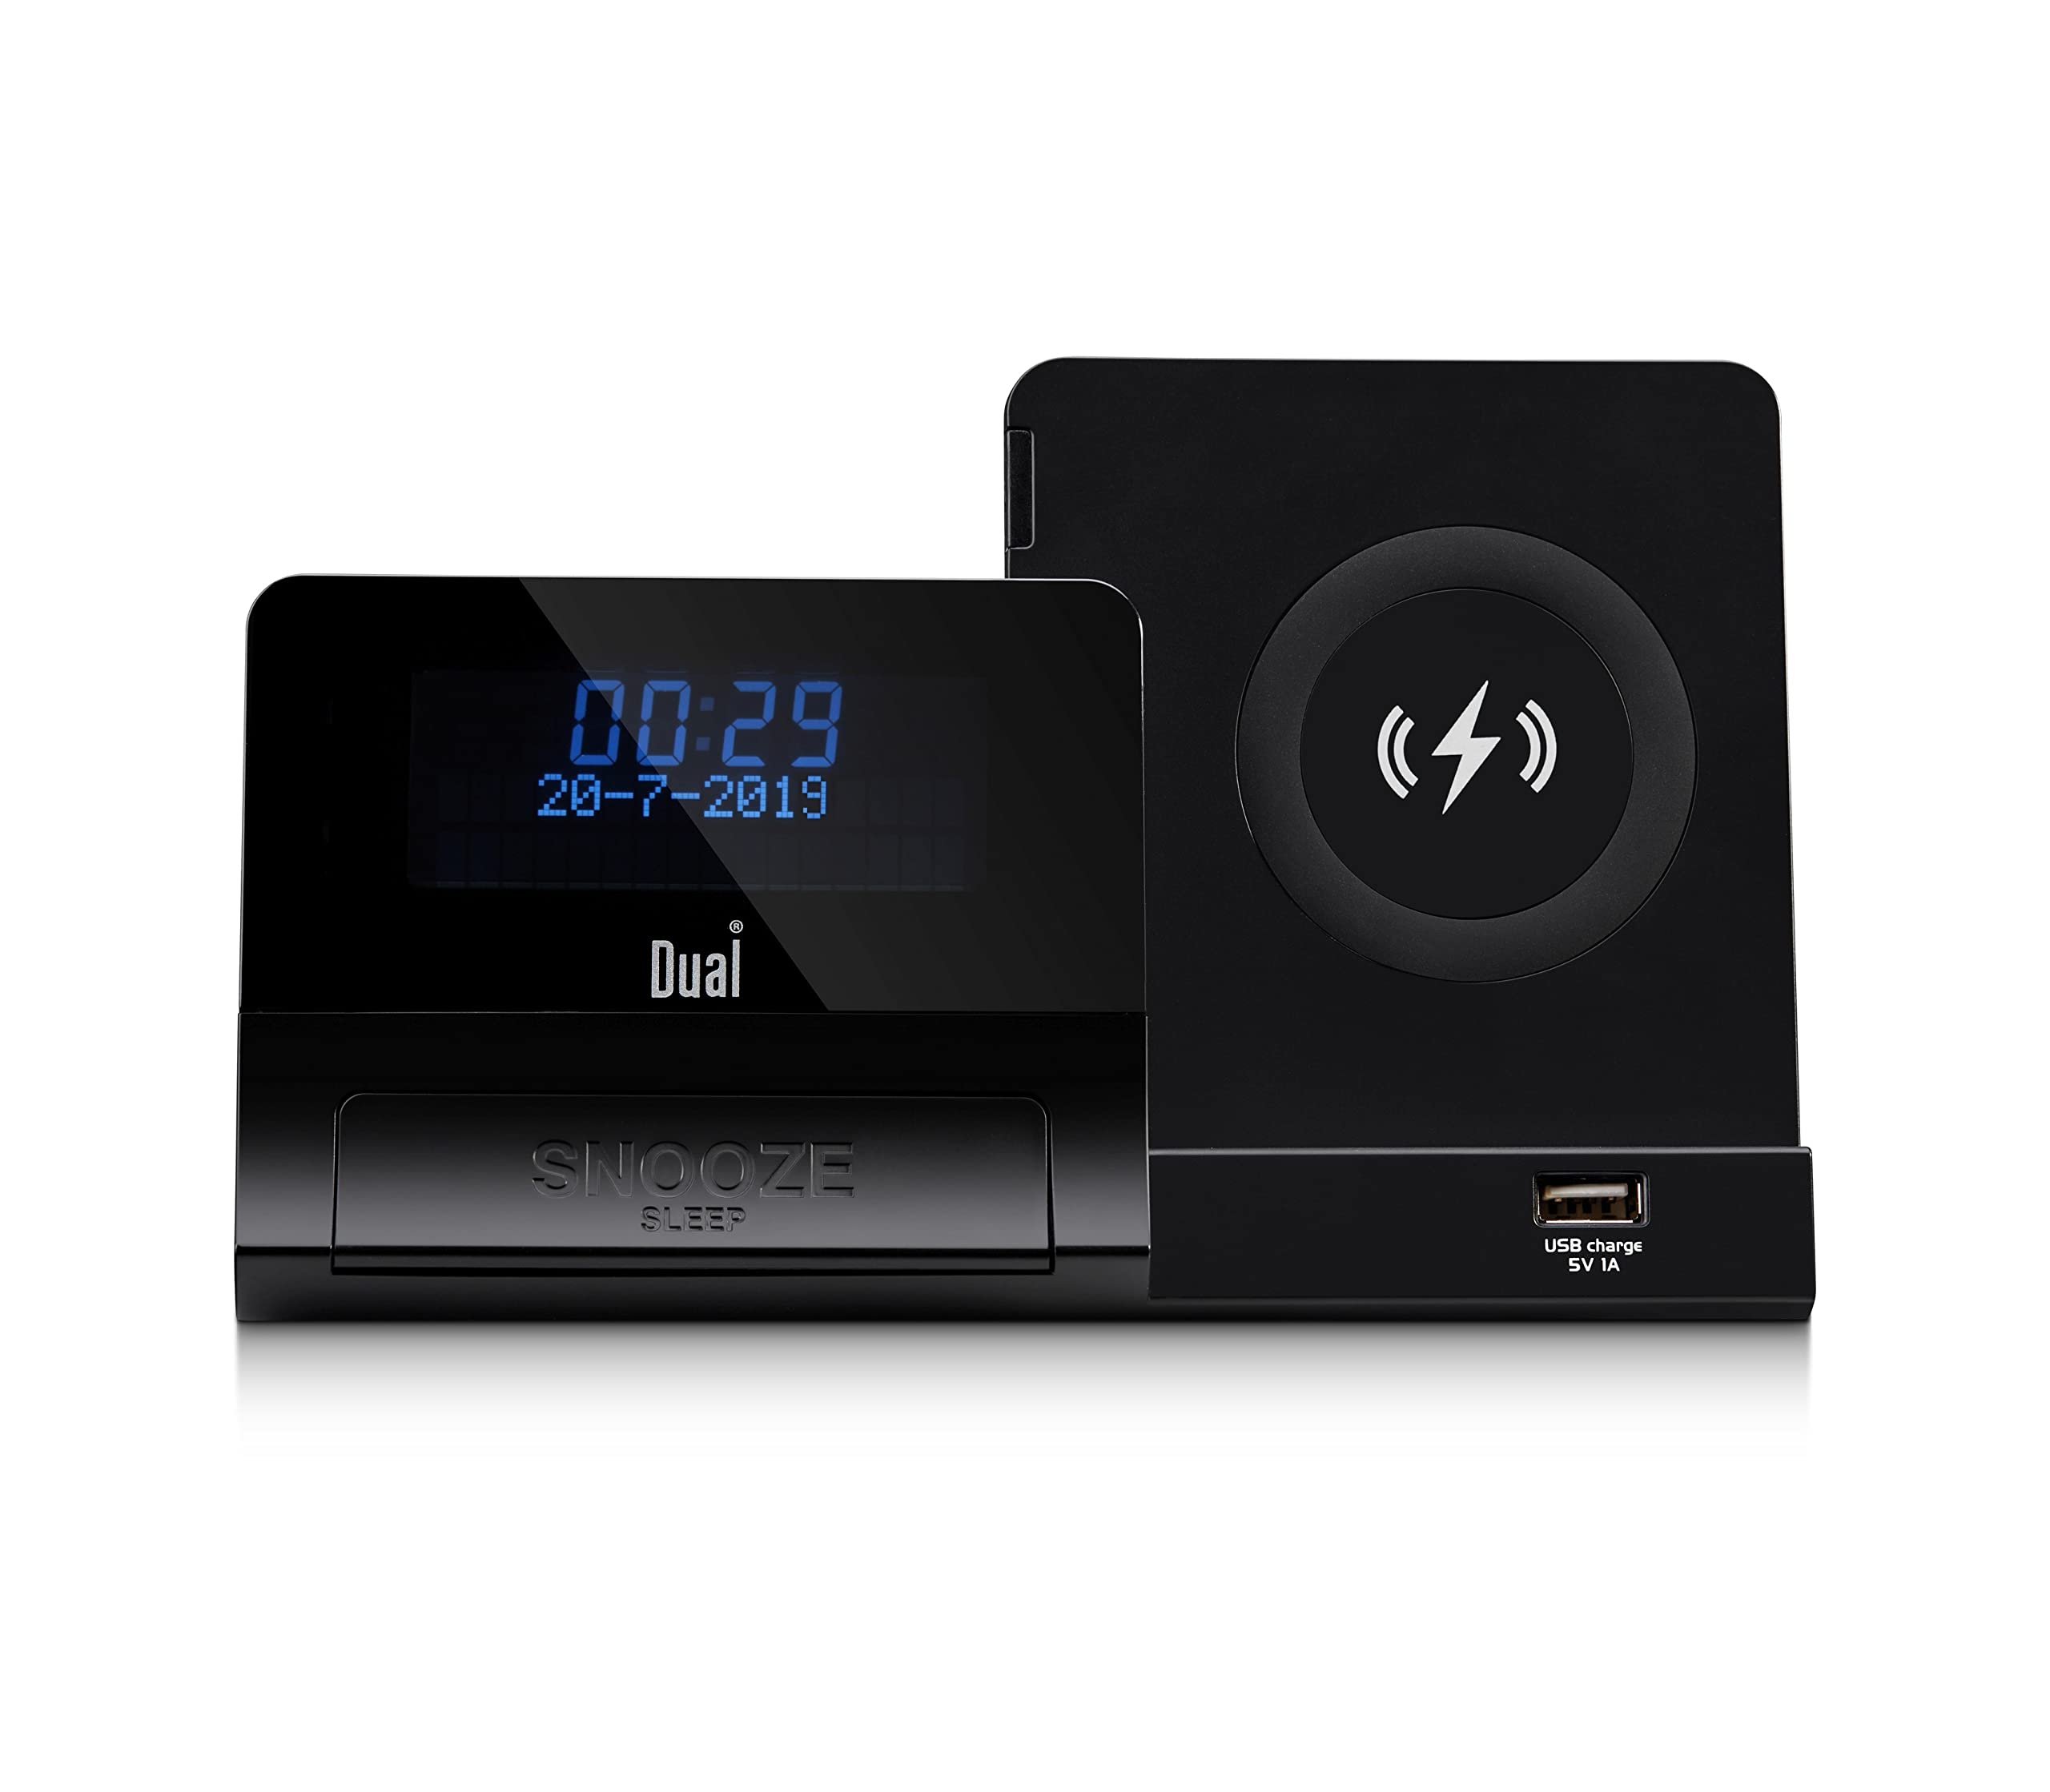
Figura 1.1: The DUAL DL-DAB3-001 alarm clock radio positioned on a bedside table, demonstrating its compact design and integration into a modern bedroom environment. A smartphone is shown on the induction charging pad, and the digital display shows the time and date.
2. Istruzioni di sicurezza
- Leggere tutte le istruzioni prima di utilizzare il dispositivo.
- Non esporre il dispositivo a pioggia, umidità o temperature estreme.
- Assicurare una ventilazione adeguata; non ostruire le aperture di ventilazione.
- Use only the provided AC adapter. Using unauthorized adapters may damage the device and void the warranty.
- Non tentare di smontare o modificare il dispositivo. Per qualsiasi intervento di manutenzione, rivolgersi a personale qualificato.
- Tenere il dispositivo lontano da forti campi magnetici.
- Smaltire le batterie in modo responsabile, nel rispetto delle normative locali.
3. Contenuto della confezione
Si prega di verificare che tutti gli articoli elencati di seguito siano presenti nel pacco:
- DUAL DL-DAB3-001 Alarm Clock Radio
- AC Power Adapter (Input: AC 100-240V ~ 50/60 Hz 1A; Output: DC 9V 2.5A)
- Manuale dell'utente (questo documento)
Note: 2 x AAA R4 batteries for backup are not included and must be purchased separately.
4. Prodotto finitoview
4.1 Anteriore e superiore View

Figura 4.1: Dettagliato view of the DUAL DL-DAB3-001, highlighting the 5-inch LCD display, the large 'SNOOZE' button, the circular wireless induction charging pad on the right, and the USB charging port (5V 1A) located below the charging pad.
- Schermo LCD: Shows time, date, radio information, and alarm status.
- Pulsante SNOOZE/SLEEP: Activates snooze during an alarm or sleep timer during playback.
- Pad di ricarica wireless: For induction charging of compatible smartphones.
- Porta di ricarica USB (5 V 1 A): For charging other USB-powered devices.
- Control Buttons (not visible in this view, typically on top/side): Power, Mode, Tune/Scan, Volume, Alarm Set, Presets.
4.2 Rear Panel (General Description)
Il pannello posteriore in genere comprende:
- Presa DC IN: Per collegare l'adattatore di alimentazione CA.
- Presa AUX IN: Per collegare dispositivi audio esterni.
- Jack per cuffie: Per l'ascolto privato.
- Vano batteria: For 2 x AAA R4 backup batteries.
5. Impostazione
5.1 Collegamento di alimentazione
- Insert the DC plug of the supplied AC adapter into the DC IN jack on the rear of the unit.
- Plug the AC adapter into a standard wall outlet (AC 100-240V ~ 50/60 Hz).
- L'unità si accenderà o entrerà in modalità standby.
5.2 Installazione della batteria (backup)
Per il backup delle impostazioni di ora e sveglia durante l'interruzione di correntetages:
- Aprire il coperchio del vano batterie sul retro dell'unità.
- Insert 2 x AAA R4 batteries (not included), observing the correct polarity (+/-).
- Chiudere saldamente il coperchio del vano batterie.
5.3 Initial Power On and Time Synchronization
Upon first power-on, the unit will typically attempt to synchronize the time and date automatically via DAB+ signal. Ensure the antenna is extended for optimal reception.
6. Istruzioni per l'uso
6.1 Funzionamento radio (DAB+/FM)
- Accensione: Premere il tasto Energia pulsante per accendere la radio.
- Seleziona modalità: Premere il tasto Modalità pulsante per passare dalla radio DAB+ a quella FM.
- Scansione automatica (DAB+): In DAB+ mode, the radio will automatically scan for available stations upon first use. For a manual scan, refer to the specific button (e.g., Scansione or Menu opzioni).
- Tuning (FM): In modalità FM, utilizzare il Sintonizzazione +/- buttons to manually tune or press and hold for auto-scan to the next available station.
- Salvataggio delle preimpostazioni: To save a station, tune to the desired station, press and hold the Preimpostato pulsante, selezionare un numero preimpostato utilizzando Sintonizzazione +/-e premere Preimpostato di nuovo per confermare.
- Richiamo delle preimpostazioni: Premere il tasto Preimpostato brevemente il pulsante, quindi utilizzare Sintonizzazione +/- per selezionare la preimpostazione desiderata.
6.2 Funzionamento Bluetooth
- Accedi alla modalità Bluetooth: Premere il tasto Modalità button until "Bluetooth" appears on the display. The unit will enter pairing mode, indicated by a flashing Bluetooth icon.
- Abbinamento: On your smartphone or other Bluetooth device, enable Bluetooth and search for available devices. Select "DL-DAB3-001" from the list.
- Connessione: Once paired, the Bluetooth icon on the radio's display will stop flashing and remain solid. You can now stream audio from your device to the radio.
- Controllo della riproduzione: Use your connected device or the radio's controls (if available) to play, pause, skip tracks, and adjust volume.
6.3 Funzione sveglia
The DL-DAB3-001 features a dual alarm system.
- Impostazione degli allarmi: Premere e tenere premuto il tasto Allarme impostato button (or similar, refer to specific button labels). Use Sintonizzazione +/- per impostare l'ora della sveglia, quindi premere Allarme impostato to confirm. Repeat for the second alarm.
- Fonte di allarme: Select your preferred alarm source (DAB+ radio, FM radio, or buzzer) using the Modalità or Allarme impostato button during the alarm setup process.
- Attivazione/disattivazione degli allarmi: Premere brevemente il tasto Allarme impostato button to toggle alarms on/off. An alarm icon will appear on the display when active.
- Posticipa: Quando suona un allarme, premere il tasto POSTICIPARE pulsante per silenziarlo temporaneamente per un periodo di tempo impostato (ad esempio, 9 minuti).
- Arresto allarme: Premere il tasto Energia button to turn off the alarm completely until the next set time.
- Sveglia: While playing audio, press the SNOOZE/SONNO button repeatedly to cycle through sleep timer options (e.g., 15, 30, 60, 90 minutes) before the unit automatically turns off.
6.4 Induction Charging
The unit features a wireless induction charging pad for Qi-compatible smartphones.
- Ensure the radio is powered on and connected to the AC adapter.
- Place your Qi-compatible smartphone directly onto the wireless charging pad.
- The charging indicator on your phone should activate, confirming that charging has begun.
- If charging does not start, adjust the position of your phone on the pad. Remove any thick cases that may interfere with charging.
6.5 Ricarica USB
The USB port on the front of the unit provides 5V 1A power output for charging other devices.
- Connect your device's USB charging cable to the USB charging port on the radio.
- Ensure the radio is powered on and connected to the AC adapter.
- La ricarica inizierà automaticamente.
6.6 Ingresso ausiliario
Connect external audio sources (e.g., MP3 player) via the AUX IN jack.
- Connect a 3.5mm audio cable (not included) from your external device's headphone jack to the AUX IN jack on the radio.
- Premere il tasto Modalità pulsante per selezionare la modalità AUX.
- Controlla la riproduzione e il volume dal tuo dispositivo esterno.
7. Manutenzione
- Pulizia: Disconnect the power before cleaning. Use a soft, dry cloth to wipe the unit. Do not use abrasive cleaners or solvents.
- Magazzinaggio: If storing the unit for an extended period, disconnect it from power and remove the backup batteries. Store in a cool, dry place.
- Antenna: Maneggiare con cura l'antenna telescopica per evitare danni.
8. Risoluzione Dei Problemi
| Problema | Possibile causa | Soluzione |
|---|---|---|
| Nessun potere | AC adapter not connected or faulty; Power outlet not working. | Controllare il collegamento dell'adattatore CA. Provare una presa di corrente diversa. |
| Scarsa ricezione radio (DAB+/FM) | Antenna non estesa; Segnale debole; Interferenza. | Fully extend the telescopic antenna. Reposition the unit. Perform a new auto-scan for DAB+ stations. |
| L'associazione Bluetooth non riesce | Device not in pairing mode; Bluetooth disabled on smartphone; Already connected to another device. | Ensure the radio is in Bluetooth pairing mode. Enable Bluetooth on your smartphone. Disconnect from other Bluetooth devices. |
| Induction charging not working | Phone not Qi-compatible; Phone not positioned correctly; Thick phone case. | Verify phone compatibility. Adjust phone position on the pad. Remove phone case. |
| L'allarme non suona | Allarme non attivato; volume troppo basso. | Ensure alarm is set and activated (check display icon). Increase volume. |
9. Specifiche
- Modello: DL-DAB3-001
- Alimentazione elettrica: DC 9V 2.5A (via AC adapter)
- Batterie di riserva: 2 x AAA R4 (not included)
- Sintonizzatore radio: DAB+, FM
- Versione Bluetooth: 5.0
- Potenza di uscita: 2 x 3 Watt
- Display: 5-inch LCD (adjustable brightness)
- Induction Charging: Compatibile con Qi
- Uscita di ricarica USB: 5V 1A
- Connettività: Auxiliary Input, Headphone Jack
- Dimensioni (L x P x A): Dimensioni: 18 x 10.8 x 9.8 cm
- Peso: 800 grammi
10. Garanzia e supporto
This DUAL product is covered by a manufacturer's warranty. Please refer to the warranty card included in your package or contact your retailer for specific warranty terms and conditions. For technical support or service inquiries, please contact the customer service department of your place of purchase or visit the official Dual websito per ulteriore assistenza.