Introduzione
The ASRock B650E PG-ITX WiFi motherboard is designed for AMD Ryzen 7000 Series processors, offering advanced features in a compact Mini-ITX form factor. This manual provides essential information for the proper installation, operation, and maintenance of your motherboard.
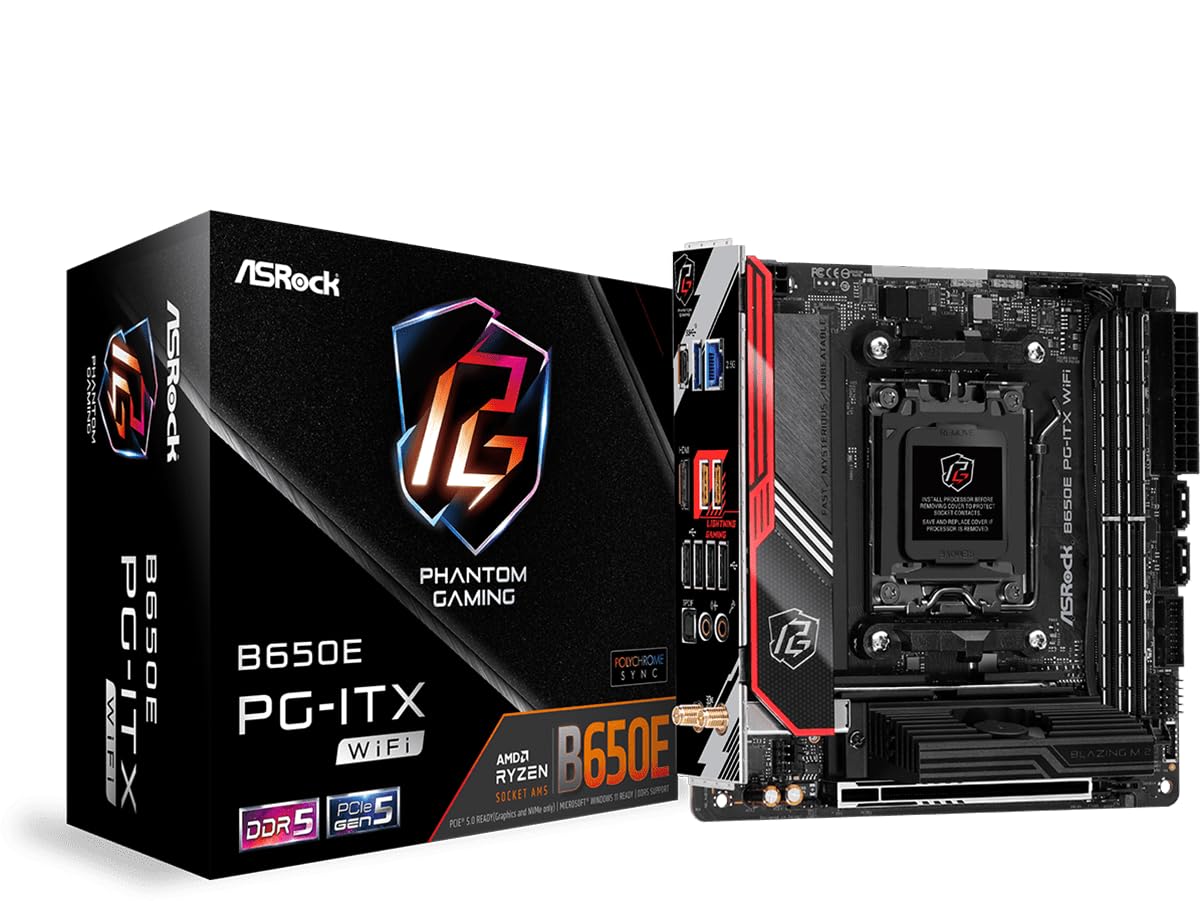
Figura 1: Dall'alto verso il basso view of the ASRock B650E PG-ITX WiFi Motherboard.
Caratteristiche principali:
- Supporta i processori AMD Ryzen serie 7000 (Socket AM5)
- 10+2+1 Phase Power Design with SPS
- 2 slot DIMM DDR5, che supportano fino a 6400+(OC) MHz
- 1 slot PCIe 5.0x16
- Graphics Output Options: 1 HDMI, eDP
- Audio HD a 7.1 canali (codec audio Realtek ALC1220), audio Nahimic
- 1 Blazing M.2 (PCIe Gen5x4), 1 Hyper M.2 (PCIe Gen4x4), 2 SATA3
- USB Connectivity: 1 USB 3.2 Gen2x2 Type-C (Front), 1 USB 3.2 Gen2 Type-C (Rear), 3 USB 3.2 Gen2 Type-A (Rear), 2 USB 3.2 Gen1 (Front), 6 USB 2.0 (4 Rear, 2 Front)
- Killer 2.5G LAN
- Killer 802.11ax Wi-Fi 6E + Bluetooth 5.3

Figure 2: Diagram highlighting key features and components of the motherboard.
Configurazione e installazione
Questa sezione ti guiderà attraverso l'installazione fisica della scheda madre e dei suoi componenti principali.
1. Disimballaggio e ispezione
Carefully remove the motherboard from its packaging. Inspect for any visible damage. Ensure all accessories are present.
Video 1: Prodotto finitoview and Unboxing. This video provides a visual overview of the ASRock B650E PG-ITX motherboard and its components, including the unboxing process.
2 Installazione della CPU
- Individuare il socket della CPU AM5 sulla scheda madre.
- Sollevare delicatamente la leva di caricamento e aprire il coperchio del socket della CPU.
- Allineare il segno triangolare sulla CPU con il segno corrispondente sul socket.
- Inserire con cautela la CPU nel socket, senza forzarla.
- Chiudere il coperchio della presa e spingere verso il basso la leva di carico finché non si blocca in posizione.

Figure 3: CPU socket with protective cover. Ensure to remove the cover before installing the processor.

Figure 4: CPU socket ready for processor installation.
3. Installazione della RAM (memoria)
- Aprire le clip su entrambe le estremità degli slot DIMM DDR5.
- Allineare la tacca sul modulo RAM con la chiave nello slot DIMM.
- Inserire saldamente il modulo RAM nello slot finché le clip non scattano in posizione.
4. Installazione SSD M.2
- Locate the M.2 slots (Blazing M.2 and Hyper M.2).
- Remove the M.2 heatsink/cover if present.
- Inserire l'SSD M.2 nello slot tenendolo inclinato.
- Spingere delicatamente l'SSD verso il basso e fissarlo con la vite o il distanziatore forniti.
- Reattach the M.2 heatsink/cover.
5. Motherboard Mounting and Connections
- Install the motherboard into your PC case, aligning it with the standoffs.
- Fissare la scheda madre con le viti.
- Connect the 24-pin ATX power connector and the 8-pin 12V CPU power connector from your power supply.
- Connect front panel headers (power button, reset button, USB, audio).
- Connect SATA devices to the SATA3 ports if applicable.
- Install your graphics card into the PCIe 5.0 x16 slot.
- Attach the Wi-Fi antennas to the rear I/O panel connectors.
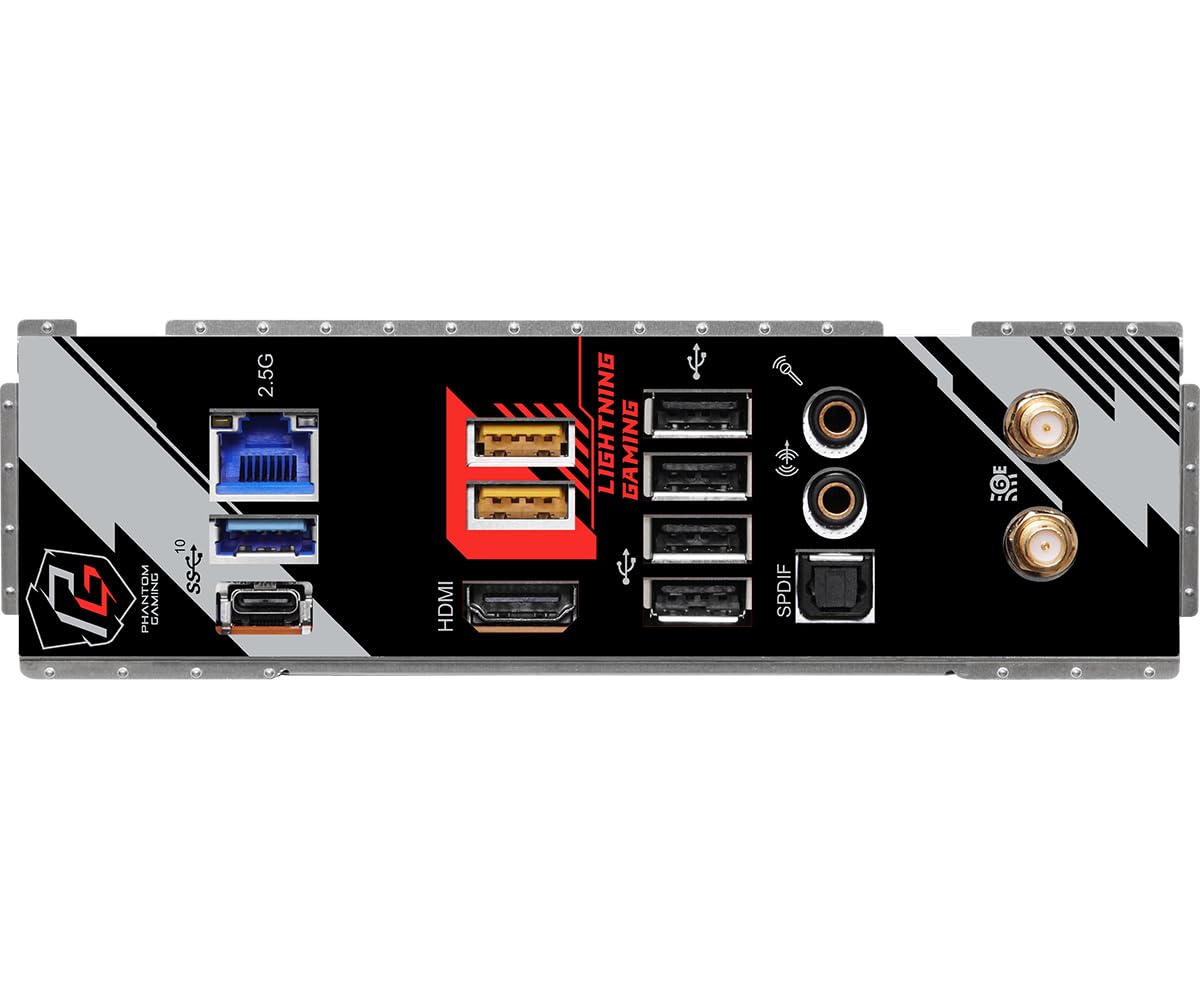
Figure 5: Rear I/O panel showing various ports including USB, HDMI, LAN, and Wi-Fi antenna connectors.
Istruzioni per l'uso
After successful hardware installation, follow these steps to operate your system.
1. Avvio iniziale e configurazione del BIOS
- Collega il monitor, la tastiera e il mouse.
- Accendi il tuo sistema. Premi Del or F2 durante l'avvio per accedere all'utilità di configurazione BIOS/UEFI.
- In the BIOS, verify that all installed components (CPU, RAM, SSDs) are detected correctly.
- Configure boot order to install your operating system from a USB drive or other media.
- Salvare le modifiche ed uscire dal BIOS.
2. Installazione del sistema operativo
Follow the on-screen instructions of your chosen operating system (e.g., Windows, Linux) to complete the installation process.
3. Installazione del driver
After OS installation, install the necessary drivers for your motherboard components (chipset, LAN, Wi-Fi, audio, etc.). These can typically be found on the ASRock support websito per il tuo modello specifico.
4. Aggiornamenti del BIOS
Controllare regolarmente l'ASRock website for BIOS updates. BIOS updates can improve compatibility, stability, and performance. Refer to the ASRock website for detailed instructions on how to update the BIOS safely.
Manutenzione
Una corretta manutenzione garantisce la longevità e le prestazioni ottimali della scheda madre.
- Rimozione della polvere: Periodically clean dust from the motherboard and case using compressed air. Ensure the system is powered off and unplugged before cleaning.
- Gestione dei cavi: Ensure all cables are neatly routed to promote good airflow and prevent interference.
- Aggiornamenti software: Keep your operating system, drivers, and BIOS updated to the latest versions.
- Condizioni ambientali: Operate the motherboard in a well-ventilated area, away from direct sunlight, excessive heat, and moisture.
Risoluzione dei problemi
Questa sezione affronta i problemi più comuni che potresti incontrare.
1. Il sistema non si accende
- Controllare tutti i collegamenti di alimentazione: ATX a 24 pin, CPU a 8 pin e cavo di alimentazione alla presa a muro.
- Assicurarsi che l'interruttore di alimentazione sia in posizione ON.
- Verificare la connessione del pulsante di accensione del pannello frontale alla scheda madre.
- Se possibile, provare con un alimentatore diverso.
2. No Display Output (No POST)
- Ensure the monitor is connected to the correct graphics output (either integrated graphics or discrete GPU).
- Reinstallare i moduli RAM. Provare ad avviare il sistema con un solo modulo RAM.
- Reinstallare la scheda grafica.
- Clear CMOS: Locate the CLRCMOS jumper on the motherboard (refer to the full manual for exact location) and short it for a few seconds with the system powered off and unplugged.
- BIOS Compatibility: If using a newer AMD Ryzen 7000 series CPU, ensure your BIOS version supports it. An older BIOS might require an older compatible CPU for an initial update.
3. Instabilità o arresti anomali del sistema
- Controllare le temperature di CPU e GPU. Assicurarsi che le soluzioni di raffreddamento siano installate correttamente.
- Verificare la stabilità della RAM. Eseguire strumenti di diagnostica della memoria.
- Assicurarsi che tutti i driver siano aggiornati.
- Controllare che non vi siano collegamenti allentati o componenti non correttamente posizionati.
Specifiche
| Caratteristica | Dettaglio |
|---|---|
| Marca | AssoRock |
| Nome del modello | B650E PG-ITX WIFI |
| Presa CPU | Presa AM5 |
| Processori compatibili | Processori AMD Ryzen serie 7000 |
| Tipo di chipset | Processore AMD B650 |
| Tecnologia della memoria RAM | DDR5 |
| Velocità di memoria | Up to 6400+(OC) MHz |
| Tipo senza fili | 802.11ax (Wi-Fi 6E) + Bluetooth 5.3 |
| Rete locale | Killer 2.5G LAN |
| Slot PCIe | 1x PCIe 5.0 x16 |
| Slot M.2 | 1 x Blazing M.2 (PCIe Gen5x4), 1 x Hyper M.2 (PCIe Gen4x4) |
| Porte SATA | 2 x SATA3 |
| Porte USB (posteriori) | 1 x USB 3.2 Gen2 Tipo-C, 3 x USB 3.2 Gen2 Tipo-A, 4 x USB 2.0 |
| Porte USB (anteriore) | 1 x USB 3.2 Gen2x2 Tipo-C, 2 x USB 3.2 Gen1, 2 x USB 2.0 |
| Uscita grafica | 1 x HDMI, eDP |
| Audio | 7.1 CH HD Audio (Realtek ALC1220), Nahimic Audio |
| Fattore di forma | Mini-ITX |
| Dimensioni del prodotto | 19.69 x 19.69 x 11.02 pollici |
| Peso dell'articolo | 2.2 libbre |
Garanzia e supporto
The ASRock B650E PG-ITX WiFi Motherboard comes with a Garanzia di 3 anno from ASRock, covering defects in materials and workmanship under normal use.
For technical support, driver downloads, BIOS updates, and further information, please visit the official ASRock support website. You can also refer to the full product manual available on their website for more detailed instructions and diagrams.
For warranty claims or service, please contact ASRock customer support directly or the retailer from whom you purchased the product.


