Introduzione
This manual provides detailed instructions for the setup, operation, and maintenance of your LFF Atomic Clock Model LWC204. This digital clock features a large, easy-to-read display, atomic time synchronization, and a wireless sensor for indoor and outdoor temperature readings. Please read this manual thoroughly before use to ensure proper functionality and longevity of your device.
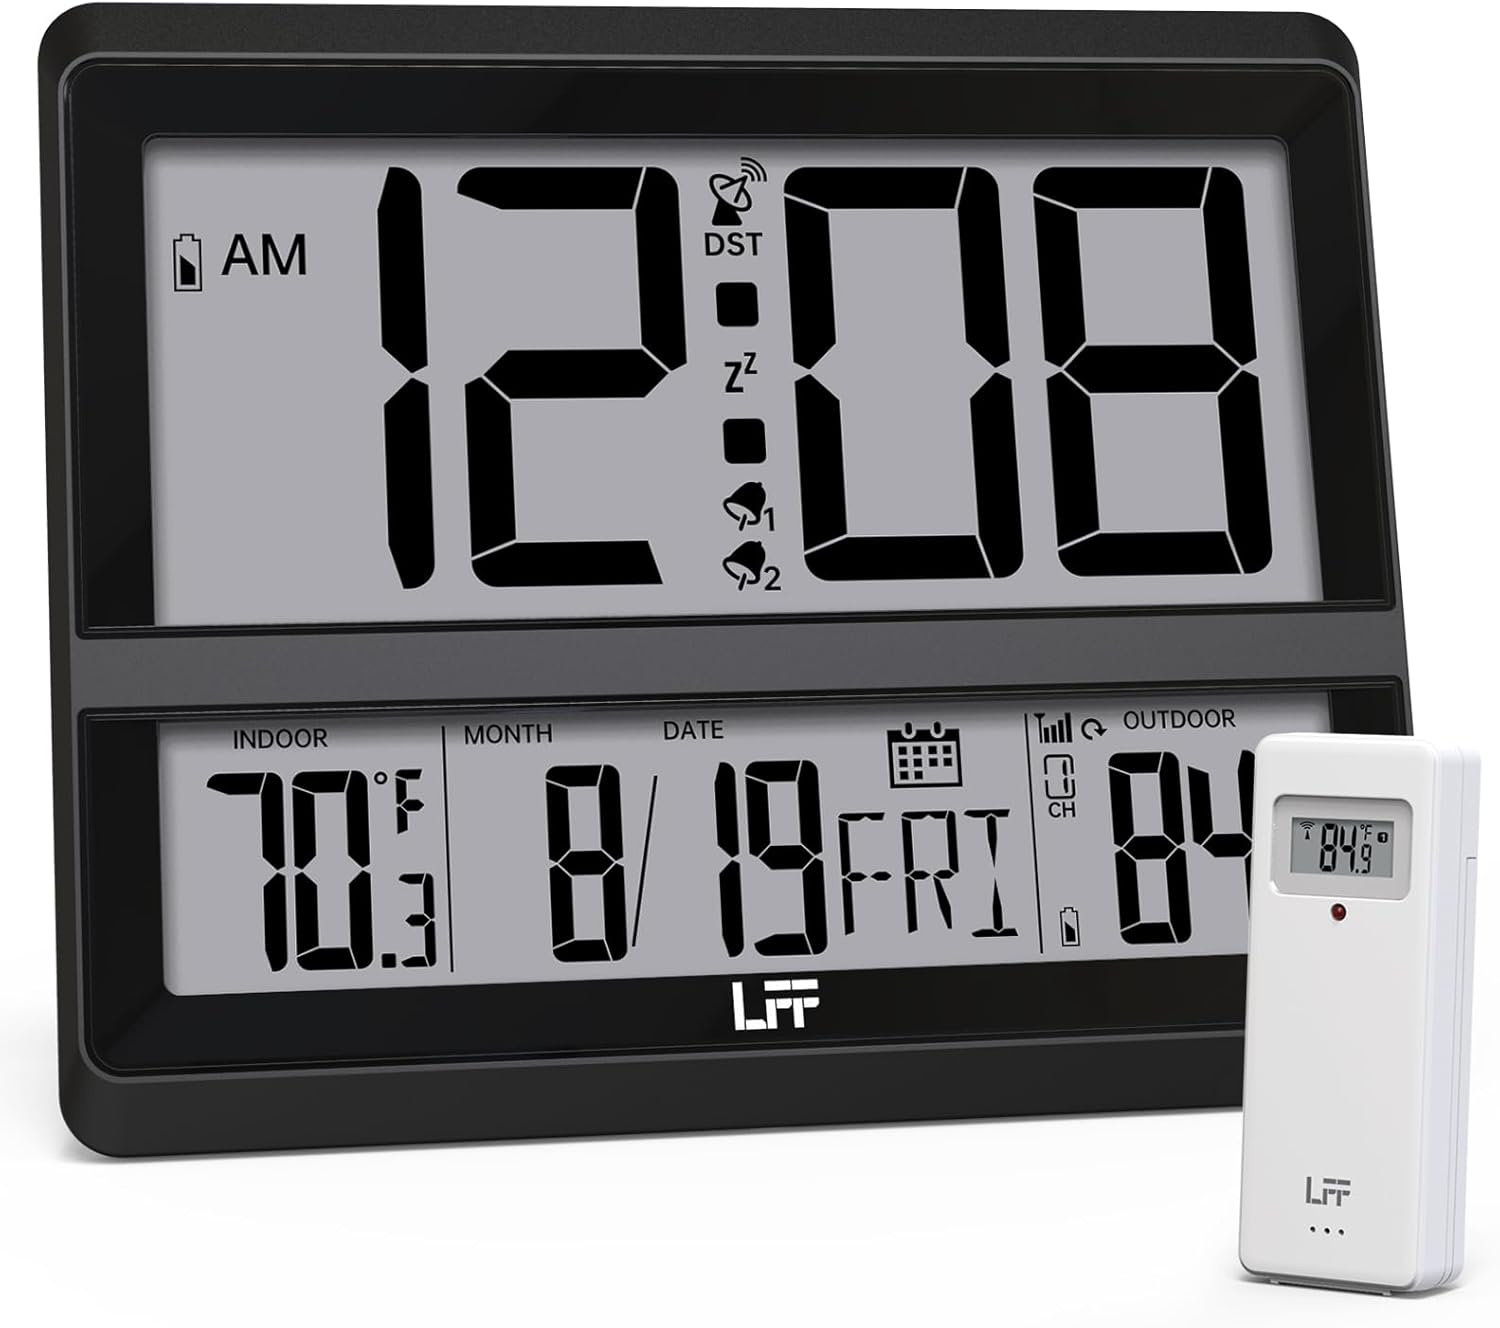
Image: The LFF Atomic Clock main unit with its wireless outdoor temperature sensor.
Contenuto della confezione
- LFF Atomic Clock Main Unit
- Sensore di temperatura esterna wireless
- Manuale di istruzioni (questo documento)
- Bracket for table standing
Note: Batteries are not included. The main clock unit requires 3x AA batteries, and the outdoor sensor requires 2x AAA batteries.
Prodotto finitoview
Familiarize yourself with the main components and controls of your LFF Atomic Clock.

Image: Front display and rear button layout of the LFF Atomic Clock.
Caratteristiche dello schermo:
- Visualizzazione dell'ora: Large digits for current time (12/24 Hour format).
- Indicatore AM/PM: Per il formato 12 ore.
- Simbolo DST: Indicates Daylight Saving Time is active.
- RCC Reception Icon: Shows status of atomic time signal reception.
- Alarm Icons (Zz, 1, 2): Indicate active alarms and snooze function.
- Temperatura interna: Current temperature inside (°C/°F).
- Temperatura esterna: Current temperature from wireless sensor (°C/°F).
- Data e giorno della settimana: Month, Day, and Day of the Week.
- Indicatore di batteria scarica: For both main unit and outdoor sensor.
Pulsanti posteriori:
- Pulsante IMPOSTA: Entra nella modalità di impostazione.
- Pulsante ALLARME: Accede alle impostazioni dell'allarme.
- Pulsante CANALE: Cycles through outdoor sensor channels (if multiple sensors are used).
- DOWN/WAVE/°C/°F Button: Decreases values in setting mode, manually initiates atomic signal search (WAVE), or switches temperature units.
- UP/ALARM Button: Increases values in setting mode, or activates/deactivates alarm.
Impostare
1. Installazione della batteria
- Sensore esterno:
- Aprire il vano batteria sul retro del sensore esterno wireless.
- Inserire 2 batterie AAA, rispettando la polarità corretta (+/-).
- Chiudere bene il vano batterie.
- Note: For temperatures below -4°F (-20°C), Lithium batteries are recommended for the outdoor sensor.
- Unità orologio principale:
- Open the battery compartment on the back of the main clock unit.
- Inserire 3 batterie AA, rispettando la polarità corretta (+/-).
- Chiudere bene il vano batterie.

Image: Battery compartments for the main clock and outdoor sensor.
2. Sincronizzazione iniziale e impostazioni
Upon battery installation, the clock will automatically begin searching for the WWVB atomic time signal and attempt to connect with the outdoor sensor.
- The RCC Reception Icon will flash during the atomic signal search. This process may take several minutes or up to 24 hours depending on signal strength.
- The outdoor temperature should appear on the display within a few minutes after the sensor batteries are installed. If not, press the CANALE button on the main unit to cycle through channels or press the reset button on the outdoor sensor.
3. Manual Settings (if needed)
If the atomic signal is not received or you wish to adjust settings manually:
- Impostazione del fuso orario:
- Premere e tenere premuto il tasto IMPOSTATO button for 3 seconds to enter time zone setting.
- Utilizzare il UP/ALARM or DOWN/WAVE/°C/°F buttons to select your time zone (e.g., PST, MST, CST, EST).
- Premere IMPOSTATO per confermare e passare all'impostazione successiva.
- Formato 12/24 ore:
- After time zone, the hour format will flash. Use UP/ALARM or DOWN/WAVE/°C/°F to select 12-hour or 24-hour format.
- Premere IMPOSTATO per confermare.
- Manual Time and Date Setting:
- Continua a premere IMPOSTATO to cycle through Year, Month, Day, Hour, Minute settings.
- Utilizzo UP/ALARM or DOWN/WAVE/°C/°F per regolare ciascun valore.
- Premere IMPOSTATO per confermare ogni impostazione.
- Ora legale (DST):
- After setting the time, the DST setting will flash. Use UP/ALARM or DOWN/WAVE/°C/°F to enable or disable DST.
- Premere IMPOSTATO per uscire dalla modalità di impostazione.

Image: The clock automatically corrects time daily via WWVB signal.
4. Posizionamento del sensore esterno
- Place the wireless outdoor sensor within 330 feet (100 meters) of the main unit.
- Choose a shaded location to avoid direct sunlight, which can affect temperature accuracy.
- Assicurarsi che il sensore sia protetto dalla pioggia diretta e dalla neve.
- Evitare di posizionare il sensore vicino a grandi oggetti metallici o apparecchi elettrici che potrebbero interferire con il segnale wireless.

Image: Wireless range of 330 feet for the outdoor sensor.
Istruzioni per l'uso
1. Modalità di visualizzazione
- The clock continuously displays time, indoor temperature, outdoor temperature, date, and day of the week.
- Premere il tasto DOWN/WAVE/°C/°F pulsante per passare dalla visualizzazione della temperatura in gradi Celsius (°C) a quella in gradi Fahrenheit (°F).
2. Funzione di allarme
- Impostazione della sveglia:
- Premere il tasto ALLARME button once to display Alarm 1 time. Press again for Alarm 2.
- While an alarm time is displayed, press and hold the ALLARME button for 3 seconds to enter alarm setting mode. The hour will flash.
- Utilizzo UP/ALARM or DOWN/WAVE/°C/°F per regolare l'ora. stampa ALLARME per confermare.
- I minuti lampeggeranno. Utilizzare UP/ALARM or DOWN/WAVE/°C/°F per regolare i minuti. stampa ALLARME per confermare e uscire dall'impostazione della sveglia.
- Attivazione/disattivazione dell'allarme:
- Premere il tasto ALLARME button to display Alarm 1 or Alarm 2.
- Premere il tasto UP/ALARM button to toggle the alarm ON or OFF. The corresponding alarm icon (1 or 2) will appear/disappear on the display.
- Funzione snooze:
- Quando suona la sveglia, premere il tasto POSTICIPARE button (usually located on top or a dedicated button) to activate snooze. The alarm will sound again after approximately 5-10 minutes.
- Per interrompere completamente l'allarme, premere un altro pulsante (ad esempio, ALLARME, IMPOSTATO).
3. Manual Atomic Signal Search
If you wish to manually initiate a search for the WWVB atomic time signal, press and hold the DOWN/WAVE/°C/°F button for 3 seconds. The RCC Reception Icon will flash, indicating the search is in progress.
Manutenzione
- Pulizia: Pulire l'orologio e il sensore con un panno morbido e asciutto. Non utilizzare detergenti abrasivi o solventi.
- Sostituzione della batteria: When the low battery indicator appears on the display for either the main unit or the outdoor sensor, replace the batteries promptly to ensure continuous operation and accurate readings. Refer to the "Battery Installation" section for details.
- Magazzinaggio: Se si conserva il dispositivo per un periodo prolungato, rimuovere tutte le batterie per evitare perdite.
Risoluzione dei problemi
| Problema | Possibile causa | Soluzione |
|---|---|---|
| Nessun display sull'unità principale. | Le batterie sono scariche o installate in modo errato. | Controllare la polarità delle batterie e sostituirle con batterie AA nuove. |
| La temperatura esterna non viene visualizzata o è errata. |
|
|
| Atomic time signal not received (RCC icon flashing or not displayed). |
|
|
| Time is incorrect after atomic synchronization. | Impostazione del fuso orario errata. | Adjust the time zone setting as described in the "Manual Settings" section. |
Specifiche
| Caratteristica | Dettaglio |
|---|---|
| Numero di modello | LWC204 |
| Tipo di visualizzazione | LCD digitale |
| Fonte di alimentazione (unità principale) | 3x batterie AA (non incluse) |
| Fonte di alimentazione (sensore esterno) | 2 batterie AAA (non incluse) |
| Intervallo di temperatura interna | da 32°F a 122°F (da 0°C a 50°C) |
| Intervallo di temperatura esterna | Da -58°C a 158°C (da -50°F a 70°F) |
| wireless Range | Fino a 330 piedi (100 metri) all'aria aperta |
| Formato ora | Selezionabile 12/24 ore |
| Dimensioni (unità principale) | 7.48" L x 8.66" A (circa) |
| Opzioni di montaggio | Wall Mount or Tabletop (bracket included) |
Garanzia e supporto
LFF products are designed for reliability and performance. For specific warranty information, please refer to the warranty card included with your purchase or contact LFF customer support.
For technical assistance or further inquiries, please visit the official LFF weboppure contatta il servizio clienti. I recapiti sono solitamente disponibili sulla confezione del prodotto o sul sito web ufficiale del marchio.


