1. Introduzione
The DEWINNER 4-in-1 Wall Detector, Model DE-SH201, is a versatile tool designed for quickly and accurately locating various hidden objects within walls, floors, and ceilings. It features four distinct detection modes to identify metal, wood studs, magnetic materials, and live AC wires. This device is ideal for home renovation, electrical wiring projects, decoration, and safely hanging items.
Equipped with a large LCD screen and an audible buzzer, the detector provides clear indications of detection mode, depth, signal strength, and battery level. Its ergonomic design ensures a comfortable and secure grip during use.

Figura 1: The DEWINNER 4-in-1 Wall Detector (Model DE-SH201) and its included 9V battery.
2. Caratteristiche del prodotto
- 4 modalità di rilevamento: Includes Stud Scan, Deep Mode, Metal Scan, and AC Scan for comprehensive material detection.
- LCD Display & Audio Alarm: Large backlit LCD screen shows detection mode, depth, signal strength, and battery status. An audible buzzer indicates target detection and proximity.
- Uso multifunzionale: Suitable for locating wood studs, metal studs, rebar, pipes, and live AC wires.
- Design ergonomico: Soft-grip coating provides a firm and comfortable hold, preventing slippage.
- Alta precisione: Advanced anti-interference chip ensures quick and accurate positioning of hidden objects.
- Costruzione durevole: Features an ABS fall-proof housing and is designed to be dustproof and splash-resistant (IP65 rating).
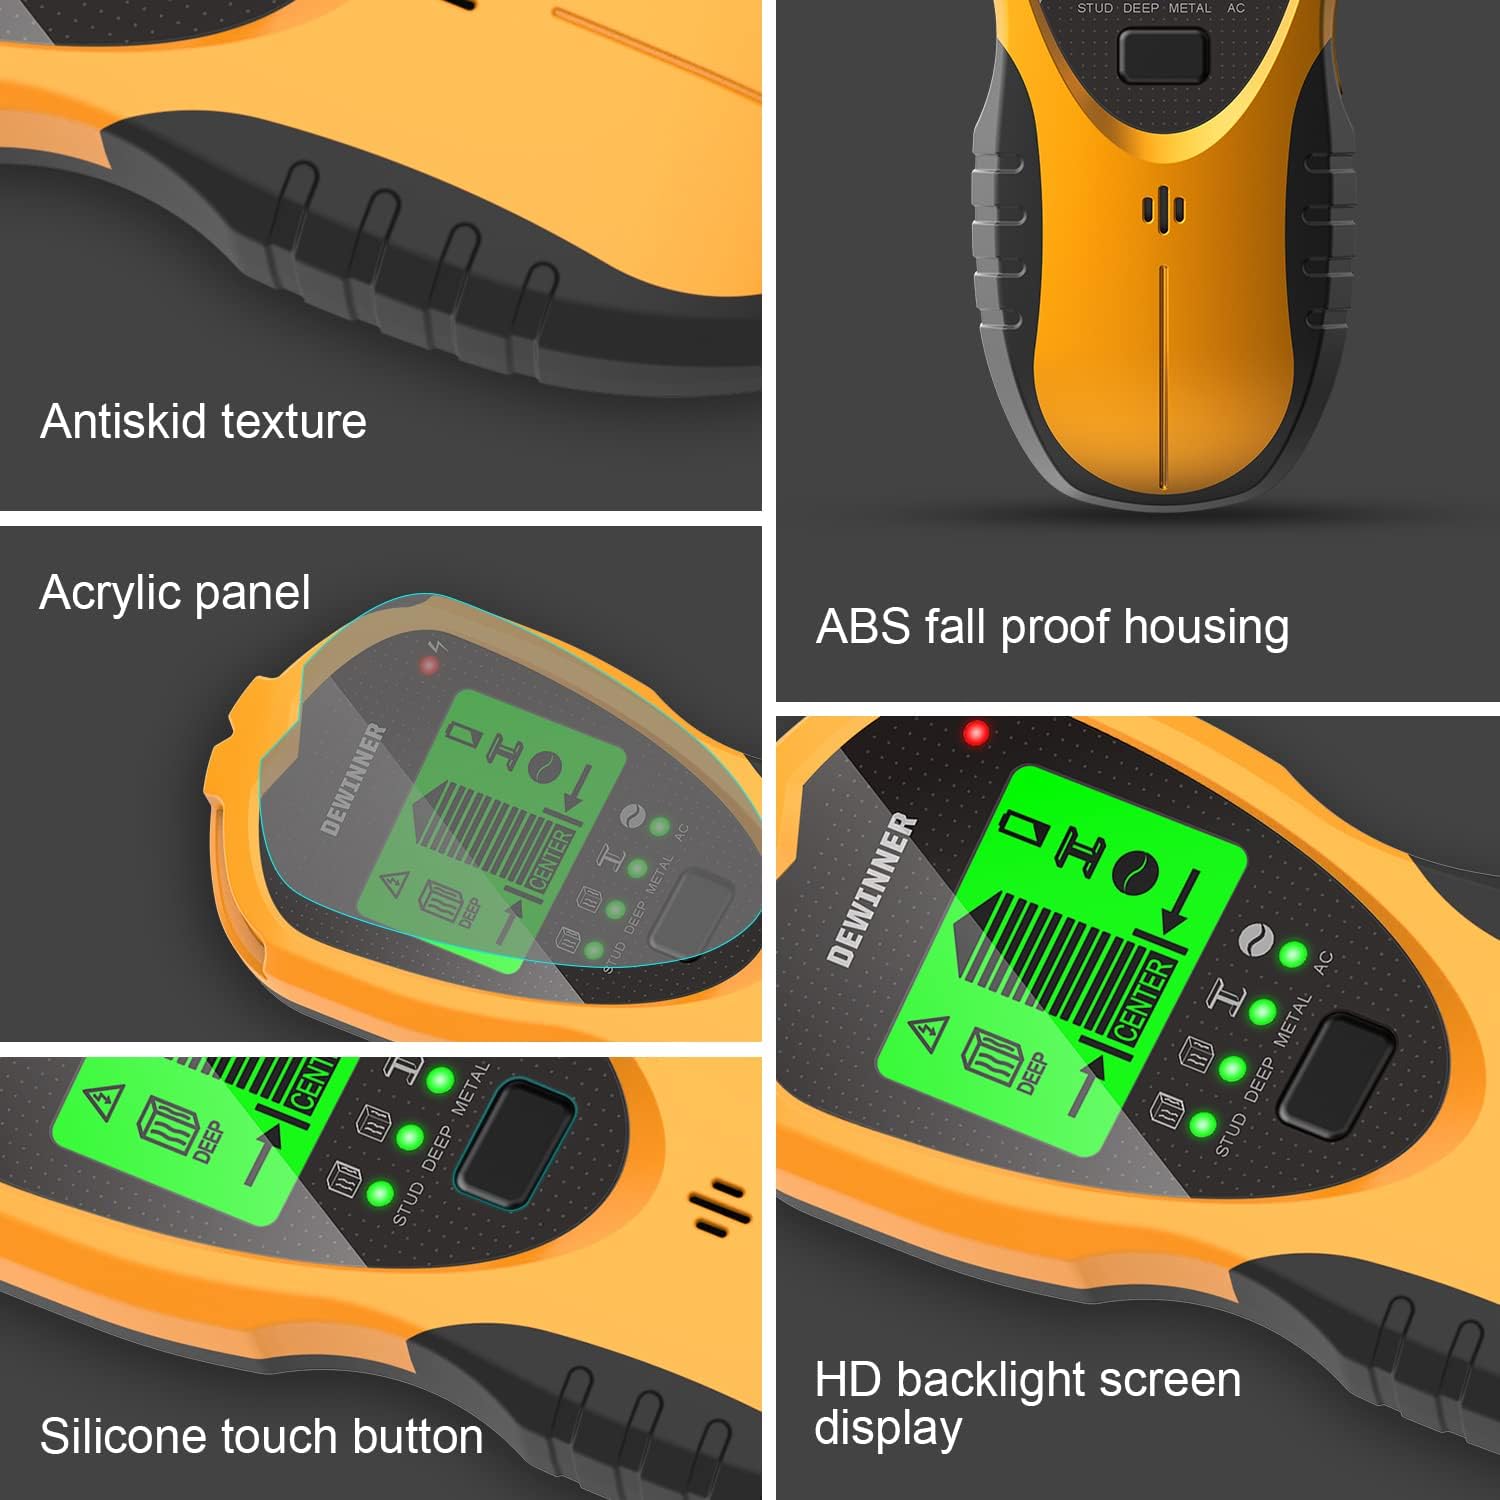
Figura 2: Key design elements of the DEWINNER Wall Detector, including its ergonomic and durable construction.
3. Impostazione e calibrazione
3.1 Installazione della batteria
The DEWINNER Wall Detector requires a 9V battery for operation. To install the battery, open the battery compartment located on the back of the unit. Insert a fresh 9V battery, ensuring correct polarity, then close the compartment securely.
3.2 Calibrazione iniziale
For accurate readings, the device must be calibrated before each use and when switching between detection modes. To calibrate:
- Place the detector flat against the wall surface where you intend to scan. Ensure there are no known studs, metal, or AC wires in the immediate area during calibration.
- Press and hold the Power Button/Mode Switch Button (located on the side of the unit) until the device powers on and emits a short beep.
- Keep the device stationary against the wall until the calibration process is complete, indicated by a stable display and another beep.
- The device is now ready for scanning in the selected mode.
Nota: Improper calibration can lead to inaccurate readings. Always calibrate on a clear section of the wall.
4. Istruzioni per l'uso
The DEWINNER Wall Detector offers four scanning modes, each optimized for different materials and depths. Select the appropriate mode using the Power Button/Mode Switch Button.

Figura 3: Sopraview of the four detection modes and their maximum scanning depths.
4.1 Modalità di scansione dei perni
This mode is designed to locate the center and edges of wood and metal studs behind drywall. It detects up to 3/4 inch (19 mm) deep.
- Select Stud Scan mode.
- Calibrare il dispositivo su una sezione libera della parete.
- Far scorrere lentamente il rilevatore orizzontalmente sulla superficie.
- The LCD will indicate signal strength, and an audible beep will sound as it approaches a stud. The 'CENTER' indicator will illuminate when the center of the stud is found.
4.2 Deep Mode
For detecting deeper wood and metal studs, this mode extends the scanning depth up to 1 1/2 inches (38 mm).
- Select Deep Mode.
- Calibrare il dispositivo su una sezione libera della parete.
- Proceed with horizontal scanning as in Stud Scan mode.
- The display and audio alerts will guide you to the stud's location.
4.3 Modalità di scansione del metallo
This mode is used to detect various metal objects, including rebar, pipes, and metal studs, up to a maximum depth of 2.36 inches (60 mm).
- Selezionare la modalità Metal Scan.
- Calibrare il dispositivo su una sezione libera della parete.
- Scan the surface slowly. The device will indicate the presence of metal.
4.4 Modalità di scansione CA
Designed to detect live unshielded AC wires (110-220V) up to 2 inches (51 mm) deep. This mode is crucial for safety when drilling or cutting into walls.
- Selezionare la modalità AC Scan.
- Calibrare il dispositivo su una sezione libera della parete.
- Scan the area slowly. The AC wire warning indicator and an audible alarm will activate upon detecting live AC wires.
Nota importante sulla sicurezza: Always exercise extreme caution when detecting AC wires. The presence of an AC warning indicates live electricity. Disconnect power if possible before proceeding with any work.

Figura 4: The detector's capability for precise detection of multiple materials, including metal, wires, and wood.
5. Comprensione del display e degli indicatori
The DEWINNER Wall Detector features a clear LCD screen and various indicators to provide real-time feedback during scanning.
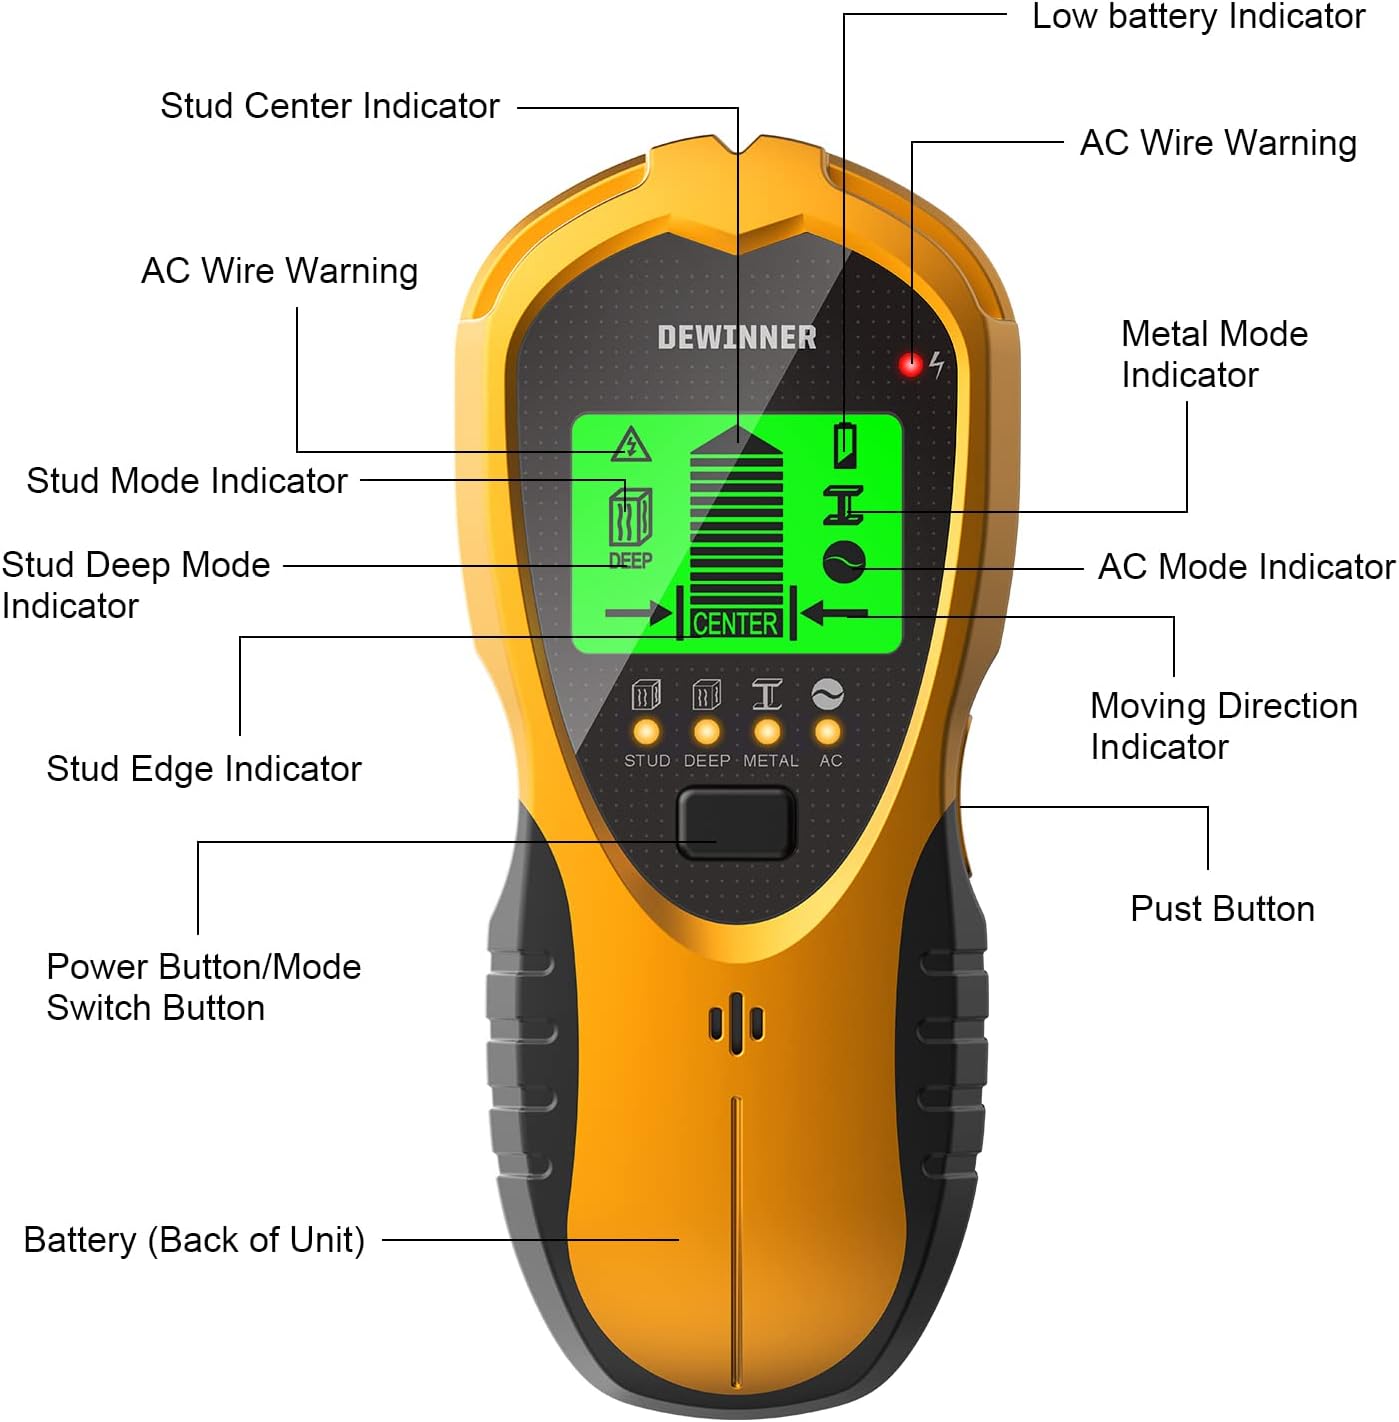
Figura 5: Labeled diagram of the DEWINNER Wall Detector's display and controls.
- Stud Mode Indicator: Icon representing stud detection.
- Stud Deep Mode Indicator: Icon representing deep stud detection.
- Metal Mode Indicator: Icon representing metal detection.
- Indicatore modalità AC: Icon representing AC wire detection.
- Indicatore di batteria scarica: Avvisi quando la batteria è scarica.
- Avvertenza sul cavo CA: Visual alert for detected live AC wires.
- Indicatore del centro del perno: Indicates when the device is centered over a stud.
- Indicatore del bordo del perno: Indicates when the device is over the edge of a stud.
- Moving Direction Indicator: Arrows guide the user towards the center of the target.
- Barre di potenza del segnale: Displays the proximity and strength of the detected object.
- Power Button/Mode Switch Button: Used to turn the device on/off and switch between modes.
- Pust Button: (Likely a typo, intended as 'Push Button' or 'Scan Button') Used to initiate scanning or confirm actions.
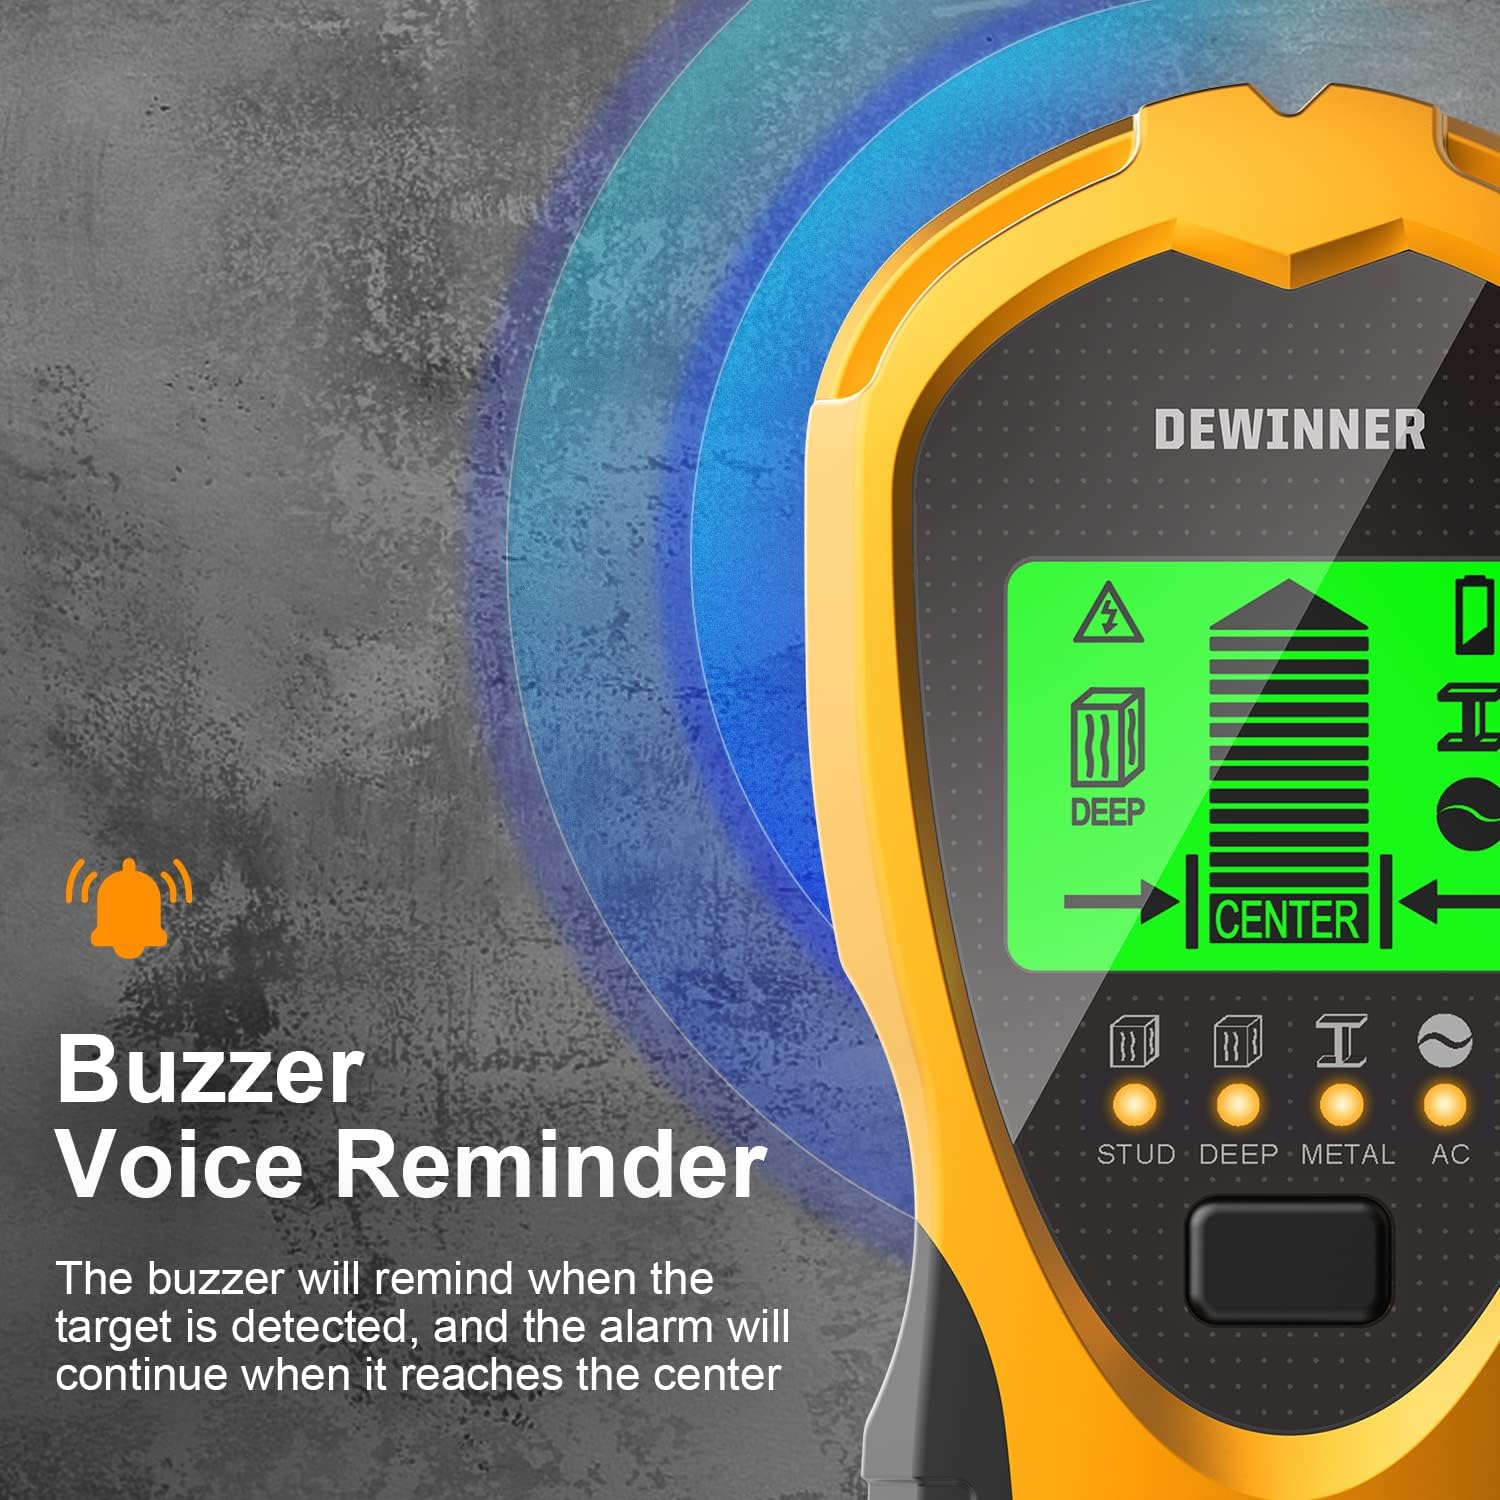
Figura 6: The buzzer provides an audible reminder when a target is detected, intensifying as the device approaches the center.
6. Manutenzione
- Pulizia: Pulire il dispositivo con un panno morbido e asciutto. Non utilizzare detergenti abrasivi o solventi.
- Magazzinaggio: Store the detector in a cool, dry place away from direct sunlight and extreme temperatures. Remove the battery if the device will not be used for an extended period to prevent leakage.
- Protezione: While the device is dustproof and splash-resistant (IP65), avoid submerging it in water or exposing it to heavy rain.

Figura 7: The detector's robust design offers protection against dust, water splashes, and minor impacts.
7. Risoluzione Dei Problemi
- Inaccurate Readings/False Positives: Ensure the device is properly calibrated on a clear section of the wall before scanning. Avoid scanning over recently painted or damp surfaces, as moisture can interfere with detection.
- Nessun rilevamento: Check the battery level. If the low battery indicator is on, replace the 9V battery. Ensure you are using the correct detection mode for the material you are trying to locate.
- Difficulty Understanding Instructions: Refer to the detailed operating instructions in Section 4. Practice on known objects (e.g., a piece of wood or metal) to familiarize yourself with the device's feedback.
- Dispositivo non si accende: Verify the battery is correctly installed and fully charged. Press and hold the Power Button/Mode Switch Button firmly.
8. Specifiche
| Specificazione | Valore |
|---|---|
| Numero di modello | DE-SH201 |
| Fonte di alimentazione | Battery Powered (9V required) |
| Peso | 155 grammi |
| Dimensioni (confezione) | Dimensioni: 18.8 x 8.4 x 5.2 cm |
| Profondità di scansione del perno | Fino a 3/4 pollice (19 mm) |
| Deep Scan Depth | Up to 1 1/2 inches (38 mm) |
| Profondità di scansione del metallo | Fino a 2.36 pollici (60 mm) |
| Profondità di scansione AC | Fino a 2 pollici (51 mm) |
| Valutazione della protezione internazionale (IP) | Grado di protezione IP65 |
| Usi consigliati | Construction, Repair, DIY Projects |
9. Garanzia e supporto
For warranty information, technical support, or further assistance, please refer to the official DEWINNER website or contact DEWINNER customer service directly. Contact details can typically be found on the product packaging or the manufacturer's official online channels.


