1. Introduzione
This manual provides instructions for the assembly, operation, and maintenance of your Yaheetech 72" H Garden Planter with Trellis. This product is designed to support climbing plants and provide a dedicated space for various horticultural plants, herbs, and flowers. It features a durable fir wood construction and an integrated trellis for plant support.

Image 1.1: Two Yaheetech 72" H Garden Planters with Trellis, showcasing their design and capacity for plants.
Caratteristiche principali:
- Integrated Trellis: A 72-inch tall trellis provides support for climbing plants and can be used as a privacy screen or for hanging basket plants.
- Spacious Planter Box: Offerte ample room for growing various small to medium-sized plants, including herbs, flowers, fruits, and vegetables.
- Sistema di drenaggio efficiente: Equipped with four drainage holes at the bottom to prevent water accumulation and ensure proper aeration for plant roots.
- Mobilità: Features 360-degree universal industrial wheels for easy movement and locking mechanisms for stability.
- Costruzione durevole: Made from fir wood, suitable for outdoor use.
2. Informazioni sulla sicurezza
Si prega di leggere attentamente tutte le avvertenze di sicurezza prima del montaggio e dell'uso. Il mancato rispetto di queste istruzioni può causare lesioni o danni al prodotto.
- Capacità di peso: Do not overload the planter. The maximum weight capacity for the bottom board is 100 kg (220 lb). The top shelf has a maximum load capacity of 10 kg (22 lb).
- Stabilità: Ensure the planter is placed on a level, stable surface. Use the wheel locking mechanisms to prevent unintended movement.
- Protezione dalle intemperie: During harsh weather conditions (e.g., strong winds, heavy snow), consider moving the planter to a sheltered area to prevent damage or instability.
- Montaggio: Always follow the assembly instructions carefully. Ensure all fasteners are securely tightened.
- Bambini e animali domestici: Tenere bambini e animali domestici lontani dal prodotto durante il montaggio.

Image 2.1: Illustration of the top shelf load capacity, emphasizing safety limits.
3. Elenco dei componenti
Prima di iniziare il montaggio, verificare che tutti i componenti siano presenti e integri. Se qualche componente risulta mancante o danneggiato, contattare l'assistenza clienti.
Note: Specific part labels may vary. Refer to the included hardware pack for detailed identification.
- Pannelli per fioriere (anteriore, posteriore, laterali, inferiore)
- Pannelli a traliccio
- Support Rods for Trellis
- Top Extended Design Components
- Ruote (con meccanismo di bloccaggio)
- Pacchetto hardware (viti, bulloni, dadi, chiave a brugola)

Image 3.1: Close-up of key structural components: side support rods, trellis frame, drainage holes, and the planter box.
4. Istruzioni di montaggio
Assembly typically requires two people. Follow these steps carefully. A power drill with appropriate bits may expedite the process, but hand tools are sufficient.
- Disimballare e identificare le parti: Carefully remove all components from the packaging. Lay them out and compare them against the components list to ensure everything is present.
- Montare la fioriera: Attach the side panels to the front and back panels using the provided screws. Ensure the grooves for the bottom panels are aligned. Insert the bottom panels into the assembled frame.
- Collegare le ruote: Securely attach the four wheels to the bottom of the planter box using the provided hardware. Ensure the locking wheels are positioned for easy access.
- Install Trellis Support Rods: Fasten the two side support rods to the rear of the planter box, ensuring they are vertical and stable.
- Pannelli a traliccio di montaggio: Attach the trellis panels to the support rods. Ensure the trellis is securely fixed and aligned.
- Install Top Extended Design: Secure the top extended design components to the upper part of the trellis. This provides additional support for hanging plants.
- Controllo finale: Verify all screws and fasteners are tight. Ensure the planter is stable and ready for use.
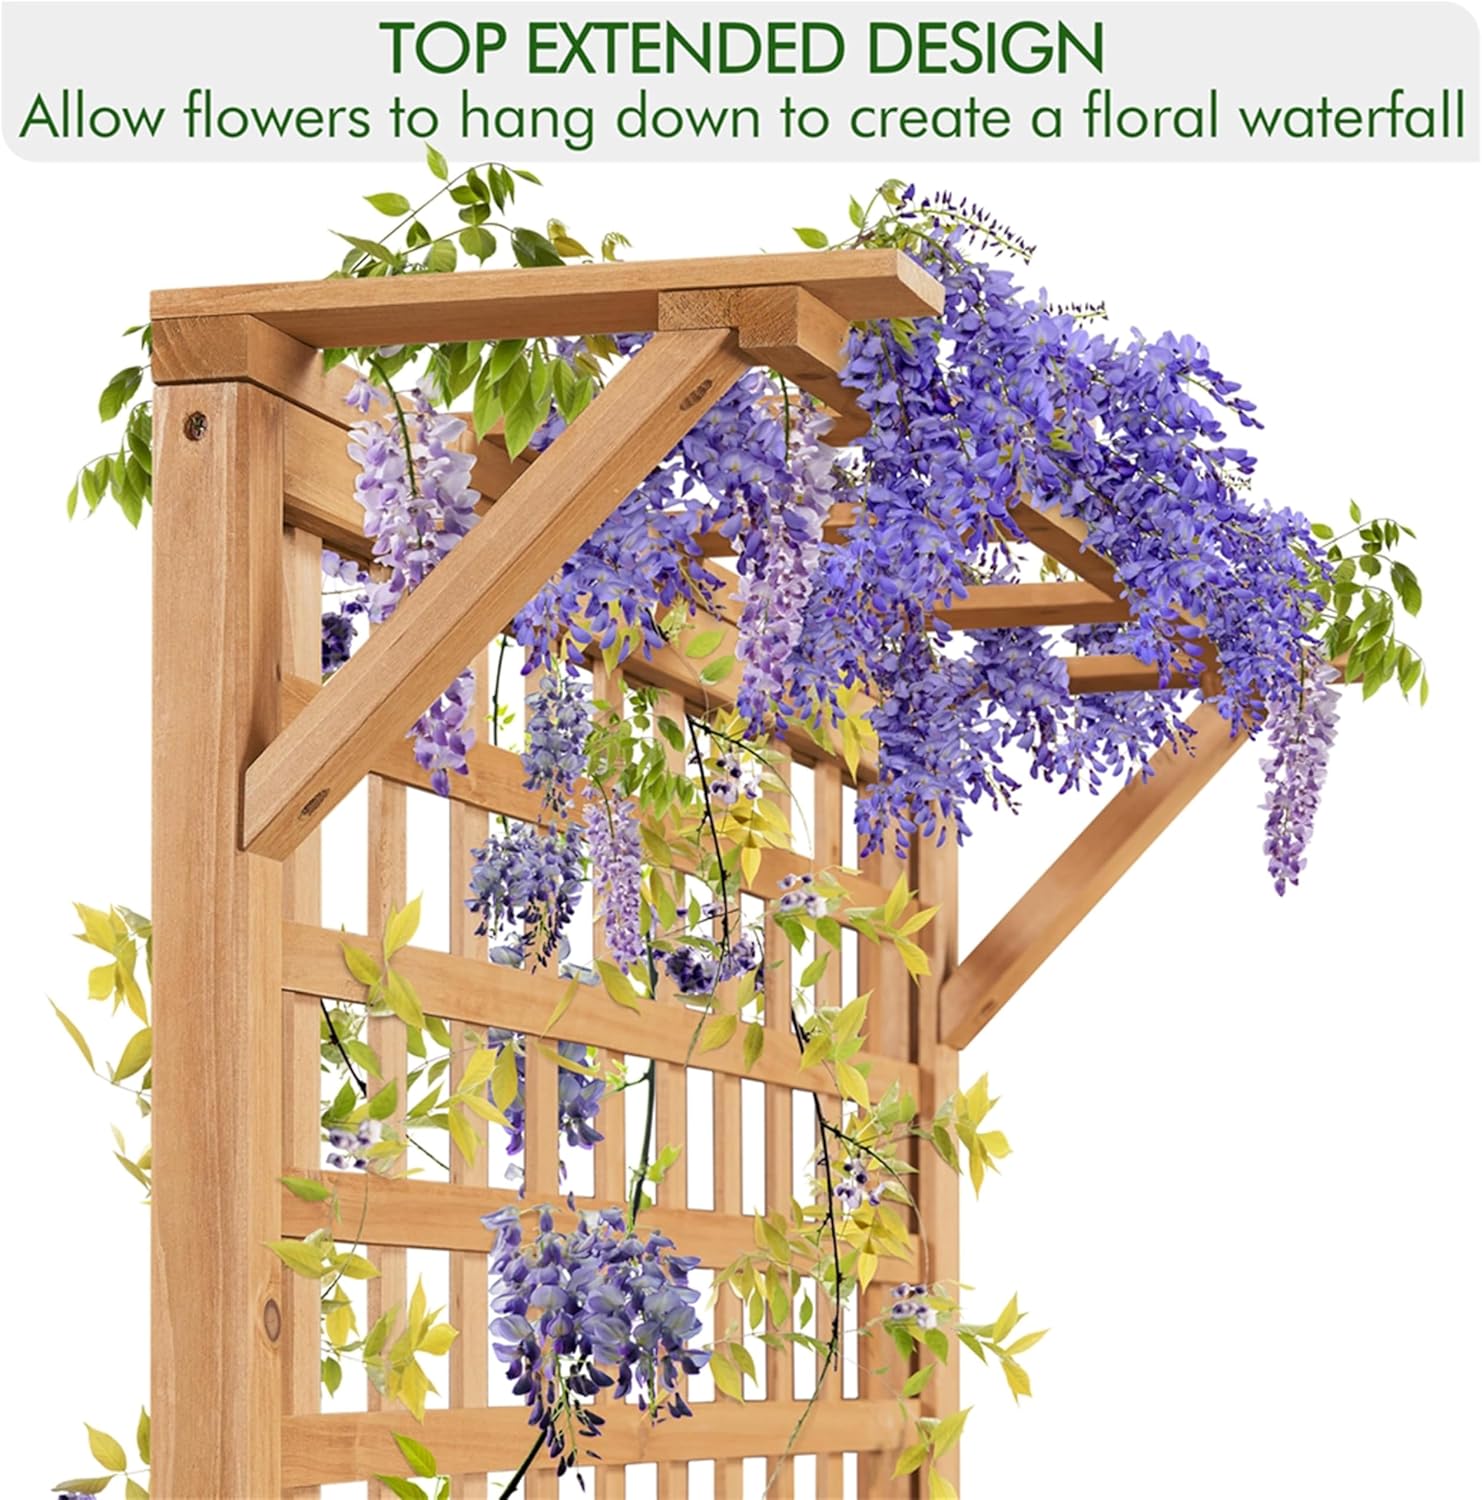
Image 4.1: Detail of the 360-degree universal industrial wheels, highlighting their mobility and locking feature for secure placement.
5. Funzionamento
5.1 Piantagione
- Preparazione del terreno: Fill the planter box with appropriate potting mix or soil suitable for your chosen plants. Ensure the soil level allows for adequate watering without overflow.
- Selezione delle piante: The planter box is suitable for various small to medium-sized crops, including herbs, flowers, fruits, and vegetables. The trellis is ideal for climbing plants such as morning glory, clematis, or honeysuckle.
- Disposizione: Consider plant growth habits and sunlight requirements when arranging plants in the box and on the trellis.
5.2 Irrigazione e drenaggio
The planter is equipped with drainage holes to prevent waterlogging. Proper watering is crucial for plant health.
- Frequenza di irrigazione: Water plants according to their specific needs. The drainage holes will allow excess water to escape, preventing root rot.
- Drainage Monitoring: Periodically check that water is draining freely from the bottom holes. If drainage appears obstructed, inspect and clear any blockages.

Image 5.1: Demonstrating the watering process and the function of the drainage holes to prevent water accumulation.
5.3 Utilizing the Trellis
- Piante rampicanti: Guide climbing plants gently onto the trellis as they grow. Use soft ties if necessary to encourage upward growth.
- Hanging Baskets: The trellis and its top extended design can support hanging basket plants, adding vertical interest to your garden. Ensure the weight of hanging baskets does not exceed the top shelf load capacity (10 kg / 22 lb).

Image 5.2: The top extended design of the trellis, ideal for creating a cascading floral effect with climbing or hanging plants.
6. Manutenzione
6.1 Pulizia
- Pulisci le superfici in legno con un pannoamp panno per rimuovere sporco e detriti.
- Evitare l'uso di prodotti chimici aggressivi o detergenti abrasivi, poiché potrebbero danneggiare la finitura del legno.
6.2 Cura del legno
- The fir wood is treated for outdoor use, but periodic maintenance can extend its lifespan.
- Consider applying a wood sealant or stain annually to protect against weathering and UV damage.
6.3 Conservazione stagionale
- In regions with harsh winters, it is recommended to empty the planter, clean it, and store it in a dry, sheltered location to prevent damage from freezing and thawing cycles.
7. Risoluzione Dei Problemi
- Scarso drenaggio: If water is pooling in the planter, check the drainage holes for blockages (e.g., compacted soil, debris). Gently clear any obstructions. Consider adding a layer of gravel or coarse material at the bottom of the planter before adding soil to improve drainage.
- Instabilità: Ensure the planter is on a flat surface and the wheel locks are engaged. If the structure feels wobbly, re-check all assembly fasteners for tightness.
- Scolorimento/invecchiamento del legno: This is a natural process for outdoor wood. Regular application of wood sealant or stain can mitigate this.
- Climbing Plants Not Attaching: Gently guide new growth onto the trellis and use soft plant ties to secure them until they establish themselves.
8. Specifiche
| Attributo | Valore |
|---|---|
| Marca | Prodotti |
| Modello | B0BNBBX6DB |
| Colore | Marrone chiaro |
| Materiale | Legno di abete |
| Dimensioni del prodotto | 35.5"L x 72"A |
| Peso dell'articolo | 21.1 libbre |
| Max. Capacity Bottom Board | 100 kg (220 libbre) |
| Max. Capacity Top Shelf | 10 kg (22 libbre) |
| Assemblaggio richiesto | SÌ |

Image 8.1: Detailed dimensions of the planter and trellis for planning placement and plant selection.
9. Garanzia e supporto
Yaheetech products are manufactured with quality and durability in mind. For specific warranty details, please refer to the product packaging or contact Yaheetech customer service directly.
If you have any questions, require assistance with assembly, or need to report missing/damaged parts, please contact Yaheetech customer support:
- Supporto online: Visita il sito ufficiale Negozio Yaheetech su Amazon.
- E-mail/Telefono: Fare riferimento alle informazioni di contatto fornite con la documentazione di acquisto.


