1. Introduzione
The LASERLINER VideoPocket HD 082262A is a compact and versatile industrial endoscope designed for visual inspection in hard-to-reach areas. This device allows for real-time viewing, image capture, and video recording, making it an essential tool for professionals in various fields. This manual provides detailed instructions for the safe and effective operation, maintenance, and troubleshooting of your VideoPocket HD.
2. Istruzioni di sicurezza
- Sicurezza generale: Read all instructions carefully before use. Keep the device away from water, high temperatures, and direct sunlight.
- Sicurezza della batteria: Use only specified AA alkaline batteries. Do not mix old and new batteries, or different types of batteries. Remove batteries if the device will not be used for an extended period.
- Cavo della telecamera: Do not bend, pinch, or pull the camera cable excessively. Avoid inserting the camera into live electrical circuits or hazardous environments without proper safety precautions.
- Pulizia: Scollegare l'alimentazione prima della pulizia. Utilizzare un panno morbido e asciutto. Non utilizzare detergenti abrasivi o solventi.
- Riparazione: Non tentare di aprire o riparare il dispositivo da soli. Per qualsiasi intervento di assistenza, rivolgersi a personale qualificato.
3. Contenuto della confezione
Verifica che tutti gli articoli siano presenti nel tuo pacco:
- LASERLINER VideoPocket HD Main Unit
- Camera Cable with 5.2mm Camera Head (1m length)
- Attacco magnetico
- Attacco a specchio
- Attacco a gancio
- Camera Tip Attachments (for securing magnet, mirror, hook)
- Manuale d'uso
4. Prodotto finitoview
The VideoPocket HD features a robust design for industrial use, with an integrated display and flexible camera probe.

Figura 1: LASERLINER VideoPocket HD industrial endoscope handheld unit. This image shows the complete device, highlighting its compact form factor and integrated display.

Figura 2: Close-up of the 5.2mm camera head with 6 integrated LEDs for illumination. The small diameter allows access into narrow spaces, and the LEDs provide necessary lighting.
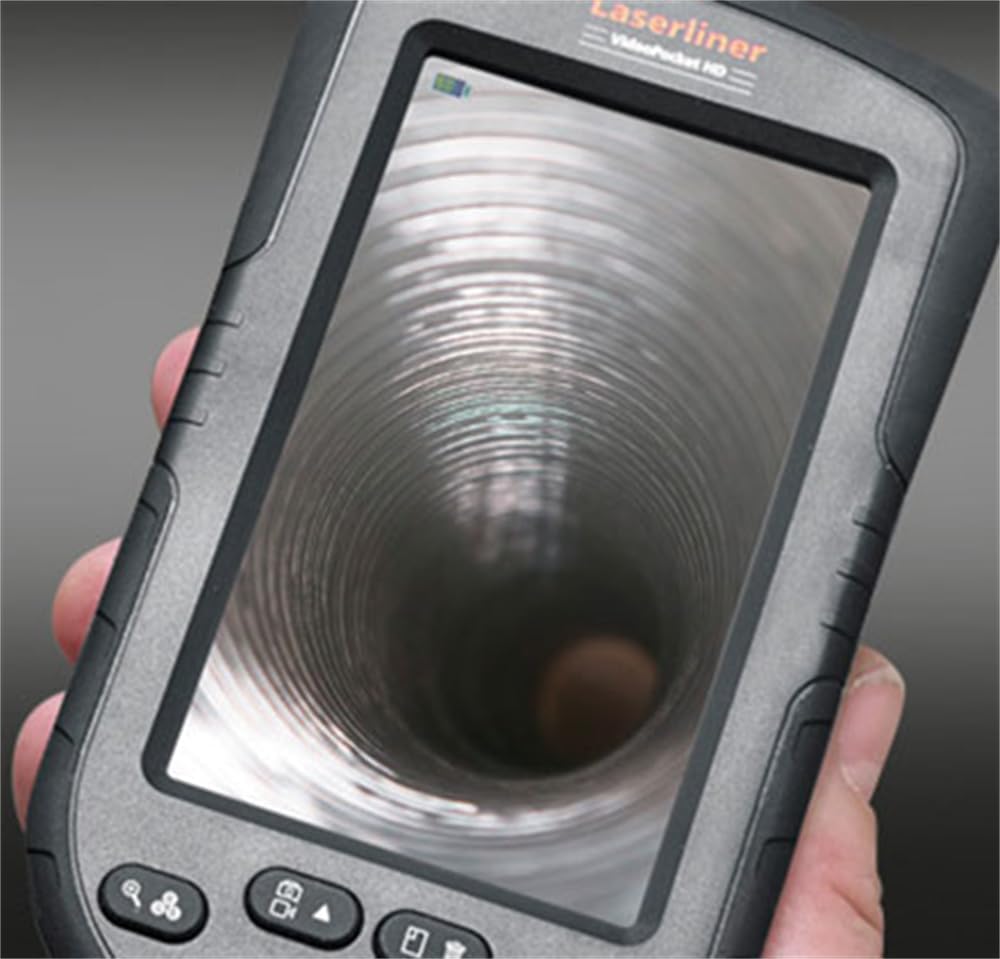
Figura 3: LASERLINER VideoPocket HD display showing a live view from inside a corrugated pipe. This demonstrates the device's capability to provide clear visuals during inspection.

Figura 4: Lato view of the VideoPocket HD unit, highlighting the MicroUSB port and microSD card slot. These ports are used for data transfer and memory expansion.

Figura 5: Posteriore view of the LASERLINER VideoPocket HD, showing the integrated storage for the camera cable. This design ensures convenient and secure storage of the probe.
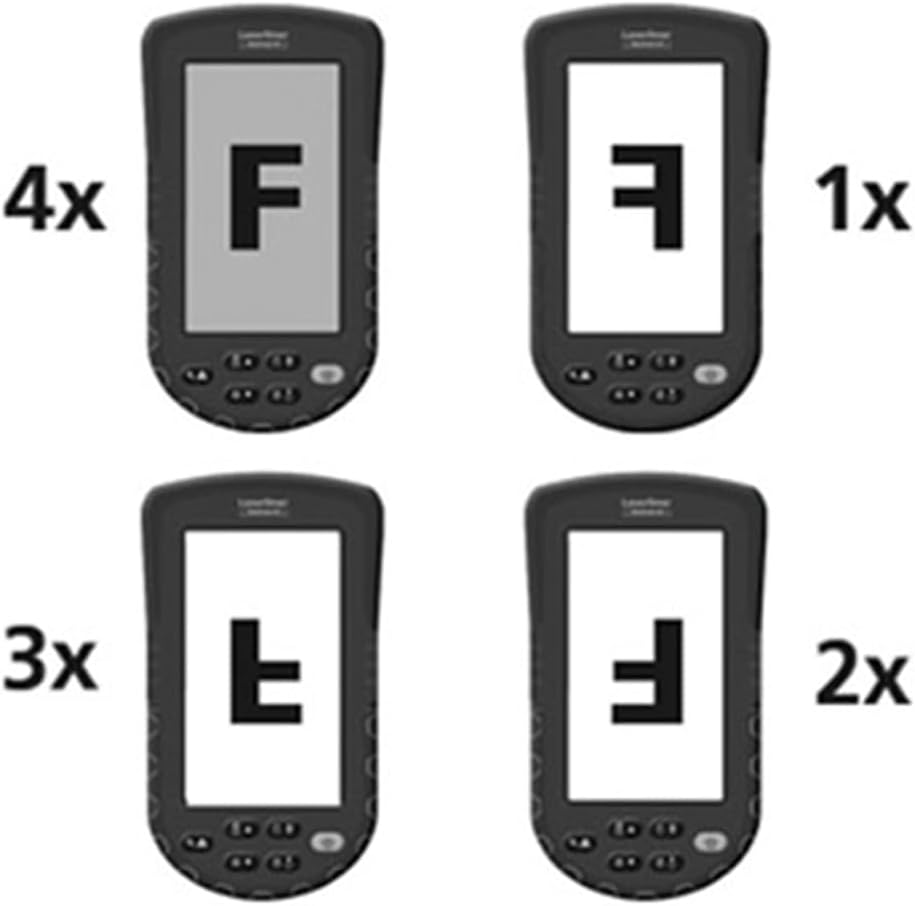
Figura 6: Diagram illustrating the 4x digital zoom function of the VideoPocket HD, showing different magnification levels. This feature allows for closer examination of details.
5. Impostazione
5.1 Installazione della batteria
- Individuare il coperchio del vano batteria sul retro del dispositivo.
- Aprire il coperchio facendolo scorrere o sbloccandolo.
- Inserire quattro (4) batterie alcaline AA, assicurandosi della corretta polarità (+/-) come indicato all'interno del vano.
- Chiudere saldamente il coperchio del vano batterie.
5.2 Inserimento della scheda MicroSD
- Locate the microSD card slot on the side of the device (refer to Figure 4).
- Insert a microSD card (up to 32GB, not included) into the slot with the contacts facing down, until it clicks into place.
- Per rimuoverla, spingere delicatamente la scheda finché non scatta fuori.
5.3 Collegamento degli accessori
The magnet, mirror, and hook attachments can be secured to the camera head using the provided camera tip attachments.
- Select the desired attachment (magnet, mirror, or hook).
- Carefully slide the camera tip attachment over the camera head.
- Ensure the accessory is firmly seated and aligned with the camera lens if necessary (e.g., mirror).
6. Istruzioni per l'uso
6.1 Accensione/Spegnimento
- Accensione: Tenere premuto il pulsante di accensione finché il display non si illumina.
- Spegni: Tenere premuto il pulsante di accensione finché il display non si spegne.
6.2 Vivere View e Navigazione
- Once powered on, the device will display a live feed from the camera probe.
- Use the directional buttons (if present) to navigate through menus or adjust settings.
6.3 Regolazione della luminosità
The camera head features 6 LEDs with 10-stage brightness adjustment.
- Locate the brightness adjustment buttons (often marked with sun icons or up/down arrows).
- Press the appropriate button to increase or decrease the LED illumination intensity.
6.4 Utilizzo dello zoom digitale
The device supports up to 4x digital zoom (refer to Figure 6).
- Press the Zoom button (often marked with a magnifying glass icon) to cycle through zoom levels (1x, 2x, 3x, 4x).
6.5 Acquisizione di immagini e video
Ensure a microSD card is inserted before attempting to record.
- Cattura immagine: In diretta view, press the Photo/Capture button (often marked with a camera icon) to take a still image.
- Registra video: Press the Video/Record button (often marked with a video camera icon) to start recording. Press it again to stop recording.
6.6 Viewing Recorded Media
- Enter Playback mode (usually via a dedicated button or menu option).
- Use the directional buttons to browse through captured images and videos.
- Premere il pulsante OK/Riproduci per view un'immagine o riprodurre un video.
6.7 Collegamento a un computer
Use the MicroUSB port to transfer files a un computer.
- Connect the device to your computer using a MicroUSB cable (not included).
- Il dispositivo dovrebbe apparire come un dispositivo di archiviazione rimovibile sul computer.
- You can then access and transfer the images and videos stored on the microSD card.
7. Manutenzione
7.1 Pulizia
- Unità principale: Wipe the main unit and display with a soft, dry, lint-free cloth. For stubborn dirt, a slightly damp si può usare un panno, seguito da un panno asciutto.
- Testa della telecamera: Gently clean the camera lens with a soft lens cleaning cloth or cotton swab. Avoid scratching the lens.
- Non immergere nessuna parte del dispositivo in acqua.
7.2 Conservazione
- Conservare il dispositivo in un luogo fresco e asciutto, lontano dalla luce solare diretta e da temperature estreme.
- Rimuovere le batterie se il dispositivo non verrà utilizzato per un periodo prolungato per evitare perdite.
- Ensure the camera cable is neatly coiled and stored in its designated compartment (refer to Figure 5).
8. Risoluzione Dei Problemi
| Problema | Possibile causa | Soluzione |
|---|---|---|
| Il dispositivo non si accende. | Le batterie sono scariche o inserite in modo errato. | Sostituire le batterie con nuove batterie alcaline AA, assicurandosi della corretta polarità. |
| Nessuna immagine in mostra. | Camera cable not properly connected or damaged. | Check the camera cable connection. If problem persists, contact support. |
| Impossibile acquisire immagini/video. | Nessuna scheda microSD inserita oppure la scheda è piena/danneggiata. | Insert a valid microSD card. Delete unnecessary fileoppure formattare la scheda (questa operazione cancellerà tutti i dati). |
| L'immagine è troppo scura/chiara. | LED brightness is not adjusted correctly. | Regolare la luminosità dei LED utilizzando i pulsanti dedicati. |
| Il dispositivo si blocca o non risponde più. | Problema temporaneo del software. | Remove and reinsert batteries to perform a hard reset. |
9. Specifiche
| Caratteristica | Specificazione |
|---|---|
| Marca | Laserliner |
| Numero di modello | 082262A |
| Dimensioni del prodotto (L x A x P) | Dimensioni: 8.5 x 15.5 x 3.2 cm |
| Peso (con batterie) | 370 grammi |
| Product Weight (Gross/Shipping) | 810 grammi |
| Diametro della testa della telecamera | 5.2 millimetri |
| Camera Cable Length | 1 metri |
| Risoluzione della fotocamera | 1280 x 720 pixel |
| Campo di View | 65° |
| Distanza focale | 3 - 8 centimetri |
| Tipo di visualizzazione | Display a colori TFT da 4.3 pollici |
| Risoluzione dello schermo | 480 x 272 pixel |
| Regolazione della luminosità del LED | Anno 10tages |
| Digital Zoom | 4x |
| Risoluzione di acquisizione video | 1080p (for saved files) |
| Supporti di memoria | Scheda MicroSD (fino a 32 GB) |
| Porta | MicroUSB |
| Fonte di alimentazione | 4 batterie alcaline AA |
| Accessori inclusi | Magnet, Mirror, Hook, Camera Tip Attachments |
10. Garanzia e supporto
10.1 Informazioni sulla garanzia
This LASERLINER VideoPocket HD 082262A comes with a Garanzia del produttore di 1 anni dalla data di acquisto. La presente garanzia copre i difetti di materiali e fabbricazione in condizioni di normale utilizzo. Non copre i danni causati da uso improprio, incidenti, modifiche non autorizzate o normale usura. Si prega di conservare la prova d'acquisto per eventuali reclami in garanzia.
10.2 Assistenza clienti
For technical assistance, troubleshooting beyond this manual, or warranty inquiries, please contact your retailer or visit the official Laserliner website for support contact information. When contacting support, please have your product model number (082262A) and proof of purchase readily available.