1. Introduzione
This manual provides essential information for the safe and efficient operation of your Acekool Portable Air Conditioner. This 3-in-1 unit offers cooling, fan, and dehumidification functions, designed to provide comfort in various indoor environments. Please read this manual thoroughly before installation and use, and retain it for future reference.
2. Informazioni sulla sicurezza
Per evitare lesioni all'utente o ad altre persone e danni alle cose, è necessario seguire le seguenti istruzioni. Il funzionamento errato dovuto all'ignoranza delle istruzioni può causare danni o danni.
- Sicurezza elettrica: Ensure the power supply matches the unit's requirements (220 Volts). Do not operate with a damaged power cord or plug. Do not share the electrical outlet with other appliances. Always unplug the unit before cleaning or servicing.
- Refrigerante (R290): This appliance contains R290 refrigerant, which is flammable. Keep the unit away from open flames, heat sources, and ignition sources. Do not puncture or burn the refrigerant circuit.
- Posizionamento: Place the unit on a flat, stable surface. Maintain a minimum distance of 20 cm from walls or other objects to ensure proper airflow. Do not block air inlets or outlets.
- Bambini e animali domestici: Keep children and pets away from the unit. Do not allow children to play with the appliance or its controls.
- Drenaggio dell'acqua: Ensure proper drainage of condensed water, especially during dehumidification mode, to prevent water overflow and damage.
- Manutenzione: Eseguire la manutenzione solo come descritto nel presente manuale. Per le riparazioni, contattare personale di assistenza qualificato.
3. Cosa c'è nella scatola
Disimballare con cura la scatola e assicurarsi che tutti gli articoli siano presenti e integri. Se alcuni articoli risultano mancanti o danneggiati, contattare l'assistenza clienti.
- Portable Air Conditioner Unit (x1)
- Telecomando (x1)
- Exhaust Hose (x1)
- Window Sealing Kit (x1)
- Tubo di scarico (x1)
- Manuale utente (x1)

Image: All components included in the product package, clearly labeled with numbers for identification.
4. Impostazione
Segui questi passaggi per impostare il tuo condizionatore portatile e ottenere prestazioni ottimali.
4.1 Posizionamento dell'unità
- Posizionare l'unità su una superficie solida e piana nella stanza desiderata.
- Ensure there is at least 20 cm of space around the unit for proper air circulation.
- Posizionare l'unità vicino a una finestra o a una porta per l'installazione del tubo di scarico.
4.2 Installazione del tubo di scarico
- Attach the exhaust hose connector to the back of the air conditioner unit.
- Estendere il tubo di scarico e collegare l'adattatore del kit per finestre all'altra estremità.
- Regolare la guarnizione della finestra in base all'apertura della finestra. Fissarla in posizione.
- Inserire l'adattatore del kit per finestre nell'apertura della piastra di tenuta della finestra.
- Ensure the exhaust hose is as straight and short as possible to maximize efficiency. Avoid kinks or sharp bends.

Image: Visual instructions demonstrating the process of connecting the exhaust hose to the unit and installing it in a window.

Immagine: dettagliata view of the exhaust hose connection points, highlighting the ease of installation.
4.3 Collegamento di alimentazione
Plug the power cord into a grounded electrical outlet (220V). Do not use extension cords or adapters.
5. Istruzioni per l'uso
Your Acekool Portable Air Conditioner can be operated using the control panel on the unit or the included remote control.
5.1 Pannello di controllo Sopraview
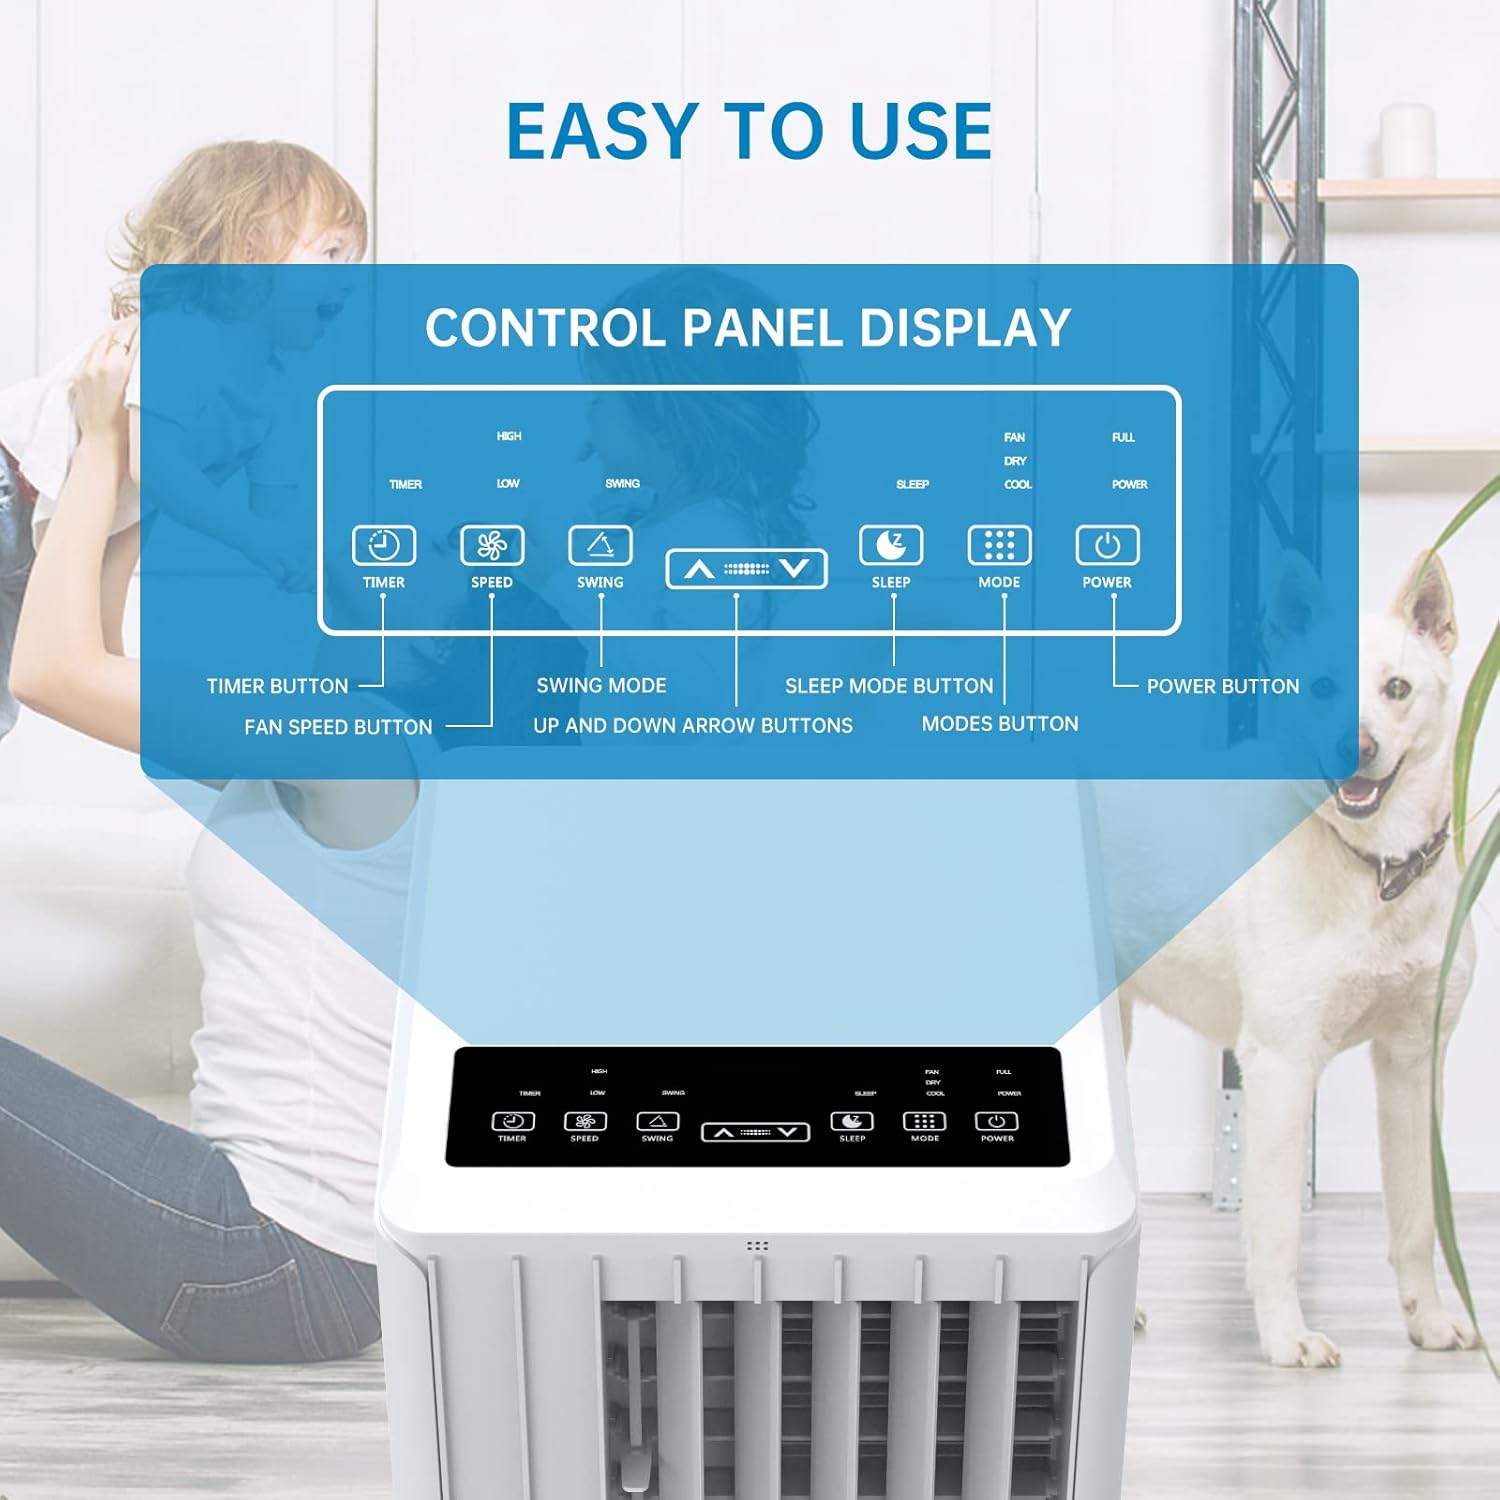
Image: A detailed diagram illustrating the control panel buttons and their functions, including Timer, Speed, Swing, Sleep, Mode, and Power.

Image: A user interacting with the touch-sensitive control panel, demonstrating its intuitive design.
- Pulsante di accensione: Accende o spegne l'unità.
- Pulsante Modalità: Passa attraverso le modalità Raffreddamento, Ventilatore e Deumidificazione.
- Pulsante di velocità: Regola la velocità della ventola (bassa, media, alta).
- Pulsante Timer: Imposta il timer di accensione/spegnimento automatico (fino a 24 ore).
- Pulsante oscillante: Attiva o disattiva l'oscillazione automatica delle alette per una distribuzione più ampia dell'aria.
- Frecce su/giù: Regola le impostazioni della temperatura o la durata del timer.
- Pulsante di sospensione: Activates Sleep Mode for quiet operation and energy saving during sleep.
5.2 telecomando
The remote control provides convenient operation from a distance. Ensure there are no obstructions between the remote and the unit's receiver.

Image: The portable air conditioner unit alongside its remote control, demonstrating the convenience of remote operation and the air swing feature.
Modalità operative 5.3
The unit offers three primary operating modes:

Image: A graphic illustrating the three distinct modes of operation: Cooling, Dehumidifying, and Fan, with their respective visual effects.
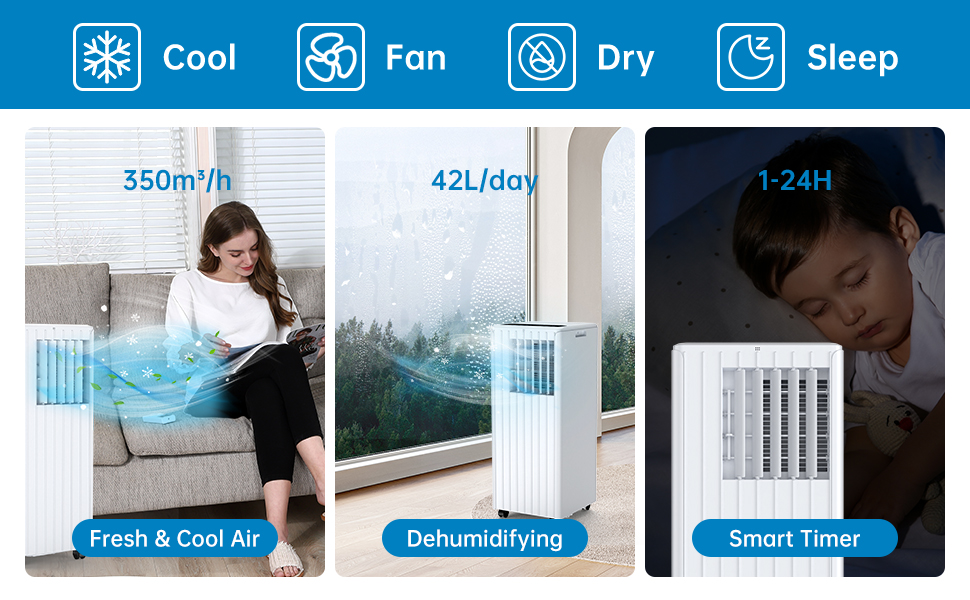
Image: A comprehensive display of the unit's modes, including cooling, fan, dry (dehumidifying), and sleep, along with performance metrics.
- Modalità di raffreddamento: Provides powerful cooling. Set your desired temperature using the Up/Down arrows. The unit will cool until the room reaches the set temperature.
- Modalità ventola: Circulates air without cooling. Choose from Low, Medium, or High fan speeds.
- Modalità di deumidificazione: Removes excess moisture from the air. The unit will operate at a low fan speed. Ensure the continuous drainage hose is connected for prolonged use in this mode.
5.4 Modalità di sospensione
Activate Sleep Mode for quiet operation and energy efficiency during nighttime. In this mode, the fan speed is reduced, and the temperature may gradually increase to ensure comfortable sleep.

Image: The portable air conditioner in a bedroom setting, illustrating its quiet operation and features like automatic shut-off and 24-hour smart timer for undisturbed sleep.

Image: A graph depicting the temperature adjustment curve in Sleep Mode, showing how the temperature gradually rises over several hours to maintain comfort.
6. Manutenzione
Una manutenzione regolare garantisce la longevità e il funzionamento efficiente del tuo condizionatore d'aria.
6.1 Pulizia del filtro dell'aria
Il filtro dell'aria deve essere pulito ogni due settimane o più frequentemente, a seconda dell'utilizzo e della qualità dell'aria. Un filtro sporco può ridurre l'efficienza di raffreddamento e il flusso d'aria.
- Scollegare l'unità dalla presa di corrente.
- Individuare e rimuovere il filtro dell'aria dal retro o dal lato dell'unità.
- Lavare il filtro sotto l'acqua corrente (tiepida, non calda) oppure utilizzare un aspirapolvere per rimuovere la polvere.
- Lasciare asciugare completamente il filtro prima di reinserirlo nell'unità. Non esporre alla luce solare diretta.

Immagine: un primo piano view of the washable filter being easily removed from the unit for maintenance.
6.2 Drenaggio dell'acqua
The unit has an internal water collection tank. When the tank is full, the unit will stop operating and display an indicator. You will need to drain the water manually.
- Scollegare l'unità.
- Posizionare una bacinella o un secchio poco profondo sotto l'uscita di scarico nella parte inferiore posteriore dell'unità.
- Remove the drainage plug and allow the water to drain completely.
- Replace the drainage plug firmly.
For continuous drainage in dehumidification mode, connect the provided drain hose to the continuous drainage outlet.
6.3 Pulizia generale
Pulire l'esterno dell'unità con un panno morbido, damp panno. Non utilizzare prodotti chimici aggressivi, abrasivi o solventi.
6.4 Conservazione
Prima di riporre l'unità per un lungo periodo:
- Drain all condensed water.
- Pulire il filtro dell'aria.
- Scollegare il cavo di alimentazione e arrotolarlo ordinatamente.
- Conservare l'unità in un luogo asciutto e fresco, lontano dalla luce solare diretta e da temperature estreme.
7. Risoluzione Dei Problemi
Se riscontri problemi con il tuo condizionatore d'aria, consulta la tabella sottostante per i problemi più comuni e le relative soluzioni.
| Problema | Possibile causa | Soluzione |
|---|---|---|
| L'unità non si accende | Nessuna alimentazione Serbatoio dell'acqua pieno Protezione da surriscaldamento attivata | Controllare la spina e la presa di corrente Svuotare il serbatoio dell'acqua Lasciare raffreddare l'unità per 30 minuti |
| Raffreddamento insufficiente | Filtro dell'aria sporco Exhaust hose blocked or kinked La dimensione della stanza è troppo grande Finestre/porte aperte Impostazione della temperatura troppo alta | Pulisci il filtro dell'aria Check and clear exhaust hose Assicurarsi che l'unità sia adatta alle dimensioni della stanza Chiudi tutte le finestre e le porte Abbassare la temperatura impostata |
| Perdita d'acqua | Tappo di scarico allentato Unità non livellata Continuous drain hose improperly connected | Tappo di scarico sicuro Posizionare l'unità su una superficie piana Ensure drain hose is properly attached and sloped downwards |
| L'unità è rumorosa | Unità non su una superficie piana Componenti interni vibranti | Posizionare l'unità su una superficie piana e stabile This may be normal operation noise, especially at high fan speeds. Ensure no obstructions. |
| Il telecomando non funziona | Batterie scariche o inserite in modo errato Ostruzione tra telecomando e unità | Sostituire le batterie, controllare la polarità Remove any obstructions, ensure direct line of sight |
8. Specifiche
Technical specifications for the Acekool Portable Air Conditioner Model PAC-M09.
| Caratteristica | Specificazione |
|---|---|
| Numero di modello | PAC-M09 |
| Marca | Acekool |
| Capacità di raffreddamento | 9000 BTU |
| Refrigerante | R290 |
| Alimentazione elettrica | 220 Volt |
| Livello massimo di rumorosità | 55 dB(A) |
| Dimensioni del prodotto (L x P x A) | Dimensioni: 38.2 x 35 x 88.5 cm |
| Peso del prodotto | 26 kg |
| Capacità di deumidificazione | 42 litri/giorno |
| Valutazione dell'efficienza energetica | Classe A |
| VEGGENTE | 2.8 |
| Area di copertura consigliata | 30-40 mq |
9. Garanzia e supporto
For warranty information, technical support, or service inquiries, please refer to the warranty card included with your product or contact Acekool customer service through their official website or the retailer where the product was purchased. Please have your model number (PAC-M09) and purchase date ready when contacting support.


