Introduzione
This manual provides essential information for the safe and efficient operation, maintenance, and troubleshooting of your Cecotec Conga Rockstar Wet & Dry Steel Max vacuum cleaner. Please read this manual thoroughly before using the appliance and keep it for future reference.
The Cecotec Conga Rockstar Wet & Dry Steel Max is a high-power solid and liquid vacuum cleaner designed with a durable metal tank, capable of cleaning various types of dirt, including liquids, from any area of your home or workshop.
Istruzioni di sicurezza
Quando si utilizzano apparecchi elettrici, seguire sempre le precauzioni di sicurezza di base per ridurre il rischio di incendi, scosse elettriche e lesioni personali.
- Garantire l'alimentazione voltage corrisponde all'etichetta di classificazione sull'apparecchio.
- Non utilizzare l'aspirapolvere per aspirare liquidi infiammabili o combustibili, come la benzina, né utilizzarlo in aree in cui potrebbero essere presenti.
- Non raccogliere nulla che stia bruciando o che stia producendo fumo, come sigarette, fiammiferi o cenere calda.
- Non immergere l'apparecchio, il cavo di alimentazione o la spina in acqua o altri liquidi.
- Always unplug the vacuum cleaner from the electrical outlet before cleaning or performing any maintenance.
- Tenere capelli, abiti larghi, dita e tutte le parti del corpo lontano dalle aperture e dalle parti mobili.
- Utilizzare solo come descritto nel presente manuale. Utilizzare solo gli accessori consigliati dal produttore.
- È necessaria un'attenta supervisione quando un elettrodomestico viene utilizzato da bambini o nelle loro vicinanze.
Prodotto finitoview
Familiarize yourself with the components of your Cecotec Conga Rockstar Wet & Dry Steel Max vacuum cleaner.

Figure 1: Main unit and included accessories, showing the vacuum's wet and dry capabilities.

Figura 2: dettagliata view of the vacuum cleaner and its various attachments for different cleaning tasks.
Componenti:
- Main Vacuum Unit with Metal Tank
- Tubo flessibile
- Extensible Tube (Wand)
- Spazzola per pavimenti
- 2-in-1 Accessory (Crevice tool and brush)
- Accessorio d'angolo
- Ruote per una facile mobilità
- Sistema di filtraggio a cartuccia

Figure 3: Close-up of one of the durable wheels, highlighting the vacuum's mobility.

Figure 4: The included accessories: a crevice tool, a brush attachment, and a floor nozzle.
Impostare
- Disimballaggio: Rimuovere con cautela tutti i componenti dall'imballaggio. Verificare la presenza di eventuali danni.
- Collegare le ruote: Insert the wheels into the designated slots on the base of the vacuum cleaner until they click into place.
- Collegare il tubo: Attach the flexible tube to the suction inlet on the front of the vacuum unit. Ensure it is securely fastened.
- Montare la bacchetta e l'ugello: Connect the extensible tube (wand) to the flexible tube. Then, attach the desired cleaning nozzle (e.g., floor brush, 2-in-1 accessory, or corner accessory) to the end of the wand.
- Installazione del filtro: Ensure the cartridge filter is correctly installed inside the tank for dry vacuuming. For wet vacuuming, the filter may need to be removed or replaced with a foam filter (if included and specified by manufacturer). Refer to the maintenance section for filter details.
Istruzioni per l'uso
Aspirazione a secco:
For dry vacuuming, ensure the cartridge filter is properly installed. Plug the vacuum cleaner into a suitable electrical outlet. Turn on the appliance using the power switch. Guide the nozzle over the dry surfaces you wish to clean.

Figure 5: A user demonstrating dry vacuuming on an outdoor patio, effectively cleaning solid debris.

Figure 6: The vacuum cleaner being used to clear leaves and dirt from an outdoor area, showcasing la sua versatilità.

Figure 7: Using the vacuum with a specialized attachment to clean the interior of a car, reaching tight spaces.
Aspirazione a umido:
Before wet vacuuming, ensure the dry filter is removed and, if applicable, a wet-specific foam filter is installed. Do not overfill the tank; monitor the liquid level. The vacuum is designed to pick up spilled liquids. When the tank is full, the float mechanism will automatically shut off suction to prevent overflow.

Figure 8: The vacuum effectively cleaning up a liquid spill on a hard floor, demonstrating its wet vacuuming capability.

Figure 9: A close-up showing the vacuum's nozzle collecting water from a surface, indicating its wet function.
Funzione soffiante:
The vacuum cleaner also features a blower function. To use it, detach the flexible tube from the suction inlet and connect it to the blower outlet, usually located on the rear or side of the unit. This function is useful for clearing debris from hard-to-reach areas or blowing leaves.
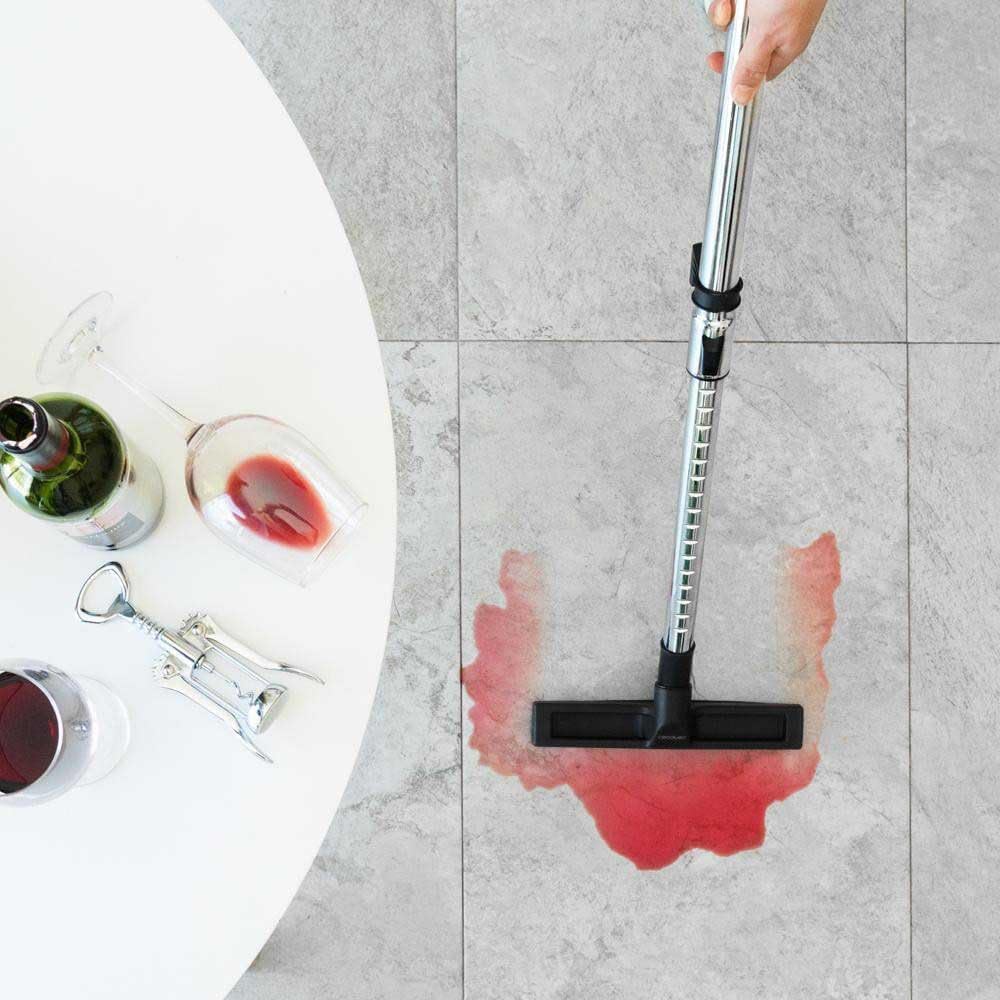
Figure 10: A user utilizing the blower function to clear debris from around a rock wall, demonstrating its utility beyond vacuuming.
Manutenzione
Una manutenzione regolare garantisce prestazioni ottimali e prolunga la durata del tuo aspirapolvere.
Svuotamento del serbatoio:
After each use, especially after wet vacuuming, empty the tank. Unlatch the top motor unit from the tank and carefully pour out the contents. Clean the inside of the tank with water and mild detergent if necessary, then dry thoroughly.

Figure 11: The vacuum cleaner being carried, illustrating its portability for emptying or transport.
Pulizia e sostituzione del filtro:
The cartridge filter is crucial for dry vacuuming. Periodically remove and clean it by tapping off dust or rinsing with water. Ensure the filter is completely dry before re-installing for dry use. For wet vacuuming, ensure the appropriate filter (e.g., foam filter) is used and cleaned as per its specific instructions.

Figure 12: A close-up of the vacuum's filter, emphasizing the importance of regular cleaning for optimal performance.

Figure 13: Diagram illustrating the multi-layer filter system, designed for efficient dust and debris capture.
Pulizia generale:
Pulisci l'esterno dell'aspirapolvere con l'adamp cloth. Do not use abrasive cleaners or solvents. Ensure all parts are dry before storage.
Risoluzione dei problemi
| Problema | Possibile causa | Soluzione |
|---|---|---|
| L'aspirapolvere non si accende. | Non collegato; interruttore di alimentazione spento; interruttore automatico scattato. | Check power cord connection; ensure switch is ON; reset circuit breaker. |
| Perdita di aspirazione. | Full tank; clogged hose/nozzle; dirty filter. | Empty tank; clear any blockages; clean or replace filter. |
| Il motore si arresta durante l'aspirazione di liquidi. | Il serbatoio è pieno (meccanismo galleggiante attivato). | Svuotare il serbatoio. |
| Rumore insolito. | Blockage in hose/nozzle; damaged motor. | Check for and remove blockages. If noise persists, contact customer support. |
Specifiche
- Marca: Cecotec
- Numero modello: 08114
- Colore: Grigio
- Dimensioni (L x P x A): Dimensioni: 36 x 36 x 45 cm
- Peso: 6.8 chilogrammi
- Capacità: 20 litri
- Energia: 1400 Watt
- Voltage: 1400 Volts (as per product specifications, typically refers to power input)
- Fonte di energia: Elettrico con cavo
- Tipo di filtro: Cartuccia
- Superficie consigliata: Pavimento duro, moquette

Figure 14: Visual representation of the 1400W power output, indicating strong suction capabilities.

Figure 15: Illustration of the 20-liter tank capacity, allowing for extended cleaning sessions.
Garanzia e supporto
Cecotec provides support for its products. Spare parts for this model are available for up to 10 years from the date of purchase. For warranty claims, technical assistance, or to inquire about spare parts, please refer to the contact information provided with your purchase or visit the official Cecotec websito.


