Introduzione
This manual provides detailed instructions for the setup, operation, maintenance, and troubleshooting of your Makeid L1 Portable Wireless Sticker Label Maker Machine. Please read this manual thoroughly before using the device to ensure proper function and longevity.
Cosa c'è nella scatola
Verificare che tutti i componenti siano presenti nella confezione:
- Makeid L1 Label Maker Machine
- Rotolo di nastro per etichette da 4 metri
- Cavo di ricarica USB
- Manuale dell'utente (questo documento)
Prodotto finitoview
Familiarize yourself with the key components of your Makeid L1 Label Maker.

Immagine: Sopraview of the Makeid L1 Label Maker, highlighting the power button, the lid for tape replacement, and the integrated cutter for crisp labels.
- Pulsante di accensione: Situato sul lato, serve per accendere/spegnere il dispositivo.
- Coperchio: Opens to access the tape compartment for loading and replacing label rolls.
- Taglierina incorporata: Ensures clean and precise cuts of printed labels.
- Slot di uscita dell'etichetta: Dove emergono le etichette stampate.
- Porta di ricarica: USB port for recharging the device.
Impostare
1. Carica del dispositivo
Before first use, ensure the label maker is fully charged. Connect the provided USB charging cable to the device's charging port and a compatible USB power source (e.g., computer USB port, USB wall adapter). The indicator light will show charging status (refer to device specific light indicators for full/charging status).
2. Caricamento del nastro per etichette
The Makeid L1 supports various label tape widths (9mm, 12mm, 16mm) and types (continuous, die-cut, transparent, white, colored, pattern). Ensure the tape is correctly oriented.
- Aprire il coperchio dell'etichettatrice.
- Insert the label roll into the compartment, ensuring the tape feeds out from the bottom and through the output slot.
- Chiudere bene il coperchio.
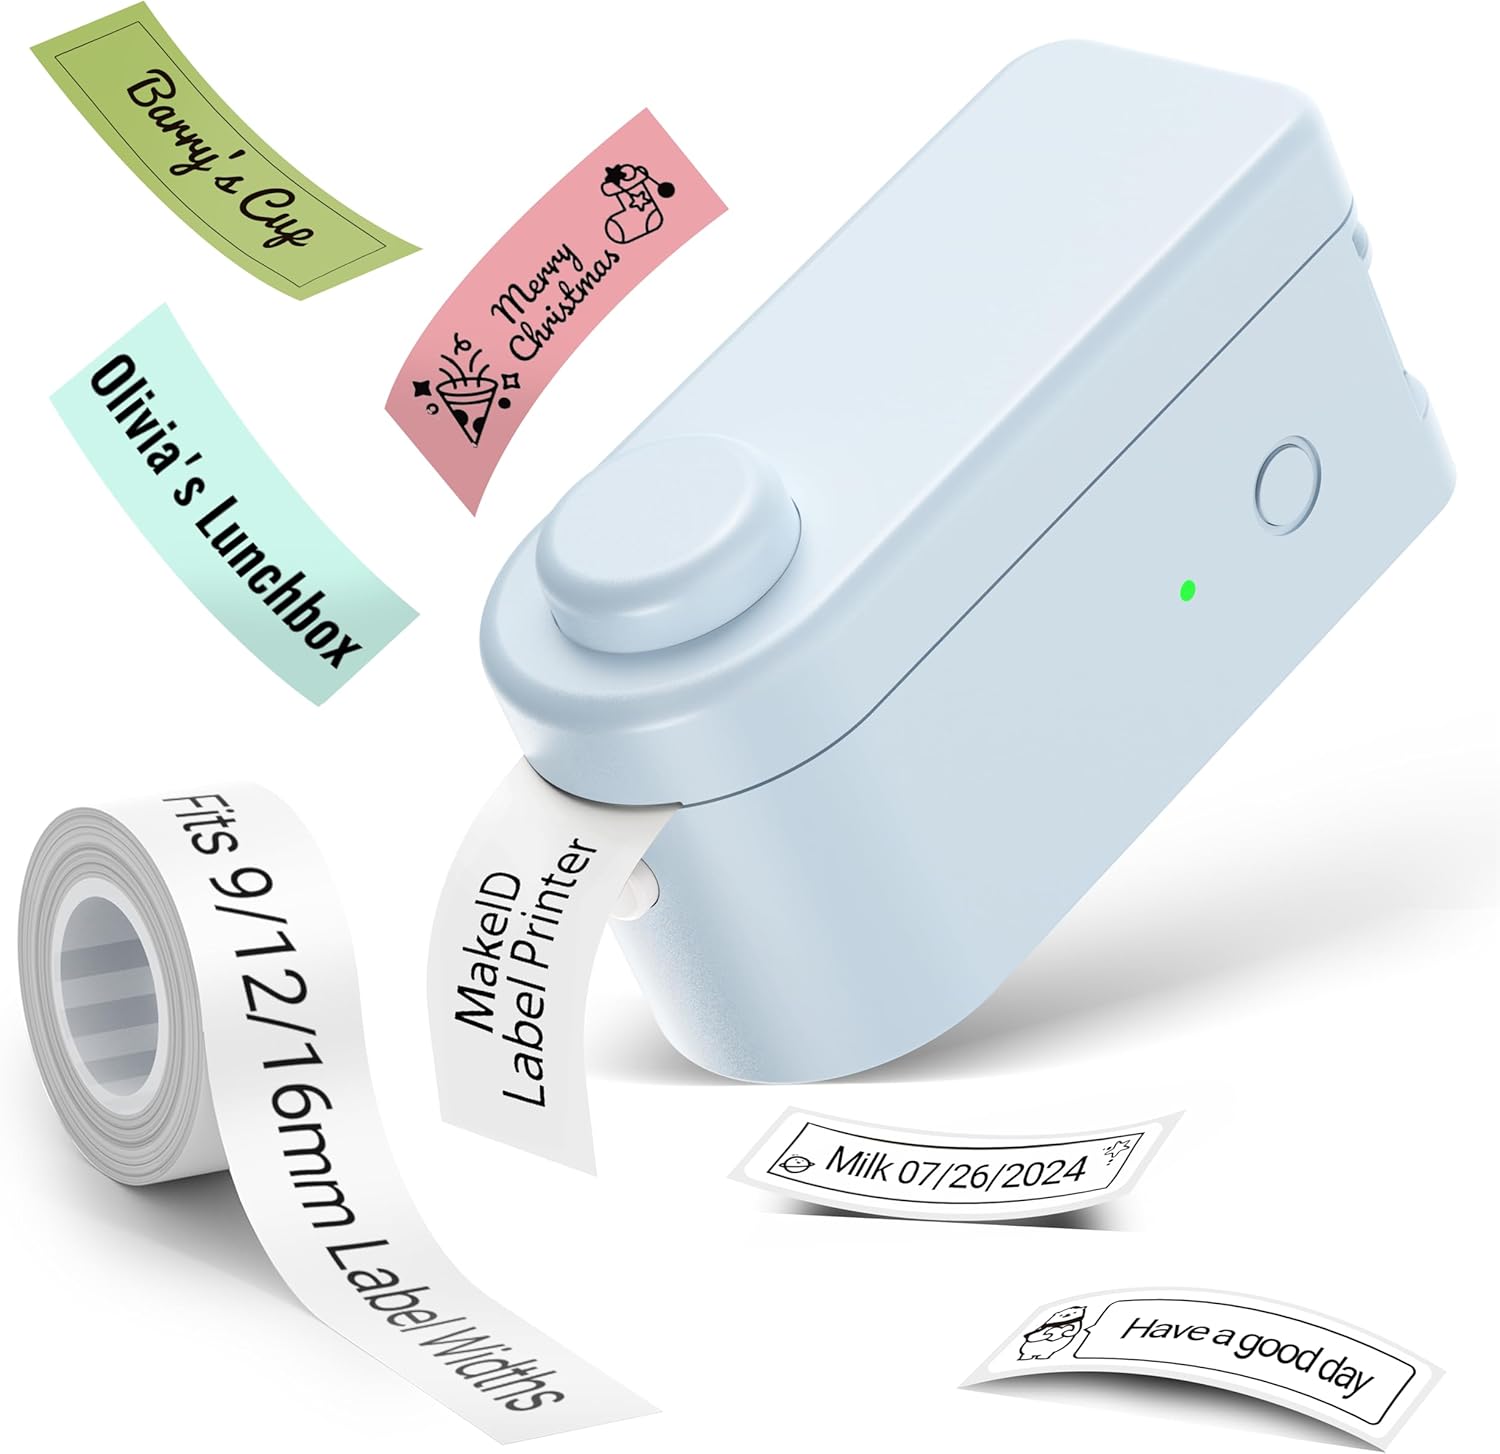
Immagine: The Makeid L1 Label Maker demonstrating the label tape roll and examples of printed labels, including continuous and die-cut types.
3. Scaricare e installare l'app
The Makeid L1 operates via a dedicated mobile application. Cercare "MakeID-Life" on your device's app store.

Immagine: Screenshots showing the "Get it on Google Play" and "Download on the App Store" buttons, indicating where to find the MakeID-Life application.
4. Accoppiamento Bluetooth
The label maker connects to your smartphone via Bluetooth.
- Assicurati che il Bluetooth sia abilitato sul tuo smartphone.
- Turn on the Makeid L1 Label Maker by pressing the power button. The indicator light will flash, indicating it's ready for pairing.
- Open the "MakeID-Life" app. The app will automatically search for nearby devices.
- Select "L1" from the list of available devices to connect. Once connected, the indicator light on the label maker will become solid.

Immagine: A visual guide demonstrating the three steps for Bluetooth connection: turning on Bluetooth, selecting the L1 model within the app, and confirming the device connection.
Istruzioni per l'uso
1. Progettare l'etichetta
The "MakeID-Life" app offers extensive customization options:
- L'immissione di testo: Digita il testo desiderato.
- Caratteri: Choose from 88 different font styles.
- Icone e simboli: Access over 600 icons and various symbols.
- Modelli: Utilize over 400 pre-designed templates for various purposes (e.g., kitchen, office, school).
- Bordi e cornici: Add decorative borders.
- Altre funzioni: Create barcodes, QR codes, tables, dates, and patterns.
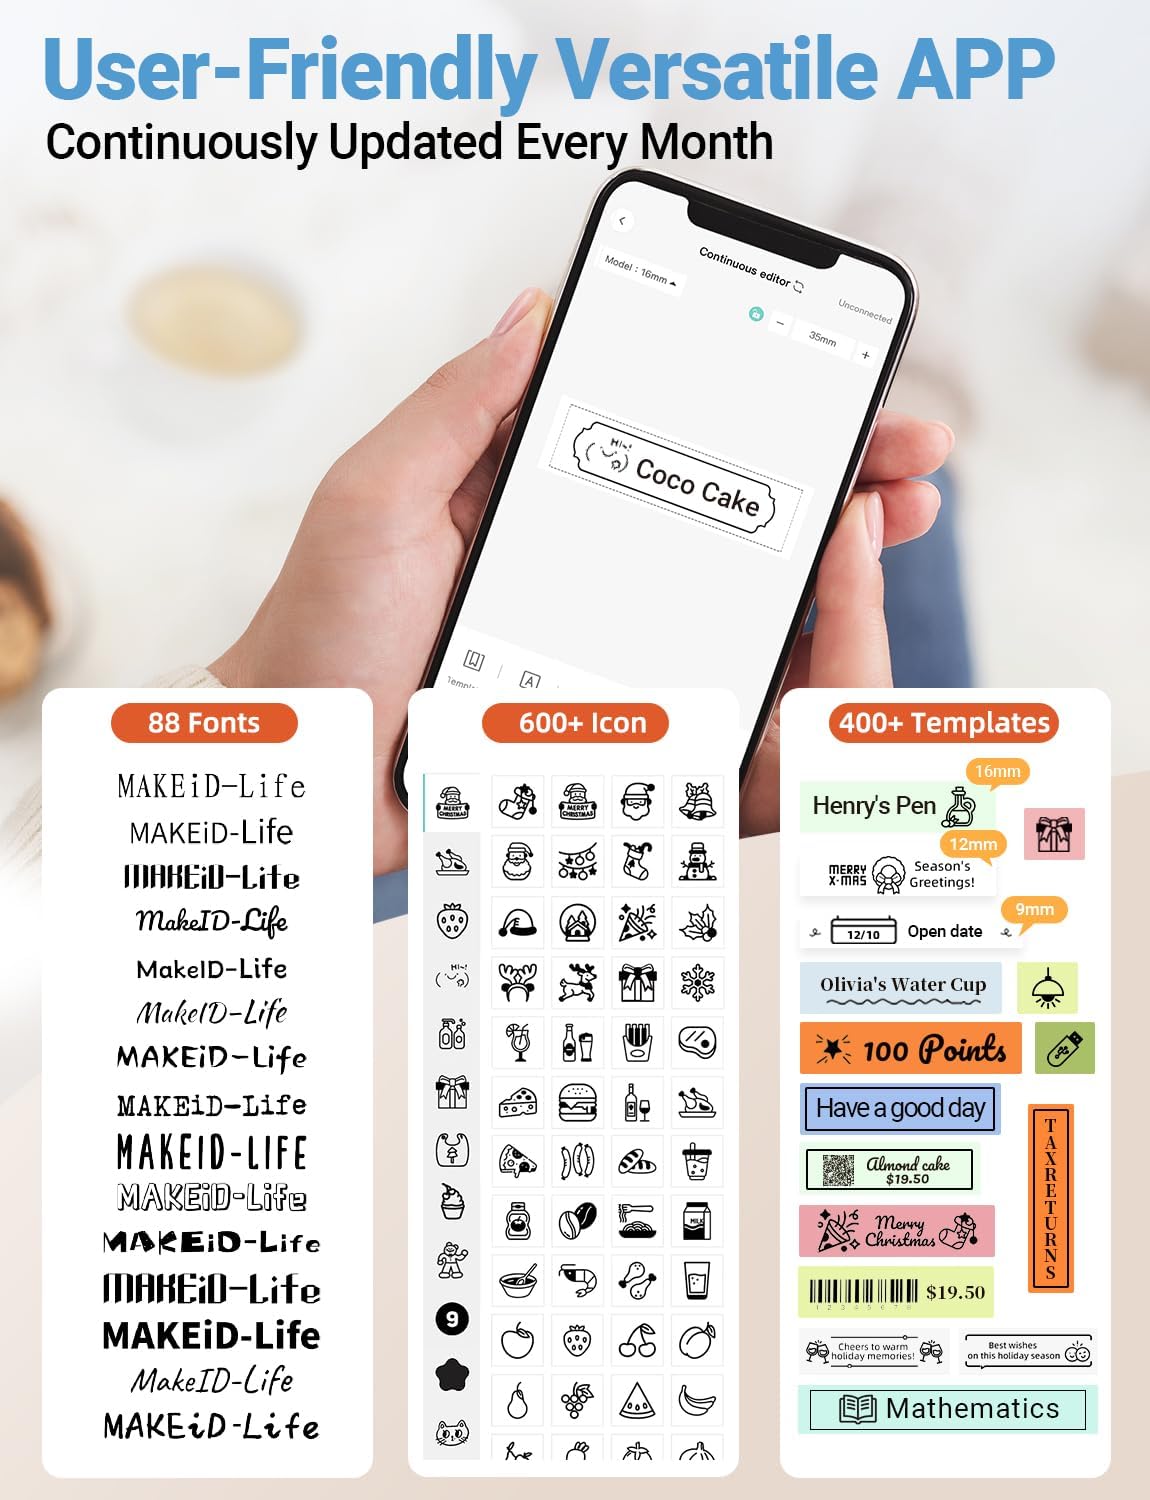
Immagine: Un dettagliato view of the MakeID-Life app interface, showcasing the wide selection of 88 fonts, over 600 icons, and more than 400 templates available for label customization.
2. Stampa di etichette
Once your design is complete in the app:
- Review your label design on the app screen.
- Tap the "Print" button within the app.
- The label will be thermally printed and emerge from the output slot.
3. Taglio delle etichette
The Makeid L1 features a built-in cutter for clean edges.
- After printing, gently pull the label forward slightly.
- Press the cutting button (refer to the Product Overview image for location) to cleanly cut the label.

Immagine: Illustration of the Makeid L1's built-in cutter, demonstrating how it provides professional and safe cutting of labels, eliminating messy torn edges.
4. Types of Label Printing
The L1 supports two primary types of label printing:
- Etichette continue: Ideal for custom lengths, allowing you to print text of any length and cut it precisely.
- Etichette fustellate: Pre-sized labels with specific shapes, perfect for consistent labeling of items like jars or files.

Immagine: Visual representation of continuous labels, which can be cut to any length, and die-cut labels, which are pre-shaped for specific applications.
Manutenzione
Pulizia della testina di stampa
To ensure optimal print quality, periodically clean the thermal print head.
- Spegnere l'etichettatrice e scollegarla dalla fonte di alimentazione.
- Open the lid and remove the label tape.
- Pulire delicatamente la testina di stampa con un panno morbido e privo di lanugine.ampcon alcol isopropilico. Non utilizzare acqua o detergenti abrasivi.
- Allow the print head to dry completely before reinserting the tape and closing the lid.
Magazzinaggio
Store the label maker in a cool, dry place away from direct sunlight and extreme temperatures. Remove the label tape if storing for extended periods.
Risoluzione dei problemi
Per i problemi più comuni e le relative soluzioni, fare riferimento alla tabella sottostante.
| Problema | Possibile causa | Soluzione |
|---|---|---|
| Il dispositivo non si accende. | Batteria scarica. | Carica il dispositivo utilizzando il cavo USB in dotazione. |
| Impossibile connettersi tramite Bluetooth. | Bluetooth is off on phone; device not in pairing mode; app issue. | Ensure Bluetooth is enabled on your phone. Turn the label maker off and on again to re-enter pairing mode. Restart the "MakeID-Life" app. |
| Poor print quality / Faded prints. | Print head dirty; incorrect label tape; low battery. | Clean the print head. Ensure you are using Makeid compatible thermal label tape. Charge the device. |
| Label tape not feeding. | Tape incorrectly loaded; tape jammed. | Open the lid and re-insert the label tape correctly, ensuring it's not jammed. |
| Labels are not cutting cleanly. | Cutter blade dull or obstructed. | Ensure no debris is obstructing the cutter. If issues persist, contact customer support. |
Specifiche
Detailed technical specifications for the Makeid L1 Label Maker Machine:
| Caratteristica | Dettaglio |
|---|---|
| Marca | Makeid |
| Nome del modello | L1 |
| Tecnologia di connettività | Bluetooth |
| Tecnologia di stampa | Termico |
| Uscita della stampante | Monocromo |
| Risoluzione | 203 x 203 DPI (also 300 x 300 DPI for other variants) |
| Dimensione massima del supporto | 0.63 pollici (16 mm) |
| Dispositivi compatibili | Smartphone (Android e iOS) |
| Metodo di controllo | Applicazione |
| Interfaccia Hardware | USB |
| Fonte di alimentazione | 1 batteria agli ioni di litio (inclusa) |
| Dimensioni del prodotto | 10 x 4.06 x 4.98 cm (3.93"P x 1.6"L x 1.96"A) |
| Peso dell'articolo | 4.4 once (126 grammi) |
| Caratteristiche speciali | Continuous & Pre-cut Label Tapes, Waterproof, Oil-proof, Friction Resistant, Light Resistant, No Fading, Rich Font Icon Pattern, Portable, Inkless, Wireless, Rechargeable, Creative Print Functions (Barcode, Text, Picture, QR 2D Code, Table, Date, Border, Icon, Shape, Pattern, Template) |
Garanzia e supporto
L'etichettatrice Makeid L1 è dotata di un Garanzia a vita. For technical support, warranty claims, or further assistance, please contact Makeid customer service through the official Makeid websito o le informazioni di contatto fornite nella confezione del prodotto.
Per ulteriori risorse e FAQ, visitare il Negozio Makeid su Amazon.
Informazioni sulla sicurezza
- Non smontare né tentare di riparare da soli il dispositivo.
- Tenere il dispositivo lontano dall'acqua e dall'umidità elevata.
- Use only original or certified compatible label tapes and charging cables.
- Tenere fuori dalla portata dei bambini.
- Evitare di esporre il dispositivo a temperature estreme o alla luce solare diretta.


