1. Introduzione
Thank you for choosing the Nipify YHM01C Outdoor Solar Lights. This manual provides essential information for the safe and efficient installation, operation, and maintenance of your new solar lighting system. Please read these instructions carefully before use and retain them for future reference.

This image displays the complete package, including two Nipify solar light units, two separate solar panels, and two remote controls, ready for installation.
2. Prodotto finitoview
2.1 Componenti
The Nipify YHM01C solar light system includes the following main components:
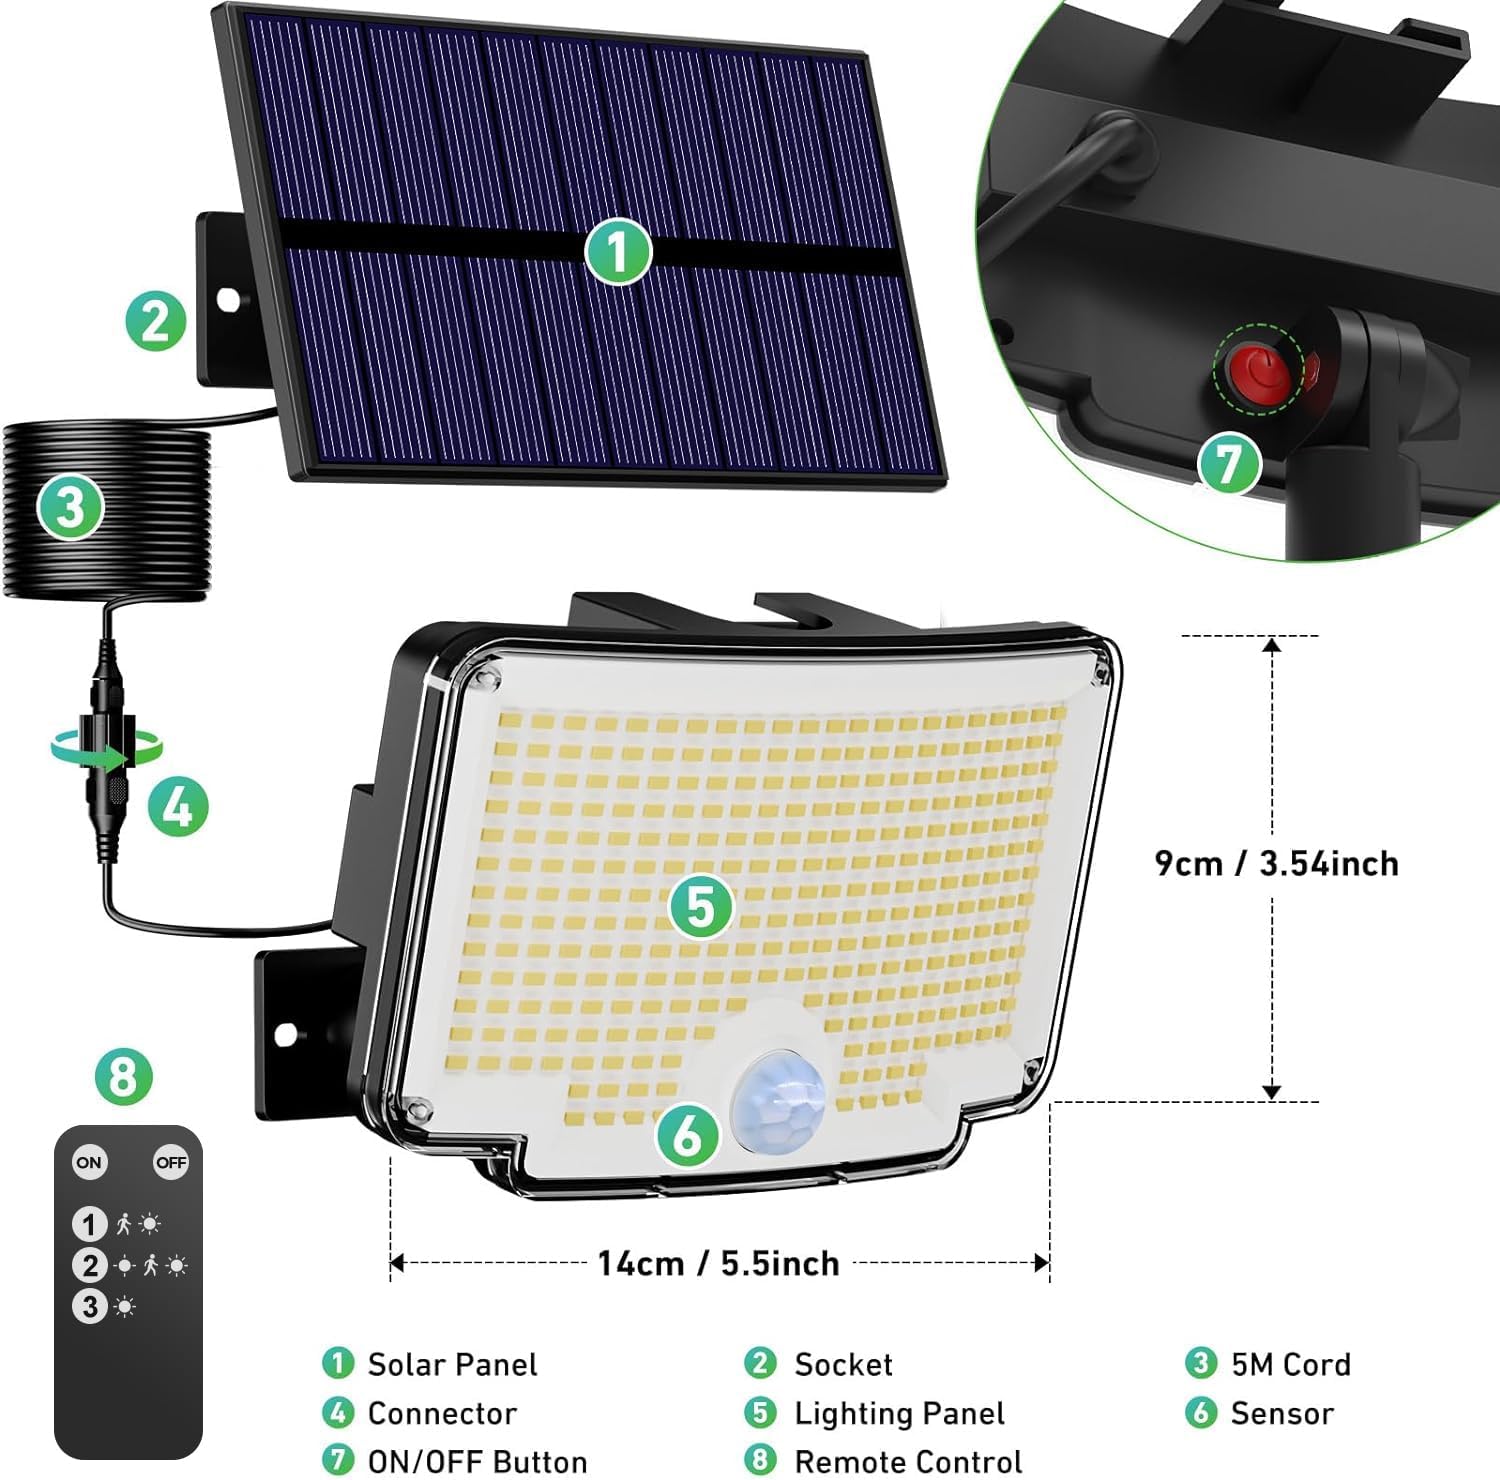
Un esploso view diagram identifying the main components of the solar light system: (1) Solar Panel, (2) Socket, (3) 5M Cord, (4) Connector, (5) Lighting Panel, (6) Sensor, (7) ON/OFF Button, and (8) Remote Control.
- Pannello solare: Converte la luce solare in energia elettrica per caricare la batteria interna.
- PRESA: Connection point for the solar panel cable.
- 5M Cord: Provides flexibility for separating the solar panel from the light unit.
- Connettore: Secures the 5M cord to the light unit.
- Lighting Panel: Houses the 310 LED chips for illumination.
- Sensore: Detects motion to activate specific lighting modes.
- Pulsante ON/OFF: Manual power control for the light unit.
- Telecomando: Allows convenient selection of lighting modes and power control.
2.2 Caratteristiche principali
- Super Bright Wide-Angle Lighting: Equipped with 310 high-quality LEDs, these lights offer super bright illumination. The arched design provides a 270° wide-angle light distribution, effectively covering a broad area.
- Pannello solare separato: The solar panel is separate from the light unit, connected by a 5-meter cable. This allows flexible placement of the solar panel in optimal sunlight, even if the light unit needs to be installed in a shaded area for effective illumination.
- Three Lighting Modes with Remote Control: The lights feature three distinct operating modes, easily selectable via the included remote control. These modes are designed to optimize energy usage and lighting performance based on your needs.
- Resistenza a tutte le condizioni atmosferiche (IP65): Constructed from high-quality ABS material, these lights are designed for durability and resistance to various weather conditions, including cold, heat, rain, and snow (IP65 rated). They are suitable for year-round outdoor use.
- Installazione flessibile: Two installation methods are supported: integrated or separated. The separated option allows the solar panel to be mounted up to 5 meters away from the light unit. All necessary screws and mounting hardware are included for straightforward installation.
3. Configurazione e installazione
Proper installation ensures optimal performance of your solar lights. Consider the following steps:
3.1 Scelta del luogo di installazione
- Posizionamento del pannello solare: The solar panel must be installed in a location that receives direct sunlight for at least 6-8 hours daily to ensure full battery charge. Avoid areas shaded by trees, buildings, or other obstructions.
- Light Unit Placement: Position the light unit where illumination is desired. The motion sensor has a 270° detection angle and a range of 78-118 inches (2-3 meters). An ideal installation height for the light unit is 2-3 meters (approximately 6.5-10 feet) from the ground to maximize detection range and light coverage.

This image highlights the motion detection capabilities, showing a 270° detection angle and a detection range of 78-118 inches. It also indicates an ideal installation height of 2-3 meters and a remote control range of 10-16.4 feet.
3.2 Metodi di installazione
Your Nipify solar lights offer two installation options:

This image demonstrates the two flexible installation options: mounting the solar panel directly with the light unit (without extension cord) or separately with the 5-meter extension cord.
- Integrated Installation (Without Extension Cord):
- Mount the solar panel directly onto the light unit.
- Secure the combined unit to a wall or desired surface using the provided screws and anchors. Ensure the solar panel faces direct sunlight.
- Separated Installation (With Extension Cord):
- Mount the solar panel in a location with optimal sunlight exposure.
- Mount the light unit in the desired illumination area, which can be shaded.
- Connect the solar panel to the light unit using the 5-meter extension cable. Ensure the connection is secure.
Passaggi generali di installazione:
- Segnare sulla parete i punti di foratura desiderati.
- Praticare i fori e inserire i tasselli nel muro.
- Secure the mounting bracket (for the light unit and/or solar panel) with screws.
- Attach the light unit and/or solar panel to the bracket.
- If using separated installation, connect the solar panel to the light unit via the 5-meter cable.

An aesthetic image depicting two Nipify solar lights mounted on a modern house, providing bright illumination to a patio and swimming pool area during nighttime.
4. Istruzioni per l'uso
Your Nipify solar lights are designed for automatic operation, but you can select different lighting modes using the included remote control.
4.1 Attivazione iniziale
Before first use, ensure the solar panel has charged the light for at least 6-8 hours in direct sunlight. Press the ON/OFF button on the light unit or the remote control to activate the light.
4.2 modalità di illuminazione
The lights feature three distinct modes, selectable via the remote control:
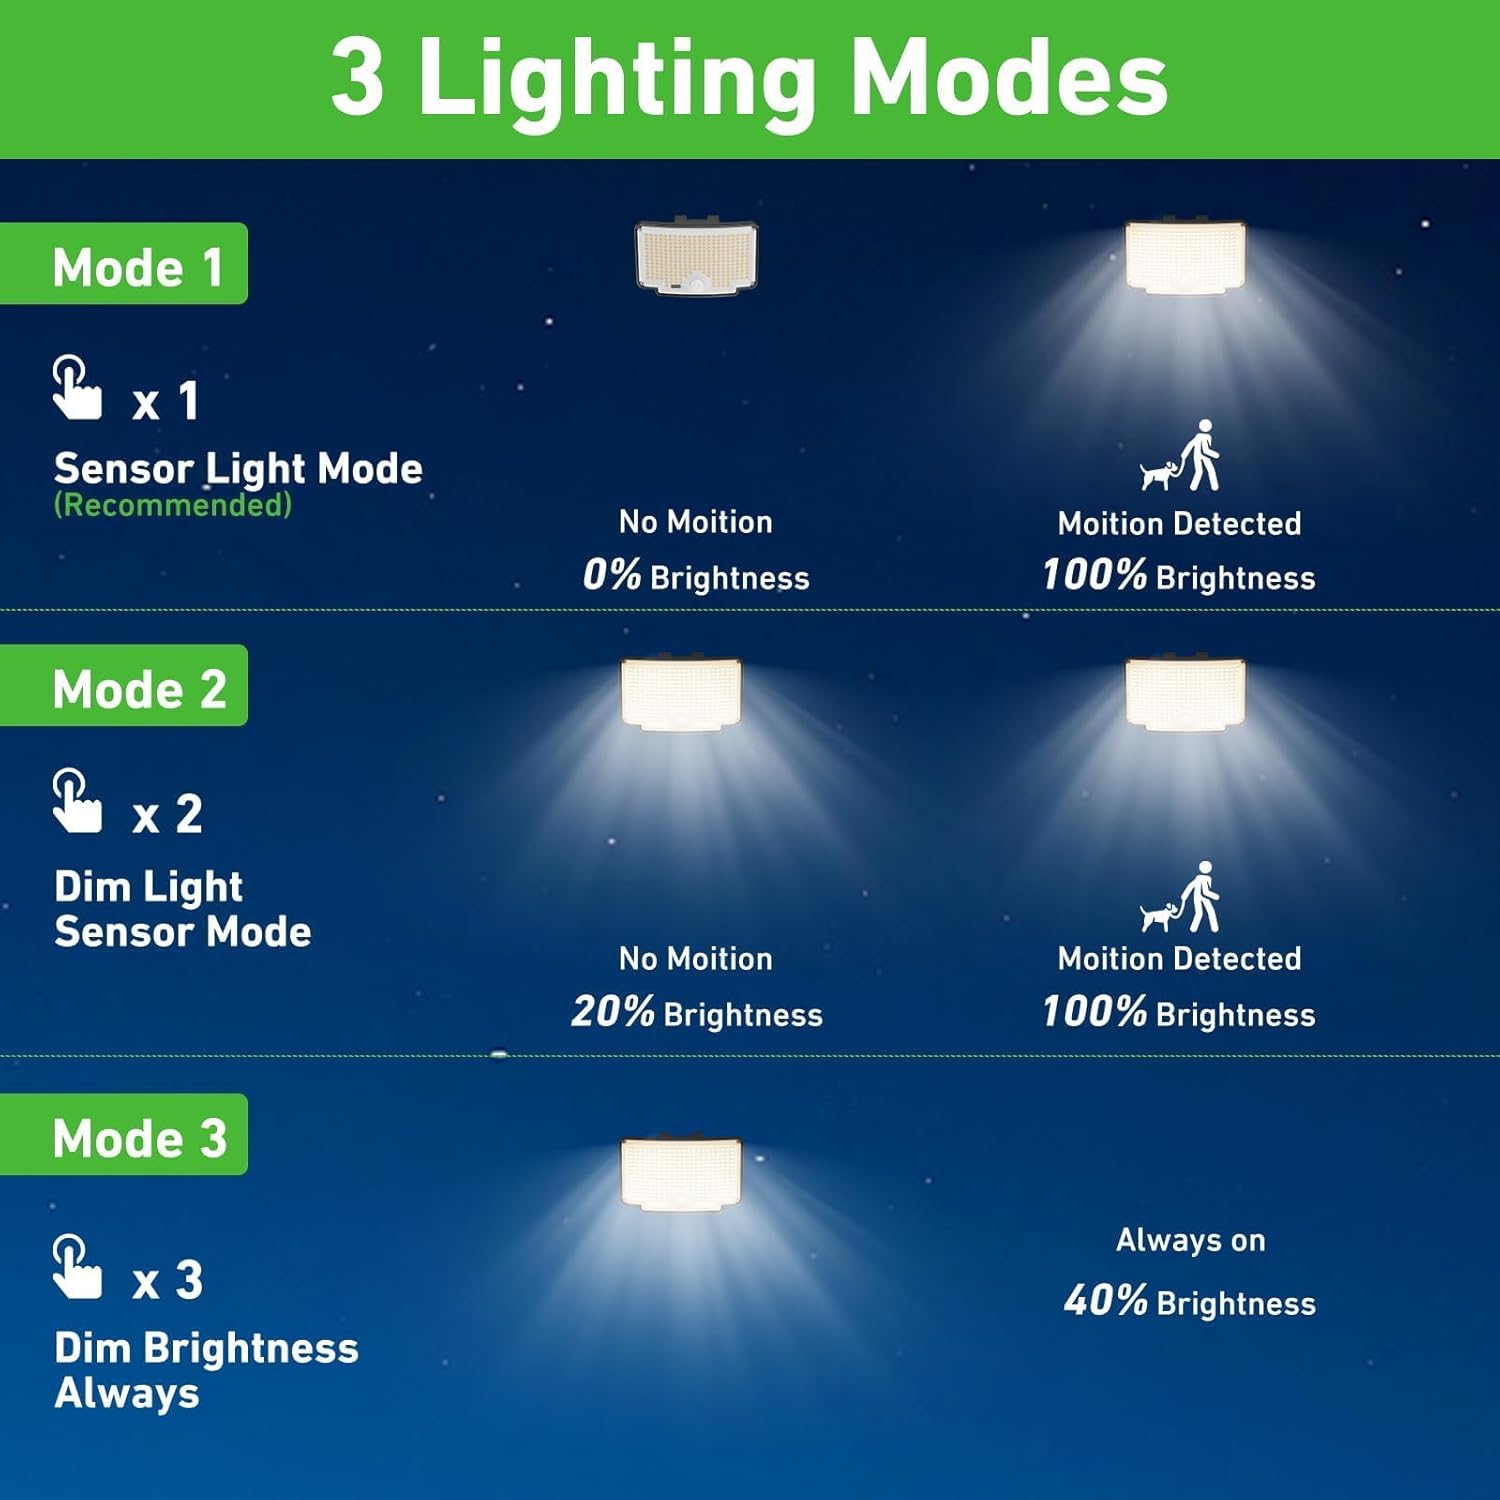
A visual guide detailing the three operational modes: Mode 1 (Sensor Light Mode), Mode 2 (Dim Light Sensor Mode), and Mode 3 (Constant Dim Brightness).
- Mode 1 (Sensor Light Mode - Recommended): The light remains off in the absence of motion. When motion is detected, the light illuminates at 100% brightness. After approximately 15-30 seconds of no motion, it turns off. This mode is energy-efficient and ideal for security lighting.
- Mode 2 (Dim Light Sensor Mode): The light stays on at a dim brightness (e.g., 20%) continuously. When motion is detected, it brightens to 100%. After approximately 15-30 seconds of no motion, it returns to dim brightness. This mode provides ambient lighting with a boost for activity.
- Mode 3 (Constant Dim Brightness): The light remains on at a constant dim brightness (e.g., 40%) throughout the night, regardless of motion. This mode is suitable for continuous ambient lighting.
4.3 Utilizzo del telecomando
Il telecomando consente di:
- Turn the light ON/OFF.
- Select Mode 1, Mode 2, or Mode 3.
Ensure the remote control is pointed towards the light unit for effective communication. The remote range is approximately 10-16.4 feet (3-5 meters).
5. Manutenzione
Regular maintenance helps ensure the longevity and optimal performance of your solar lights.
- Pannello solare pulito: Pulire periodicamente il pannello solare con un panno morbido e asciutto.amp panno per rimuovere polvere, sporco, foglie o neve. Un pannello pulito garantisce il massimo assorbimento della luce solare e l'efficienza di ricarica.
- Unità di luce pulita: Clean the light's surface and motion sensor regularly to ensure proper operation and light output.
- Controllare le connessioni: Ensure all cable connections, especially the 5-meter cord if used, remain secure and free from damage.
- Batteria: The internal battery is designed for long-term use. If the light's performance significantly degrades over time, it may indicate the battery is reaching the end of its lifespan. Battery replacement should be performed by qualified personnel if possible, or consider replacing the unit.
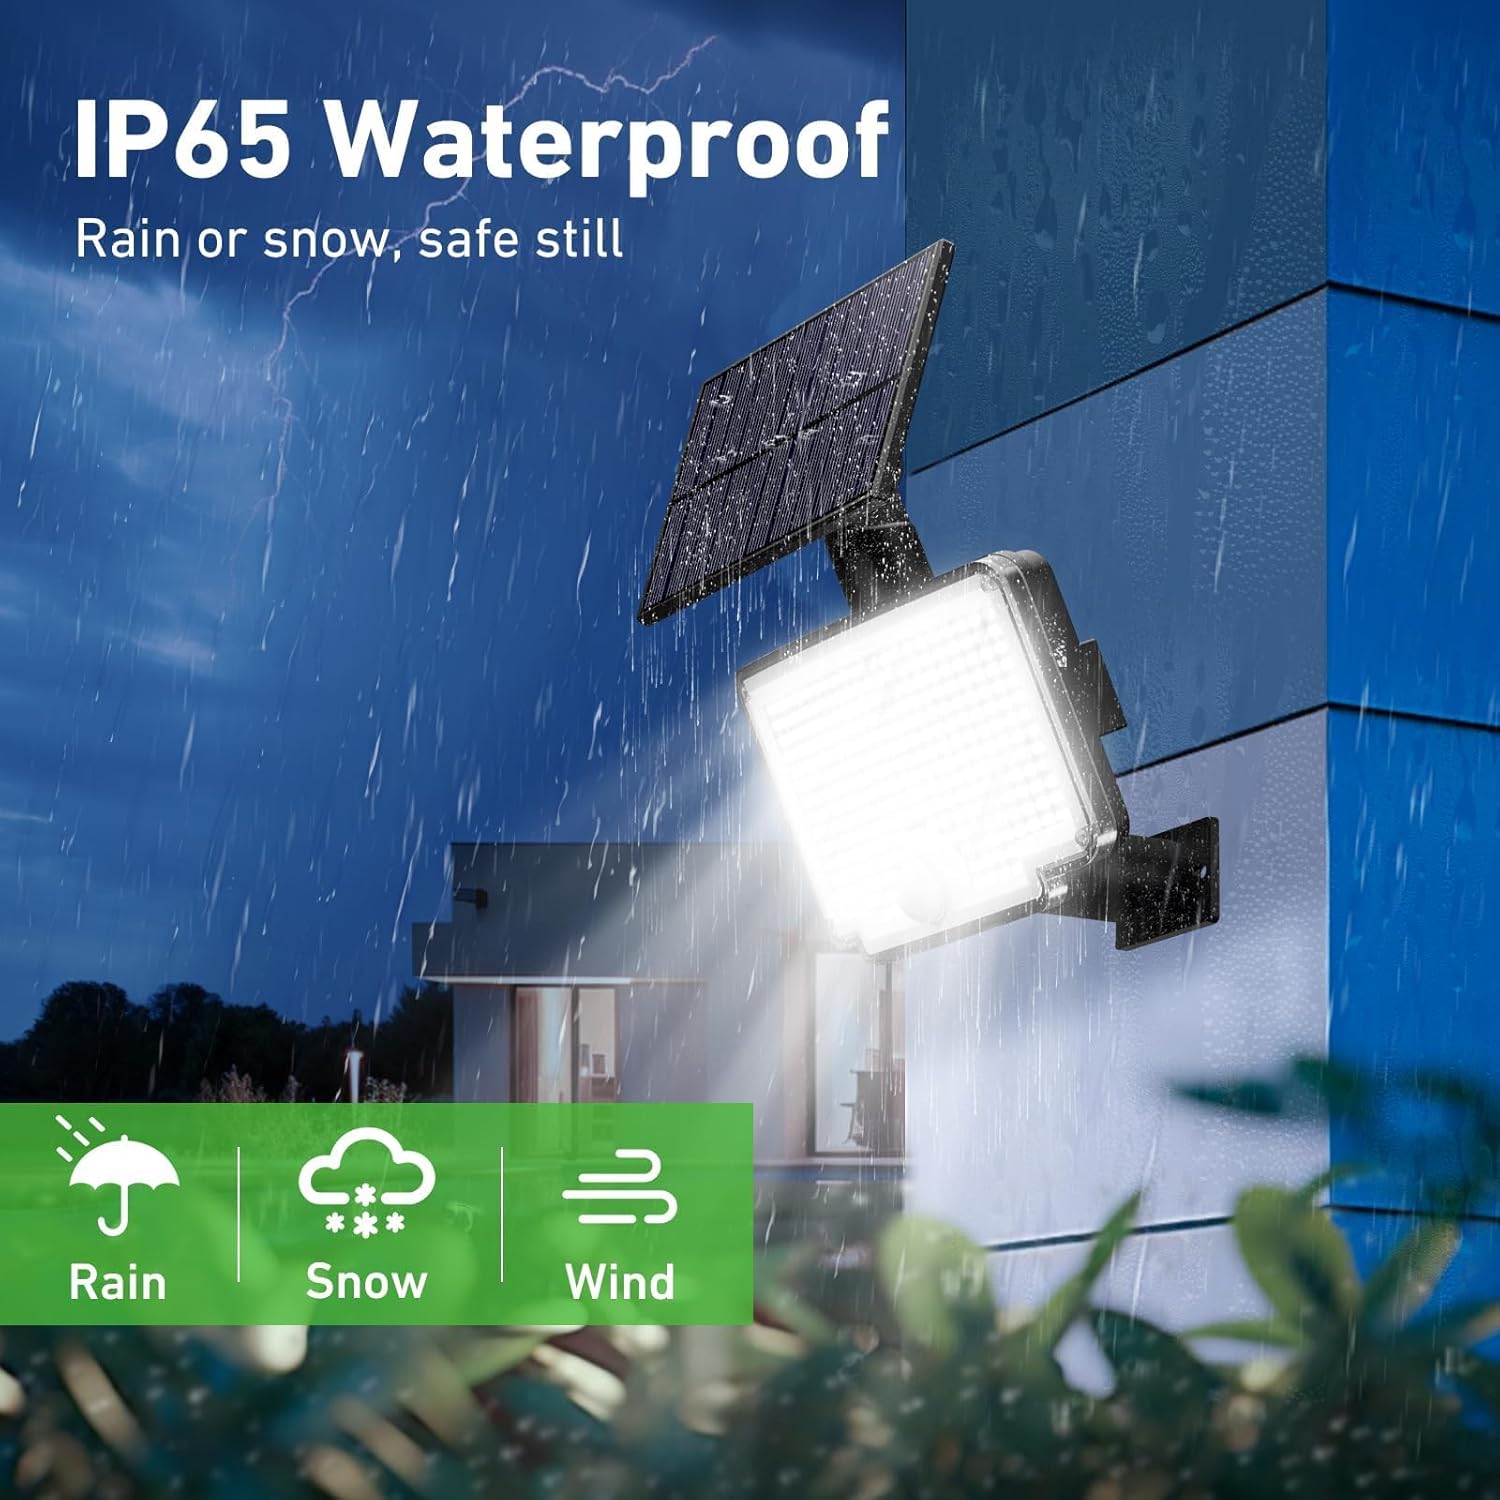
Un'illustrazione mostraasing the light's IP65 waterproof rating, indicating its resilience against rain, snow, and wind, ensuring safe operation in various weather conditions.
6. Risoluzione Dei Problemi
If your solar light is not functioning as expected, try the following troubleshooting steps:
| Problema | Possibile causa | Soluzione |
|---|---|---|
| La luce non si accende di notte. | Carica solare insufficiente. | Assicurarsi che il pannello solare sia esposto alla luce solare diretta per 6-8 ore al giorno. Pulire il pannello solare. |
| La luce è fioca o rimane accesa solo per poco tempo. | Batteria non completamente carica o vecchia. | Relocate the solar panel for better sun exposure. Ensure no obstructions. If the battery is old, its capacity may have decreased. |
| Il sensore di movimento non funziona o è troppo sensibile. | Sensore ostruito o modalità errata. | Ensure the sensor lens is clean and unobstructed. Verify the light is in Mode 1 or Mode 2 using the remote control. |
| Telecomando non funzionante. | Batteria scarica o ostruita. | Replace the remote control battery. Ensure no objects are blocking the signal path between the remote and the light. |
| Acqua all'interno dell'unità luminosa. | Compromissione della tenuta o condizioni meteorologiche estreme. | While rated IP65, extreme conditions can sometimes affect seals. If water ingress occurs, discontinue use and contact customer support. |
7. Specifiche
Below are the technical specifications for the Nipify YHM01C Outdoor Solar Lights:
| Caratteristica | Specificazione |
|---|---|
| Marca | Nipify |
| Numero di modello | YHM01C |
| Dimensioni del prodotto (L x P x A) | Dimensioni: 20 x 15 x 5 cm |
| Peso | 900 grammi |
| Grado di protezione IP | Grado di protezione IP65 |
| Numero di LED | 310 |
| Stile | Moderno |
| Temperatura del colore | 6500 Kelvin (bianco freddo) |
| Materiale | Acrilonitrile Butadiene Stirene (ABS) |
| Componenti inclusi | Solar Panel, Remote Control, 5m Cable |
| Watt massimi | 1800 milioneampere-hour (mAh) (Battery Capacity) |
| Voltage | 12 Volt (CC) |
| Caratteristiche speciali | Motion Detector, Separate Solar Panel, 210° Wide Angle Lighting |
| Fonte di alimentazione | Alimentato ad energia solare |
| Flusso luminoso | 1000 lumen |
8. Garanzia e supporto
Specific warranty information for the Nipify YHM01C Outdoor Solar Lights is not provided in the product data. For any support inquiries, warranty claims, or technical assistance, please contact the seller or manufacturer directly through your purchase platform.