1. Introduzione
This manual provides essential information for the safe and effective operation of the KAIWEETS HT206D Smart Digital Clamp Misuratore. Leggere attentamente il presente manuale prima dell'uso e conservarlo per riferimento futuro.
2. Informazioni sulla sicurezza
Always adhere to local and national safety codes. Use appropriate personal protective equipment (PPE) when working with electrical circuits. This device is designed for professional use and requires a basic understanding of electrical principles.
- Non superare i valori massimi di input specificati per ciascun intervallo di misurazione.
- Prestare la massima attenzione quando si lavora su circuiti sotto tensione.
- Controllare i puntali per verificare la presenza di eventuali danni prima di ogni utilizzo. Sostituire immediatamente i puntali danneggiati.
- Non utilizzare il misuratore se appare danneggiato o non funziona correttamente.
- Prima dell'uso, assicurarsi che il coperchio della batteria sia ben chiuso.
- Evitare di utilizzare il misuratore in ambienti con elevata umidità, temperature estreme o gas esplosivi.
3. Prodotto finitoview
The KAIWEETS HT206D is a smart digital clamp meter designed for accurate electrical measurements. It features a D-shaped jaw for easy clamping and a clear display for readings.

Image 3.1: KAIWEETS HT206D Smart Digital Clamp Meter highlighting key features like 6000 Counts T-RMS, Auto Shutdown, CAT.IV 600V safety rating, and Auto-ranging capability.
Le caratteristiche principali includono:
- Modalità Smart: Identifica automaticamente la tensione AC/DCtage/corrente, resistenza e continuità.
- Vero valore efficace: Provides accurate measurements for non-linear loads.
- Visualizzazione di 6000 conteggi: Display digitale ad alta risoluzione.
- D-Shaped Jaws: Designed for secure clamping and holding test leads.
- Volume senza contattotage (NCV) Rilevamento: Detects electrical status without direct contact.
- Filtro passa basso (LPF): For accurate measurements on variable frequency drives.
- Funzioni aggiuntive: MAX/MIN, Data Hold, Flashlight, Auto-Off.

Immagine 3.2: Passoview of the KAIWEETS HT206D's multi-functional capabilities, showing icons for AC/DC voltage, resistance, continuity, frequency, temperature, NCV, and inrush current measurements.
4. Impostazione
4.1. Installazione della batteria
The meter requires batteries for operation. To install or replace batteries:
- Assicurarsi che il misuratore sia spento.
- Individuare il vano batterie sul retro del misuratore.
- Utilizzare un cacciavite per aprire il coperchio del vano batteria.
- Inserire le batterie nuove, rispettando la polarità corretta.
- Chiudere saldamente il coperchio del vano batterie.
4.2. Accensione iniziale
Press the power button to turn on the meter. The default intelligent mode will activate, automatically identifying common measurement signals.
5. Istruzioni per l'uso
5.1. Modalità intelligente
When the meter is powered on, it defaults to Smart Mode. In this mode, the meter automatically detects and measures AC/DC voltage, AC/DC current, resistance, and continuity, simplifying operation.
5.2. Selezione della funzione
Rotate the rotary dial to select specific measurement functions as needed. Press the SEL/FUNC button to cycle through sub-functions within a selected range (e.g., AC/DC voltagE).
5.3. Vol. AC/DCtage Misurazione
Per misurare il volumetage:
- Insert the red test lead into the "VΩHz" input jack and the black test lead into the "COM" input jack.
- Seleziona il volumetage measurement function using the rotary dial.
- Collegare i puntali di prova in parallelo al circuito o al componente in prova.
- Leggi il vol.tage valore sul display.

Image 5.1: Demonstrations of AC/DC Voltage Test (top) and AC/DC Current Test (bottom) using the KAIWEETS HT206D clamp metro.
5.4. Misurazione della corrente AC/DC
Per misurare la corrente:
- Select the current measurement function (A~) or (A=) using the rotary dial.
- Aprire il clamp ganasce e racchiudere solo un conduttore del circuito. Assicurarsi che le ganasce siano completamente chiuse.
- Leggere il valore corrente sul display.
5.5. Resistance and Continuity Measurement
To measure resistance or check continuity:
- Insert the red test lead into the "VΩHz" input jack and the black test lead into the "COM" input jack.
- Select the resistance/continuity function using the rotary dial.
- Connect the test leads across the component. For continuity, a beep indicates a continuous circuit.
5.6. Vol. senza contattotage (NCV) Rilevamento
The NCV function allows detection of AC voltage senza contatto diretto.
- Premere il tasto VNC button on the right side of the meter.
- Move the meter's NCV sensor close to the conductor.
- Il misuratore indicherà la presenza di tensione alternatatage through audible beeps and visual indicators (Low Voltage 'L' or High Voltage 'H').

Image 5.2: Non-contact Voltage Test demonstrating the meter's ability to detect both low and high voltage senza contatto fisico.
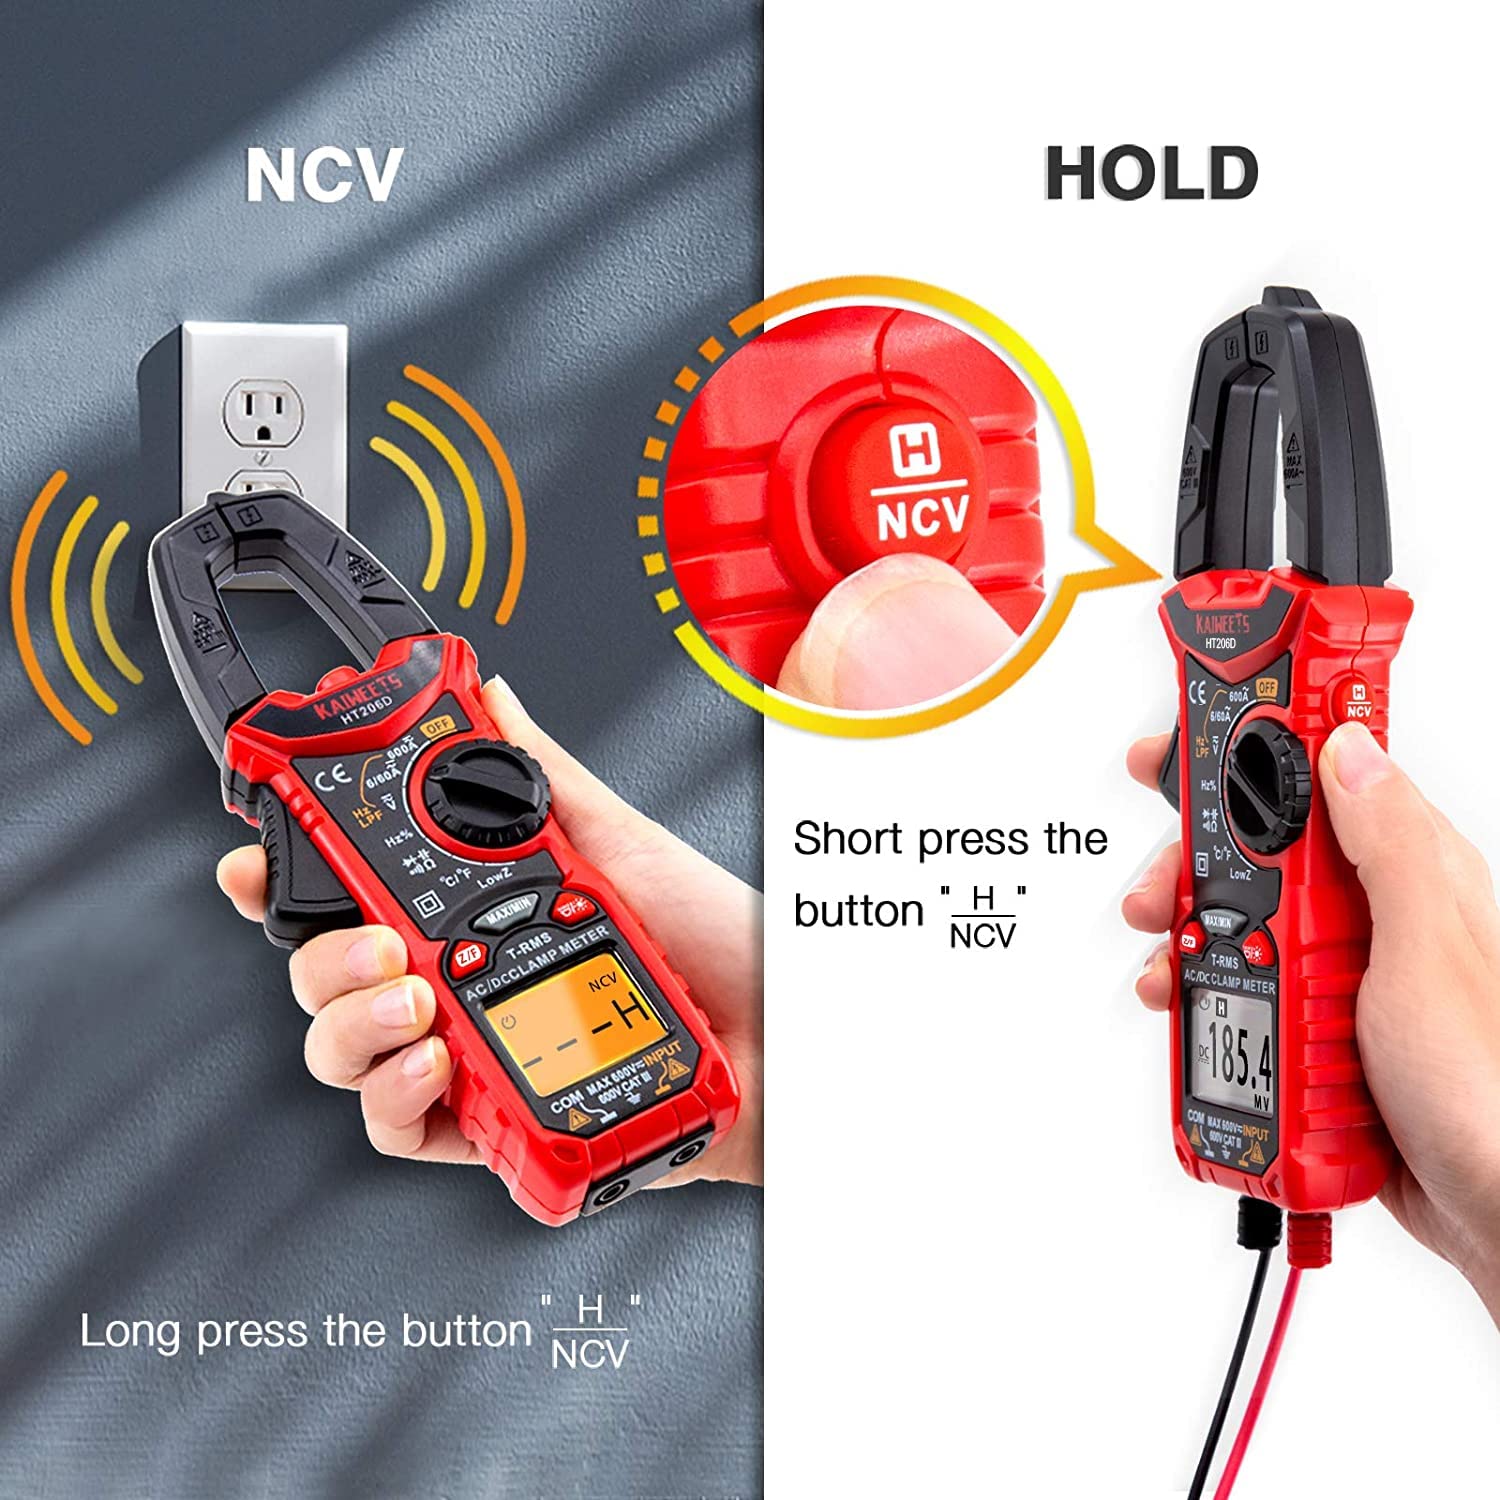
Image 5.3: Illustration of activating the NCV function with a long press and the Data Hold function with a short press of the NCV/HOLD button.
5.7. Filtro passa-basso (LPF)
The LPF function is used for accurate voltage measurements on variable frequency drives (VFDs) or other noisy circuits. It filters out high-frequency interference.
- Seleziona il volume CAtage funzione.
- Premere il tasto LPF button to activate the Low Pass Filter.
- Procedere con AC voltage misurazione come al solito.

Image 5.4: Explanation of the Low Pass Filter (LPF) function, illustrating its effect on measurement accuracy for motor drive outputs.
5.8. Misurazione della corrente di spunto
The Inrush function measures the initial surge current when a device is powered on.
- Select the Inrush current function using the rotary dial.
- Aprire il clamp jaws and enclose one conductor of the device to be tested.
- Power on the device. The meter will capture and display the peak inrush current.

Image 5.5: Inrush Current Test in progress, demonstrating the meter's capability to measure the initial current surge with a range of 5-600A.
5.9. Conservazione dei dati (HOLD)
Premere il tasto PRESA button (short press the NCV button) to freeze the current reading on the display. Press it again to release the hold function.
5.10. Misurazione MAX/MIN
Premere il tasto Massimo/minimo button to record the maximum and minimum values during a measurement session. Press again to cycle between MAX, MIN, and current readings.
5.11. Torcia elettrica
Press the flashlight button to illuminate the measurement area. Press again to turn it off.
5.12. Funzione di spegnimento automatico
The meter will automatically power off after approximately 15 minutes of inactivity to conserve battery life. Press any button or rotate the dial to reactivate it.
6. Manutenzione
6.1. Pulizia
Pulisci il contatore casing con annuncioamp panno e detergente delicato. Non utilizzare abrasivi o solventi. Assicurarsi che il misuratore sia asciutto prima di riporlo o utilizzarlo.
6.2. Sostituzione della batteria
Sostituire le batterie quando sul display compare l'indicatore di batteria scarica. Per le istruzioni sull'installazione delle batterie, fare riferimento alla Sezione 4.1.
6.3. Conservazione
Se il misuratore non viene utilizzato per un periodo prolungato, rimuovere le batterie per evitare perdite. Conservare il misuratore in un luogo fresco e asciutto, lontano dalla luce solare diretta e da temperature estreme.
7. Risoluzione Dei Problemi
| Problema | Possibile causa | Soluzione |
|---|---|---|
| Il misuratore non si accende. | Batterie scariche o installate in modo errato. | Sostituire le batterie assicurandosi che la polarità sia corretta. |
| Letture imprecise. | Incorrect function selected, damaged test leads, or external interference. | Verify function selection, inspect/replace test leads, move away from strong electromagnetic fields. |
| Nessun segnale acustico di continuità. | Circuito aperto o alta resistenza. | Check the circuit for breaks or high resistance points. |
| NCV non rileva il volumetage. | Nessun volume CAtage present, or sensor not close enough to the conductor. | Assicurare il volume CAtage is present. Move the NCV sensor closer to the live conductor. |
8. Specifiche
The KAIWEETS HT206D Smart Digital Clamp Meter offers the following general specifications:

Image 8.1: Key specifications of the KAIWEETS HT206D, including measurement ranges for current, voltage, capacitance, and display count, along with special features.
- Display: 6000 Conteggi
- Corrente CA/CC: Fino a 600A
- Volume AC/DCtage: Fino a 600V
- Capacità: Fino a 100 mF
- Temperatura: Celsius/Fahrenheit
- Tipo di misurazione: Vero RMS
- Valutazione di sicurezza: CAT.IV 600V
- Fonte di energia: Alimentato a batteria
- Caratteristiche speciali: Smart Mode, NCV, LPF, LowZ, Inrush Current, Data Hold, MAX/MIN, Flashlight, Auto-Off
9. Garanzia e supporto
KAIWEETS offers a 3-year after-sales service for the HT206D Smart Digital Clamp Meter, along with lifetime technical assistance.
For any questions, technical support, or warranty claims, please contact KAIWEETS customer service through their official channels or the retailer where the product was purchased.


