Introduzione
Questo manuale fornisce istruzioni dettagliate per l'installazione, il funzionamento e la manutenzione del termostato wireless Sygonix SY-5470190. Questo dispositivo è progettato per controllare in modo efficiente il sistema di riscaldamento, offrendo funzionalità come la programmazione settimanale e la funzione vacanze. Si prega di leggere attentamente questo manuale prima di utilizzare il prodotto per garantirne il corretto funzionamento ed evitare danni.
Informazioni sulla sicurezza
- In caso di dubbi, assicurarsi che tutti i collegamenti elettrici siano effettuati da un elettricista qualificato.
- Scollegare l'alimentazione dell'impianto di riscaldamento prima dell'installazione o della manutenzione.
- Non esporre il termostato o il ricevitore a umidità, temperature estreme o luce solare diretta.
- Utilizzare solo il tipo di batteria specificato per l'unità termostato.
- Tenere il dispositivo fuori dalla portata dei bambini.
- Non tentare di riparare il dispositivo da soli. Contattare personale di assistenza qualificato.
Contenuto della confezione
Si prega di verificare che tutti gli articoli siano presenti e integri:
- Unità termostato wireless (con display)
- Unità ricevente (per il collegamento all'impianto di riscaldamento)
- Manuale di istruzioni (questo documento)
- Accessori di montaggio (viti, tasselli, solitamente inclusi)
Prodotto finitoview
Il sistema Sygonix SY-5470190 è costituito da due componenti principali: l'unità termostato wireless e l'unità ricevitore.
Unità termostato
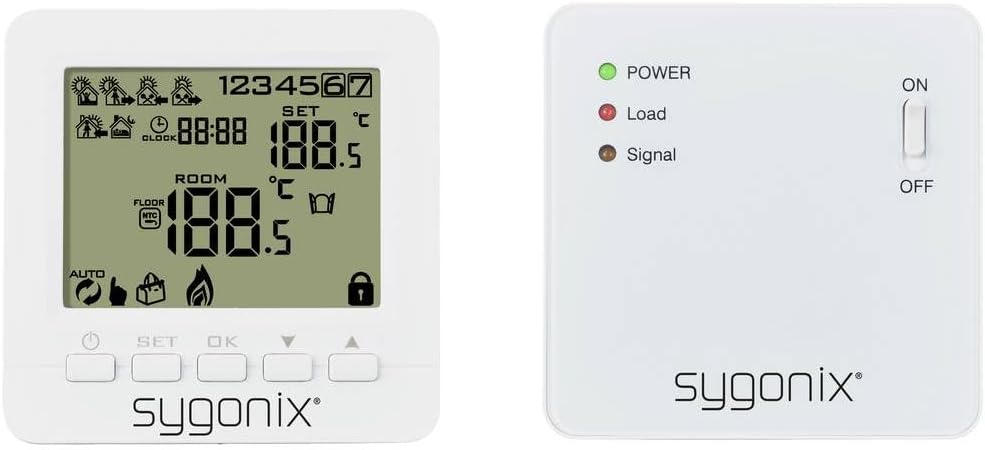
Immagine: Davanti view dell'unità termostato wireless Sygonix SY-5470190, che mostra il suo display LCD con temperatura, ora e varie icone, insieme ai pulsanti di controllo sotto lo schermo.
Il termostato è dotato di un display LCD che mostra la temperatura ambiente attuale, la temperatura impostata, l'ora e varie icone operative (ad esempio, riscaldamento attivo, batteria scarica, modalità di programmazione). Dispone di pulsanti per impostare la temperatura, navigare nei menu e confermare le selezioni. L'unità è alimentata a batteria e comunica in modalità wireless con il ricevitore.
Unità ricevente

Immagine: Davanti view dell'unità ricevente Sygonix SY-5470190, che visualizza tre indicatori LED (alimentazione, carico, segnale) e un interruttore a levetta ON/OFF sul lato destro.
L'unità ricevente si collega direttamente al sistema di riscaldamento. È dotata di indicatori LED per Alimentazione (verde), Carico (rosso, a indicare che il riscaldamento è attivo) e Segnale (ambra, a indicare la comunicazione wireless). Un interruttore ON/OFF controlla l'alimentazione del ricevitore. Questa unità è in genere montata su rack o a parete vicino all'apparecchio di riscaldamento.

Immagine: Sia l'unità termostato wireless Sygonix SY-5470190 (a destra) sia la sua unità ricevente (a sinistra) sono mostrate fianco a fianco, per illustrarne le dimensioni e il design.
Impostare
1. Installazione della batteria (unità termostato)

Immagine: Posteriore view dell'unità termostato Sygonix SY-5470190, che mostra il vano batterie aperto progettato per più batterie AA o AAA e il retro dell'unità ricevente con punti di montaggio.
- Rimuovere delicatamente il coperchio posteriore dell'unità termostato.
- Inserire le batterie necessarie (ad esempio AA o AAA, in genere 2 o 3 a seconda del modello) nel vano batterie, rispettando la polarità corretta (+/-).
- Riposizionare saldamente il coperchio posteriore. Ora il display dovrebbe accendersi.
2. Installazione dell'unità ricevente
- L'unità ricevente è progettata per il montaggio su rack o a parete. Scegliere una posizione vicina all'impianto di riscaldamento (ad esempio, caldaia, termosifone elettrico) che sia libera da ostacoli e nel raggio d'azione wireless dell'unità termostato.
- Importante: Prima di procedere ai collegamenti elettrici, assicurarsi che l'alimentazione principale dell'impianto di riscaldamento sia disattivata.
- Collegare l'unità ricevente all'impianto di riscaldamento secondo lo schema elettrico fornito nel manuale completo del prodotto (non incluso qui). In genere, ciò comporta il collegamento dei cavi di fase, neutro e fase commutata.
- Fissare l'unità ricevente alla parete o al rack utilizzando gli accessori di montaggio forniti.
- Una volta effettuato il cablaggio, accendere l'alimentazione principale dell'impianto di riscaldamento. Il LED verde POWER sul ricevitore dovrebbe accendersi.
3. Abbinamento delle unità
Il termostato e il ricevitore sono solitamente pre-associati. Se non comunicano o se si sta sostituendo un'unità, seguire questi passaggi generali per l'associazione (consultare il manuale completo per le sequenze di pulsanti specifiche):
- Sull'unità ricevente, tenere premuto il pulsante di associazione (la posizione varia a seconda del modello, spesso si tratta di un piccolo pulsante incassato) finché il LED di segnale non inizia a lampeggiare.
- Sull'unità termostato, accedere alla modalità di associazione (solitamente premendo una combinazione di pulsanti come SET e OK, oppure un'opzione di associazione dedicata nel menu).
- Una volta completata l'associazione, il LED di segnale sul ricevitore smetterà di lampeggiare e rimarrà acceso fisso, e il display del termostato potrebbe visualizzare un'icona di conferma.
- Verificare la connessione regolando la temperatura impostata sul termostato e osservando se il LED di carico sul ricevitore risponde (diventa rosso quando è richiesto il riscaldamento).
Istruzioni per l'uso
Impostazione dell'ora e del giorno
Accedere alla modalità di impostazione dell'ora/giorno (solitamente premendo il pulsante 'CLOCK' o 'SET') e utilizzare i pulsanti freccia per regolare l'ora e il giorno della settimana correnti. Confermare ciascuna impostazione con 'OK' o 'SET'.
Regolazione della temperatura
- In modalità di funzionamento normale, utilizzare il Up E Giù pulsanti freccia per aumentare o diminuire la temperatura impostata desiderata.
- Verrà visualizzata la nuova temperatura impostata e il termostato regolerà automaticamente il riscaldamento per raggiungere e mantenere tale temperatura.
Programmazione settimanale
Il termostato supporta la programmazione settimanale, consentendo di impostare temperature diverse per diversi orari della giornata durante la settimana. Questa funzione aiuta a ottimizzare i consumi energetici.
- Entrare in modalità programmazione (fare riferimento al manuale completo per il pulsante specifico, spesso 'PROG' o tenendo premuto 'SET').
- Selezionare il giorno o il gruppo di giorni che si desidera programmare (ad esempio, giorni feriali, fine settimana o singoli giorni).
- Impostare i periodi di tempo desiderati e le temperature corrispondenti per ciascun periodo.
- Salva le impostazioni ed esci dalla modalità di programmazione.
Funzione vacanza
La funzione vacanza consente di impostare una temperatura costante e a risparmio energetico per un periodo prolungato quando si è assenti. In questo modo si evita che il riscaldamento funzioni inutilmente e si protegge la casa dalle temperature gelide.
- Attivare la modalità vacanza (solitamente tramite un pulsante dedicato o un'opzione di menu).
- Impostare la temperatura costante desiderata per il periodo delle vacanze.
- Specificare la durata del periodo di vacanza (ad esempio, numero di giorni).
- Dopo la durata impostata, il termostato tornerà alla sua programmazione normale.
Retroilluminazione
Il display del termostato è retroilluminato per una migliore visibilità in condizioni di scarsa illuminazione. In genere si attiva automaticamente quando si preme un pulsante e si spegne dopo un breve periodo di inattività per preservare la durata della batteria.
Manutenzione
- Pulizia: Pulire il termostato e il ricevitore con un panno morbido e asciutto. Non utilizzare detergenti abrasivi o solventi.
- Sostituzione della batteria: Quando sul display del termostato compare l'indicatore di batteria scarica, sostituire tempestivamente le batterie per garantire un funzionamento continuo. Per le istruzioni, consultare la sezione "Installazione delle batterie".
- Controlli regolari: Controllare periodicamente la connessione wireless e assicurarsi che i LED del ricevitore funzionino come previsto.
Risoluzione dei problemi
| Problema | Possibile causa | Soluzione |
|---|---|---|
| Il display del termostato è vuoto. | Batterie scariche o inserite in modo errato. | Sostituire le batterie assicurandosi che la polarità sia corretta. |
| L'impianto di riscaldamento non risponde al termostato. |
|
|
| Lettura della temperatura errata. | Termostato posizionato vicino a una fonte di calore/corrente d'aria o malfunzionamento del sensore. | Spostare il termostato in una zona centrale, lontano da fonti dirette di calore/freddo. Se il problema persiste, contattare l'assistenza. |
| Impossibile programmare la programmazione settimanale o la funzione festiva. | Modalità errata o errore dell'utente. | Per la procedura di programmazione dettagliata, fare riferimento alla sezione "Istruzioni per l'uso" e al manuale completo del prodotto. Assicurarsi di essere nella modalità di programmazione corretta. |
Specifiche
| Marca | Sygonix |
| Numero di modello | Codice articolo: SY-5470190 |
| Dimensioni del prodotto (L x P x A) | Dimensioni: 3 x 8.6 x 8.6 cm |
| Peso dell'articolo | 290 grammi |
| Voltage | 230 Volt |
| Energia | 280 (Unità non specificata, in genere Watt per carico di riscaldamento) |
| Metodo di controllo | Controllo remoto (termostato wireless) |
| Retroilluminazione | SÌ |
| Livello di rumore | 1 decibel (funzionamento del ricevitore) |
Garanzia e supporto
Le informazioni sulla garanzia sono solitamente fornite con la documentazione di acquisto o sulla confezione del prodotto. Per i termini e le condizioni di garanzia specifici, consultare questi documenti.
Per supporto tecnico, assistenza per la risoluzione di problemi non inclusi nel presente manuale o richieste di pezzi di ricambio, contattare il servizio clienti Sygonix. I recapiti sono solitamente reperibili sul sito web del produttore. websito o la ricevuta di acquisto.


