1. Introduzione
This manual provides essential instructions for the safe and efficient setup, operation, and maintenance of your BONTEC 10x10 Pop-Up Canopy Tent. Please read all instructions carefully before assembly and use. Retain this manual for future reference.

Image 1: The BONTEC 10x10 Pop-Up Canopy Tent in Beige.
2. Informazioni sulla sicurezza
AVVERTIMENTO:
Always ensure the canopy is properly anchored to the ground using the provided sandbags to prevent it from tipping over in windy conditions. Do not use the canopy in high winds or during thunderstorms.
- Tenere tutte le fiamme e le fonti di calore lontano dal tessuto della tettoia.
- Do not leave the canopy unattended in adverse weather conditions.
- Assicurarsi che tutti i meccanismi di bloccaggio siano completamente inseriti durante l'installazione e prima dell'uso.
- Tenere bambini e animali domestici lontani dalla capottina durante il montaggio e lo smontaggio.
3. Contenuto della confezione
Verificare che tutti i componenti siano presenti prima di iniziare il montaggio:
- 1 x Pop-Up Canopy Frame (Pre-assembled)
- 1 x Canopy Top Fabric (Silver-coated 150D)
- 1 x Wheeled Storage Bag
- 4 x Sandbags (empty, for filling with sand/weight)
- 8 x picchetti di terra
- 4 x Corde

Image 2: All components included in the BONTEC 10x10 Pop-Up Canopy Tent package.
4. Istruzioni per l'installazione
The BONTEC 10x10 Pop-Up Canopy Tent features an easy one-person setup with a central locking system. Follow these steps for quick assembly:
- Aprire la cornice: Place the folded frame in the desired location. Gently pull the outer legs apart to partially open the frame.
- Fissare la parte superiore del baldacchino: Drape the canopy top fabric over the partially opened frame. Secure the corners of the fabric to the frame using the attached Velcro fasteners.
- Estendi il frame: From underneath the canopy, push up the central lock hub until it clicks into place. This will fully extend the canopy top.
- Estendi le gambe: Extend each leg downwards until it locks into the desired height setting. Use the height-adjustment button design for easy adjustment.
- Fissare la tettoia: Fill the provided sandbags with sand or other suitable weight and attach them to each leg. Use the ground stakes and ropes to further secure the canopy, especially in breezy conditions.

Image 3: Visual guide for the three main installation steps.
Guida video all'installazione
Video 1: Official BONTEC 10x10ft Pop Up Canopy Tent Setup Guide (Model ZP02, similar to ZP01-FBA).
Video 2: General 10x10 Pop Up Canopy Tent Setup Instructions from a seller.
5. Istruzioni per l'uso
Regolazione dell'altezza
The canopy offers three adjustable height settings. To adjust the height, locate the red height-adjustment button on each leg. Press the button and slide the leg to the desired height, ensuring the button clicks securely into one of the pre-drilled holes.

Image 4: Detail of the height-adjustment button design.
Assicurare la tettoia
For optimal stability, especially in outdoor environments, utilize all provided anchoring accessories:
- Sacchi di sabbia: Fill the four sandbags with sand, small stones, wet soil, or bottled water. Attach one sandbag to each leg of the canopy using the integrated straps.
- Picchetti di terra: Insert the ground stakes through the footplates of each leg and into the ground.
- Corde: Attach the ropes to the canopy's corners and secure them to the ground using additional stakes, pulling taut to provide extra stability against wind.
Video 3: Demonstration of securing a canopy tent with sandbags and stakes.
6. Manutenzione
- Clean the canopy fabric with mild soap and water. Do not use harsh chemicals or abrasive cleaners.
- Ensure the fabric is completely dry before folding and storing to prevent mold and mildew.
- Inspect the frame and fabric regularly for any signs of wear or damage. Replace damaged parts as needed.
7. Conservazione
To store your canopy tent:
- Disassemble the canopy by reversing the setup steps.
- Ensure all components, especially the fabric, are clean and dry.
- Fold the frame compactly and place it into the wheeled storage bag.
- Conservare la borsa in un luogo fresco e asciutto, lontano dalla luce solare diretta.
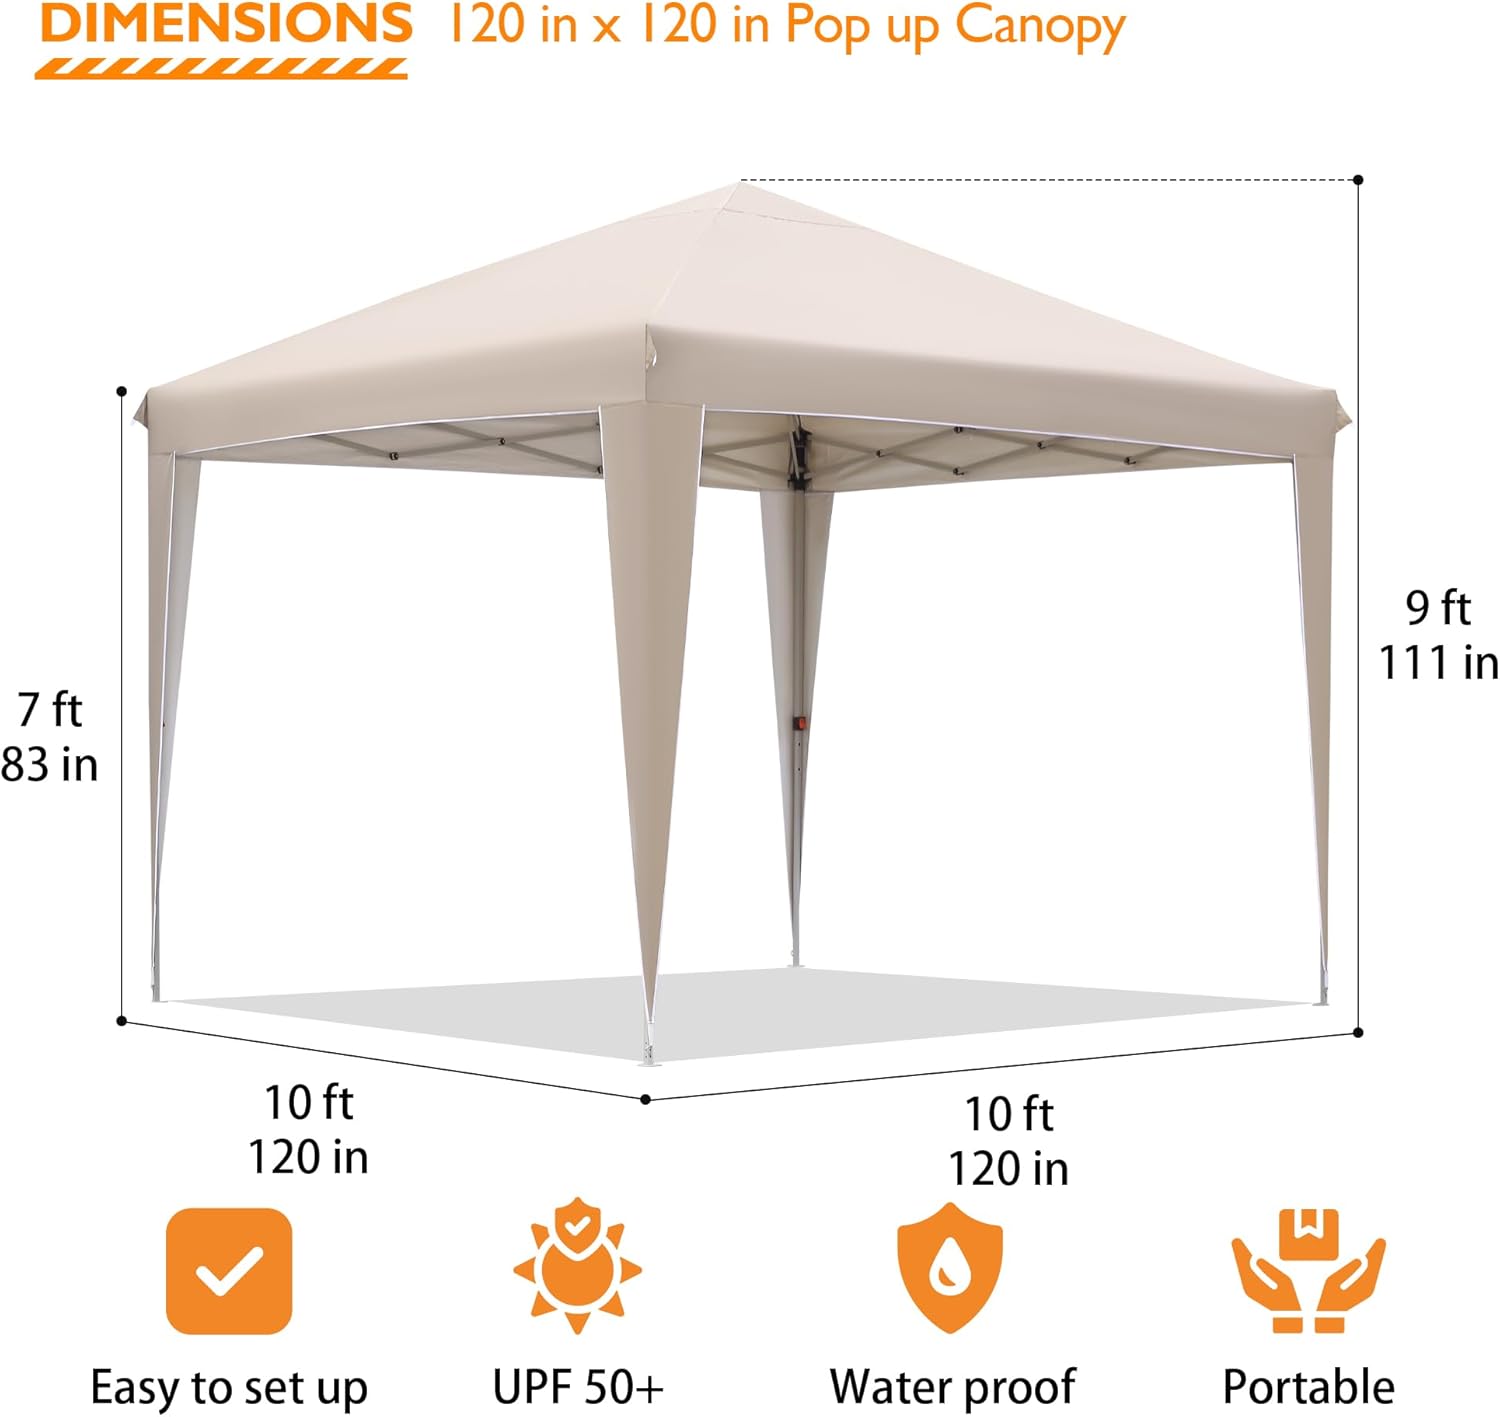
Image 5: Dimensions of the canopy tent.
8. Specifiche
| Caratteristica | Specificazione |
|---|---|
| Marca | BONTEC |
| Numero di modello | ZP01-FBA |
| Dimensioni del prodotto | 118.1"L x 118.1"W x 114.6"H (10 piedi x 10 piedi x 9.55 piedi) |
| Superficie del pavimento | 100 piedi quadrati |
| Materiale del telaio | Metallo (acciaio ad alta resistenza) |
| Tessuto del baldacchino | Silver-coated 150D Fabric |
| Protezione UV | Protezione solare UPF 50+ |
| Livello di resistenza all'acqua | Water Resistant (78.7 inches) |
| Peso dell'articolo | 37.4 libbre |
| Assemblaggio richiesto | SÌ |
9. Risoluzione Dei Problemi
- Canopy not standing securely: Ensure all legs are fully extended and locked. Verify that sandbags are filled and attached, and ground stakes/ropes are properly installed.
- Difficoltà nell'estendere/collassare il telaio: Check for any obstructions in the frame's scissor mechanism. Ensure the central locking hub is fully released or engaged as appropriate.
- Accumulo d'acqua sulla sommità della chioma: Ensure the canopy top is taut and properly secured to the frame. Adjust leg heights if necessary to create proper tension and allow water runoff.
10. Garanzia e supporto
For warranty information, technical support, or to order replacement parts, please contact BONTEC customer service directly through their official website or the retailer where the product was purchased. Please have your model number (ZP01-FBA) and purchase date available.


