Introduzione
This manual provides detailed instructions for the installation, configuration, and operation of your ASRock B760M PG Riptide WiFi Micro-ATX Motherboard. Please read this manual thoroughly before attempting to install or use the motherboard to ensure proper setup and to prevent damage to the components.
The ASRock B760M PG Riptide WiFi motherboard supports 14th, 13th, and 12th Generation Intel Core Processors (LGA1700 socket) and features DDR5 memory support up to 7200MHz (OC), WiFi 6E, and 2.5G LAN for high-performance computing.
Informazioni sulla sicurezza
- Always disconnect the power cord from the power supply before handling any components inside the computer case.
- Wear an anti-static wrist strap or frequently touch a grounded metal object to discharge static electricity before touching the motherboard or other components.
- Maneggiare la scheda madre tenendola per i bordi per evitare di toccare i componenti sensibili.
- Prima di accendere il sistema, assicurarsi che tutti i cavi siano collegati correttamente e saldamente.
- Tenere la scheda madre e i componenti lontani dall'umidità e dalle temperature estreme.
Contenuto della confezione
Verifica che tutti gli elementi siano presenti nella confezione della scheda madre. Se alcuni elementi risultano mancanti o danneggiati, contatta il rivenditore.
- ASRock B760M PG Riptide WiFi Motherboard
- I/O Shield (Pre-installed)
- Cavi dati SATA
- Antenna/e WiFi
- Viti/distanziatori M.2
- Manuale utente / Guida di installazione rapida
- Support CD/DVD (may include drivers and utilities)
Layout della scheda madre
Familiarizza con i vari componenti e connettori della tua scheda madre.

Figura 1: Dall'alto verso il basso view of the ASRock B760M PG Riptide WiFi motherboard, showing the CPU socket, RAM slots, PCIe slots, M.2 slots, and various headers.

Figure 2: Diagram highlighting key features and ports of the ASRock B760M PG Riptide WiFi motherboard, including I/O shield, power connectors, VRM design, DDR5 slots, M.2 sockets, SATA ports, and audio components.
Impostare
1 Installazione della CPU
- Aprire la leva del socket della CPU e sollevare la piastra di carico.
- Carefully align the notches on your Intel LGA1700 processor with the socket and gently place the CPU into the socket. Do not force it.
- Chiudere la piastra di carico e spingere la leva verso il basso finché non si blocca in posizione.
- Applicare la pasta termica alla CPU e installare il dissipatore della CPU seguendo le istruzioni del produttore.
2. Installazione della memoria (RAM)
This motherboard supports DDR5 memory. Refer to your motherboard manual for specific dual-channel configurations.
- Aprire le clip su entrambe le estremità dello slot DIMM.
- Allineare la tacca sul modulo di memoria DDR5 con la chiave nello slot DIMM.
- Premere con decisione su entrambe le estremità del modulo di memoria finché le clip non scattano in posizione.
3. Installazione dell'archiviazione (M.2 e SATA)
The motherboard features 2 Hyper M.2 (PCIe Gen4 x4) slots and 4 SATA3 ports.
Installazione SSD M.2:
- Locate the M.2 slots (often under heatsinks). Remove the M.2 heatsink if present.
- Inserire l'SSD M.2 nello slot con un'angolazione di 30 gradi.
- Gently push the SSD down and secure it with the provided M.2 screw or standoff.
- Se applicabile, reinstallare il dissipatore M.2.
Installazione dell'unità SATA:
- Connect one end of a SATA data cable to a SATA3 port on the motherboard.
- Collegare l'altra estremità del cavo dati SATA al disco rigido SATA o all'SSD.
- Collegare un cavo di alimentazione SATA dall'alimentatore all'unità.
4. Installazione della scheda di espansione (PCIe)
The motherboard has 1 PCIe 4.0 x16 slot and 1 PCIe 4.0 x1 slot.
- Rimuovere il coperchio dello slot di espansione corrispondente dal case del computer.
- Align your expansion card (e.g., graphics card) with the PCIe slot and press down firmly until it is seated correctly.
- Fissare la scheda alla custodia con una vite.
- Collegare tutti i cavi di alimentazione PCIe necessari dall'alimentatore alla scheda grafica.
5. Collegamenti di alimentazione
- Connect the 24-pin ATX power connector from your power supply to the motherboard's 24-pin power socket.
- Connect the 8-pin (or 4+4-pin) CPU power connector from your power supply to the motherboard's 8-pin 12V power socket.
6. Collegamenti del pannello frontale
Connect the cables from your computer case's front panel (USB, audio, power button, reset button, LED indicators) to the corresponding headers on the motherboard. Refer to the motherboard layout diagram and the small labels on the motherboard for correct pin alignment.
- USB 3.2 Gen1 Type-C (anteriore): Connect your case's front USB-C cable.
- USB 3.2 Gen1 Type-A (Front): Connect your case's front USB 3.0/3.1 cables.
- USB 2.0 (Front): Connect your case's front USB 2.0 cables.
- Audio HD: Connect your case's front panel audio cable.
- Intestazione del pannello di sistema: Connect power switch, reset switch, power LED, and HDD LED cables. Pay close attention to polarity for LEDs.
Operativo
1. Configurazione del BIOS
The BIOS (Basic Input/Output System) is firmware that initializes hardware during the booting process. To enter BIOS Setup, press the Del or F2 key repeatedly during system startup.
- Ordine di avvio: Configure the boot device priority (e.g., USB drive for OS installation, then SSD/HDD).
- XMP/EXPO: Abilita XMP (Extreme Memory Profile) or EXPO for optimal DDR5 memory performance.
- Controllo della ventola: Adjust fan curves for CPU and chassis fans.
- Illuminazione RGB: Configure or disable onboard RGB lighting (ASRock Polychrome RGB).
2. Installazione del driver
After installing your operating system, install the necessary drivers for optimal performance. Drivers can be found on the included support CD/DVD or downloaded from the ASRock websito.
- Driver del chipset
- LAN Drivers (Dragon 2.5G LAN)
- WiFi/Bluetooth Drivers (Killer 802.11ax WiFi 6E)
- Driver audio (Realtek ALC897)
- Graphics Drivers (for integrated graphics, if applicable, or discrete GPU drivers from the GPU manufacturer)
ASRock Auto Driver Installer can simplify this process by automatically detecting and installing required drivers.
3. Configurazione di rete
LAN cablata:
Connect an Ethernet cable from your router/modem to the 2.5G LAN port on the motherboard's rear I/O panel. Ensure the Dragon 2.5G LAN driver is installed.
Wireless (WiFi 6E):
Attach the included WiFi antennas to the connectors on the rear I/O panel. Ensure Killer 802.11ax (WiFi 6E) drivers are installed. Connect to your wireless network through your operating system's network settings.
4. Configurazione audio
The motherboard features Realtek ALC897 7.1 CH HD Audio with Nahimic Audio support. Connect your speakers or headphones to the appropriate audio jacks on the rear I/O panel. Install the audio drivers for full functionality and access to Nahimic Audio software.
5. RGB Lighting (ASRock Polychrome RGB)
The motherboard includes built-in RGB illumination and onboard RGB headers for compatible LED devices. You can synchronize RGB LED devices using ASRock Polychrome RGB software or configure settings directly in the BIOS.

Figura 3: Esample of ASRock Polychrome RGB lighting effects on the motherboard and compatible components.
Manutenzione
1. Aggiornamenti del BIOS
Controllare periodicamente l'ASRock website for BIOS updates. BIOS updates can improve system stability, add support for new CPUs, or fix bugs. Follow the instructions provided by ASRock carefully when updating the BIOS to avoid system damage.
2. Pulizia
Regularly clean your computer's interior to prevent dust buildup, which can lead to overheating and reduced performance. Use compressed air to remove dust from fans, heatsinks, and motherboard components. Ensure the system is powered off and unplugged before cleaning.
Risoluzione dei problemi
Se riscontri problemi con la scheda madre, prendi in considerazione i seguenti passaggi comuni per la risoluzione dei problemi:
- Nessuna alimentazione/Nessun avvio:
- Controllare tutti i collegamenti di alimentazione (ATX a 24 pin, CPU a 8 pin).
- Assicurarsi che l'alimentazione sia inserita.
- Verificare il collegamento dell'interruttore di alimentazione sul pannello frontale.
- Prova ad avviare il sistema con componenti minimi (CPU, un modulo RAM, GPU se non hai una scheda grafica integrata).
- Nessuna visualizzazione:
- Ensure your monitor is connected to the correct graphics output (discrete GPU or motherboard's HDMI/DisplayPort).
- Reinstallare la scheda grafica e i moduli RAM.
- Controllare la selezione dell'ingresso del monitor.
- Instabilità/arresti anomali del sistema:
- Controllare le temperature della CPU e della GPU.
- Ensure RAM is properly seated and running at stable speeds (disable XMP/EXPO to test if it's memory related).
- Update all drivers and BIOS to the latest versions.
- Eseguire strumenti di diagnostica della memoria.
- Problemi di rete:
- Verify LAN cable connection or WiFi antenna attachment.
- Reinstall LAN/WiFi drivers.
- Controllare lo stato del router/modem.
For more specific troubleshooting, consult the ASRock support website or the full motherboard manual available for download.
Specifiche
| Caratteristica | Specificazione |
|---|---|
| Nome del modello | B760M PG RIPTIDE WIFI |
| Presa CPU | LGA1700 |
| Processori compatibili | 14th/13th/12th Gen Intel Core Processors |
| Chipset | Intel B760 |
| Tecnologia della memoria RAM | DDR5 |
| Max Memory Speed (OC) | 7200MHz+ |
| Progettazione della fase di potenza | 14+1+1 |
| Slot PCIe | 1 x PCIe 4.0 x16, 1 x PCIe 4.0 x1 |
| Uscita grafica | HDMI, DisplayPort |
| Codice audio | Audio HD Realtek ALC897 7.1 canali, audio Nahimic |
| Porte SATA | 4 x SATA3 |
| Slot M.2 | 2 x Hyper M.2 (PCIe Gen4 x4) |
| USB 3.2 Gen1 Tipo-C | 1 Posteriore, 1 Anteriore |
| USB 3.2 Gen1 Tipo A | 3 Posteriore, 2 Anteriore |
| USB 2.0 | 4 Posteriore, 2 Anteriore |
| Rete locale | Dragon 2.5G LAN |
| Connettività wireless | Killer 802.11ax (WiFi 6E) + Bluetooth 5.3 |
| Fattore di forma | Micro-ATX |
| Dimensioni | 10.63 x 10.24 x 2.36 pollici |
| Peso dell'articolo | 3.01 libbre |
CPU Support List
This motherboard supports a range of Intel 12th, 13th, and 14th generation processors. Always refer to the latest CPU support list on the ASRock website for the most up-to-date compatibility information and recommended BIOS versions.

Figure 4: Partial CPU Support List for ASRock B760M PG Riptide WiFi, showing Intel Core i9, i7, and i5 processors (Raptor Lake-S Refresh).

Figure 5: Continuation of the CPU Support List, including more Intel Core i5 and i3 processors (Raptor Lake-S).
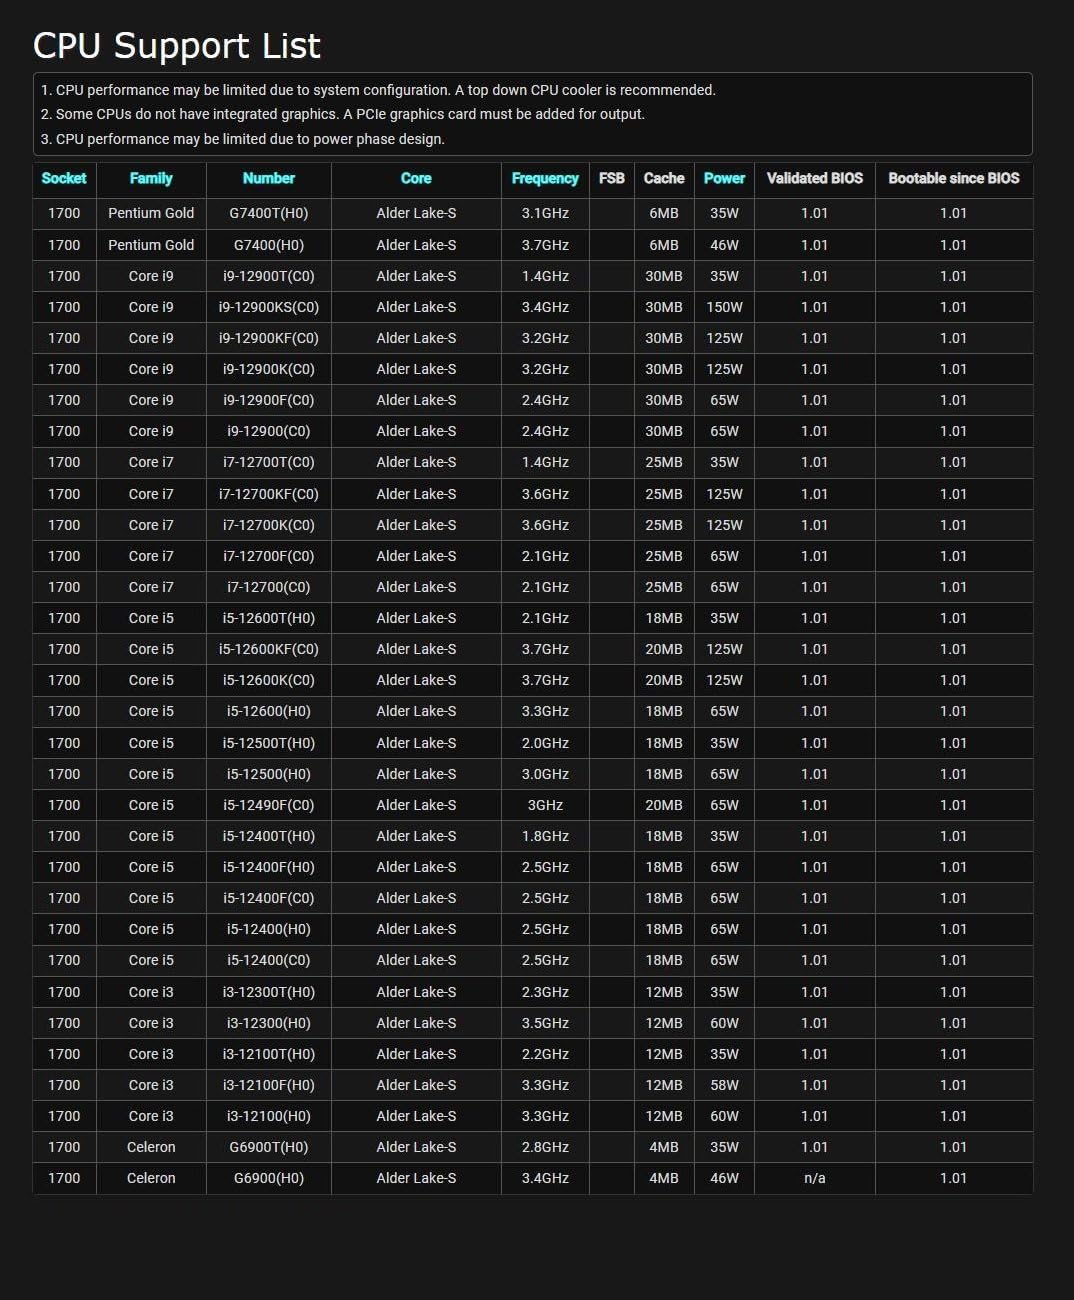
Figure 6: Further continuation of the CPU Support List, including Intel Pentium Gold and Celeron processors (Alder Lake-S).
Note: CPU performance may be limited by system configuration. A top-down CPU cooler is recommended. Some CPUs do not have integrated graphics. A PCIe graphics card may be needed for output. CPU performance may be limited due to power phase design.
Garanzia e supporto
Per informazioni sulla garanzia, fare riferimento alla scheda di garanzia inclusa con il prodotto o visitare il sito ufficiale ASRock website. ASRock provides technical support and driver downloads through their official websito.
- ASRock Ufficiale Websito: www.asrock.com
- Supporto tecnico: Refer to the support section on the ASRock websito per domande frequenti, guide alla risoluzione dei problemi e informazioni di contatto.


