Introduzione
This manual provides detailed instructions for the assembly, operation, and maintenance of your Vetroo AL800 Mid Tower ATX PC Computer Case. Please read this manual thoroughly before beginning installation to ensure proper setup and optimal performance.

Figure 1: Vetroo AL800 Mid Tower ATX PC Computer Case (Black)
Informazioni sulla sicurezza
- Scollegare sempre l'alimentatore dalla presa a muro prima di installare o rimuovere qualsiasi componente.
- Handle components with care to avoid damage from electrostatic discharge. Consider using an anti-static wrist strap.
- Keep the case and components away from liquids and excessive humidity.
- Garantire una ventilazione adeguata per evitare il surriscaldamento.
- Non tentare di modificare la custodia o i suoi componenti, poiché ciò potrebbe invalidare la garanzia e comportare rischi per la sicurezza.
Contenuto della confezione
Verificare che tutti gli articoli siano presenti nel pacco:
- Vetroo AL800 Mid Tower ATX PC Computer Case
- Scatola degli accessori (viti, distanziatori, fascette)
- Pre-installed 1x 120mm PWM/ARGB Fan (rear)
- Manuale dell'utente (questo documento)
Caratteristiche principali
- ARGB LED Strip: Integrated LED lighting and ARGB case fans can be synchronized with compatible motherboards via a 5V 3-pin interface.
- Door Opening Design: Features a 4mm thick tempered glass side panel with a convenient door-opening mechanism for easy access to internal components.
- High Performance Airflow: A mesh front panel and strategically placed dust filters ensure optimal airflow and system cooling.
- Ampia compatibilità: Supports ATX, M-ATX, and ITX motherboards. Accommodates GPUs up to 340mm in length and CPU coolers up to 165mm in height.
- Supporto per il raffreddamento a liquido: Front panel supports up to a 360mm liquid cooling radiator.
- Supporto dei fan: Supports up to 8 x 120mm fans.
- Gestione semplice dei cavi: Includes two soft silicone cord grommets for organized cable routing.
- Powerful I/O Panel: Features 1x USB 3.2 Type-C port, 2x USB 3.0 ports, and a combined microphone/headphone jack.
Configurazione e installazione
1. Preparazione generale
- Posizionare la custodia su una superficie piana e stabile.
- Open the tempered glass side panel by gently pulling it open. It is hinged for easy access.
- Remove the tempered glass panel if necessary for easier installation by lifting it off its hinges once open.

Figure 2: Tempered Glass Door Opening Design
2. Installazione della scheda madre
- Installare la schermatura I/O (se applicabile) nell'apertura posteriore del case.
- Align your ATX, M-ATX, or ITX motherboard with the pre-installed standoffs.
- Fissare la scheda madre utilizzando le viti fornite nella scatola degli accessori.
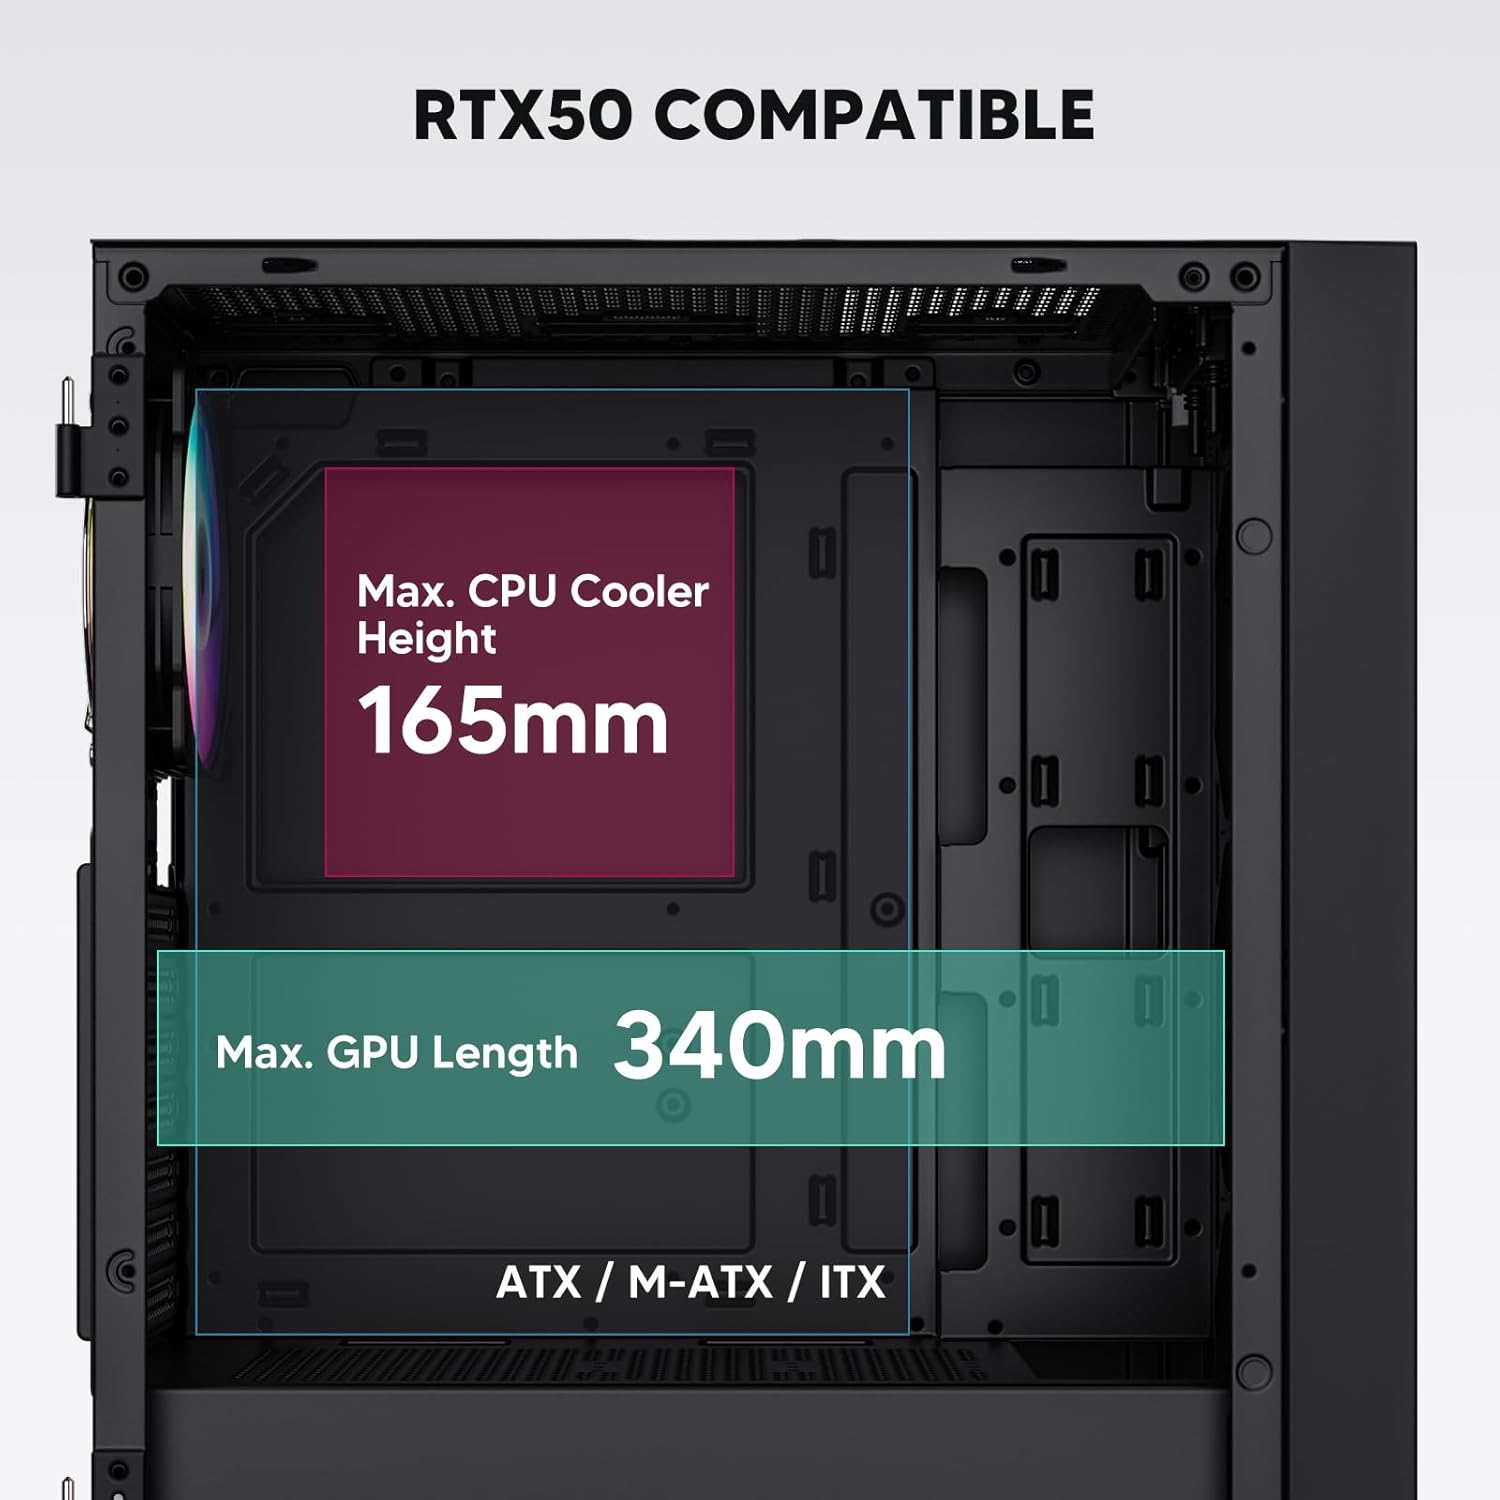
Figure 3: Motherboard and Component Clearance (Max CPU Cooler Height 165mm, Max GPU Length 340mm)
3. Storage Device Installation (HDD/SSD)
- Locate the dedicated mounting points for SSDs and HDDs.
- Install 2.5" SSDs onto the SSD trays or mounting brackets.
- Installare gli HDD da 3.5" nell'apposito alloggiamento situato nella parte inferiore del case.
- Fissare tutte le unità con le viti appropriate.

Figure 4: Internal Layout with Drive Bay Locations (SSD, HDD, Power Supply)
4. Installazione dell'alimentatore
- Mount your power supply unit (PSU) in the dedicated compartment at the bottom rear of the case.
- Ensure the PSU fan faces downwards (if the case has a bottom vent) or upwards, depending on your cooling preference.
- Secure the PSU with screws from the rear of the case. The case supports PSUs up to 200mm in length.
5. Installazione della scheda di espansione (GPU)
- Rimuovere le coperture degli slot PCI-E necessari dalla parte posteriore del case.
- Inserisci la scheda grafica o altre schede di espansione negli slot PCI-E della scheda madre.
- Secure the cards with screws. The case supports GPUs up to 340mm in length.
6. Cooling System Installation (Fans/Radiators)
- The case comes with one pre-installed 120mm PWM/ARGB fan at the rear.
- Additional fans (120mm or 140mm) can be installed at the front, top, and bottom.
- Liquid cooling radiators up to 360mm can be installed at the front, and up to 240mm at the top.
- Refer to the diagram for supported fan and radiator configurations.

Figure 5: Fan and Liquid Radiator Support Diagram
7. Collegamenti del pannello frontale
- Connect the front panel cables (Power, Reset, USB 3.0, USB Type-C, HD Audio) to the corresponding headers on your motherboard.
- Consult your motherboard manual for the exact pin layout of these headers.
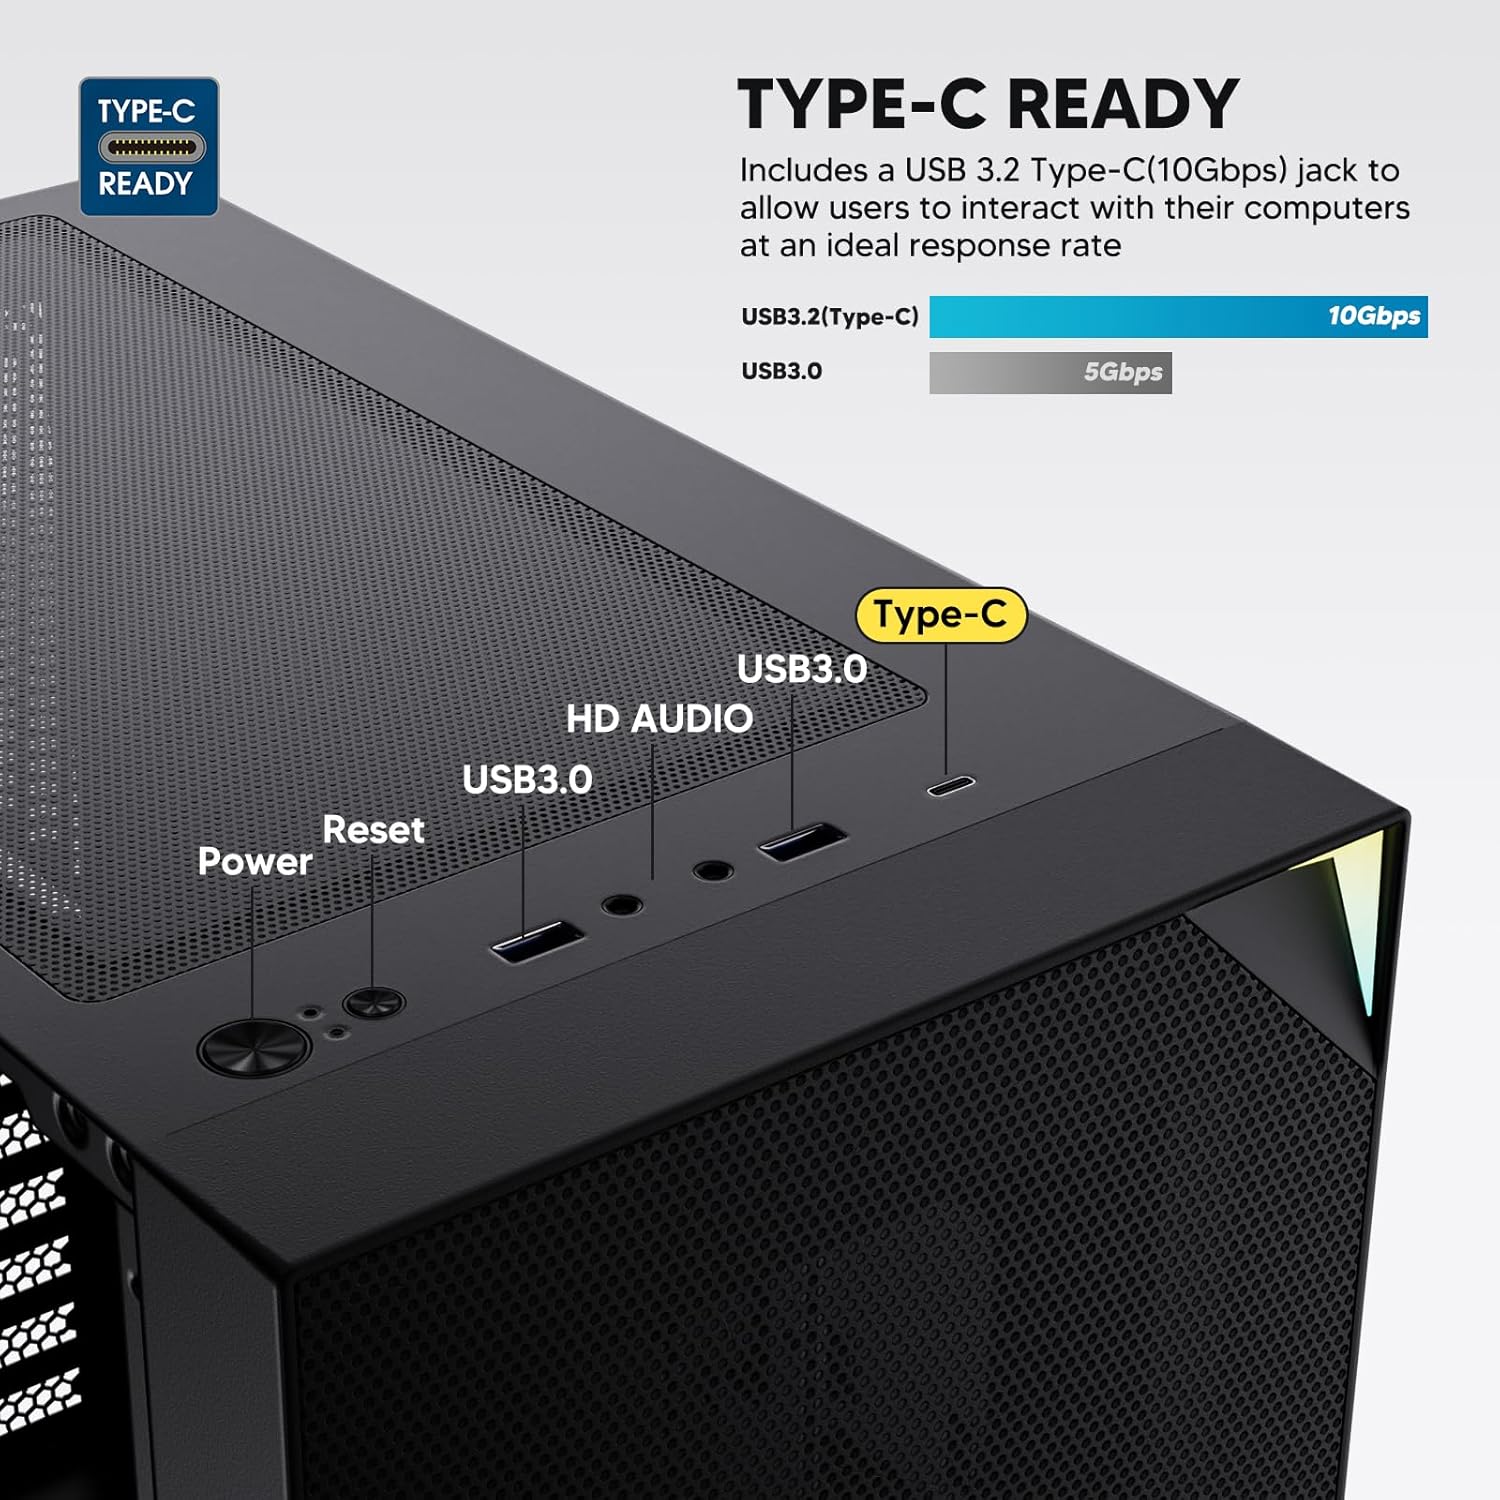
Figure 6: Top I/O Panel Connections
8. ARGB and PWM Connections
- The pre-installed fan and ARGB LED strip require connection to your motherboard.
- Connect the 4-pin PWM connector from the fan to a compatible fan header on your motherboard for speed control.
- Connect the 3-pin ARGB connector from the fan and LED strip to a 5V 3-pin ARGB header on your motherboard for lighting synchronization. Non collegare a un connettore RGB da 12 V, poiché ciò danneggerebbe i LED.
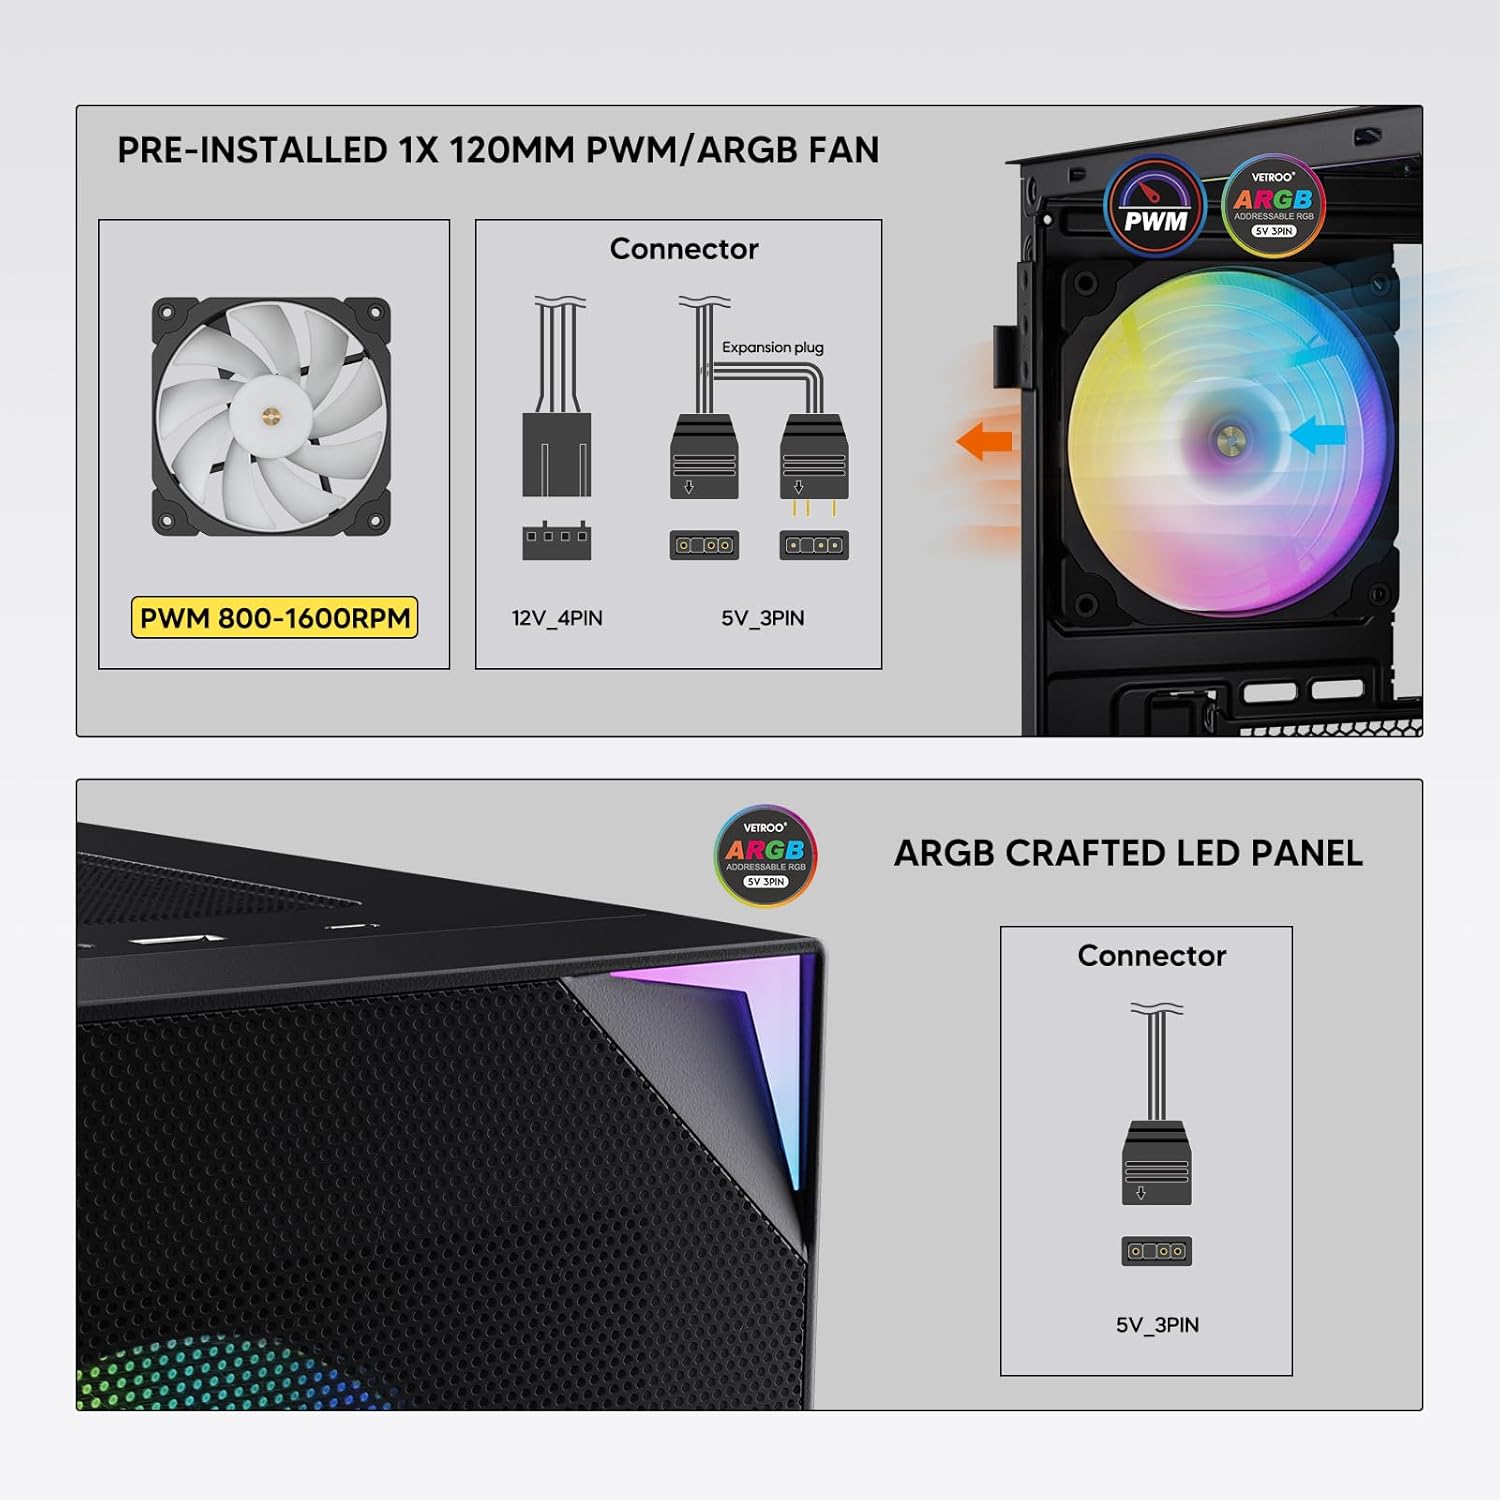
Figure 7: PWM and ARGB Connector Details
9. Gestione dei cavi
- Utilizzare i ritagli per il passaggio dei cavi e i punti di fissaggio dietro il vassoio della scheda madre per organizzare i cavi.
- The soft silicone grommets help protect cables and provide a clean look.
- Una corretta gestione dei cavi migliora il flusso d'aria e l'estetica.
Operazione
1. Accensione iniziale
- After all components are securely installed and cables connected, close the tempered glass side panel.
- Collegare il monitor, la tastiera, il mouse e il cavo di alimentazione al PC.
- Portare l'interruttore di alimentazione dell'alimentatore in posizione "ON".
- Press the power button on the top I/O panel of the case to start your system.
2. Controllo dell'illuminazione ARGB
- If connected to a compatible motherboard's 5V 3-pin ARGB header, the lighting of the pre-installed fan and LED strip can be controlled via your motherboard's RGB software (e.g., ASUS Aura Sync, MSI Mystic Light Sync, Gigabyte RGB Fusion, ASRock Polychrome Sync).
- Per istruzioni specifiche sull'utilizzo del software di controllo ARGB, consultare il manuale della scheda madre.
3. Airflow Management
- The mesh front panel is designed for optimal air intake.
- Ensure that intake fans (typically front and bottom) and exhaust fans (typically rear and top) are configured to create positive or neutral air pressure for efficient cooling and dust prevention.

Figure 8: Airflow Diagram with Dust Filters
Manutenzione
1. Pulizia del filtro antipolvere
- The case is equipped with dust filters on the top and bottom panels.
- Regularly check and clean these filters to maintain optimal airflow and prevent dust buildup inside the system.
- Gently remove the magnetic dust filters and clean them with compressed air or by rinsing with water (ensure they are completely dry before re-installation).
2. Tempered Glass Panel Care
- Clean the tempered glass panel with a soft, lint-free cloth and a non-abrasive glass cleaner.
- Avoid harsh chemicals or abrasive materials that could scratch or damage the glass.
Risoluzione dei problemi
- Il sistema non si accende:
- Assicurarsi che il cavo di alimentazione sia collegato saldamente sia all'alimentatore che alla presa a muro.
- Verificare che l'interruttore dell'alimentatore sia in posizione "ON".
- Verificare che il cavo del pulsante di accensione del pannello frontale sia collegato correttamente al connettore della scheda madre.
- Confirm all power cables (24-pin ATX, CPU, GPU) are properly seated in the motherboard and components.
- Le ventole non girano / L'ARGB non si accende:
- Check that the fan's PWM connector is securely plugged into a motherboard fan header.
- Verify the ARGB 3-pin connector is correctly attached to a 5V 3-pin ARGB header on the motherboard (not 12V RGB).
- Assicurati che il software ARGB della tua scheda madre sia installato e configurato correttamente.
- Porte USB non funzionanti:
- Confirm the USB 3.0 and USB Type-C front panel cables are correctly connected to their respective motherboard headers.
- Check your motherboard manual for correct header locations.
- For other component-specific issues, refer to the instruction manuals for your motherboard, CPU, GPU, and other installed hardware.
Specifiche
| Marca | Vetro |
| Nome del modello | AL800 |
| Numero modello articolo | VT-CASE-AL800-BK (FBA) |
| Tipo di caso | Mid Tower |
| Compatibilità della scheda madre | ATX, M-ATX, ITX |
| Colore | Nero |
| Materiale | Metallo, vetro temperato |
| Peso dell'articolo | 12.37 libbre (circa 5.61 kg) |
| Dimensioni del prodotto (LxWxH) | 18.4 x 8.6 x 17.9 pollici (circa 46.7 x 21.8 x 45.5 cm) |
| Lunghezza massima della GPU | 340 millimetri |
| Altezza massima del dissipatore della CPU | 165 millimetri |
| Lunghezza massima dell'alimentatore | 200 millimetri |
| Porte I / O anteriori | 1x USB 3.2 Type-C, 2x USB 3.0, HD Audio (Mic/Headphone), Power, Reset |
| Supporto per i fan | Front: 3x 120mm or 2x 140mm; Top: 2x 120mm or 2x 140mm; Rear: 1x 120mm; Bottom: 2x 120mm |
| Supporto radiatore | Front: 120/140/240/280/360mm; Top: 120/140/240mm; Rear: 120mm |
| Ventole preinstallate | 1x 120mm PWM/ARGB (Rear) |
Garanzia e supporto
For warranty information, technical support, or to inquire about replacement parts, please visit the official Vetroo webo contattare direttamente il servizio clienti. Conservare la prova d'acquisto per eventuali reclami in garanzia.
Official Vetroo Store: Vetroo Amazon Store
Documenti correlati - AL800
 |
Manuale utente del case per PC Vetroo AL800 Manuale utente per il case per PC Vetroo AL800, che descrive dettagliatamente i passaggi di installazione di componenti come scheda madre, alimentatore, ventole, radiatori a liquido, HDD, SSD e schede grafiche. Include una guida al collegamento del pannello I/O e un elenco degli accessori. |
 |
Manuale di istruzioni per il case da gioco full tower Vetroo AL800 Manuale di istruzioni completo per il case per PC gaming Full Tower Vetroo AL800. Scopri come installare alimentatore, scheda madre, unità di archiviazione (SSD/HDD), scheda grafica e le opzioni di supporto per ventole e radiatori. Include un elenco degli accessori e una guida dettagliata passo dopo passo. |
 |
Manuale utente del case per PC Vetroo MESH-7C AL SERIES Manuale utente dettagliato per il case per PC Vetroo MESH-7C AL SERIES, che illustra specifiche, dimensioni, accessori e passaggi di installazione hardware per assemblare il computer. |
 |
Manuale di istruzioni per il case per PC Vetroo M05 M-ATX Manuale di istruzioni dettagliato per l'assemblaggio del case per PC Vetroo M05 M-ATX, che illustra l'installazione dei componenti, l'uso degli accessori e i collegamenti del pannello I/O. |
 |
Manuale utente del case per PC ATX Vetroo AL900 Manuale utente per il case da gaming per PC ATX Vetroo AL900, che descrive in dettaglio l'assemblaggio, l'installazione di componenti come l'alimentatore e le connessioni del pannello I/O. |
 |
Manuale utente e guida all'installazione del dissipatore per CPU Vetroo U6 Manuale utente dettagliato e guida all'installazione del dissipatore per CPU Vetroo U6, che copre la compatibilità con i socket Intel LGA 1700/1200/115X e AMD AM5/AM4/AM3(+)/AM2(+)/FM2(+)/FM1. Include l'elenco dei componenti e le istruzioni di montaggio passo passo. |