1. Introduzione
Thank you for choosing Rockville RM-PREMIUM-65 6.5" Marine Boat Speakers. These speakers are designed to deliver crisp, clear audio with robust lows and highs, making them ideal for marine and various outdoor vehicle applications. Built with durability in mind, they are fully marinized to withstand harsh salt and freshwater conditions.
This manual provides essential information for the proper setup, installation, operation, and maintenance of your new speakers. Please read it thoroughly before use to ensure optimal performance and longevity.

Figure 1: Rockville RM-PREMIUM-65 Marine Speakers
Prodotto finitoview Video
Video 1: Un overview of the Rockville RM-PREMIUM-65 speakers, highlighting their features and applications.
2. Cosa c'è nella scatola
Carefully unpack your Rockville RM-PREMIUM-65 speakers and ensure all items are present:
- Pair of 6.5" Marine Speakers
- 9.84 feet of Speaker Wire
- Viti di montaggio in acciaio inossidabile

Figure 2: Included components with your RM-PREMIUM-65 speakers.
3. Installazione
The RM-PREMIUM-65 speakers can be installed directly into a panel or into speaker pods such as wakeboard tower speakers or UTV kick panel pods. Ensure the chosen mounting location has sufficient space for the speaker's dimensions (5.787" cutout diameter, 2.56" mounting depth).
Installation into Speaker Pods
- Prepare the Pod: Identify the location for the speaker wire exit. The speaker terminals are located at the bottom of the speaker. Drill a hole in the pod at the desired location for the speaker wire.
- Collegare i cavi degli altoparlanti: Use the provided speaker wire with spade terminals. Connect the white wire to the positive (+) terminal and the black wire to the negative (-) terminal on the speaker. The positive terminal is typically connected to a red wire running to a fuse.
- Instradamento dei cavi: Feed the connected speaker wires through the drilled hole in the pod, leaving enough slack inside the pod for speaker placement.
- Posizionare gli altoparlanti: Carefully fit the speakers into the pods. For a clean aesthetic, align the Rockville emblem at the bottom.
- Altoparlanti sicuri: Use the provided stainless steel mounting screws to secure the speakers to the pods. Align the screws with the holes on the speaker and use a drill to fasten them.

Figure 3: Drilling a hole in the speaker pod for wire routing.
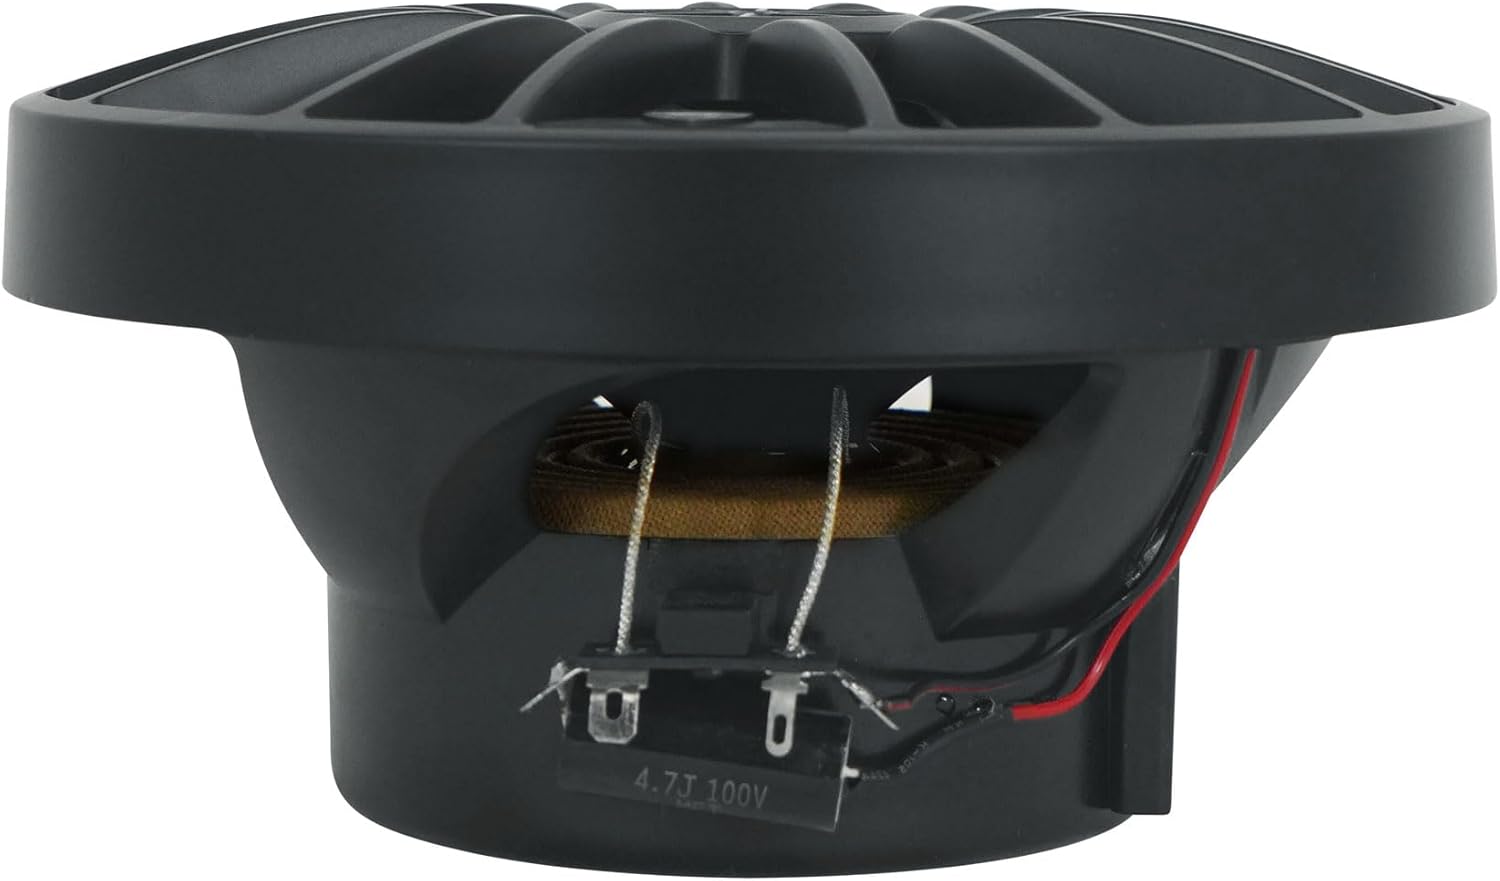
Figure 4: Connecting speaker wires to the terminals.
Figure 5: Routing speaker wires through the pod.

Figure 6: Speakers fitted into pods.
Figure 7: Securing speakers into pods.
Video di installazione
Video 2: Detailed instructions on how to install your RM-PREMIUM-65 speakers into panel speaker pods.
4. Cablaggio e configurazione
After securing your speakers, the next step is to connect them to your amplifier. Maintain consistency in wiring (e.g., white to positive, black to negative) for all speakers.
- Preparare Amplifier Terminals: Use an Allen key to loosen the speaker terminals on your amppiù vivace.
- Collegare i cavi degli altoparlanti a Amplificatore: Insert the white wire (from the speaker's positive terminal) into the positive (+) terminal of an amplifier channel. Insert the black wire (from the speaker's negative terminal) into the negative (-) terminal of the same ampcanale lificatore.
- Connessioni sicure: Once the wires are correctly inserted, use the Allen key to tighten the amplifier terminals, ensuring a secure connection.
- Regolare AmpImpostazioni lificatore: Imposta il amplifier to full range mode, as these are full range speakers. Adjust the level for the amplificatore secondo necessità.
- Connect Music Source: Connect your head unit or music source to the amppiù vivace.

Figure 8: Connecting speaker wires to the amppiù vivace.
Installa video
Video 3: Step-by-step guide on how to set up your RM-PREMIUM-65 speakers with an amppiù vivace.
5. Specifiche
| Caratteristica | Specificazione |
|---|---|
| Dimensioni dell'altoparlante | 6.5 pollici |
| Gestione della potenza di picco | 600 Watt (per coppia) |
| Gestione della potenza RMS | 150 Watts (per pair), 75 Watts (per speaker) |
| Impedenza | 4 Ohm |
| Tweeter | 1" PEI Dome Tweeter with Neodymium Magnet |
| Magnete | 11 Oz Y35 Magnet |
| Sensibilità | 93 dB |
| Diametro ritaglio | 5.787" |
| Profondità di montaggio | 2.56" |
| Materiale | Acrylonitrile Butadiene Styrene (ABS) Basket |
| Impermeabile | Yes (Fully Marinized) |
| Usi consigliati | Marine, Car, ATV, UTV |
6. Istruzioni per l'uso
Once installed and wired, your RM-PREMIUM-65 speakers are ready for use. Ensure your amplifier is powered on and your music source is connected and playing. Adjust the volume and any equalizer settings on your head unit or amplifier to achieve your desired sound. These speakers are designed for high-power handling and deliver clear audio even at high volumes, but always listen responsibly to prevent hearing damage and speaker distortion.
7. Manutenzione
To ensure the longevity and optimal performance of your marine speakers, follow these maintenance guidelines:
- Pulizia: Regularly clean the speakers with a soft, damp cloth. Avoid harsh chemicals or abrasive cleaners that could damage the UV-treated cones or rubber surrounds.
- Ispezione: Periodically inspect all wiring connections for corrosion or looseness. Tighten any loose connections and clean any corrosion to maintain good electrical contact.
- Protezione ambientale: While fully marinized, prolonged exposure to extreme conditions can still affect performance. If possible, cover the speakers when not in use for extended periods, especially in harsh sunlight or heavy rain.
8. Risoluzione Dei Problemi
If you experience issues with your RM-PREMIUM-65 speakers, refer to the following common troubleshooting steps:
- Nessun suono:
- Check all wiring connections from the speakers to the amplifier and from the amplifier to the music source. Ensure they are secure and correctly polarized (positive to positive, negative to negative).
- Verificare il amplifier sia acceso e funzioni correttamente.
- Confirm the music source is playing and its volume is turned up.
- Suono distorto:
- Reduce the volume on your head unit or amplifier. Distortion often occurs when the signal is too high.
- Controllo amplifier gain settings. If set too high, it can cause distortion.
- Ispezionare i coni degli altoparlanti per verificare la presenza di eventuali danni fisici.
- Basso volume:
- Increase the volume on both your music source and amppiù vivace.
- Garantire amplifier gain settings are appropriate for the input signal.
- Verificare che l'impedenza dell'altoparlante corrisponda a amplifier's recommended load (4-Ohm).
9. Garanzia e supporto
Your Rockville RM-PREMIUM-65 speakers come with a limited warranty. For specific warranty details, please refer to the warranty card included in your package or visit our official support websito.
For any questions, comments, or concerns regarding your product, please do not hesitate to contact our customer support team:
- Telefono: 1-646-758-0144 (Open 24/7)
- E-mail: vendite@rockvilleaudio.com
- Supporto online: rockvillesupport.com/rm-premium-65-black

Figure 9: Rockville Logo


