1. Introduzione
The Trevi DAB 7F80 R is a portable digital radio offering DAB, DAB+, and FM reception, along with Bluetooth connectivity. It features a high-readability Dot Matrix display, a programmable alarm clock, and a headphone jack. This manual provides instructions for the proper setup, operation, and maintenance of your device.
2. Informazioni sulla sicurezza
- Leggere attentamente tutte le istruzioni prima di utilizzare il dispositivo.
- Non esporre il dispositivo ad acqua, umidità o temperature estreme.
- Use only the specified power source (4 x AAA batteries or a compatible 5V DC adapter, not included).
- Non tentare di smontare, riparare o modificare il dispositivo. Per qualsiasi intervento di assistenza, rivolgersi a personale qualificato.
- Smaltire le batterie in modo responsabile, nel rispetto delle normative locali.
- Tenere il dispositivo lontano da forti campi magnetici.
3. Contenuto della confezione
Si prega di verificare che i seguenti articoli siano inclusi nel pacchetto:
- Trevi DAB 7F80 R Main Unit
- Manuale dell'utente (questo documento)
- Certificato di garanzia
4. Prodotto finitoview
Familiarize yourself with the components and controls of your Trevi DAB 7F80 R radio.
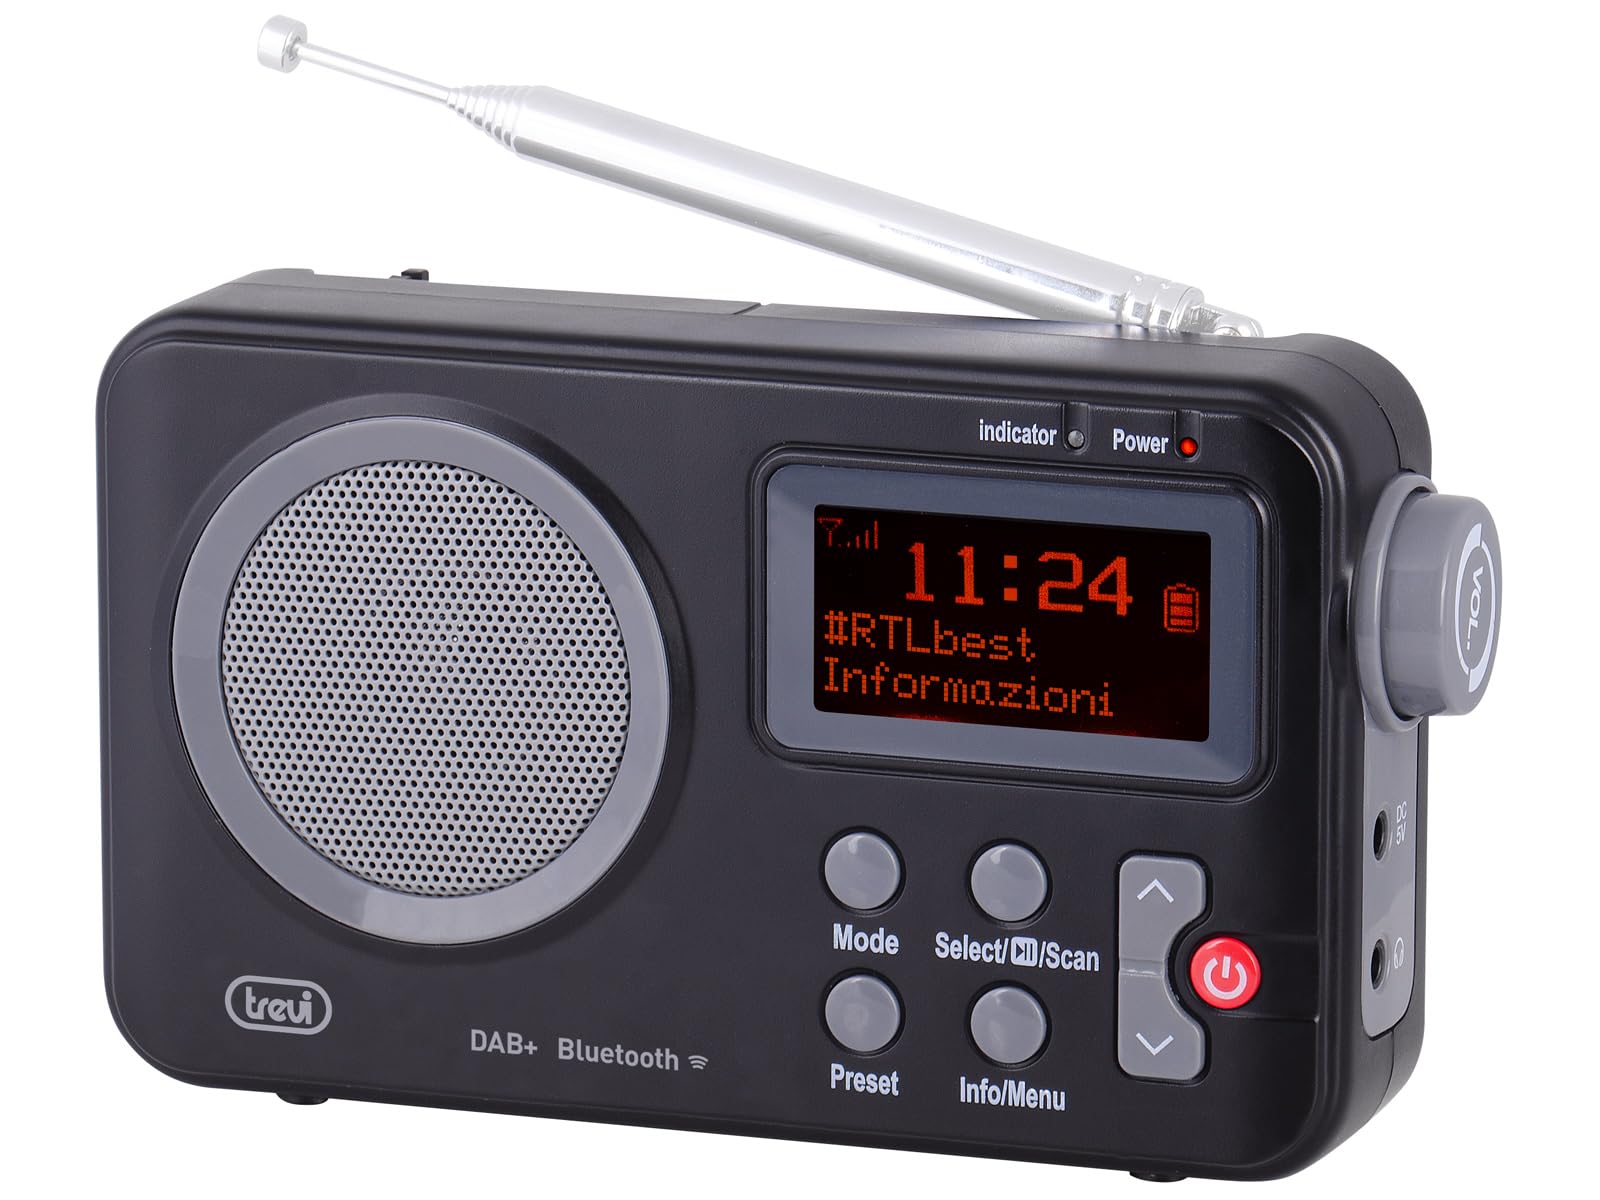
Figura 1: Davanti view of the Trevi DAB 7F80 R radio. This image displays the Dot Matrix screen, the main speaker grille, and the primary control buttons including Mode, Select/Scan, Preset, Info/Menu, and Power. The extendable telescopic antenna is visible at the top.
Controlli e funzionalità:
- Display: High-readability Dot Matrix screen for station information, time, and menu navigation.
- Oratore: Altoparlante integrato per l'uscita audio.
- Pulsante di accensione: Accende/spegne la radio.
- Pulsante Modalità: Switches between DAB/DAB+, FM, and Bluetooth modes.
- Select/Scan Button: Confirms selections in menus, initiates station scans.
- Pulsante di preselezione: Accesses and stores favorite radio stations.
- Pulsante Info/Menu: Displays station information and accesses system settings.
- Pulsanti freccia su/giù: Navigates through menus, adjusts volume, changes stations.
- Jack per cuffie: Uscita da 3.5 mm per l'ascolto privato.
- Antenna: Antenna telescopica estensibile per una migliore ricezione radio.
5. Impostazione
5.1 Alimentazione del dispositivo
The Trevi DAB 7F80 R can be powered by batteries or an external AC adapter.
- Installazione della batteria: Open the battery compartment cover on the back of the unit. Insert 4 x AAA batteries (not included), ensuring correct polarity (+/-). Close the cover securely.
- Adattatore CA (opzionale): For continuous power, connect a compatible 5V DC, 1A AC adapter (not included) to the DC IN port on the side of the radio.
Avviso importante: Do not use batteries in the device when it is connected to an AC adapter for extended periods. This may lead to battery leakage or damage to the unit. If using the AC adapter, remove the batteries. If using batteries, disconnect the AC adapter.
5.2 Accensione iniziale e scansione della stazione
- Per una ricezione ottimale, estendere completamente l'antenna telescopica.
- Premere il tasto Energia pulsante per accendere la radio.
- Al primo utilizzo, la radio potrebbe richiedere di selezionare una lingua. Utilizzare il Freccia su / giù pulsanti per navigare e Select/Scan per confermare.
- The radio will automatically perform a full scan for DAB/DAB+ stations. This process may take a few minutes. Once complete, the first available station will begin playing.
6. Istruzioni per l'uso
6.1 Radio Mode (DAB/DAB+, FM)
- Modalità di commutazione: Premere il tasto Modalità ripetutamente il pulsante per alternare tra le modalità DAB, FM e Bluetooth.
- Scansione delle stazioni:
- In DAB mode, a full scan is usually performed on first use. To perform a new scan, press and hold Select/Scan.
- In modalità FM, premere Select/Scan per effettuare la scansione automatica della prossima stazione disponibile.
- Selezione delle stazioni: Utilizzare il Freccia su / giù buttons to browse through available stations.
- Memorizzazione delle preimpostazioni: The radio can store up to 20 DAB/DAB+ and 20 FM stations.
- Sintonizzati sulla stazione desiderata.
- Premere e tenere premuto il tasto Preimpostato finché sul display non compare la scritta 'Preset Store'.
- Utilizzare il Freccia su / giù pulsanti per selezionare un numero preimpostato (1-20).
- Premere Select/Scan per confermare e salvare la stazione.
- Richiamo delle preimpostazioni: Premere il tasto Preimpostato button briefly. Use the Freccia su / giù per selezionare il numero preimpostato desiderato, quindi premere Select/Scan.
- RDS/DLS Information: In FM or DAB mode, press the Info/Menù button repeatedly to cycle through available information such as station name, program type, time, and song title (if broadcast).
6.2 Modalità Bluetooth
- Premere il tasto Modalità button until 'Bluetooth' appears on the display. The radio will enter pairing mode, indicated by a flashing Bluetooth icon.
- Attiva il Bluetooth sul tuo smartphone, tablet o laptop e cerca i dispositivi disponibili.
- Select 'Trevi DAB 7F80 R' from the list of devices to pair. Once connected, the Bluetooth icon will stop flashing.
- You can now play audio from your connected device through the radio. Use your device's controls for playback and the radio's volume controls for audio level.
6.3 Funzioni orologio e sveglia
The radio features an integrated clock and two programmable alarms.
- Impostazione dell'ora:
- Premere e tenere premuto il tasto Info/Menù pulsante per accedere al menu principale.
- Utilizzo Freccia su / giù buttons to navigate to 'Time/Date' and press Select/Scan.
- Select 'Set Time/Date' and adjust the hour, minute, day, month, and year using the Freccia su / giù buttons and confirming each step with Select/Scan.
- Setting Alarms (Alarm 1 / Alarm 2):
- From the main menu, navigate to 'Alarm' and press Select/Scan.
- Select 'Alarm 1 Setup' or 'Alarm 2 Setup'.
- Configure the alarm settings: 'On Time' (hour/minute), 'Duration', 'Source' (Buzzer or last used radio station), 'Volume', and 'Frequency' (Daily, Weekdays, Weekends, Once). Use Freccia su / giù pulsanti per regolare i valori e Select/Scan per confermare ogni impostazione.
- Ensure the alarm is set to 'On' in the alarm setup menu.
- Deactivating a sounding alarm: Premere il tasto Energia pulsante per disattivare l'allarme.
6.4 Uso delle cuffie
To listen privately, insert standard 3.5mm headphones into the headphone jack located on the side of the radio. The internal speaker will automatically mute.
7. Manutenzione
- Pulizia: Pulire la radio con un panno morbido, asciutto e privo di lanugine. Non utilizzare detergenti abrasivi, cere o solventi.
- Sostituzione della batteria: When the low battery indicator appears on the display, replace all four AAA batteries with new ones.
- Magazzinaggio: If the radio will not be used for an extended period, remove the batteries to prevent leakage and potential damage. Store the device in a cool, dry place.
8. Risoluzione Dei Problemi
If you encounter issues with your Trevi DAB 7F80 R, please refer to the following common problems and solutions:
- La radio non si accende:
- Controllare che le batterie siano inserite correttamente e non siano scariche. Sostituirle se necessario.
- Se si utilizza un adattatore CA, assicurarsi che sia collegato correttamente e che la presa di corrente sia funzionante.
- Nessun suono o scarsa qualità del suono:
- Regola il volume.
- Se si desidera ascoltare l'audio dall'altoparlante, assicurarsi che le cuffie non siano collegate.
- Check radio reception. Extend and adjust the antenna. Try moving the radio to a different location.
- For Bluetooth, ensure the device is paired and audio is playing from the source.
- Clock resets after power loss or battery change:
- This model does not feature a backup battery for the clock. It is normal for the time to reset when power is completely removed (e.g., batteries removed or AC adapter unplugged). You will need to re-set the time manually as described in section 6.3.
- Breve durata della batteria:
- Battery life can vary depending on usage and battery quality. Use high-quality alkaline batteries for best performance.
- For prolonged use, consider using a compatible 5V DC AC adapter (not included).
- Difficulty with setup or navigation (e.g., station search, alarm setup):
- The radio uses a limited number of buttons for various functions. Refer to the specific operating instructions in section 6 for detailed, step-by-step guidance. Some functions may require pressing buttons multiple times or holding them down.
- Radio turns off when switching between battery and AC power:
- This is expected behavior. The radio will power cycle when changing its primary power source. Ensure you have saved any settings or presets before switching.
9. Specifiche
| Marca | Trevi |
| Modello | DAB7F80R |
| Colore | Nero |
| Tecnologia di messa a punto | DAB/DAB+, FM |
| Bande radio supportate | DAB, DAB+, FM (3 bands) |
| Bluetooth | SÌ |
| Display | High-readability Dot Matrix |
| Allarmi | 2 allarmi programmabili |
| Preimpostazioni | 20 DAB/DAB+, 20 FM |
| Fonte di alimentazione | 4 x AAA batteries (not included) or 5V DC adapter (not included) |
| Dispositivi compatibili | Smartphone, tablet, laptop |
| Dimensioni del prodotto (L x P x A) | Dimensioni: 14 x 3.5 x 8.5 cm |
| Componenti inclusi | Main unit, user manual, warranty certificate |
10. Garanzia e supporto
This product is supplied with a warranty certificate. For detailed information regarding warranty terms and conditions, please refer to the certificate included in your package.
For technical support, troubleshooting beyond this manual, or warranty claims, please contact your retailer or the manufacturer's customer service using the contact information provided with your purchase.